Print this article Font size 16
It's no secret that to minimize problems with a car, it requires constant care. Be sure to monitor the wear and tear of spare parts and change them in a timely manner before their breakdown leads to even greater financial losses.
Pay special attention to the fuel system. If it fails, then the engine will not be able to work.
The VAZ 2114 fuel filter used is a key element of the entire system. After all, its task is to filter out rust and various types of impurities that are necessarily present in the fuel at our gas stations. The filter element ensures the supply of clean, system-safe gasoline.
Many car owners have to change it, so let's talk about it in more detail.
Signs of a clogged filter device
The filter has special filter paper, the cells of which become clogged over the course of vehicle operation. Because of this, fuel flows worse, which causes problems with the engine itself. You can detect that the filter is clogged by several obvious signs.
- Fuel consumption has increased sharply;
- Your car begins to stall frequently at idle;
- At higher speeds, failures in engine operation are observed;
- Starting the engine is carried out with certain difficulties;
- The engine falters and the power drops noticeably;
- When driving, the car brakes spontaneously, although you did not press the brake pedal;
- The car rarely jerks when going uphill.
As you can see, there are many signs, and they differ from each other in many ways. These signs do not indicate 100% that the problem lies with the filter. Similar phenomena occur when there is a malfunction of the electronic control unit, sensors, throttle valve, spark plugs, detonation, and so on.
How to check that the problem is in the filter? Easily.
- Connect a nanometer to the nipple on the fuel frame of the injectors;
- Start the engine;
- Measure the pressure;
- If the indicators are lower than those indicated in the technical documentation of the VAZ 2114, it means that the cleaner is really clogged.
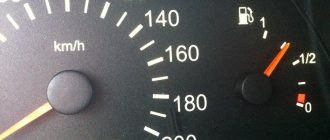
Measuring pressure in the fuel rail of a VAZ 2114
Popular breakdowns
Problems with the fuel pump can occur for several reasons. Therefore, your first priority is to determine the source of the problem. These may be:
- Fuel pump fuse;
- Fuel pump relay;
- Pump weight;
- Contacts;
- The pump itself.
If one of these elements fails, it can stop the normal functionality of the entire module.
Let us consider the situations with each of the specified elements of the fuel module in more detail.
Pressure
What exactly is a fuel pump? This is an element of the fuel system that allows fuel to pass through due to pressure. Therefore, if you take pressure measurements, you can get answers to many questions.
Let's give an example of normal pressure readings when checking in certain modes.
Contacts
The fuel pump includes three wiring:
- Plus (positive);
- Minus (negative);
- Fuel level indicator.
So, failure of the pump may occur due to a simple violation of the integrity of the wires. So if the pressure check shows normal, then we definitely examine the condition of the wiring.
To check, you will need a 12V lamp, which is attached to the external connectors of the pump with positive and negative contacts. Turn the ignition key. If the lamp blinks, contact is present. In this case, you will have to check the condition of the internal contacts.
If the pressure and wiring are normal, let's try to check the serviceability of the motor. It is this element that is responsible for moving fuel through the system.
- To check it, you will need the same 12V lamp;
- Attach it to any motor terminal;
- Turn the ignition key;
- If the lamp blinks, you will have to get rid of the motor and buy a new one.
Don't jump to conclusions. Before checking, look at the condition of the terminals and motor wiring.
Fuel pump weight
The contacts are fine, but the fuel level sensor may provide incorrect information. In this case, you definitely need to check the weight of the pump responsible for dispersing the fuel.
It often turns out that after prolonged use or driving on difficult road sections, the mass simply loses its fastening strength. Accordingly, if the mass falls off, the pump will not be able to work.
The mass is attached to the pump under the dashboard in the area of the hand brake. Therefore, when the driver turns on the handbrake, there is a possibility of hitting the ground contact, which is why it will fall off.
Putting the mass back in place is not that difficult. The problem is caused by the path to it. You'll have to:
- Get to the bottom through the interior;
- Remove the plastic under the handbrake;
- Remove the floor covering;
- Remove the grounding contacts;
- Clean;
- Secure it to the fuel pump as firmly as possible.
Relay
The fuel pump relay is located exactly where the ground is. Therefore, there should be no problems with the search.
With an ideally working fuel supply system, when the ignition is turned on, the relay instantly creates pressure inside the system, and then turns off.
If this process is disrupted, you will have to:
- Lift the front facing panel, which covers the contacts of the audio system and air conditioning;
- Take a look from the front passenger side;
- Find three relays;
- The lowest one is our desired pump relay;
- Turn the ignition key;
- If you hear a characteristic click from the relay, it is working properly;
- If there is no click, check the contacts. The reason is either them or a failed relay.
Fuse
All that remains is to check the condition of the fuse. This stage will make sure who the real culprit of the problems is - the pump itself or its fuse.
- Getting to the fuse is as easy as getting to the relay - through the hood or from the inside. The first option is preferable.
- Raise the hood and look in the area near the windshield.
- There is a dark-colored box located directly on the electronic engine control unit.
- Open the box and look inside for the topmost fuse.
- It has a current strength of 15A, as well as an inscription in English - Fuel Pump, that is, a fuel pump.
- Examine its external condition by removing it from the box.
- If the contacts are intact, then everything with the fuse is normal.
- If burnt contacts are clearly visible, consider purchasing a new device. Its price is affordable, so finding and replacing should not be a problem.
Which filter to use
All VAZ 2114 models are equipped with two power plant options - 1.5 or 1.6 liters. Gasoline, injection engines. It is important to note that injection cars are more demanding in terms of fuel purification than carburetor cars.
Because of this, the filter for the VAZ 2114 must have high filtration efficiency and quality. The throughput is at least 5-7 microns, and the operating pressure is 3-5 bar.
Also, the fuel filters for this car differ in the way they are attached to the fuel line. If versions with a 1.5-liter power unit have hexagonal fasteners, then for a model with a 1.6-liter engine the fixation is carried out according to the spring principle, that is, it is held in place by latches.
Preliminary stage
1.Relieve the pressure in the fuel system. This can be done by pressing the nipple under the black cap on the left side of the engine compartment for a few seconds. Don't forget to place a small container, as gasoline will leak out. (1-1, 1-2)
2. A similar result can be achieved in another way. To do this, remove the rear seat and see a small hatch under the seal. We unscrew 2 screws with a Phillips screwdriver, remove the cover and disconnect the terminal located under it.
We start the car and let the gasoline in the fuel line be used up.
3. Disconnect the battery terminal.
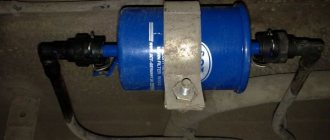
4. Raise the car and find the fuel filter under the bottom on the trunk side.
We clean off all the dirt with a metal brush and spray it on the threaded joints.
Tools
To do the job correctly and competently, you will need a certain set of tools, which includes:
- New filter that matches your car's powertrain;
- O-rings required for the fuel line fitting;
- Open-end wrenches. Moreover, certain sizes - 19, 17 and 10;
- Two buckets or basins. They are needed to collect gasoline and drain water.
Safety regulations
Don't want a simple filter replacement to end in tragic consequences? Then carefully read the basic safety rules.
- The room should be well ventilated, but it is better to do such work outside.
- Disconnect the battery. It is not necessary to completely remove the battery; simply remove the terminals from the battery.
- Do not work near fire sources or highly heated surfaces.
- Do not smoke under any circumstances during the entire replacement process.
- Always have fire extinguishing agent on hand. Many car owners keep a special fire extinguisher, although a simple container of water or a bucket of sand will do.
- Protect your eyes and skin as gasoline may come into contact with you during operation.
- As you work, you will probably end up with a lot of rags that you used to wipe up gasoline spills. Do not put them in a common pile, do not throw them towards the tools. Allocate a separate place for such rags.
Pressure release
The filter replacement procedure must begin with releasing pressure in the system. For this:
- Put the car in parking brake mode and engage neutral gear;
- Remove or simply move the rear row of seats;
- Open the hatch at the bottom under the seats;
- Turn off the power going to the fuel pump;
- Disconnect all connectors;
- Start the car and wait until all the pumped fuel has been used up. This will take literally a few minutes;
- After this, the car will stall on its own;
- Try starting the car several times. This will ensure that all pressure has been released.
There is another method that is suitable for those who do not like the previous one:
- Remove the negative terminal from the car battery;
- In the VAZ mounting block, remove fuse - F3. It is responsible for powering the gasoline pump;
- Use off the remaining fuel in the line by starting the engine;
- After releasing the pressure, replace the safety valve.
Causes of malfunction of the VAZ 2109/2114/2115 fuel filter
As was written above, the causes of purifier malfunctions are dirty fuel filled into car tanks at Russian gas stations. The high tar content in gasoline has a destructive effect on all vehicle power plant systems and injectors. This clogs the fuel lines. If there is water in the fuel, this contributes to corrosion, system elements are damaged, breakdowns occur in the cylinder-piston group, etc.
One of the common filter malfunctions involves filter leakage. This is caused not only by the fact that the cleaner becomes clogged with dirt, but also by the presence of excessive pressure in the system. Another reason for leakage is associated with abrasion of the sealing rings inside the fine filter.
If the filter is leaking due to dirt inside, then it is better to replace such an element. Worn seals also need to be replaced with new ones. But if there is excessive pressure in the system, then you need to pump out the air from inside. On VAZ cars a special spool is provided for this.
To remove excess pressure from the system, you need to press the spool
Before releasing the pressure, the car must be put on the handbrake and the gear engaged in neutral.
On VAZ cars, in which the cleaner is fixed with latches, the cause of the malfunction may lie elsewhere. The latch may simply break off, and then the filter will begin to leak fuel. In the photo below, the latches are circled with large red circles.
Latches are located on both sides of the filter
This is what a broken latch looks like.
A broken latch on a pipeline looks like this
A broken latch is always a problem, since it is simply impossible to find it on sale separately. You can, of course, purchase assembled tubes, but they are sold in a set of 3 pieces. The price is not small - 1300 rubles. If you don’t want to buy an expensive kit with an extra part, you can cut off the plastic part of the latches, leaving only the part that goes into the pipeline. Then make two adapters from fuel hoses, put them on and secure them with ordinary clamps for 20 rubles.
Another common defect is that the filter is not filled with fuel or is only half filled. The reason for this lies in the air lock formed inside the fuel system. Air is expelled, as mentioned above, through the spool.
If there is no special spool valve on the VAZ, then it is easy to expel the air by removing the fuel supply hose and allow the engine to exhaust the remaining fuel. The hose is then threaded into place and gasoline is manually pumped into the system.
A dirty filter cannot always be replaced. In some cases, especially when the purifier was installed relatively recently, you can try cleaning it. This is done like this: a stream of air from the compressor blows through the filter. The procedure can be carried out at any service station or enterprise where there is an air compressor. You can also ask familiar KamAZ or ZiL drivers, whose trucks have a compressor with the ability to bleed air.
Thus, the fuel filter on VAZ cars may fail for the following reasons:
- the malfunction is caused by clogging or failure of the sealing cuffs;
- due to rusting of internal elements, which is explained by water getting inside the filter;
- due to a broken latch, which leads to fuel leakage;
- due to an air lock formed inside the system due to excessive pressure.
Timely and competent care of filters will extend the performance of the car. Replacing the purifier will make it possible to avoid difficulties in the operation of the fuel system.
Removing the old filter
The next operation you have to do is to remove the old cleaner.
Before changing the fuel filter on a VAZ 2114, it will be useful for you to know that the dismantling process is largely different for the two types of engine.
VAZ 2114 with a 1.5-liter engine
- Treat the fasteners with lubricant, WD40, which will make them easier to remove later.
- Remove the fuel supply line fitting. Here you will need a key for 19 and 17. Use the 19th to hold the filter, preventing it from turning, and use the second key for 17 to unscrew the fitting.
- Drain the remaining fuel into a container prepared in advance. Whether you use fuel later or not, decide for yourself. But if you want to put it back into the tank, make sure the fuel drain container is dry.
- Follow the same procedure for removing the fuel outlet pipe fitting. It is on the other side of the filter.
- Drain the remaining gasoline from there too.
- Using a gentle movement from the base of the fuel line, disconnect the tubes.
- Make some slack in the clamp using a 10mm open-end wrench.
- Remove the filter without any sudden movements. Many, realizing the availability of the device after the work has been done, begin to jerk it sharply. Not worth it. Let the filter go to the landfill, the rest of the fuel system components will continue to serve you and your car.
VAZ 2114 with 1.6 engine
Everything is much simpler here. Press the spring clips located on the fuel line and carefully remove the tubes. After this, removing the filter will not be any problem.
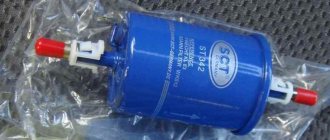
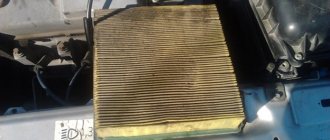
Design
The fuel filter resembles a barrel inside, which has special gas-resistant paper placed inside it, which is capable of passing fuel, but at the same time catching even the smallest particles of debris. At the ends of the filter there are two fittings to which the fuel line pipes are connected.
The filter comes in two types: a bolted fitting and a plastic clamp. The type depends on the year of manufacture of the car; more recent cars had a filter with quick-release fittings installed.
Installing a new element
Before installing a new filter, it is recommended to immediately replace the o-rings that are located on the gas pipes. If there are drops of gasoline on the filter, be sure to wipe them off. By not doing this, you yourself will cause a decrease in the service life of the new element.
Installation of the filter element is carried out in the reverse order of its removal. But here the direction of this element plays an important role.
Filter direction
Look at the body. It has an arrow that indicates the direction of fuel movement through the system. If you have a version with a 1.5 liter engine, then the arrow should point from starboard to left. If it is a VAZ 2114 with a 1.6-liter power unit, the fine fuel filter of the VAZ 2114 injection engine is directed from left to right.
After installing the element, wait a little. This is necessary so that the filter is filled with gasoline and all excess air comes out of it. You can even leave the car overnight and then come back with renewed vigor and finish the job. As you prefer.
When the filter is filled with fuel, check the quality of the connections and their tightness. To do this, start the engine for just a few seconds. If after this you notice gasoline leaks, then try to fit the pipes onto the filter more tightly. As a rule, there are no other reasons for leaks other than the defective part itself.
how to flush the gas tank on a VAZ 2109
https://youtube.com/watch?v=2pw3gaEI8UA
After washing the gas tank from dirt, we also wash the dirty filter. Gas tank of the VAZ 2109 (bottom front view). “1” the fuel tank itself, “2” the fuel drain line, “3” the fuel supply line. VAZ 21093, 1.5, 1995. Hello everyone! I removed the gas tank, washed it with plain water, and finally doused it with boiling water. Are there any recommendations? and how to dry the gas tank?2109. My grandfather from the car depot taught me how to rinse. You pour water and sand into the tank, then it’s all a chore and a chore. Find out how to rinse the gas tank. Several ways to clean a gas tank from rust and Instructions for removing a gas tank using the example of a VAZ 2106. High-quality flushing of a gas tank: methods - Then remove the fuel tank of the VAZ 2109 by unscrewing the nuts and holding the gas tank with your hand.4. Rinse the gas tank, or at least remove and blow out the gas inlet. 5. If there is absolutely nothing and nothing to do, remove the inlet in the carburetor and blow it out. Community forum “VAZ: Repair and Improvement” on DRIVE2. I want to wash the tank. I’m tired of changing the fuel filter every week. Tell me who has already encountered this, how to do it correctly and what is the best way to wash it? To flush the gas tank, use Lobomid, MS or ML detergents. Then, to remove any remaining detergent, rinse and steam the gas tank. HELPFUL ADVICE It is recommended to remove the gas tank on VAZ 2108, VAZ 2109, VAZ 21099 cars with an assistant. On domestic VAZ 2110, 2109 it is installed at the bottom, on the VAZ 2106 or 2107 on the side, and on foreign cars again at the bottom. We must not lose sight of the change of seasons, when during the transitional spring-autumn period the tank needs to be cleaned and washed. There are several ways to flush the fuel tank. Flushing with electrolyte. The Nissan gas tank flap lock can be installed on a VAZ.
To completely remove their residues from the surface, it is necessary to rinse the tank with a stream of very hot water. Removing and replacing the gas tank. We carried out the procedure for this procedure on a VAZ 2110 car; on other cars (2107, 2109-2114) the procedure was not - Before cleaning, you should drain the fuel from the tank.
The fuel tank of VAZ 2108, 2109, 21099 cars does not have a drain hole, so to do this, remove it from the fuel intake and thoroughly clean it with a toothbrush soaked in acetone. Wash with gasoline. Cleaning and flushing the gas tank. The gas tank can be cleaned and washed only after it has been completely dismantled. Replacing the gas tank is thus carried out in two planes - under the car and in the cabin. The design of the VAZ 2108, 2109, 2114 and 2115 does not allow the work to be done. Repair manual for the VAZ 2108, 2109, 2114, 2115. Remove fuel level sensor 9 from the tank. To remove dirt and deposits, wash the tank with detergents (Lobomid, ML, MS). After studying the repair manual and this algorithm, there should be no questions left about how to flush the carburetor of a VAZ 2109. Repeat the procedure after 5-7 thousand km. After first use, clean the gas tank as a preventative measure. The fuel tank on the VAZ 2109-2108 is located under the bottom of the car, and is located across the body at the rear. It is not necessary to replace the gas tank very often, since it is quite problematic to damage it, even though it is not protected by anything. After removing the gas tank to wash it, you will need to drain all the sediment from it and then fill it and thereby wash it with clean gasoline. Replacing the gas tank is thus carried out in two planes - under the car and in the cabin. Design of VAZ 2108, 2109, 2114 To flush the gas tank, use Lobomid, MS or ML detergents. Then, to remove any remaining detergent, rinse and steam the gas tank. HELPFUL ADVICE It is recommended to remove the gas tank on VAZ 2108, VAZ 2109, VAZ 21099 cars with an assistant.
Price issue
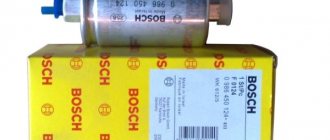
The cost of a filter is influenced by its quality and the manufacturer’s pricing policy. Here, decide for yourself - pay more for a well-known brand, or buy a mid-price device, but from an unknown company.
If you frankly doubt the quality of the product, it is strongly not recommended to purchase it.
A filter for VAZ 2114 is not an expensive pleasure. The average price ranges from 150 to 600 rubles. As practice shows, you can find an excellent filter for 400-500 rubles. This is the optimal price.
Video review of replacing the fuel pump mesh on VAZ 2114 and 2115
In this example, the design is the most understandable and simple, so there were practically no problems with this type of repair. There are other types of pumps that differ in their design, and there everything will be a little different.
It is worth keeping in mind that you should only buy a new mesh when you know for sure how it is installed on your car. The price of this part is usually no more than 50-100 rubles, so do not delay this procedure and perform it periodically to avoid clogging the fuel system.
It is also worth noting the fact that when removing the fuel pump, carefully inspect the internal condition of the tank, and, if necessary, thoroughly clean or rinse it to get rid of foreign particles and formations.