A car's tachometer is an important element for monitoring technical parameters. The article describes how to connect a tachometer to a VAZ-2109 with a carburetor engine.
Malfunctions of this device, methods for eliminating them, and a connection diagram to the electrical circuit of the car will also be considered.
To help the car enthusiast: tachometer connection diagram for VAZ 2109 carburetor
What is a tachometer? What is the connection diagram for the tachometer on a VAZ 2109 carburetor? A tachometer is a technical device that displays the number of revolutions of the engine crankshaft. The device shows not only engine speed. Modern developments inform the driver about fuel consumption and recommend a more optimal driving mode. There are devices with other functions. These are usually electronic models.
The role of the tachometer in driving a car
The VAZ 2109 tachometer is a device that displays the rotation speed of the engine crankshaft in thousands of revolutions per minute. Modern cars, including those produced by AvtoVAZ, are required to be equipped with a tachometer. This is reasonable, since the device provides the driver with information important for adequate control of the car.
First of all, engine speed must be taken into account when choosing a gear. The VAZ 2109 is equipped with a manual transmission, and the choice of a specific gear appropriate to the driving conditions is the responsibility of the driver. The design of the engine is such that it operates in the most economical mode at speeds in the range of 2 - 2.5 thousand rpm. It is precisely these tachometer readings that the driver must provide when driving uniformly along a horizontal section of the road with a hard surface. The choice of engine operating mode depending on driving conditions is determined by the driver’s qualifications, but the tachometer on the VAZ 2109 helps make the right choice. In addition, based on the readings of this device, the engine is adjusted and the idle speed is selected to ensure the stability and efficiency of the internal combustion engine.
If your car has a low panel and does not have a tachometer, you can install one. There are different, including budget models available on the market. You can choose a tachometer option for the VAZ 2109 with a liquid crystal numerical indicator. It will fit comfortably on the dashboard next to the ignition switch.
Connecting the VAZ 2109 tachometer is easy to do with your own hands - there are only three wires, including ground. The tachometer connection diagram is included in the installation kit.
How to Connect a Tachometer to a VAZ 2108 Carburetor
Connect the tachometer to the VAZ 2109 (carburetor)
Tachometer. This device is used to display the number of revolutions the crankshaft makes. While conventional entry-level tachometers just reported this, modern models are equipped with additional features that are useful to the driver: fuel consumption, recommendations for optimal driving conditions, etc.
What can you get
The best solution for owners of nine top and bottom panels. This is to buy new modern computing equipment and install it as a freelance device on the VAZ 2109. This will provide additional information and a little more to decorate the interior of your car,
But before you go to the hardware store, you should learn about the types of tachometers.
Types
Features of work
For diesel engines
Diesel engines are not equipped with ignition coils, since the tachometer works based on the readings of the generator pulses.
For gasoline engines
There are gasoline power units ignition coils
, whose current pulses are read by the tachometer. Therefore, the panel provides relevant information. Gasoline tachometers differ from each other depending on the number of cylinders in the engine
When purchasing a tachometer for your vehicle, be sure to specify that it is a four-cylinder gasoline power unit. Or just say you need a device for nine.
Own device. nothing special
Price issue
Device cost. This is an always debated issue. Some people believe that it is useless to buy expensive equipment, because all spare parts for VAZ are available and cheap.
But buying a cheap tachometer involves obtaining inaccurate information. Available devices may have 20-30% errors. The idea is to install such equipment if the data is still not true and the real benefits of the device you are not getting?
On average, a good tachometer for a VAZ 2109 will cost 1000-2000 rubles. Not a lot of money to save. By installing it yourself, the entire setup will cost the largest number of readers. And we will tell you in detail how to install it.
installation
Installation of tachometer VAZ 2108
DIY customization of VAZ 2108 (tachometer from 06 to 2108)
This video describes how to install a tachometer
six to six
2108
, 2109, 2199.
Everyone has a tachometer in your hands, so you can safely take it to your garage and start connecting the device.
You don't have to be afraid of DIY. Although the tachometer is an electrical device, it has three wires. Therefore, even inexperienced drivers can easily cope with the task.
Connection agreement is not an issue
Determine in advance where your engine speed reader will be located. Here the choice is entirely yours. Some are mounted directly on the dashboard, while others. next to the ignition switch. Try to choose a site where the device does not interfere and will not spoil the appearance of the salon.
The location has been decided so you can start safely.
- Remove the tachometer from the cab from the passenger compartment to the engine compartment. Practice shows that it is most convenient to remove it from the hole intended for the speedometer cable.
- To make the task easier, take a heavy but fairly thin wire. It takes about a meter in length. Connect the tachometer to one end using an extension cord. Just do it carefully so it can fit through the speedometer hole.
- Insert the other end of the wire into the socket and begin to remove it. Therefore, without unnecessary hassle, you extend the wiring into the engine compartment.
- Distribute the wires. 12. B ignition coil, signal. ignition coil but minus. the weight of your vehicle in any accessible or convenient location. For reliability, make sure that the weight can be increased with a nut.
- Even with high quality tachometers, the wires in the cable are thin and fragile. To prevent this from happening, solder full high quality wires to the device in 1 square wire. Try to find wires that match standard tachometer wiring colors. Then, on the other side of the wire, 1 square millimeter, install the lugs.
- Unscrew the mounting nuts on the ignition coil using a 10mm wrench, and then connect the wiring as shown in the figure.
- Tighten the nut, just pull it, showing that its strength is not worth it. Otherwise, you risk breaking the thread, and eliminating such a defect is problematic.
- Connect the ground. To do this, select a section where there is no wire that will interfere
, will not interact with other devices, will not overheat, etc. - Make sure your device is working. To do this, turn on the ignition. At the same time, the tachometer should show a proud 0. This means that the elevator is now zero and the crankshaft is not rotating.
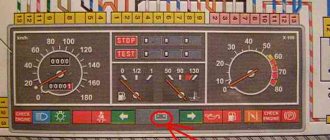
- Start a car. At idle the normal speed for the VAZ 2109 is 750-850 rpm. The relevant information should appear on the device in the cockpit.
- If the tachometer has the additional function of a voltmeter (a very useful function for those who prefer to independently repair and diagnose their cars). When selecting a voltmeter, the mains voltage should be displayed. about 11-12 V when the battery is properly charged.
Everything on this tachometer setup can be considered complete. There is nothing complicated in this process, so even a beginner can do this job.
Tips for motorists
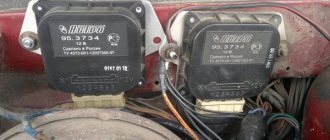
The tachometer on the VAZ-2109 was installed only on cars with a high panel, and its connection diagram depended on which engine was installed, carburetor or injection. On “nines” with a carburetor engine, the signal to the tachometer comes from the ignition coil terminal, and in case of abnormal operation, troubleshooting should begin with the ignition coil terminal, to which two wires are screwed.
There are cases when they are bent so that they are located next to the central high-voltage wire and in the event of a breakdown, the spark goes to these wires, which causes the tachometer to glitch. A similar picture occurs in the case of oxidation of these contacts. If the tachometer needle moves sharply in one direction or the other, it can be assumed that the culprit of this malfunction will be the switch, which will fail after some time. The tachometer, in fact, is an indicator of malfunctions appearing in the ignition system.
If everything is in order with the contacts on the ignition coil, then you will have to remove the instrument panel and connect the wire running from the ignition coil to the third terminal of the connector block “A” of the instrument panel. It would also be a good idea to check this contact for the presence of oxides. If the wires and connector contacts are in normal condition, you will have to check the printed circuit board of the instrument panel, but this will require a tester and relevant knowledge in electrical engineering. Therefore, most likely, you will have to contact a qualified auto electrician.
If a VAZ-2109 car has an injection engine, the tachometer receives data from the ignition module. Therefore, you need to look for a fault by checking the wire going from the ignition module to the fifth pin of plug connector “A” of the instrument panel. If this circuit is working properly, you will also have to check the printed circuit board of the instrument panel. The tachometer malfunctions when replacing conventional high-voltage ignition wires with silicone ones due to the difference in their resistance.
The VAZ 2109 car, when produced at the manufacturer's plant, is not equipped with a standard tachometer. However, this situation is easy to fix. If necessary, you can install a freelance tachometer to control engine speed. There is a wide variety of tachometers on sale, many of them also have secondary functions: voltmeter, clock, alarm clock, etc. There are two types of tachometers: for gasoline and diesel engines. The operating principle of a gasoline engine tachometer is based on counting current pulses on the ignition coil. A diesel engine does not have an ignition coil, so the tachometer of a diesel car picks up current pulses from the generator. Tachometers for gasoline engines are also divided depending on the number of cylinders in the car engine. Therefore, when you buy your tachometer, the seller will definitely ask you: gasoline or diesel and the make of the car. A regular tachometer for a VAZ 2109 with a voltmeter function will cost about $15.
Installing a tachometer
You bought and brought home a new tachometer. Now you can go to your garage to install the device on a car that has a carburetor. Installing and connecting it is not that difficult. This is an electric device, but don't be afraid of it. How to connect it? The tachometer connection diagram is extremely simple. Even a less experienced person can easily connect the 3 wires coming from the device. So let's get started. You should:
- choose a location for the device in the car;
- lead the wires out of the passenger compartment into the space under the hood;
- distribute the wires on the ignition coil and on the ground of the car;
- check the operation of the device.
The choice of location is up to you. You can install a tachometer on the instrument panel or next to the ignition switch. As long as the device does not interfere with the driver and does not spoil the appearance of the interior. Then the wires are brought out. The best way to do this is through the hole through which the speedometer cable passes. To help, you can take a meter-long piece of rigid, but rather thin wire.
The cable coming from the tachometer is wound to the end of the wire with electrical tape so that it passes through the hole. In this way, you can run all the wires under the hood without any problems. Connect wire 12 to terminal B, the signal to terminal K. For the negative one, you need to find a suitable place on the ground of the car. It is better to tighten it with a nut.
DIY installation instructions
Installing a tachometer on a VAZ is done as follows:
- First, a place is selected where the device will stand, after which the cable from it must be routed into the engine compartment.
- Before connecting the VAZ 2109 tachometer, it is necessary to distribute the wiring. The +12 volt terminal is connected to the coil (contact B, the signal is connected to contact K), and the “-” is connected to the ground of the car, and the ground must be securely fixed. If the wiring is very weak and fragile, then it is better to connect more reliable wires in advance.
- After the wires have been distributed, they need to be connected. To connect the ground wire, it is advisable to choose a place where the cable itself will not interfere with or interact with moving parts.
- To diagnose the functionality of the device, you need to turn on the ignition and start the car. During normal engine operation at idle speed, the needle on the instrument scale will remain in the region of 750-850 rpm. If the device is additionally equipped with a voltmeter function, you can check it - when you select this option, information about the voltage level in the on-board network should appear on the display. If the battery is operating normally, this parameter should be approximately 11-12 volts.
Device connection diagram
Examination
The rotation counting system must be checked one at a time. It’s better to start by checking the ignition coil; it is the one responsible for the operation of this device in the first place.
Coil
This element is an inductor. Its task is to convert electrical voltage into a pulse of a certain magnitude and value. There are 2 contacts on the element.
- Contact "B" is the "+" input from the battery. This contact is the beginning of the primary winding of the inductor.
- Contact “K” is the outlet for the controller.
- The central contact is necessary to supply a spark to the spark plugs.
To check the coil you will need a multimeter. The check is carried out as follows:
- Switch the multimeter to the mode for measuring electrical resistance.
- The red test lead is connected to pin “B”.
- The black test lead is connected to pin "K".
- The resistance of the primary winding should vary between 3–3.5 Ohms.
If lower data is available, the device can be considered faulty. Next, the secondary winding is checked.
- The tester switches to resistance measurement mode.
- The red test probe is connected to contact “B” on the coil.
- The black test lead connects to the center output.
- Operating resistance should be in the range from 5.4 to 9.2 kOhm
Any deviations are considered a malfunction. Next, check for a short circuit:
- The multimeter must be switched to dialing mode.
- The red test lead is connected to pin “B”.
- The black test probe is connected to the device body.
Connection diagram for tachometer VAZ-2108 and 2109
Let us immediately note that the fuel supply system – injector or carburetor – does not play a special role here. As you know, currently the most common are cars with the following engine types: gasoline or diesel. Depending on this, the tachometer is selected, unless, of course, it comes in the stock version. The thing is that on gasoline engines the tachometer reads data from the ignition coil, or rather, the impulses that arise here. However, the design of diesel power plants does not provide for this unit. Accordingly, here the tachometer reads pulses not from the ignition coil (for lack of one), but from the generator.
The first two wires (12-volt and Signal) are to contacts “B” and “K” of the ignition coil, respectively. All that remains is to secure the mass in any convenient place.
Connection
Connecting the tachometer of a VAZ-2109 car can be done regardless of the model of this car. The connection will be identical for a car with a high and low panel. The connection process is as follows:
- Place 3 wires with a cross-section of at least 2 square meters into the engine compartment. mm. It is better that these are not separate wires, but a solid cable. You must first attach round terminals to all 6 ends.
- Place the cable or wires into the hole intended for the flexible speedometer shaft (cable). It is necessary to insert a rigid steel wire into the hole, attach the prepared cable to it and pull it under the hood.
- The tachometer has only 3 contacts: “+”, “minus”, “W”, you need to connect the ends of the prepared wires to them.
It is better to choose 3 wires of different colors, this will make it easier to connect their ends under the hood.
In the engine compartment, the connection is made as follows:
- The wire from the “+” contact of the tachometer is connected to contact “B” of the ignition coil.
- The wire from the “W” terminal is a pulse wire and is connected to the “K” terminal of the coil.
- The minus wire must be connected to a previously prepared place. It is better to first clean this place from dirt, oil and paint. The best connection to ground is established using a bolt. Alternatively, this wire can be connected under the coil mount.
- Next you need to test the device. To do this, the power unit needs to be started and warmed up at low speeds. If the carburetor is configured correctly, then the needle should be at 800 rpm. When you press the gas pedal, the arrow should deflect. The pointer should not jump, get stuck in place, or slowly return to minimum values when the gas is suddenly released.
Possible faults
It’s understandable why drivers decide to install the device on cars with low panels, but before you connect the tachometer, you need to understand its main faults.
Symptoms of device failure are:
- when starting the power unit or while driving, the instrument needle may begin to jump;
- When the engine is running, the needle on the scale points to zero.
To begin with, if malfunctions are detected, you should diagnose the wiring and condition of the contacts. If the circuit for connecting the tachometer to the ignition switch was made using silicone wires, this can also lead to incorrect operation of the device. Sometimes the reason for a non-working device lies in a breakdown of the motor speed controller. As for digital devices themselves, in this case the digital display most often breaks down, so in the event of such a breakdown, the display will have to be replaced.
Malfunctions of the carburetor version
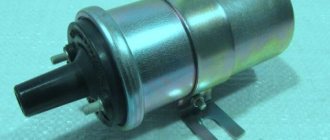
An ignition coil is used as a source of information about the speed of rotation of the crankshaft in the VAZ 2109 carburetor. It is designed to generate a spark that ignites the fuel-air mixture in the combustion chambers. Essentially, it is a mini pulse transformer that converts 12V to 30KV. In a four-cylinder engine, a spark is generated twice per revolution of the crankshaft. Taking this circumstance into account, the tachometer determines the number of revolutions per minute and deflects the needle proportionally.
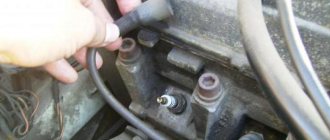
Normal operation of the engine while the tachometer needle of the VAZ 2109 is jumping indicates a failure of the device itself, a wiring fault or problems in the units associated with the ignition coil. Start by checking the wiring. The device removes the signal from the negative coil, switching occurs through the terminal system and the fuse block. If a visual inspection does not reveal a problem, you can connect the coil to the tachometer directly using a meter-long piece of wire. If the problem disappears, you can leave this temporary connection as a permanent one, attaching the wire to the standard harnesses.
Inspect the high-voltage wires, distributor and switch. A very likely cause of the needle jumping is a faulty switch. In the VAZ 2109 this device cannot be repaired and can only be replaced. Experienced motorists carry this inexpensive and easy-to-install spare part with them.
Connect the replacement switch without installing it, and if the arrow stops moving, replace the switch. If all this does not help and the tachometer still does not work, consider replacing the device.
Purpose
The tachometer serves to visually monitor the number of revolutions of the power unit, both at idle and while driving at different speed ranges. It is convenient for the driver to control the number of revolutions when shifting a manual transmission if music is playing or the muffler is damaged. In addition to monitoring speed, using a tachometer it is very easy to adjust the carburetor of the car. A car enthusiast just needs to adjust the carburetor to a tachometer position within 800 rpm.
What is a tachometer and why is it needed?
A tachometer is a device that, as I already said, shows the number of engine revolutions per minute (thousand rpm). The tachometer readings are necessary to make it easier for the driver (usually a beginner) to navigate and correctly select the desired gear (up or down). A tachometer is also necessary in order to monitor the correct operation of the engine by the number of revolutions. For example, when the speed fluctuates or is too high, a fault can be detected in time.
The first tachometers were analog (they are also called dial gauges). Analog tachometers have a dial with numbers and an arrow. One division of the analog tachometer is equal to 1 thousand revolutions. A little later, digital (electronic) tachometers began to appear on mostly Western-made cars. Data in electronic tachometers is displayed on a display (LCD or LCD display). In modern cars, digital tachometers look like analog ones because, like older tachometer models, they display information in the form of a dial and an arrow that indicates the number of revolutions.
October 2009
| Mon | W | Wed | Thu | Fri | Sat | Sun |
| « Sep | But I " | |||||
| 1 | 2 | 3 | 4 | |||
| 5 | 6 | 7 | 8 | 9 | 10 | 11 |
| 12 | 13 | 14 | 15 | 16 | 17 | 18 |
| 19 | 20 | 21 | 22 | 23 | 24 | 25 |
| 26 | 27 | 28 | 29 | 30 | 31 | |
Recently, quite a lot of friends and acquaintances have been changing their carb systems to an injector. In principle, there is quite a lot of information on this matter... But people periodically have some questions... In this article I will tell you how to connect a tachometer and speedometer to an injection car with an old-style instrument panel (not VDO!)
I myself solved this problem simply - I installed a VDO panel. Everything there is simple and clear, and I have enough information on connection on my blog. But as practice shows, sometimes people do not have the opportunity to buy VDO, since the budget is limited... And sometimes, out of ignorance, they prefer not to worry at all and drive without a speedometer and tachometer.
Speedometer As we know, on old-style devices there is no speed sensor, but a speedometer cable. The dashboard also does not have a speedometer signal input, but there is a hole for the speed cable. The problem is easily solved, you just need to buy a suitable speed sensor. According to their design, there are two types. One without cable implementation
install such a sensor on the VDO dash
But such a sensor is installed on the devices with a cable
Those. it is connected to the COURT harness, and the cable is also inserted into its hole. those. the sensor takes data without disturbing the old design.
That's basically all about the speed sensor. The only thing worth considering is that there are different connectors, be guided by the one you need.
Tachometer
They told me that on the instrument panel of a tall torpedo there is a separate input for a low-voltage tachometer - pin 5 of the red block.
The following can only be considered as a theory of converting a high-voltage signal into a low-voltage one
The situation with this issue is even more complicated than with the speed sensor. To be honest, many friends asked “how do we connect the tachometer?” ... I kept silent and said, “I know it’s possible, but how? xs." Again, as for the VDO panel, everything is simple, there are initially two connectors on the white block for connecting the tachometer injection signal (pin 2) and for connecting a high-voltage signal (pin 3). A high-voltage signal is needed when the VDO tidy is installed on a carburetor car. But what if the tidy is old? I thought about this a lot, especially because I have an old instrument panel and tachometer on one injection machine. I was too lazy to look at how everything was implemented... Out of boredom today I started studying electrical circuit diagrams and came to an interesting observation. ’ll just make a reservation right away: I haven’t tested this in practice, so I can’t vouch for it. If someone checks it, please write about your success. While studying the circuit diagram of the VDO instrument panel, I noticed that the only difference in each signal input is that there is a resistor on the high-voltage track. that's all. everything is very simple. I dare to suggest that on the old tidy there is also a resistor on the tachometer track that converts the high-voltage signal into a low-voltage one. Therefore, to connect an injection tachometer to this tidy, you just need to disassemble the tidy, pay attention to the contact path that comes from pin 3 of the red block and find this resistor. Remove the resistor from the device or bypass it. those. solder the bypass wire. Again, I emphasize that these are all just theoretical thoughts, since I myself have not disassembled the device. If anyone does it, be sure to post the results. If someone sends photos of the disassembled device or a report on this operation, I will be grateful.
I checked it with the tachometer. I just connected the device with VP to January 7.2. Everything is a bundle, there are no problems, you don’t need to do anything with the resistor, just stretch the wire from the instrument panel (red connector, 3rd pin, red-brown wire) to the controller wiring (it’s also red-brown there). Everything works great. Thanks for the tip, I thought there was a completely different signal there.)
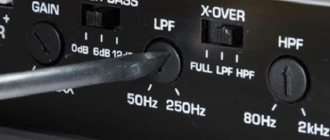
Idle speed adjustment
The second setting of the VAZ-2109 carburetor is idle speed, it can be partial or full. The first is for minor speed adjustments, the second is for adjusting the amount of air (setting CO emissions in the exhaust gases).
Partial adjustment is performed using the air-fuel mixture “amount” screw. This screw sets the opening angle of the throttle valves, which ensures that the air-fuel mixture enters the cylinders when the accelerator pedal is released. The “quantity” screw rests on the throttle valve control lever and when screwed in, it pushes the lever, causing the valves to open slightly.
Partial idle adjustment is performed with a warm engine and creating a load on the vehicle's on-board network by turning on the high beam headlights and the interior heater at full power. The adjustment is carried out with the engine running by screwing in/unscrewing the “quantity” screw until the optimal idle speed is established, which for the VAZ-2109 is 800-900 rpm (this can be tracked using a standard or plug-in tachometer).
If it is not possible to set the required speed or the motor operates unstably at it, a complete adjustment is made, which is made by two screws - “quantity” and “quality”.
The algorithm for this adjustment consists of the following stages:
- Warm up the engine and then turn it off;
- We find the quality screw (it may be closed with a plug that will have to be removed), screw it in until it stops, and then unscrew it 3-4 full turns;
- We start the engine, turn on electrical consumers (lighting and stove) to create a load in the on-board network;
- By rotating the “quantity” screw, we achieve 700-800 rpm on the tachometer;
- By turning the “quality” screw, we set the maximum possible speed (they will increase to a certain level, and then stop. The moment the speed increase stops is considered the maximum);
- We set the “quantity” screw to 900 rpm;
- Using the “quality” screw we lower them to 800 rpm;
- We slowly tighten the “quality” screw until interruptions appear in the operation of the power plant, after which we unscrew it back 1 turn;
- We adjust the speed with the “quantity” screw, bringing it to a normal value - 800-900 rpm;
After the adjustment operations, we check that they were carried out correctly. This is done by sharply pressing the gas pedal and then quickly releasing it. With a properly configured carburetor, the engine should respond quickly to pressure, without any failures or hesitations. And after releasing the pedal, the speed will drop to the idle level, without sags or instability of the engine.