A DVR is a very convenient device for filming what is happening on the road. In our article we will tell you how to connect it in a car and hide all the wires.
The DVR is a convenient device and drivers often use other gadgets along with it. Most devices for cars work through the cigarette lighter and therefore the question often arises of connecting a DVR without using it.
A video recorder allows you to record everything that happens on the road, and therefore everyone tries to use it, because the video will be the best proof of correctness in the event of an accident. However, the wire is one of the significant disadvantages of the device, because it not only spoils the appearance, but can also block the view and simply get in the way.
Moreover, the cigarette lighter socket is not always in working condition, and there may already be something connected there. You can correct the situation using a splitter, but only then will the on-board network be heavily loaded. So, all that remains is to look for a more convenient way to connect.
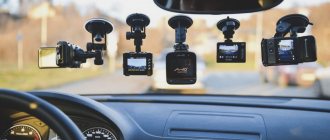
Where to install the DVR in the car?
Installation locations
Choosing a location for the DVR is quite simple, but you must take into account some requirements:
- The overview must be preserved, that is, the recorder must not interfere with it
- You need to choose the most convenient shooting angle so that you can see the whole situation on the road
- At the same time, access to the gadget must be maintained to quickly change settings
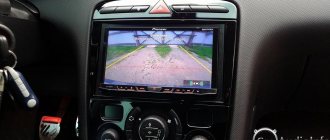
As a rule, installation is carried out on the windshield, but a torpedo is also a good place.
So, here are the two best ways to install a DVR:
- If you have a very light recorder, then it will be most convenient to place it behind the rearview mirror. This way it won’t interfere, and the camera itself will have an ideal viewing angle. Although, there is a drawback. Please note that you will not be able to turn the camera around, for example, when talking with a traffic police officer. Moreover, the entire view can be spoiled by a hanging wire, especially during sharp turns.
- Heavier models are usually placed on the torpedo, which turn out to be stable precisely on the horizontal plane. The advantage of this installation is that you can take out the gadget at any time and film not only the road, but also other interesting moments. Although, with this installation, the lower viewing angle will be greatly limited.
Recommendations
If you need to install a DVR, installing this device is not difficult. The main thing is to determine in advance the installation location of the device and the type of connection (hidden or external).
We also recommend reading the article on how to remove a radio without a special key. From this article you will learn about the available methods for removing the radio in a car without a key, as well as what to pay attention to during this procedure.
When using a hidden connection, it is strongly recommended to supply power to the recorder from the cigarette lighter, since the device will operate immediately after the driver inserts the key into the ignition.
Finally, we note once again that it is advisable to immediately get rid of hanging wires and hide them under the trim, secure the wire with plastic hooks, route it under the glove compartment, etc.
Often, incorrectly laid and secured wires in the cabin cause the recorder to not work or the driver experiences certain inconvenience when operating the car.
Methods for mounting a DVR in a car: overview
Mounting methods
- Depending on the location of the recorder, the method of its placement on the surface is also selected. You can use a suction cup or double-sided tape. Suction cups are ideal for attaching the recorder to the windshield.
- Often a suction cup is already included. The surface must be degreased with alcohol or glass cleaner before installation. A soft rag is ideal for wiping.
- After this, the surface needs time to dry. After this, you can press the suction cup onto the glass and turn the latch to fix it. Don't forget to check how well the suction cup holds!
- Please note that suction cups are not durable, as they gradually lose their elasticity and eventually your recorder may fall. By the way, in winter, due to the cold, the suction cup may not fix well, so it is worth checking it before each trip.
- Double-sided adhesive tape may also be included with the DVR. It is more reliable and will not change its properties over time, even if you clean the gadget often. When choosing a tape, it is important to look at whether its properties change with changes in temperature.
Mounting on a standard suction cup
The complete set of most modern car recorders requires the presence of a suction cup. It allows you to fix the device almost anywhere, but usually it is mounted on the front glass in such a way as not to interfere with good visibility. The installation algorithm is very simple: you need to first degrease the desired area with cotton wool or a cloth soaked in an alcohol-containing solution, and wait until the liquid dries completely. Then you should firmly press the fixation means - sometimes there are several of them - and check the reliability of the fastening by shaking the DVR. Moreover, such checks need to be carried out regularly.
The advantage of this method is its simplicity and minimal labor costs combined with accessibility - almost everything you need is already included in the kit. The downside of this advantage is considered to be the low quality of fastening, since a sudden change in temperature can lead to the device coming off. In addition, installation work cannot be carried out hidden.
How to hide wires from a DVR in a car: methods
How to lay the cable?
Every motorist wants the wires not to get in the way, much less block the view. There are two effective ways to hide the wires that will go from the power source to the recorder:
- Hidden installation
This method assumes that the wires will be securely fixed under the panel, and then under the rack casing. If you decide to do the installation this way, be sure to leave a little free wire so that the recorder rotates.
- Open installation
In this case, there is no need to crawl under the casing; it is enough to install special plastic brackets to secure the wires. The brackets are attached with Velcro and are included in many DVRs. This method is not very reliable, but it is easy to implement. Poor reliability is that the Velcro will simply come off.
Using a radio
In this particular case, the wires from the camera and the player are connected and the junction points are isolated. If the car radio operates on a voltage of 5V, then the cable is attached directly to the plug. The block or transformer is hidden under the instrument panel. The wires are pulled through the installed chamber.
Modern car radios are usually equipped with USB connectors. In this case, the process of connecting the DVR is greatly simplified.
How to connect a DVR without a cigarette lighter: instructions
If your recorder can be connected via a USB connector, then you will clearly not have problems with the cigarette lighter. In other situations, you can use slightly unusual connection methods.
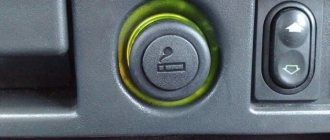
Method 1. Connecting to a lampshade
The presented method allows you to use a lighting lamp as a power source.
- Use a Phillips or straight screwdriver to remove the shade.
- Next, solder the wires to the cable connectors or lighting contacts.
- Check that everything is done reliably, otherwise problems with the operation of the recorder may occur. Frequent interference, interruptions in shooting, and so on - all this is the result of a poor-quality connection.
- You can use a universal multimeter to check the voltage.
- It will also be useful for determining the mass in the loops and where the wires are connected.
- It is important to do the next step carefully and it would be better if you had experience in electrical installation work. Your task is to disassemble the standard plug, because it will not be suitable for supplying power to the recorder.
- A special power module provides the proper level of safety when connected to the lampshade. The main advantage of the power supply is that it has a built-in 150 Ohm resistor. Sometimes it is necessary to supplement the circuit with load resistors. This is necessary in a situation where the recorder consumes less than 200 mA.
- Now remove the windshield trim on the sides so that you can hide the wires and route them to the dome light or dashboard.
If you want to use an open installation, then route the cable along the junction of the pillar and the windshield. It is important that the wire is the same color as the interior. Fix the brackets and connect the recorder.
Method 2: Connecting to fuse blocks
This method is considered the safest of all existing ones. It requires preliminary preparation, namely the purchase of additional parts. You will need a classic car fuse and if you have one, then proceed to connect:
- Take a plug and solder one leg to the positive contact, and solder the wire with a ring to the negative contact
- We fix the wire with the ring on the dashboard frame with a screw
- Now install the fuse in the free socket
If the power is 5 Volts, then there is no need to disassemble the plug. The voltage in the car battery will decrease to the required level thanks to the electrical circuit of the plug.
Method 3. Connecting to a car radio
Everything will be even simpler here, because the gadget’s power supply already corresponds to the required voltage. So there is no point in using any additional details. Your task is to fix the recorder and connect it to the orange wire that goes to the radio. You can find it under the panel.
Method 4. Connecting to the ignition
This method is not used very often, because the device will only work when the key is turned. Although, such a method does exist. To connect you need to do this:
- First, install the gadget and connect it to the adapter
- We lay the wires along the edge of the windshield and connect them to the ignition system
- Next, determine the positive terminal with a tester and connect it to a wire of the appropriate polarity
- All that remains is to attach the minus. It can be connected to the wiring contacts or radio tape recorder
As you can see, there are enough ways to connect the recorder, and each of them allows you to hide the wires so that they do not interfere with your view or spoil the appearance of the car.
What should a registrar user remember?
And finally, a few things that every DVR user should remember. In fact, these simple rules are no less important than proper placement of the registrar.
When leaving the car in an unguarded place, take both the recorder and the mount with you
There are often cases when the presence of a holder on the glass leads attackers to believe that the expensive gadget remains in the car and is simply hidden in the glove compartment. The result is broken glass.
Install the recorder and start shooting as soon as you start moving
Even in a parking lot or in your own yard, an emergency or a collision with a pedestrian may occur, in other words, a situation where the recorder will come in handy.
The presence of a battery in the recorder for autonomous operation is not essential
In some cases, a smartphone or a regular cell phone can handle shooting outside a car. But a backup battery is a necessary thing, because... it is this that guarantees that the recording will be saved correctly if the power cable is accidentally pulled out of the cigarette lighter or something happens to the car battery
It is the presence of a backup battery that you should pay attention to when choosing a recorder
voice
Article rating
What are the dangers of connecting a DVR?
DVR
Essentially, all of the above actions carry certain risks, especially if they are performed by an inexperienced person. Car manufacturers advise against doing anything like this, because the standard fuses and electrical circuitry are not designed for long-term use.
If you constantly load them, the wires will quickly “grow old”. The fuse itself does not react to such phenomena, because it can turn off at the limiting starting current.
If you decide to connect the recorder to the battery, then be sure to make a separate button to break the circuit. When connected directly, the device will work constantly, and therefore even when turned off, the battery will lose charge.
If the connection is made correctly, the recorder will not lose its functionality and will record in the required quality.
Functions
DVR-UNI-N:
DVR-NIS3-N:
- DVR with Wi-FI and Full HD front camera 120 degrees horizontally, G sensor and motion sensor
- Automatic recording at startup. Continuous cyclic recording when the car is running
- “Parking mode” function - automatically starts recording when the car is turned off when pushed or hit for 1 minute
- “LowFrame” function – recording with reduced power consumption for 24 hours after turning off the ignition (1 frame per second)
- The DVR does not have its own screen, but easily connects to modern smartphones on Android and IOS platforms.
Characteristics
| Specifications: | |
| Chipset | Novatec 96672 |
| Sensor | Sony IMX307, Starvis series |
| Number of pixels | 2.08 MP |
| Matrix size | 1/2.8 CMOS |
| Viewing angle | 119 gr. horizontally, 146 deg. diagonally |
| Microphone | + |
| SD card | Support up to 128 GB |
| Working temperature | -35 to +75 C |
| Current consumption | 1.2mA - in off mode. 140mA - after full startup 100mA – with Low Frame function enabled |
| Video: | |
| Video modes | 1920*1080 (30 frames per second) |
| Recording format/video codec | MOV/H264 |
| Recording Mode | Cyclic |
| Photo | |
| Photo resolution | 1920*1080 and higher |
| Photo format | JPEG |
| Settings | |
| Recording duration | Off, 1 minute, 3 minutes, 5 minutes |
| Time | Machine. synchronization with smartphone, automatic. video overlay |
| Exposure Settings | -2/+2 |
| White balance | Auto |
| G sensor | Low, medium and high level |
| Languages | Russian, English, etc. |
Installing a DVR: tips, precautions
DVR - installation tips
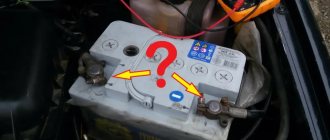
Before starting any work, you need to turn off the power to the on-board network. To do this, simply remove the terminal from the battery. In addition, follow the recommendations regarding installation and further operation:
- Each connection must be reliably isolated.
- Power is supplied through a fuse.
- Before attaching the terminals to the battery, make sure that you have connected everything correctly.
- When connecting the recorder, be careful with the polarity.
- Make sure that no moisture gets into the case, otherwise the power will be turned off. It is recommended to purchase a memory card for the recorder so that more information can be recorded.
- Always take the recorder with you if you plan not to use the car for a long time. You also shouldn't leave the mount because thieves might assume you have something to look at in the glove compartment.
- If smoke or an unpleasant odor suddenly appears in the cabin, immediately turn off the device to prevent a fire.
- It is better to turn on the recording as soon as you get into the car, because everything can be unexpected, no one is immune from emergency situations.
- If the recorder is broken, then you shouldn’t even try to resuscitate it yourself. This is done exclusively in specialized services.
- Connecting a DVR yourself requires experience with a multimeter, electronics, and wiring. If you encounter this for the first time, then it is better not to experiment, but contact knowledgeable people.
Lifehacks
How to install a DVR so that it is truly useful is only part of the questions regarding the operation of this device. After all, even when buying it, you can make a mistake with your choice. For example, some drivers purchase devices that do not have autonomy, while it is desirable to have a recorder that can work for at least one and a half or two hours on a battery without connecting to the on-board network.
Mobility also plays an equally important role, since sometimes to record a conversation with traffic police representatives you need to rotate the lens 90°. In addition, you should pay attention to the quality of the bracket - all its main joints should be metal, not plastic. Finally, when the car remains unattended by its owner or passenger for a long time, it is recommended to remove the recorder. In a word, if you approach the installation of a recording device sensibly, then it will fully justify itself and will not be stolen by intruders.
| Tweet |
FAQ
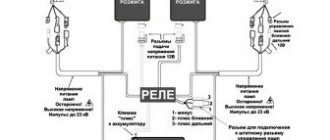
Using our adapter you connect to the interior lamp. Consequently, power will be supplied and disconnected to the DVR or other device, just like to the lamp. All cars implement this differently. For some it is related to the ignition, for some it is related to the central locking. In some cars, power is constantly supplied to the lamp. But you can check how it will work on your car. To do this, turn on the courtesy light to the constant lighting position and watch its behavior when you turn on the ignition and close/open the car.
Sho-Me G-475 STR
the computer does not see g475str drivers no thanks downloud lights up thanks
Answers 7
Drivers are available on the official website:
It looks like you have a problem with the archiver, download for example 7zip https://www.7-zip.org/download.html
Then go to the folder where you downloaded this archive, right-click -> 7zip -> unpack
The effectiveness of using a device such as a radar detector depends on the quality of the product itself, correct installation and accuracy of settings. To be sure of the quality when purchasing, it is worth checking the functionality of the device and all accompanying documents, including the presence of instructions that tell in detail how to set up the radar detector.