VAZ 2107 generator and reasons for lack of charging
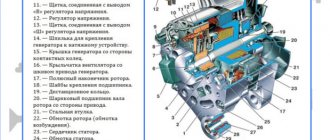
To start the engine and proper operation of the ignition system and other electrical circuits of the VAZ 2107, it is necessary to have DC voltage in the on-board network. When the engine is not started, the battery maintains the proper voltage. After the engine starts, the car's generator charges the battery and maintains the on-board voltage at 13.6-14.2 V. Regardless of engine speed, the output voltage at the generator remains constant. A relay-regulator is responsible for this, which changes the voltage of the generator excitation circuit. If the voltage rises above the permissible level, the winding current decreases, reducing the output voltage. And vice versa.
If the VAZ 2107 has lost charging, the reasons may be as follows:
- malfunction of the relay regulator;
- break or poor contact in the excitation network or generator output voltage;
- broken generator belt.
Restoring normal operation of the generator should begin by determining the reason for the lack of battery charge.
How the charging system works
The battery in any car, in particular in the VAZ 2107, is only necessary for the functioning of the power supply system while the engine is turned off. But when the engine is running, all electrical equipment runs from the generator. It provides power to the injector - nozzles, fuel pump, electronic control unit. But the main load is the battery. It charges while the engine is running.
And the service life of the battery directly depends on how well the charging occurs. A generator is just one source of electricity. But it may be in working condition, but charging is not going to the battery. There can be a lot of reasons for this behavior; you need to thoroughly study the electrical circuit of the charging circuit of the VAZ 2107 car.
How to determine if the VAZ 2107 battery is not charging
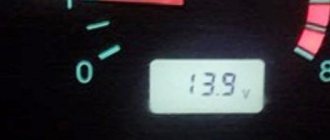
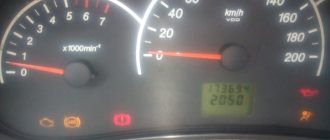
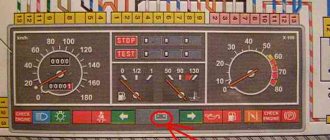
The first sign of a lack of charging is a burning indicator lamp on the instrument panel or a voltmeter needle that is not in the green sector when the engine is running. A more reliable way is to check the voltage on the battery using the will class=”aligncenter” width=”600″ height=”450″[/img]
When the engine is running, the normal voltage on the battery is 13.9±0.3 V. When the battery is not charging, the voltage on it is approximately 12 V.
Important: to avoid failure of the regulator relay and the electronic engine control unit, it is prohibited to remove the battery terminals while checking the on-board voltage while the engine is running.
Low and high voltage of the on-board network harms the battery. In the first case, it is discharged, in the second, the electrolyte boils away, which leads to battery failure.
What is needed to repair VAZ 2107 battery charging
To identify and troubleshoot problems, the following devices and tools are needed:
- multimeter;
- control lamp 12 V;
- flat screwdriver;
- knife;
- pliers;
- sandpaper.
Indicator light
As can be seen from the diagram, the charging system involves a large number of components and each of them can cause poor charging or its absence. To monitor the battery charging process, the car's dashboard is equipped with a control light.
If the system is in good working order, the control signal turns on after the factory. But when the engine enters operating mode, the VAZ 2107 battery charging light does not light up. This means that the battery's energy supply is replenished from the generator. At the same time, the needle on the voltmeter moves to the green sector.
Troubleshooting VAZ 2107 battery charging problem
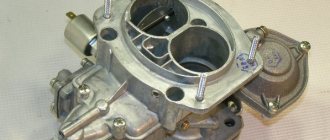
First, you should check the serviceability of the alternator belt - it is this that causes the alternator to rotate and generate current. This belt drives the coolant pump, so this malfunction also manifests itself in engine overheating.
If the charge indicator lamp does not light up, and the voltmeter shows normal voltage of the on-board network, and the battery does not charge, the reason is in the contacts at the terminals.
You should remove the wires from the battery and clean the battery terminals and wires with emery cloth. If the charge does not appear, it is necessary to measure the voltage at terminal “30” (generator output) with the engine running. If the voltage at this terminal and the battery is very different, you need to clean the contacts and ring the wire going from the generator to the battery. The faulty wire must be replaced.
Important: if the belt is over-tensioned, excessive load occurs on the bearings of the generator and pump, which can lead to their failure.
Other reasons for the lack of charge may be a broken rectifier diode on the generator, an open or shorted rotor or stator winding.
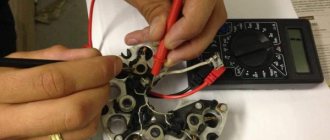
Diodes can be checked using a multimeter or a test lamp. Using a multimeter, you can check the resistance of the diodes in the direction in which they should be locked. To check with a test lamp, you must remove the “+” terminals from the battery and connect the test lamp. The wire of the test lamp must be touched in succession to the three bolts of the rectifier devices. Then perform the same operation, only disconnecting the “-” terminal. If the lamp lights up, the diode being tested is broken.
If one of the diodes malfunctions, the diode rectifier assembly must be replaced.
A break in the stator winding is determined with a multimeter by measuring the resistance between the rectifier unit mounting bolts. Lack of contact between the winding and the other indicates its breakage. In this case, it is necessary to replace the winding or generator assembly.
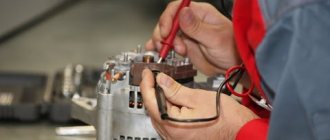
A common cause of generator failure is brush wear. To check them, you need to dismantle the brush assembly. The length of the brushes must be more than 5 mm, otherwise they need to be replaced. Also, the brushes may become warped or “stick” in the wells. Therefore, it is necessary to check the condition of their side surface.
Note: the VAZ 2107 generator (carburetor) is no different from the unit for the injection version of the “Seven”. Therefore, all tips for checking and repairing the generator are relevant for both modifications of the car.
If the warning lamp does not light up and other devices do not work when the engine is running, and the battery is not charging, the reason is a blown fuse or a breakdown of the ignition switch (relay).
The reason for the lack of battery charging may be a breakdown of the relay regulator. To check it, you need to connect “+” from the battery to the top contact, and “-” to the left one and check the voltage on the brushes, which should be 12 V. If the voltage is lower, the relay regulator must be replaced.
Main symptoms of battery charging circuit malfunctions
Before finding out why the VAZ 2107 lost charging, let’s note the main symptoms of this malfunction. There are not very many of them, and I would like to pay special attention to this point: not any of them can clearly indicate that the battery is not charging or the charging is weak.
The light on the instrument panel does not light up or, conversely, the light comes on and does not go out
If the charging circuits are working properly, the battery charge monitoring lamp lights up when the ignition is on and the engine is turned off, and after the engine starts, it goes out. But it may also happen that the battery charging lamp does not light up at all or is constantly on, regardless of whether the engine is running or not. In the first case, on carburetor cars, the culprit may be either a malfunction of the charge circuits or an indication error. For example, sticking contacts of the lamp relay or its failure. The same picture is observed when contact is broken in the blocks and power supply wiring of the relay and lamp. In this case, the battery charging will be normal, which will be confirmed by the voltmeter on the instrument panel.
In a VAZ 2101 injector, a constantly burning battery charging control lamp clearly indicates a malfunction of the charging circuits.
If the lamp does not light up at all, then there is an obvious failure of the indication circuits: light bulbs, relays, wiring. At the same time, in carburetor modifications, charging may be normal, but on the injector, even due to a burnt out light bulb, there will be problems. After all, the initial excitation current flows through it, without which the generator simply will not start. This will be clearly visible from the readings of the same voltmeter.
Injectors have another option for the status of the warning lamp. After starting the engine, the light does not go out completely, but glows slightly. This behavior of the indicator indicates a malfunction of the generator - one or more additional diodes are broken. In this case, charging will be weak or not at all. You can read more about the reasons for the malfunction of the battery charging control lamp and how to eliminate them in the article “why the battery icon on the panel is on and how to fix the problem.”
The voltmeter needle left the green sector
When the engine is running and the generator is operating normally, the voltmeter needle should be in the green sector. If after launch it “crawls” into red, then we have problems. If the red sector is on the right, it means it is recharging, if the one on the left is not charging.
If the needle drops to “0” and does not move at all, then most likely the voltmeter itself and its power supply circuits are faulty. When a battery is connected, even if it is very discharged, a working voltmeter cannot show “zero”.
The presence of the arrow in the white sector, located to the left of the green one, indicates constant undercharging. This is also a malfunction, and a serious one at that.
The engine does not start - the battery is discharged
When starting the engine, the battery spends part of its energy, which is replenished with the help of the generator during driving. If there is no or insufficient charging, then after each start the battery is discharged more and more and eventually will not be able to crank the starter. If even after a long trip the starter turns with difficulty or does not turn the engine at all, then it is likely that there is something wrong with the charging circuits.
Expert opinion
Alexey Bartosh
Specialist in repair and maintenance of electrical equipment and industrial electronics.
Ask a Question
The cause of this problem may be the battery itself. If it is heavily worn, sulfated, or fails for some other reason, the symptoms will be similar.
A characteristic whistle from under the hood
The cause of this whistling noise is usually the alternator drive belt. Moreover, the whistle usually appears or intensifies with sudden changes in engine speed, in damp or frosty weather. This is a clear sign that the belt is either loose or worn. As a result, the belt slips along the generator pulley, which is unable to gain the required speed and does not produce the voltage necessary for normal battery charging.
The reason for the lack of charging may be poor belt tension or severe wear.
In some cases, at the same time, the engine may overheat, since the same belt rotates the cooling water pump.
Why is there no charger on the VAZ 2107?
For trouble-free operation of the car, you need to ensure that the battery is fully charged. If you notice that your VAZ 2107 is not charging the battery, the problem must be resolved as quickly as possible. Especially if you have to drive a car often at night and in winter. At this time, discharge occurs much faster. Otherwise, you will definitely have to use the help of a tow truck or tug.
Reasons for lack of charging
When the ignition is turned on, voltage is supplied to the battery charge regulator relay, and the rotating generator generates current. In the vase, the mains voltage is maintained at 13.6-14.1 volts. Regardless of the engine speed, the output voltage remains unchanged; the VAZ 2107 charging relay is responsible for this function. The device controls the excitation of the armature winding, thereby changing the output voltage level.
Based on this, the reasons for the lack of charging may be the following:
- The generator belt has broken;
- Weak belt;
- The generator or excitation circuit is broken or there is poor contact between them;
- The problem is in the relay regulator;
- The generator armature (rotor) is faulty.
Diode 242
I will briefly summarize the parameters here:
reverse voltage: from 50 to 100 V or higher forward current from 5 to 10A, with a voltage drop across the diode from 1 to 1.5 V.
Constant undercharging of the battery or its absolute discharge at the most inopportune moment is a headache for many car owners. One source of these problems may be the generator. But how to check it? Perhaps it's not his fault at all? Let's figure out together how much the generator must produce for the normal functioning of all car systems and maintaining the battery in a charged state.
How to determine the charge level?
Primary control of the charge level on the VAZ 2107 is carried out by instruments on the panel: a control lamp and a voltmeter. If the charge is normal, the indicator arrow will be in the green area, and the control lamp should go out when the engine is running.
To more accurately check the voltage level, you need a voltmeter. As mentioned earlier, the correct charge is 13.6 - 14.1 volts.
You can purchase a special automotive electronic voltmeter or one combined with a watch. Installed both instead of the standard clock and on the dashboard.
Preparing to Troubleshoot
If a problem is detected, we begin diagnostics. First, let's prepare the tools.
- Multimeter (voltmeter);
- Emery cloth or needle file;
- Knife;
- Pliers;
- 12-volt indicator lamp (control).
Troubleshooting
The first thing to do is check the tension of the alternator drive belt. Let's look at the main reasons why charging on a VAZ-2107 may fail. The reasons can actually be anything - even a simple broken belt. Over time, it wears out and becomes unusable. On the "sevens" the belt also drives the coolant pump. And if the belt suddenly breaks, this can be seen by the fact that the temperature of the antifreeze in the engine block will instantly increase.
If the control light in the dashboard does not light up, and the voltage in the on-board network is at a normal level, but there is still no charging, you can look for the cause of this phenomenon in the terminals and contacts that connect the wires. Remove the terminals from the battery to clean them. Very often they are covered with a layer of oxides that interfere with the conduction of current. The result is a large voltage drop. Quite often, the fault lies not even in the charging wires themselves, but in the bus that connects the body, the engine block and the negative terminal of the battery.
Let's start the renovation
There may be several reasons for the battery not charging. The instructions below are quite universal and are suitable for any case.
Troubleshooting algorithm:
- First of all, we check the serviceability of the belt and its tension. If it is damaged or loose, charging will be less than normal and will ultimately lead to battery failure. The belt is also partly responsible for the operation of the cooling pump, so a damaged belt can cause other problems as well.
The problem can be determined by the sign when, when the engine is running, the voltage in the power circuit is within the normal range, but immediately after connecting the load it disappears. Another sign of a weak belt may be a whistling sound. It may appear immediately after starting the engine or when large current consumers, such as lights, are turned on.
This needs to be corrected, since a poorly tensioned belt slips during operation of the mechanism, which accelerates its wear. It must be tightened to a deflection level of 12 - 17 millimeters with a pressure of 10 kgf, or replaced with a new one;
This is interesting: How to save fuel?
- In order not to waste time and not draw false conclusions, you need to check the voltage on the battery with the engine stopped and running. The normal supply voltage of the machine when the engine is running should be 13.6 - 14.1 volts. A voltage below this will indicate a weak belt (point 1), a faulty regulator relay, or a failed diode bridge.
- If everything is fine with the belt, remove the charging relay and check the wear of the brushes. They should be longer than 5 millimeters, this can be seen visually, but to be sure, check with a ruler. If they malfunction, replace the VAZ 2022 charging relay.
You can check the relay by applying a battery voltage of up to 12 volts to it and connecting a multimeter to the brushes. There should be tension. Next, you need to apply a voltage of 16 - 18 volts to the relay. There should be nothing on the brushes;
- The next reason for low voltage is a break in one or more diodes. Revealed when removing and disassembling the generator.
It’s worse when a diode breakdown occurs, then there is no voltage drop, but this has a detrimental effect on the battery. An alternating voltage enters the machine's power circuit, which leads to boiling of the battery, destruction of the plates and a decrease in its service life.
- If the VAZ 2107 battery charging does not light up, or rather, the indicator light on the instrument panel does not light up, despite the fact that the voltage gauge shows normal voltage and despite all this there is no charging, then the problem lies in the contact at the terminals. To fix this, you need to disconnect the wire and clean it with sandpaper or a file and check the integrity of the wire from the battery to the generator.
- Another reason why the battery charge lamp does not light up at all is a break in the armature winding. It can only be determined after disassembling the generator and measuring the winding for an open circuit using a tester or a multimeter.
Below is a charging diagram for the VAZ 2107 battery:
Features of the circuit
The above is a general diagram of the circuit, without details, but it is enough to understand how everything works. Now about the features of battery recharging.
The generator cannot independently regulate the parameters of the generated electricity, so the output voltage from it varies, and in a significant range, it depends on the crankshaft speed and the load in the on-board circuit. That is, the battery is essentially constantly being recharged while the generator is generating electricity.
In order for the battery to accept a charge, you need to apply a voltage to it slightly higher than the nominal value of the battery itself. The input voltage on the battery differs on different cars, but in general, this figure is in the range of 13.9-14.5 V.
It is at this voltage that the battery can “take” a charge. If the voltage is lower, the battery will be undercharged, and if the voltage is higher, it will be overcharged. Both situations have a negative impact on the battery.
The generator produces a voltage with a high value, and in order to maintain it in the circuit within the required limits, a relay regulator is included in the circuit.
On some models, this element is included in the design of the generator and is combined with a brush assembly (the most common design) or is a separate unit (found, for example, on the VAZ of the classic family).
Reasons for the battery not charging
For proper operation of the ignition system and other electrical circuits of the VAZ 2107, the voltage in the on-board network must be constant. When the engines are not running, the battery maintains constant voltage. After starting the engine, the car's generator comes into operation, charges the battery and maintains the on-board voltage within 13.6-14.2 volts. Regardless of the speed, the voltage on the generator must remain constant. This is ensured by a relay regulator, which, depending on the speed, changes the voltage of the generator circuit. If the voltage drops below the permissible level, the winding current increases, increasing the output voltage and vice versa.
If there is no charging on the VAZ 2107, possible reasons may be the following:
- poor contact or break in the excitation network of the generator output voltage;
- the relay regulator is faulty;
- broken generator belt.
Troubleshooting the generator should first begin by identifying the cause of the lack of battery charge.
How does it all work?
First you need to understand how everything works. So, on the VAZ-2107, the on-board network is powered from two sources - the battery and the generator. The first provides electricity to all consumers until the power plant is started. The battery itself is a storehouse of electrical charge, which it releases when needed.
A generator is a unit that generates electricity, but for this it is necessary that it perform a mechanical action (its rotor rotates). In order for the generator to operate and power the network, it is driven from the crankshaft via a belt drive.
Everything works simply: to start the engine, the battery energy is supplied to the power electric motor - the starter, as well as the ignition system. After the power plant starts, the generator will be driven by the drive, the generated energy of which will power all devices. It will also be supplied to the battery to restore the charge spent on starting the power plant.
Recharging the battery from the generator must be carried out without fail, otherwise after several starts of the power plant, the loss of electricity in the battery will be significant (the battery runs out), and it will simply not be able to start the engine.
How to find the reason for the battery not charging
The first sign of a lack of charging is the warning light on the instrument panel coming on or if the voltmeter needle is not in the green zone when the engine is running. You can more accurately check the voltage on the battery using a multimeter.
When the engine is running, the voltage on the battery should be – 13.9±0.3 V. If the battery is not charging, the voltage will be approximately 12 V.
Increased or decreased voltage of the on-board network harms the battery. In the first case, the electrolyte boils away, in the second, it is discharged, which leads to failure of the battery.
To find the problem and fix it, you will need the following tools and devices:
- control lamp 12 V;
- multimeter;
- knife;
- flat screwdriver;
- pliers;
- sandpaper.
Generator diagnostics
In order to check the diodes, you need to use a multimeter or a test lamp. Using a multimeter, you can measure the on-state resistance of semiconductors. In order to diagnose devices using a lamp, you need to disconnect the positive terminal from the battery. One wire must be connected to the positive terminal of the battery, and the second to the three bolts of the rectifier diodes.
Afterwards you need to perform a similar operation with the negative terminal turned off (and the positive terminal turned on). If the lamp starts to light up, this may indicate that the corresponding diodes are broken. The best option is to install a new diode block. But in order to save money, you can replace only those that are faulty.
The main condition for repairs is to do everything carefully. The current flows in this node is large, so weak insulation will lead to the formation of a spark gap, which will cause failure of not only the semiconductors, but also the generator windings. If the charging light is on on a VAZ-2107, this may indicate that one of several components has failed.
Troubleshooting battery failure
The first step is to check the tension of the alternator belt - it is what drives the alternator and coolant pump, so this malfunction can also manifest itself as engine overheating.
If the VAZ 2107 battery charging lamp does not light up, and the voltmeter shows the normal voltage of the on-board network and the battery does not charge, the reason is obviously in the contacts at the terminals.
You need to remove the terminals from the battery and clean them with sandpaper. If charging does not appear, it is necessary to measure the voltage at output “30” of the generator with the engine running. If the voltage readings at this output and the battery are very different, you need to clean the contacts and check the wire running from the generator to the battery. If the wire is faulty, it must be replaced.
Another reason for the lack of charging may be a short circuit or break in the stator or rotor winding, as well as a broken rectifier diode on the generator.
Diodes can be checked using a test lamp or multimeter. A multimeter is used to check the resistance of the diodes. To check the diodes using a test lamp, you need to remove the “+” terminal from the battery and connect the test lamp with one end to the positive terminal, and with the other you need to sequentially touch the three bolts shown in the figure below. Then do the same operation, only with the “-” terminal. If the control lamp lights up, then the diode being tested is broken.
If one of the diodes fails, it is necessary to replace the diode bridge assembly.
A malfunction of the stator winding can be determined with a multimeter by measuring the resistance between the rectifier unit mounting bolts. If there is no contact between them, then there is a winding break. In this case, the winding or generator assembly is changed.
Probably the most common cause of generator failure is brush wear. To check them, you need to remove the brush assembly. The length of the brushes must be more than 5 mm, otherwise they need to be replaced. Brushes can also become jammed or skewed in the wells.
The battery is undercharged.
When using a VAZ-2107, charging may not be completely lost, that is, the battery may be undercharged. This is expressed in a voltage drop when checking at the battery terminals when the load is turned on, most often the high beam headlights. While when consumers are turned off, the voltage is normal. The reason for this may be poor contact in terminal 30 of the generator, that is, in the connection of a thick wire secured with a nut. In this case, the voltage on the bolt corresponds to the norm and strong heating is often observed. In this case, it is necessary to unscrew the nut securing the wire and clean the contact surfaces. It is also necessary to tighten the nut securing the bolt; it is not worth unscrewing it without removing the generator. If the voltage at the bolt is the same as at the battery terminals, then the generator is faulty.
In some cases, when the battery is charged, the charging lamp may light up on the instrument panel. This may be due to a malfunction of the PC702 relay on cars with a G222 generator, or a malfunction of one of the additional diodes in the 37.3701 generator.
I hope the above will help you in troubleshooting when the VAZ 2107 is not charging.
autovazremont › Blog › The battery light does not light up, the VAZ-2107 is not charging. What to do?
Recently, returning from work, the following situation arose with me - when I turned on the ignition, the battery charge indicator lamp stopped lighting, the charging itself disappeared, and the voltmeter needle showed only the battery charge level.
Therefore, having somehow reached home, I decided to find out the reason and, after rummaging on the Internet, got to work.
First, a little theory: when the engine is running, a dead battery is charged with a constant voltage of 13.6-14.2 V from the car’s on-board network through the generator. Due to the different speeds of the engine crankshaft, in order to maintain the specified voltage, a voltage regulator (PP, “pill”, “chocolate”) is included in the generator excitation circuit, which, when the voltage in the network increases above the rated one, reduces the current going to the generator excitation winding. The magnetization of the rotor poles decreases, which leads to a decrease in its output voltage. Therefore, the reasons that the generator does not charge the battery are associated with the elements of the “excitation circuit” or the “generator-battery” output voltage circuit, including the generator itself. When the ignition is turned on, the lock (14) also turns on the ignition relay (13). In this case, +12V from the battery (1) passes through the relay contacts and fuse No. 10 of the mounting block, then is supplied to the on-board network and to the output of the battery charge indicator lamp (11) and the charging sensor in the instrument panel (12). After this, they go through the diode, the mounting block (10) (plugs Ш5-Ш10), are fed to plug “61” of the generator and go to the terminal of the built-in PP (7) and through the brush and contact ring to the excitation winding (8) - the starting excitation of the generator (4). As the engine speed increases, and with it the generator rotor, the phase voltage increases, and through a block of additional diodes (3) it increases the voltage on the excitation winding and on the output diode of the battery charging indicator lamp. When the output phase voltage reaches +12V at both terminals of the battery lamp, the voltage is equalized, and due to the absence of a voltage difference, it goes out (as when starting a car). In this case, the generator produces a voltage greater than 12V, which charges the battery through output “30”.
Thus, in order to eliminate the problem, we need to sequentially check all elements of the system, starting with the elements of the “excitation circuit” and ending with the “generator-battery” circuit. We arm ourselves with a multimeter, an indicator screwdriver or a light bulb with a wire, and begin:
This is interesting: A method for checking spark plugs using a multimeter
How to check the operation of the generator
The battery in a car is an important element of the system, which is responsible for providing the car’s on-board network with electricity. The generator is used to charge the battery while it is active. Unstable operation of a device generating electricity causes a voltage drop in the network and failure to restore the capacity of the power source.
Normal generator performance means timely and complete replenishment of the battery charge level, which decreases under load. Checking the battery charge level from the generator is simple and can be done by the car owner himself.
Diagnostics of an automotive energy-generating device includes a visual inspection of the unit, its elements and related parts, as well as voltage and current measurements. At least twice a year, you should check the tension of the drive belt, excessive weakening of which leads to a decrease in the performance of the generator, and sometimes can lead to breakdown of the device. Once a year, you can check equipment elements - fasteners, diode bridge, voltage regulator and others. Timely maintenance of the battery will also guarantee the absence of problems - cleaning the terminals, adding distilled water.
No battery charging on VAZ 2107
In order for the use of your “seven” to bring benefit and pleasure, and not grief, you need to have a well-charged battery on it. The battery must be constantly recharged throughout the operation of the car, for which the VAZ 2107 generator generates charging voltage. Like any system in a car, the battery charging system sometimes fails and then the charge is lost. Therefore, during operation, the question is often asked why the battery is not charging. In this case, it will be useful for car owners to find out why the generator does not charge or why there is no charge on the VAZ 2107.
What to consider when choosing a new battery
According to the passport, the battery is designed for 3-5 years of active use (in reality it turns out to be less). Therefore, over time, it becomes necessary to buy and connect a VAZ 2107 battery instead of a failed one.
When purchasing a new battery, you should consider a number of parameters and characteristics. Battery type: serviced and maintenance-free. The first option allows you to check and replenish the electrolyte level. This makes it possible to use the battery longer.
The next question is: what power will the battery on the VAZ 2107 be most efficient. Batteries with a capacity of 50–60 Ah are suitable for this model. However, given that modern cars are equipped with energy-intensive equipment, it is better to opt for more capacious batteries. In addition, carburetor VAZ models require more powerful batteries - they consume more energy when starting. In terms of dimensions, the VAZ 2107 requires power supplies with dimensions of 242*175*190 mm. The vast majority of samples available on the market fit them.
When choosing a battery, you should also take into account the place of residence of the owner of the “Seven”. For those who live in the south, you can purchase a less powerful battery. Northerners are advised to prefer a battery with a higher capacity: in the cold, the car starts with high energy consumption.
A little theory
The reasons that the generator does not charge the battery are related to the elements of the excitation circuit or the output voltage circuit from the generator to the battery, including parts of the generator.
When the ignition is turned on, the lock also turns on the ignition relay. In this case, +12 V passes through the relay contacts and fuse No. 10 of the mounting block, then is supplied to the on-board network and to the output of the battery charge indicator lamp and the charging sensor. Then they go through the diode, the mounting block (plugs Ш5-Ш10), and are fed to plug “61” of the generator 37.3701, which have been installed on the VAZ 2107 since 1988. Next, +12 V goes to the terminal of the built-in PP and through the brush and slip ring to the winding excitation - the starting excitation of the generator is performed. As the engine speed increases, and with it the generator rotor, the phase voltage increases, and through a block of additional diodes it increases the voltage on the excitation winding and on the output diode of the battery charging indicator light. When the output phase voltage reaches +12 V at both terminals of the battery lamp, the voltage is equalized, and due to the absence of a voltage difference, it goes out. In this case, the VAZ 2107 generator produces a voltage of more than 12 V, which charges the battery.
The electrical circuit diagram of the VAZ 2107 car injector differs from the circuit diagram of the VAZ 2107 carburetor only in the presence of a piece of equipment that controls the power system, and does not affect the battery charge. Quite the contrary - malfunctions in the battery charging system can affect the operation of the injection engine ECU.
Powerful electricity consumers are controlled using electromagnetic relays connected to the network. Let's look at ways to troubleshoot battery charging problems for both injection and carburetor engines.
Troubleshooting
Before starting car repairs, you need to make sure that charging is not happening precisely because of a malfunction of the on-board equipment, and not, for example, because of a worn-out battery or severe oxidation of its terminals. Open the hood and carefully inspect the terminals. The tips on them should not dangle and be covered with a white coating similar to snow. If they are loose, we tighten them. If they are oxidized, remove and clean.
If the tips are loose, then we don’t just tighten them, but first remove and clean them. After all, in the place of poor contact they probably oxidized and burned.
Now take a multimeter and set it to measure DC voltage up to 20V. We start the engine, set the speed to about 1,000 rpm. and measure the voltage at the battery terminals. If its value is within 13.5-14.5 V, then everything is in order, the battery is charging as expected. If it’s lower, you’ll have to find out why our VAZ 2107 doesn’t have a charger and fix the problem.
Below we will look at the most common faults that cause the battery to not charge, and methods for eliminating them. More detailed information about battery charging problems can be found in the article “why the car’s alternator does not charge the battery.”
Check belt tension
Regardless of whether a whistle is heard from under the hood or not, let's start by checking the belt tension. After all, it can slip without unnecessary noise. To do this, press the belt with a force of 10 kgf at two points: between the pulleys of the water pump and the generator and between the pulleys of the crankshaft and the water pump.
In the first case, the deflection should be within 10-15 mm, in the second - 12-17 mm. If this is not the case, adjust the tension. Loosen the fixing nut on the generator adjusting bracket and use a pry bar to move the generator in the desired direction. Tighten the nut and take another measurement.
Important! The belt tension must be within the specified limits. A tightened belt is no better than a loose belt. It will quickly wear out on its own, wear out the pulleys and break the bearings of the generator and pump.
Diagnostics and replacement of the relay regulator
The battery may not be charged or recharged due to a malfunction of the relay regulator. If the key transistor of the relay is broken, there will be an overcharge. If there is a break, the battery does not charge at all. On a VAZ 2107 with a G-222 generator, the voltage regulator, which many call “chocolate,” is located on the generator above the brush block.
On the VAZ 2107, the relay injector is a single unit with the rotor brushes and looks slightly different.
To check the relay, we will need a low-power car light bulb, for example, a side light or interior lighting lamp, and a direct current source capable of changing the output voltage from 12-13 V to 15-18 V. Let's start with the carburetor modification of the VAZ 2107. Remove the relay - regulator and assemble a simple circuit shown in the figure below.
We change the voltage of the power source and observe the light bulb. When the source voltage is below 14.2-14.5 V, the lamp should light. Above - go out. If the light bulb does not behave correctly, the regulator is faulty. Checking the regulator installed on the VAZ 2107 injector, the checking algorithm is exactly the same, and the diagram will look like this:
Breaks and short circuits in wiring - where to look and what to do
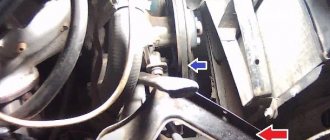
One of the weakest points in the power supply circuit of the VAZ 2107 (and any other car) is the connection of the power wire to the generator. The device is located low and is practically not protected from water and dirt. Even if this connection looks normal, it makes sense to disassemble it and inspect the contact point. We disassemble, inspect, clean if necessary, apply any thick lubricant, preferably a special one for contacts, but you can also use grease, technical petroleum jelly, etc., and assemble. Lubrication will prevent oxidation in the future, but will not interfere with the normal operation of electrical circuits.
Additionally, we inspect the generator power connection blocks. They are usually knife-type. Undocking, inspecting, and cleaning if necessary. The next weak point is all the connecting blocks that are present in the battery charging circuit. They can be located directly on the wiring harnesses. We also disconnect them, inspect them, and clean them, if necessary.
Otherwise, the wiring on the VAZ 2107 behaves quite correctly, but this does not mean that all this will last forever. Let’s not be lazy, inspect the connections and the wires themselves. If necessary, we call, focusing on the electrical diagram (see above). If somewhere we see traces of abrasion or cracking of the insulation, we insulate it with ordinary electrical tape or heat shrink and eliminate the cause of this very abrasion.
Problems with the generator
The generator is a mechanical unit and, naturally, it wears out over time. In addition, external factors can cause generator breakdown: overcurrent, water, dirt. Let us list the reasons why the VAZ 2107 generator does not charge:
- brush wear;
- wear of rotor contact rings;
- breakdown of rectifier bridge diodes;
- breakdown of additional diodes (injector on VAZ 2107);
- breakdown of the windings.
Brushes
To check the condition of the brushes, they will have to be removed. In this case, in the carburetor model, you will first have to dismantle the relay regulator. On the injector, the relay-regulator will be removed along with the brushes. Remove the protective rear cover of the generator, then the block. Carefully inspect the ends of the brushes. They must be smooth, without burrs or chips, and protrude from the body by at least 5 mm. Otherwise the block will have to be replaced.
Expert opinion
Alexey Bartosh
Specialist in repair and maintenance of electrical equipment and industrial electronics.
Ask a Question
A sign of brush wear can be a battery charge control lamp and a voltmeter. If the lamp blinks periodically and the voltmeter readings fluctuate, then most likely it is time to change the brushes, since due to their wear, contact with the slip rings is lost.
Slip rings
Over time, not only the brushes wear out, but also the rotor slip rings that supply power to the field winding. In order to check their condition, it is enough to remove the brush block and look into its seat. It is simply impossible not to notice the strong production of rings.
If the unit is in poor condition, it needs to be replaced. True, to do this you will have to disassemble the generator, but replacing it yourself is quite possible. You can see how to replace the generator slip rings in the video below.
Changing the slip rings of a car generator rotor
Rectifier
The generator rectifier of any VAZ 2107 model consists of six diodes mounted on a double horseshoe-shaped radiator, which is also a current conductor. The bridge is located under the rear cover of the generator. In order to check the diodes, it is necessary to disconnect the generator windings from them by unscrewing the screws and disconnecting the winding tips from the diodes.
We turn it off, arm ourselves with a multimeter turned on in diode testing mode, and ring each semiconductor. If we find a faulty one, we change the entire horseshoe, since qualitatively replacing a separate diode tightly pressed into the radiator is quite problematic.
Additional diodes
These diodes can be found in generators installed on the VAZ 2107 injector. The task of semiconductors is to power the excitation winding. You can find them in the rectifier block soldered in a hinged way. In the photo above, one of the additional diodes is marked with a green arrow. In order to ring these diodes, you do not need to solder them, but you will have to disconnect the windings from the rectifier (see point above). If we find a faulty one, we simply unsolder it and replace it with a similar one.
How to determine the lack of battery charge
Checking the battery charge
The easiest way to determine the lack of charging is using the car’s instruments, that is, the charging indicator lamp and the sensor (voltmeter) on the instrument panel. The sensor arrow should be in the green sector, and the battery lamp should not light up when the engine is running. Otherwise there is no charging.
But the best way is to check the voltage on the battery with a multimeter. When there is a charge, the voltage on it lies in the range of 13.6-14.2 V, and when there is no charge, it will only have its own voltage of 12 V (± 0.6 V). Under no circumstances remove the terminals from the battery to check to avoid damage to the RR, ECU and other electronic devices on your car.
To troubleshoot battery charging problems, you must use the following tools:
- control lamp 12 V;
- multimeter with a measuring range of up to 60 V AC and DC voltage;
- flat blade screwdriver;
- shaped screwdriver with a Phillips blade;
- pliers;
- knife;
- emery cloth.
Return to contents