UAZ "Bukhanka" is an all-wheel drive off-road vehicle. This model has been produced at the Ulyanovsk Automobile Plant since 1957. This machine is used not only for its intended purpose, after all, it is a special equipment, but it is also used by fishing and hunting enthusiasts.
The main advantage of this car is its versatility and enormous off-road capabilities. The cabin can accommodate 10 passengers, and if necessary, it can be transformed as desired. The heart of the car is the ZMZ-402 and ZMZ-409 engines. Since the car is special, many are interested in how the cooling system of the UAZ “Loaf” works.
General device
These cargo-passenger cars with carriage layout use closed-type liquid cooling. The coolant circulates in the system forcibly under the influence of a centrifugal pump. The manufacturer recommends using domestic Tosol as coolant. However, in emergency cases, you can fill the cooling system of the UAZ “Loaf” with ordinary water. The volume, including not only the cooling system circuits, but also the heater, on most models ranges from 13.2 to 15.3 liters.
Heater UAZ Bukhanka
A car is made up of a large number of components. Any of them requires very high attention. Thanks to this, drivers must monitor the condition of their own “iron horse”. The issue of preparing the car for the winter period is very important.
The most important role here is the presence of a well-thought-out heating system. Let's talk about it in the UAZ "Loaf".
This system is important, firstly, for maintaining normal temperature in the cabin, regardless of the time of year, for air ventilation in the middle of the car.
Most “loaf” models are equipped with a very high-power heater “N-1” produced by NAMI.
Design:
The heater includes the following elements:
- Heating device.
- Fan.
- Special device for air distribution.
There are two key operating modes:
- When clean air is supplied.
- When recirculating flows.
The second mode assumes a very high temperature in the cabin. To do this, you need to close the air intake and then open the damper. In the first mode, the actions are performed in the reverse order.
A specialized unit controls the entire system. A tap is used for adjustment. The new design, built on increased circulation of flows and the use of liquid in the heating device, allows you to warm up the interior faster.
It is necessary to remember about glass blowing. Otherwise, this will lead to their covering with ice and fogging. The driver and passengers will feel discomfort.
If moisture penetrates, it is removed through the air intake. A docking device is used here.
Motorists often encounter cases when the heater (stove) does not perform its direct functions and does not heat. What could be the reasons?
- The presence of damage in the channels through which air passes.
- Antifreeze is leaking.
- The system is clogged, resulting in unsatisfactory temperature.
- The faucet on the stove was leaking.
- The valve responsible for protecting the motor burned out.
How to change a used stove with your own hands? What will you need for this? Everything can be done using the following method.
- We drain all the antifreeze and disconnect all wiring.
- Separate the console from the shield. We remove the heating unit, the air intake hatch, remove the seal, and then clean the recesses.
- We try on the air filter, drill holes no larger than 3.2 mm in diameter.
- Apply a large layer of sealant to the installation site. We install the body and mark. We return the filters from the cabin to their place.
- We install a new heater in the cabin, securing it with M-6 studs and nuts. We mark the node, then install the block console. We mark the entire structure with screws.
- Next we connect the control rod and secure it. We connect the pipe sections containing the antifreeze to the unit and mark them with specialized clamps. Then we install blowing channels for the glass.
- To summarize, we connect the electrics, fill the system and check that it does not stop working. If breakdowns occur, you need to check the entire system again.
Summarizing
The heating system of the UAZ Bukhanka car is quite conventional in its design. If its operation is not checked in a timely manner, the owner will ultimately need to spend cash on car service.
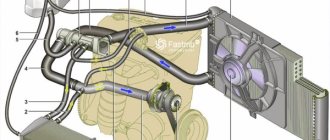
Cooling system diagram for ZMZ-402
It's quite simple. This power unit is cooled by liquid that passes through two circuits.
The system is built according to a ring scheme and consists of several main components. The liquid moves from the radiator through the pipes to the thermostat, then passes through the engine cooling jacket. Then, through the water pump, it returns to the radiator. In addition, the cooling system of the UAZ “Loaf” with a 402 engine includes an electric fan, a temperature sensor, and heaters. Let's look at each element separately.
Installation of SHAAZ radiator on UAZ-3160
There are new radiators from the SHAAZ plant for the 3160. Their heat output is 62,000 kcal/hour, versus 35,200 kcal/hour for the 3741sh radiators (our “native”). Attention!
As of August 2004, in the catalog of JSC SHAAZ, the figure for 3160 is
37000.
Tubes, when new, cost about 1.5 times more often, and the plates are straight and shorter (ours are corrugated and long) - better “air permeability” and heat transfer the plate itself - because a long plate dissipates heat worse.
Questions: 1. Do they fit without modifications?
There is only one change - instead of the standard lower bolts, regular ones are installed (new radiators have threads on the radiator).
You also need to slightly move the lower pump hose down. 2. Is there any difference in size?
No width or thickness.
The height of the “honeycomb” is about 5-7 cm (due to the absence of lower “legs”, the radiator itself seems to have “lengthened”. The hole for the handle is now in the lower tank. 3. Is it really better to cool?
Yes, indeed. The design is better .
Thermostat
This is the most delicate component in the system. It fails most often - modern spare parts are not of very high quality. The function of the thermostat is to control the flow of coolant through the engine. The ZMZ-402 unit, like many others, has two coolant circulation circles - large and, accordingly, small.
When the driver starts the engine and it warms up a little, the liquid in the cooling system of the UAZ “Loaf” circulates only in a small circle. This allows the engine to warm up faster. When the temperature reaches approximately 70 degrees, the thermostat will work and coolant will flow through the cooling radiator in a large circle. Operating temperatures for the 402 engine range from 82 to 90 degrees. If the engine does not warm up to these temperatures, this indicates that the thermostat is faulty. Often, due to wear, it jams and does not open.
Installation of a foreign-made viscous coupling on a UAZ
I tried, I even bought it from a Steyr engine, but I couldn’t install it and gave it back. There's a key problem there. that the tolerance for runout of a viscous coupling (especially imported) must be very small, otherwise even a BMW clutch will not last long. Making an adapter will only increase the already existing inherent runout of the pump shaft. It was also not possible to change (replace) the fasteners on the coupling itself, since it is made conventionally non-removable. Therefore, I decided for myself that there was a chance to install a normal viscous coupling. unfortunately, practically none. I installed a BMW clutch two and a half years ago. To do this, I had to replace the pulley hub on the pump. I took this hub itself at disassembly, its internal diameter is slightly smaller than ours, it had to be ground. The impeller is nine-bladed. Everything works perfectly, at +35 degrees in the mountains (2000 m) on long and steep climbs the temperature reached about 90-95 degrees October 2003
This is what a BMW viscous coupling with an 11-blade fan looks like; you just need to remove the fan hub from the water pump and cut the thread to 22x1.5 right.
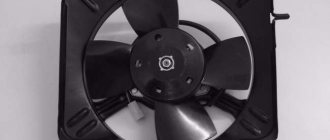
Radiator and cooling fan
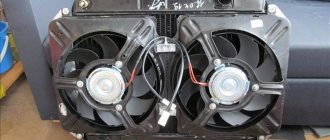
When the liquid in the cooling system of the UAZ “Loaf” passes through the engine, it will heat up. It must cool down to cool. A radiator is used for this. On these cars, the manufacturer installs mainly copper 3-row radiators. However, owners prefer to install aluminum solutions instead. As reviews note, with them the engine is cooled much more efficiently.
The radiator in the system acts as a cooler. It is cooled by the oncoming air flow when moving. When the car is stationary or moving at low speeds, the air flow is weak and cannot sufficiently blow over the radiator. Then the fan comes into play. In this car it is of a forced type. The element rotates when the engine is running, regardless of the coolant temperature. Thus, it is very difficult to overheat the engine.
Expansion tank
First of all, the expansion tank stores a supply of antifreeze. A certain volume of fluid must always be in reserve to maintain normal engine operation. In addition, vapors and gas are released into the tank, which accumulates in the system during operation. The expander is connected to the atmosphere by a valve installed in the lid. The valve is configured in such a way that there is always excess pressure in the system. This allows the engine to operate at high temperatures, but without the antifreeze boiling. Excess pressure is released from the valves into the atmosphere.
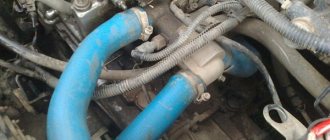
Cooling jacket and pipes
To connect various components of the cooling system of the 402nd engine of the UAZ “Loaf”, pipes are used. These are rubber products in the form of tubes. The elements are quite reliable, but if they are used for a long enough time, they wear out and become old. Then the coolant may leak and its level drops. As a result, the motor overheats.
The cooling jacket is a necessary part, without which the engine simply will not cool down. The jacket passes through the entire cylinder block. It acts as a heat absorber. The coolant is then discharged to the radiator.
Engine ZMZ-409
This engine is distinguished by a different valve cover, an improved timing mechanism, and a different cylinder head gasket. The volume of the power unit also increased, which immediately entailed the modernization of the cooling system of the ZMZ-409 UAZ “Loaves”.
The design of the cooling system is typical for internal combustion engines of this design that were ever manufactured at the Zavolzhsky plant. The engine is equipped with a liquid closed forced system. There is also a radiator, a jacket in the cylinder block and in the cylinder head, a pump, an expansion tank, temperature sensors, an electric fan, a heater core and other elements. Note that the operating principle of the cooling system of the 409 UAZ “Loaf” is simple and similar to injection engines. Here the coolant also moves in a large circle and in a small one.
What is an electric coupling? How to install it?
Structurally, it is designed like this: an electromagnet is rigidly fixed to the hub (pulley) of the pump. The fan itself is located slightly in front and rotates on the pump shaft on bearings (due to slight friction in them). Those. When the magnet is turned off, it does not have a tight connection with the pulley - it spins so lightly that you can easily stop it by hand. When the magnet is turned on (current consumption 1.5 A), the fan “grabs” and it begins to rotate along with the pump pulley, intensively cooling the radiator. Accordingly, this matter is controlled by a sensor or toggle switch. The advantages of the system are low current consumption (1.5 A versus 25 A with 2 electric fans), the “oaky” design - in general, there is nothing to break (even if the magnet fails, the coupling is locked using adjusting bolts - and a standard “meat grinder” is ready) , the clutch acts as a “limiter” of the moment - in water the impeller is unlikely to “cut out” the core of the radiator. This design was used on the Volga GAZ-24 in the early 70s, as well as on foreign cars in the 70s-80s. Then the bourgeoisie switched to viscous couplings, and we switched back to rigid mounts. The quality of workmanship requires... For a description and installation method of the electric coupling, see a separate article.
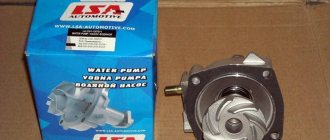
Selection and maintenance of a pump on a 3-liter engine
The original UAZ pump is designed for a greater load than the Volgov pump - the front bearing is roller. Its downside is a small irremovable backlash, but you shouldn’t be afraid of it. I took the original one, not the reinforced cast iron one. All gaskets are identical to those of the GAZ 2410 pump. Fill the grease under the small black bolt; in fact, I didn’t have a bolt, but a small (M6) pin with a slot. I unscrewed it and replaced it with a bolt. And it was located on the side of the bearing. Remember the warnings [Dachnika]: when the bearing is close to filling, the cuffs become slightly “full”. At this moment you need to stop. I don’t know how it is for anyone, but so much grease went into my bearing that there is no doubt - it was almost dry there. The best lubricant is CV joint 4 with molybdenum disulfide.
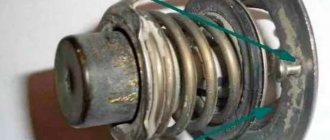
Which thermostat is suitable for a 3 liter engine?
I took it from the Volgov section. TS-107 (TS-108 is possible). Before installation, I advise you to boil it in a saucepan with a thermometer and watch the process. If the opening temperature of the standard thermostat (when tested in a saucepan) is normal, but the car does not warm up well, etc., you need to insert a gasket between the thermostat and the seat. It often happens that the thermostat comes out of its seat - as a result, there is a hole and there is no thermostat at all. Volgovsky is inserted only into an engine with a new type of pump.
Thermostat replacement without modifications for 2.5 l. engine
1) The temperature can be changed within certain limits by turning out the “regulating pin”. But it is sealed and to turn it inside out it must be heated with a soldering iron. It is located at the “top” of the bell. If the solder does not want to melt, you can remove the main part of the tin with a file or knife. Then unscrew the screw with a screwdriver - it will work easily. It is also not necessary to solder it - you can secure it with a nut or, better yet, with wire. 2) Insert another thermostat into the standard “bell”, throwing out the filling. The choice is wide - Volgovsky (80-82 g), from AZLK with Renault (90 g) - any to choose from. But here you will need to do a little work in a mechanic shop (about an hour). An old thermostat will be very useful - you can make it in advance and then replace it in 10 minutes.
I'm in a 2.5 liter engine
I installed the Volgovsky thermostat, having first sawed off the second locking washer (after which it began to differ little from the UAZ one, only in the absence of a skirt). Placed it upside down. We sealed everything with sealant and installed it. The thermostat, however, was turned up to the limit. Now it stays at 80 degrees. If you put the Volgov vehicle upside down (into the standard UAZ pump), then it will not work as expected, because the thermocouple of the vehicle is not immersed in the coolant. (the part where the spring is should be placed inside the pump). First, the engine heats up more than normal, then abruptly returns to normal. In this position, the thermoelement is not washed by hot liquid, but is heated only by the liquid that passes through the small hole. Once it warms up, the thermostat opens and then works normally. If the hole becomes clogged, the thermostat may open too late. The hole itself was originally intended to allow air to escape when filling the system. And the rivet dangles in the hole and does not allow dirt.
First, I removed the original thermostat and studied the device. I don’t remember the brand, but it said 70 degrees (my temperature never rose above 60). I also found an M5 adjusting screw with a locking nut and sealed. Out of curiosity, I unsoldered (unlocked) the screw, put a saucepan of water on the stove, stuck a thermometer in there and began to experiment. Results: 1. With the screw completely screwed in, the opening temperature is 60 degrees. 2. With the screw completely UNLOCKED, the opening temperature is 90 degrees. 3. Full opening stroke - approximately 15 degrees. by temperature and 5 mm. in height (with a diameter of 50 mm.). In short, this screw linearly shifts the initial temperature without changing the slope of the opening characteristic. I unscrewed this screw almost completely, put everything in place - the temperature became 80 degrees. All this is done in 15 minutes. The only argument in favor of a non-native thermostat I see is only if you use a thermostat with a steeper characteristic.
Installing a Volgov thermostat under an old-style pump
The experiment on converting the standard UAZ vehicle (70 degrees) (for an old-style pump) to a temperature of 80 degrees has been successfully completed! The idea for the remodel was given to me by Chief. The task was to combine the body of the UAZ vehicle with the guts of the Volgov vehicle. This is done like this: Both vehicles are disassembled by riveting 4 (Volgovsky TS) legs of the bracket for fastening the working spring of the vehicle, and unsoldering the same 4 legs (UAZkin TS), the same bracket. After which, the vehicle itself is interchanged (i.e., a valve with a plate that blocks the coolant path), i.e., instead of the UAZ valve, a Volgovsky one is installed, but do not forget to cut off the threaded part of the fastening of the second valve on the Volgovsky vehicle, otherwise it will interfere with the operation of the vehicle on the engine! After which, everything is assembled in the reverse order and the riveting points are soldered! (The assembly is most conveniently done using a large clamp, or a vice, so that it would be possible to compress the rather powerful spring of the vehicle, and it is most convenient to solder not with a soldering iron, but with a hair dryer !) As a result of the alteration and subsequent sea trials, the opening temperature of the vehicle became 80-82 degrees, instead of 70! Thus, the required engine temperature was achieved without loss of reliability and the use of extra pipes (unlike the VAZ vehicle).
A set of measures to bring the temperature back to normal
I tried a lot, but I got rid of the high fever after doing the following:
- Instead of the Orenburg thin one, I installed a normal new 10L radiator (regular Volgovsky, Gazovsky).
- I replaced the double-strand pump pulley with a single-strand gazelle pulley:
- a) spins faster - better circulation
- b) the “forced” fan works perfectly, in the sense of fast.
- I installed an electric fan from 3110/402 - but it is needed ONLY when standing in traffic jams for a long time at +35. It is turned on from the passenger compartment, but now simple units have appeared on sale that turn on an electric fan from a standard dial gauge for the antifreeze temperature when the required temperature is reached.
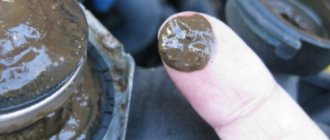
Blown head gasket?!
There is the following situation. Carb. 151-U, engine. 3L, mileage currently 23,000.
- Some time ago, antifreeze began to “disappear,” especially after overnight stops. No drips or puddles were noticed... ~ 3-4 liters in 2-3 days.
- in the radiator and extension small drops of oil in the reservoir (VERY thin film, not even noticeable)
- When warming up, thick white smoke pours out for ~ 1 minute, which gradually disappears as the engine warms up. If you start the car while it has not cooled down (for example, after refueling), then a LARGE clot of white smoke bursts out at once, like a smoke screen
- A thick layer of emulsion, ~1cm thick, was found on the back of the valve cover. It is not found anywhere else (i.e. below), the oil itself (including on the rocker arm) is as clean as TEARS
- the engine runs smoothly, without interruptions at any frequency and calmly holds at 250-300 rpm.
How can antifreeze flow in such quantities into the exhaust? The gasket has nothing to do with it - it only separates the oil from the antifreeze (if antifreeze in such quantities were poured directly into the combustion chamber, then INSTANT destruction of the piston would inevitably occur as a result of hydraulic shock. Judging by the fact that the engine starts normally and it just works). Consequently, DIRECT penetration takes place, and this could be. only a BIG crack in the jacket near the head exhaust ports, or a guide bushing on one of the exhaust valves popping out. In this case, when the engine is running, there should be A LOT OF GAS EVALUATION IN THE EXTENSION. IN THE TANK AND IN THE RADIATOR. If THIS is there, remove the head and check the bushings. And if they are fine, look for a crack and change the head. I changed the cylinder head - cylinder 4 was completely filled with water (antifreeze). The head turned out to be “broken,” or rather, at the factory, before installation on my engine, it was strongly poked in 2 places with something like a 1/2″ pipe (semicircular potholes)… In one place, a pothole connected the cylinder and the oil (?) channel in the head. The gasket lasted 20 thousand - antifreeze into the cylinder and out of it into the exhaust. Disassembly took 2 hours, searching for a new head - 4.5 hours, assembly and valve adjustment - 4 hours. All work was carried out together. It would have been assembled faster if the stud driver had been caught with a hardened head - I had to turn the studs with a gas wrench and tighten them with two nuts. Using a special tool - a piece of “L”-shaped fittings with a long “leg” of about a meter and the end “squared” under the head - unscrew the “rear” nut of the intake pipe.
Why does antifreeze escape when a warm engine is stopped?
1. The engine as a whole operates at too high a temperature, and when stopped (when the pump stops working), the stored thermal energy overheats the coolant. Carefully check the thermostat to see if it is sticking. 2. The coolant level in the cooling jacket and radiator is low - when the pump is running, the coolant still circulates somewhat under pressure, but when stopped, it stops (usually with a normal coolant level and the pump not working on a hot engine, convection movement of the coolant through the radiator).
How to clean the radiator of a UAZ car?
1. Pressure wash the outside of the radiator. This can be done at almost any car wash. 2. Remove the radiator and take it to the nearest taxi depot. There, for little money, they will wash it under high pressure, solder all the holes, check (by pressure) and solder the weak points (they will turn into holes when checked). 1. Remove the radiator and pour in a 10% strained caustic soda solution heated to 90 degrees; 2. After 30 minutes, drain the solution; 3. Rinse the radiator for 30-40 minutes with a stream of hot water under good pressure in the direction opposite to the coolant circulation.
How and with what to solder a radiator?
All kinds of dry additives (from mustard to imported products) to eliminate radiator leaks can only be used as a temporary measure and after use it is necessary to flush the system. The radiator will still leak over time, and these additives add to the scale and clog the thinnest places in the cooling system, usually the stove radiator. What this leads to is clear - the driver turns into a penguin. So it’s better to solder before the frost hits!
Construction hair dryer + soldering iron + tin + flux + hands! Since no epoxies, cold welds, sealants, etc. hold, they fall off when shaking. My purely personal opinion is that it is a blowtorch, since a soldering iron, even a 200-watt one, does not warm up the radiator very well.
Hard-to-reach places are repaired with a torch, but not an air one, but an oxygen one, with a thin hot flame that penetrates inside and melts atm solder (copper!!!!) without any soldering irons. The cost of the process is close to zero; solder is sold in any store with copper water pipes. Unlike soft (tin) solders, it not only sticks, but actually welds to the main body of the tubes and tanks, including on power parts (this is how I solder the radiator mounting ears that are always weak and break off on all the goats).
Is there a leak in the seam of the top tank? This is a very common defect. My “native” radiator was not soldered at all. For sealing it is better to remove the radiator, but you can do it by car. Drain a little coolant so that the tank is empty. Clean the seam thoroughly to remove any solder or metal. Then you treat everything with flux (I used a ready-made one like ZIL-3), put a tin rod and heat it with an industrial hair dryer or a small burner. Warm up the seam well, otherwise there will be fistulas. The solder should also spread along the walls - if it does not “stick” to the wall, scrape it (clean it) and add more flux. If it leaks under the side amplifier, it will have to be unsoldered from the top of the tank, bent so that it does not interfere with access to the seam. After soldering the seam, solder it back. In general, there is nothing particularly difficult, the main thing is not to rush and do it carefully. Another piece of advice: don’t heat one place for too long, otherwise you might unsolder the tubes.
What can you do if the radiator is broken on the road?
It so happened that on Saturday I climbed into one remote place. During one of the maneuvers, a loud crash was heard and steam began to pour out from under the hood. Opening the hood revealed that one of the fan blades was broken (it was a plastic one from a GAZ 3307). Remnants of antifreeze were gushing out from the bottom of the radiator. There was nowhere to wait for help. After stopping the engine, an attempt was made to add water (well, like driving while adding it). However, as in the problem about the pool, as much of it poured in, the same amount came out, and instantly (further removal of the radiator showed that about 10-15 tubes were “cut off” by the blade). After some thought, 2 solutions were found: 1) turn off both radiator pipes and drive on the stove. 2) create a vacuum in the cooling system, thereby preventing water from spilling out.
The 2nd one was chosen as faster. To do this, the hose from the vacuum tank was connected to the radiator steam pipe. I placed a thick wire under the radiator cap valve - thereby connecting the steam pipe directly to the cooling system (without a valve). I removed the top hose from the radiator and sealed the radiator hole with tape. He started the engine and began to pour water through the hose to the upper radiator pipe. The thermostat created some difficulty - water was poured in slowly until the engine warmed up. Having filled the hose to the top, I quickly removed the tape and placed it on the radiator pipe. The water practically did not flow - the vacuum was enough to “hold” it. Because The radiator tank was not filled to the top; water could not get into the engine. Thus, without turning off the engine, smoothly accelerating (to maintain a constant vacuum in the intake manifold and, therefore, in the cooling system), with the suction slightly extended (the mixture was lean!) I reached a habitable place where radiators for the UAZ were located (about 30 km ). The only negative is that it is difficult to brake without a booster. If the leak were smaller, it would be possible to get by with a hose for suctioning crankcase gases, which comes from the carburetor, instead of a vacuum booster. PS And the blade was bent due to a defect in the casting - porosity.
What kind of radiator is this: the top tank is twice as wide, the rest is the same?
This is an old style radiator. I have one like this. This has nothing to do with the expansion tank, since the radiator was generally designed to work only on water: the tube on which the hose leading to the expansion tank is usually pulled went to the very bottom of the radiator, i.e. it served to drain excess water and condensate So an expansion tank for antifreeze is still needed.
Replacing the standard impeller with a lighter one
The first time I changed it to Kozelevaya, it has a slightly smaller diameter, but there has never been overheating, now there is a GAZonovskaya-plastic one, with it you either need to remove the diffuser (but then forget about the curve) or cut the blades to fit our diffuser) the only thing when installing like Kazelevaya, and Gazonovskaya, you will need longer impeller mounting bolts (1-1.5 cm), but you will definitely extend the life of the pump bearings because plastic is MUCH lighter than a “meat grinder”.
I installed the Volgov one. I walked a lot of kilometers, “Ladoga”, “Blady-Heavy” (there were enough fords). It's worth it, I haven't lost any blades. Due to the fact that there are 6 of them, the airflow is better IMHO. I selected it this way - there were several Volgovsky ones in the store, all different in both the length of the blades and the diameter of the hub. I chose so that the blades did not touch the casing, and the hub as little as possible. I installed it on standard bolts, but it’s better to be slightly longer (the impeller is thicker). A plastic 6-blade one from a GAZ-53 is suitable, just trim the blades by 1.5 cm and install it calmly. But keep in mind that its productivity is one and a half to two times greater than that of the standard one, and accordingly in winter you will warm up for a long time.
To prevent the iron fan in water from damaging the radiator
Just look at how it was done on a Ural truck and copy it. There won’t be any problems with the piece of hardware, let me explain, there are two circles of wire attached to the radiator on the fan side so that when the blades deflect in the water while the engine is running, they simply slide along the wire and there are no problems. Buy or make for pennies and no hassles with electric fans.
Modification of the expansion tank
On my car, the expansion tank was shaking, tearing off the paint on the mudguard with its lower part, and it also threatened to rub through. Tightening the fasteners had no effect; it turned out that they were not welded and were hanging loosely. Therefore, I moved the expansion tank to the right pillar of the radiator frame. It was necessary to drill two holes and secure the tank with M6 bolts.
Starting heater based on a blowtorch (for GAZ-51)
How to refill coolant correctly?
- The thermostat should be oriented so that the side drainage hole in it is located at the highest point from the ground. The thermostat is made of copper alloy ;). The upper part is its widest component and is made in the form of a ring. On the side of the ring, ~5 mm from the edge, there is a hole with a diameter of about 2 mm. When installing the thermostat in place, it allows you to orient it arbitrarily relative to the vertical axis. Considering that, due to the design of the engine, this vertical axis actually has an inclination, we orient the thermostat this way by rotating it. so that the hole is in its highest position relative to ground level.
- Open the stove tap completely.
- Fill the coolant almost to the top.
- We don't put a stopper. We start it and carefully look at the temperature gauge arrow. As soon as we reach 90 degrees, we immediately turn off the engine. We smoke for 10 minutes. Add coolant if necessary. About one and a half more liters should come in, if not, then go back to step 4. Usually 3-4 cycles are required.
- We do a complete warm-up test. At the same time, touch the upper radiator pipe; it should become hot, and the indicator will temporarily show a decrease in coolant temperature.
- We close the plug.
From the section “Maintenance of a new car” - how to refill coolant correctly?
Sign up for maintenance at an official UAZ dealer in Moscow
Disadvantages of the system
The standard system has only one plus - it works. The owners cannot say that it is impeccably reliable. It's all about the quality of spare parts. But all the other advantages that this system has can be safely written off as disadvantages. The 402nd motor has a too low-speed fan - its number of revolutions is strictly limited by the pump. To have enough of them, you need a large radiator. In winter, you have to close this radiator to prevent the engine from freezing. There are also problems with the operation of the heater. Without additional artificial pumping of antifreeze, there is no need to wait for heat.
All these problems can be solved by modernizing the cooling system 402 of the UAZ “Loaf” engine (replacing the radiator with a multi-section one, installing a second stove, and so on). Many owners modify it, increasing its efficiency.
So, we found out how the cooling system of the UAZ “Loaf” with the engine of the 409th and 402nd models works. The device is very simple, but the reliability of the system leaves much to be desired, as the owners say.