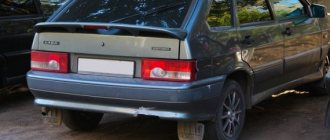
Domestic-made cars VAZ 2110 have long won the sympathy of our compatriots. Despite all the shortcomings that the “tens” have, these cars have become one of the most popular models of the Russian automobile industry. In VAZ 2110 cars, the window regulator (SP) is one of the most unreliable devices, which is due to frequent breakdowns of the SP in practice. You can learn more about the repair and replacement of joint ventures from this material.
Design features of window lifters "Tens"
What is the electric window circuit in the VAZ 2110, for what reasons does the engine or the SP control unit not work, how to replace it and how to connect the device? First, let's look at the design features of the joint venture, which may vary depending on which specific doors they are used in.
Despite these differences, joint ventures for the most part consist of identical elements; let’s look at the example of electrical systems:
- Gear motor or drive. Taking into account the electrical circuit, this device provides the signal necessary to raise the glass.
- Grooves. These constituent elements are located on the inner surface of the door frame. The main purpose of the grooves is to hold the glass in a certain position and prevent it from tilting.
- Rails. Rails are used as guide elements used to move glass. These components are installed in the door body.
- Lifting mechanism with gears.
- Seal. The rubber seal allows you to limit the movement of the glass up or down.
- Wiring. Its diagram may differ depending on the type of joint venture, but in any case, it is through wiring that signals are transmitted from the control unit to the gear motor.
- The control unit itself has buttons that transmit an impulse about the need to open or close the glass.
Separately, it is necessary to say about the drives - depending on the type of joint venture, the drives can be different:
- Mechanical type devices. Mechanical devices are structurally composed of ordinary elements, several gears and a handle. In order to move the glass to a certain position, the driver or passenger will have to turn this handle clockwise or counterclockwise. A load will be placed on the drive shaft, which will allow the glass to be raised or lowered.
- The drive can also be electric. An electrical device has a more complex structure compared to a mechanical one. The design of such a joint venture includes a gearbox, drum, control module, etc. As mentioned above, an electrical circuit is used to connect all components, which must always be in working order. Once connected, the system is controlled using the buttons on the unit.
It should be noted that the joint ventures themselves can be subdivided according to the types of the lifting mechanism itself. Cable mechanisms were the first to be used, but over time, due to multiple disadvantages, such as slow operation and low service life, they were replaced by rack and pinion mechanisms. Unlike cable ones, rack and pinion ones work much faster, but louder, and their service life is much longer due to the reliability of the design (the video was shot by Artem Aver).
DIY repair
Sometimes it turns out that it is not possible to purchase a new device, if the cable gets tangled, or the electric motor fails, then there is always the opportunity to repair it all with your own hands. Only obvious mechanical fracture of any part cannot be repaired.
If the electric motor fails, most likely your brushes or windings are simply clogged; just remove the motor, disassemble it and clean it carefully with an alcohol-soaked cloth or gasoline; you can buy special products (enough for more than one time). It is advisable to lubricate all mechanisms during disassembly.
When the cable flies off the mechanism, you should remove the entire mechanism, again remove the electric motor or unwind the cable itself if you have a mechanical one, carefully pull the cable into its place (grooves) and install it back.
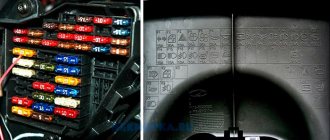
Often the fault is not in the window regulator itself; by studying the diagram below you will understand which wires go where, by calling them you can find the true cause.
I would like to add that repairs, as a rule, do not help for long; if it happens that your window regulator has failed, it is better to replace it, because all the parts have their wear and tear and are unlikely to serve you for a long time, but there are exceptions.
Possible malfunctions and ways to eliminate them
Now we suggest that you familiarize yourself with the causes of the main malfunctions that can occur in the operation of a joint venture. If there is a problem, the window regulators will either refuse to work at all, or will function incorrectly or be noisy.
Main causes of problems:
- Malfunctions in the operation of the electrical circuit, that is, wiring. If the wiring is damaged, the control motor of the joint venture will no longer receive a signal about the need to raise and lower, and accordingly, the operation of the joint venture will be impossible. The wiring may be damaged, in some cases the reason lies in insulation failure or oxidation of contacts. Damaged sections of the electrical circuit must be replaced, oxidized contacts must be cleaned or replaced.
- Inoperability of the gear motor. Electric motor failure usually occurs after several years of intensive use. If the unit fails, normal operation of the joint venture will be impossible, the drive must be repaired or replaced, here the specific nature of the breakdown must be taken into account.
- Damage to the control module with keys. If all the power windows do not work at once, then most likely the reason lies in the inoperability of the control unit. Perhaps the contact with the car's electrical network has been broken or the board itself has failed. The board itself must be replaced. If only one or more lifts do not function, then the reason may lie in poor contact of the control button with the network. Again, you need to get rid of the oxidation and reconnect the button.
- Mechanical wear of the gear. This problem is usually caused by long-term and intensive use of the joint venture; the gear teeth can be damaged as a result of wear. Repair is impractical; the gear must be replaced.
- The fuse responsible for the operation of the joint venture has blown. The fuse element may be located in the mounting block with all other fuses and relays. But if you installed the joint venture yourself, then the fuse may be located next to the battery. A failed device must be replaced (the author of the video is the V Village Life channel).
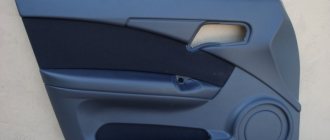
Removing the decorative door trim of a VAZ 2110
Before directly repairing the window regulator, you will need to remove the decorative door trim, for which it is recommended to follow the following sequence of actions:
- 1. Unscrew the lower door pocket, held in place by three self-tapping screws, and remove it from the grooves;
- 2. If a speaker is attached behind the panel, unscrew it too and disconnect the power terminal block;
- 3. The VAZ door handle is secured with two self-tapping screws hidden under a removable trim;
- 4. Unscrew the door latch. Now the plastic decorative trim of the VAZ door is held in place only by latches around the perimeter, which we consistently undermine.
At this point, the first stage of door disassembly can be considered completed.
The process of dismantling and replacing the device
If you decide to repair the front or rear SPs or replace them, then you will probably know how to remove the device. The procedure for removing and connecting a new window regulator may vary. It all depends on the type of joint venture, as well as the design features of the car.
Let's consider the process of replacing a manual SP with an electric one:
- First, the ignition is turned off and the car battery is disconnected; this must be done in order to de-energize the on-board network.
- Then the control handle located on the car door is removed. To dismantle the handle, remove the stopper located under the special washer - all these components are located on the handle itself. Using a flat-head screwdriver, you will need to move the latch to the side and remove the locking element from the slot. These steps will allow you to dismantle the handle. If this element is installed tightly enough, then try prying it off with a screwdriver.
- After this, the armrest handle is dismantled. Using screwdrivers, remove the plugs - behind them there are screws that secure the handle. They are unscrewed with a Phillips-blade screwdriver. To make things easier, you can also remove the handle trim on the side rearview mirror. After completing these steps, you will need to remove the door trim. At this point, the preparatory stage can be considered complete.
- Next, in order to electrically install the motor, control unit and other components of the joint venture, you will need to gain access to the latches. These components are used to attach the device itself to the glass. The device is fixed with two screws; they can be unscrewed with a wrench.
- When these steps are completed, you will need to remove the glass or fix it in one position with tape. It is necessary to disconnect the socket from the slot and unscrew the nuts using a wrench; this will allow you to dismantle the old SP mechanism. To install a new system, you will need to connect the block with wiring to the plug on the mounting block. In this case, it must be connected to the back of the fuse box.
- Next, the devices themselves are installed directly with an electric motor, control module, lifting mechanism and other components. First, all the components must be installed in the car door. When the fastening studs in the frame are installed, the nuts that secure them will need to be completely tightened. When installing, be sure to use the instructions that come with the kit, as well as the connection diagram. The latter will be required to properly connect the connector with the wiring.
- When all the elements of the electrical circuit are connected, it is necessary to connect the battery terminals and diagnose the performance of the joint venture. To do this, you will need to close the contacts on the wires.
- Then the central module with buttons is installed. This device must be installed either in the doors, or on the center console, or on the tunnel that runs from the console to the rear seats. The last option is more preferable.
- Now you need to lower the mechanism with the electric motor until you see that the mounting holes of the holder coincide with the technological holes in the mount. This clip must be bolted.
- Using the control keys on the central unit, you will need to make sure whether the joint ventures are working correctly and whether there are any problems with their operation. If no errors were made during the work and all actions were performed correctly, the window regulators will work correctly. If you make mistakes, you may encounter performance problems. At the final stage, you will need to assemble the door and install the trim in place. In the place where the handle for raising and lowering the glass was located, you will need to install a plug.
Photo gallery “Installation of electrical joint ventures”
Choice of window regulators
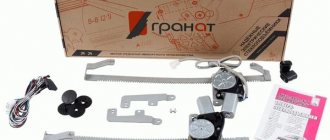
Turn the block over and carefully install the block Ш1 of the harness that was prepared earlier into the desired connector. The simplest and cheapest kit includes only an electric motor with a gearbox.
But the quality of workmanship and resource are very high.
Its design is similar to that of the windshield wiper gearmotor.
If the power supply circuit is broken, you need to find a place and then restore it.
Turn the block over and carefully install the block Ш1 of the harness that was prepared earlier into the desired connector. There are 2 wires coming from the closer and they are constantly closed in it.
Now, in order to close the window, you have to reinsert the key into the ignition... I think you are all familiar with this situation.
They are considered the most suitable and are the most reliable. If voltage is applied to the winding, then contact 30 is disconnected from contact 88 and connected to the contact how to connect a VAZ window lifter
Read additionally: Who does the energy passport of an enterprise?
What can be useful when installing an ESP?
First of all, you need to purchase a set of various devices, including: controls and an actuator. You should decide in advance on the choice of window lifters, their quantity and price. Naturally, if you choose better and more efficient lifts, the price will be significantly higher.
Conventionally, the following types of electric windows can be distinguished:
- Slat window lifters are among the most reliable. In addition, they have high operating speed and minimal noise levels during the process of lowering and raising the glass. Their only drawback can be considered only the high cost of the kits.
- Rope devices are the lowest level in the line of window regulators, as they have lower characteristics. However, their cost and ease of installation significantly outweigh their disadvantages.
- Rack and pinion electric windows include the disadvantages and advantages of other types of devices, and therefore are a connecting link between them. That is why many drivers make their choice in favor of the rack.
Once you have decided on the type of window lifters you want, you need to decide on the manufacturer. To do this, you can use various tests and reviews, of which there are quite a lot on the Internet. Differences in design also have a big impact on the installation process, as many vehicles are already equipped with mounting hardware to install the appropriate devices, while others will need modifications to the inside of the door. However, redesigning the fastening parts does not seem difficult.
A further choice will be the number of window lifters. Typically, car enthusiasts limit themselves to two and install them only on the front doors of the car. You can also mount them on the rear doors.
Window lifter.RF › Blog › Replacing the rear right electric window on a LADA Priora
Our buyer Ivan Igorevich Fokin from Moscow sent his next photo report on replacing the rear electric window on a LADA Priora car as part of his participation in our promotion.
In our Lada Priora the problem occurred again, only the window regulator on the rear right door broke. It was decided to order a window lifter, but not as an assembly, as last time, but separately the mechanism itself without a gearmotor.
Electric window lift for VAZ-2110 rear right without gearmotor.
Tools: shaped screwdriver, star screwdriver, 10 socket, 22 socket, plastic tool, adhesive tape, electrical tape, scissors.
We unscrew the screws from the panels, only 3 pieces - red arrow.
Take a tool for plastic. We use it to pry the panels in the direction as indicated in the photo, and remove them to the side. Again, use this tool to remove the door panel, starting from the lower left corner, moving in a counterclockwise direction, and unfasten the panel clips. Having unfastened the panel with clips, lift it up, the panel is removed.
We remove all the insulation so that it does not interfere.
Unscrew the nuts - red arrow.
We lower the glass a little in order to remove the strip from the door body mounted on the bolts.
Raise the glass to its highest position and secure it with tape.
We remove the engine bolts and racks from their mounted places and pull out the old window regulator through the corner.
After we have pulled out the power window, unscrew the 4 screws and use a 22mm head to unscrew the bolt/nut with a rubber surface, removing the gear motor cover.
We “throw” the gear motor onto the new window lifter and tighten the bolt/nuts, after which we connect it to the chip and check its functionality. As a result, there are 4 screws left that are not used.
In the reverse order, we insert the window regulator and, first of all, install the engine on the bolts with the nuts. Perform subsequent manipulations strictly in reverse order.
Thank you, Ivan Igorevich, for another prepared photo report. We will transfer the promised prize to your mobile phone account.
Brief summary of the work done
Replacing a VAZ-2110 window regulator is completed in half an hour, and is classified as simple car mechanic work, which can be done independently.
Therefore, it is better to spend some time in the garage than to spend a considerable amount of money at a car repair shop. Moreover, every time you overcome difficulties and do new work, you feel like a real man. And it's worth a little effort.
When replacing a window regulator, please note that the model number 2110 and the seven-digit part number must be stamped on the window regulator. The last two digits of the part number indicate: 10 – right, 11 – left.