Every driver sooner or later faces the problem of incorrectly adjusted headlights located in front: after all, they limit the visibility distance and create a real threat to oncoming cars. In this situation, you will need to know how the headlights are adjusted. Now there are three different solutions to this problem: in a car workshop, using various devices, or adjusting the headlights yourself. There are reasons why it is better to entrust this process to specialists: the “artisanal” nature of this method, as well as inaccurate compliance with all the requirements established for passing a technical inspection.
It is worth remembering that both high beam headlight adjustment and low beam headlight adjustment are necessary. The cost of adjusting the headlights is not a very expensive process, but if you decide to do it yourself, then first you should check the condition of the suspension springs, the difference in tire sizes, their pressure, etc. After all, each of these parameters can set the wrong adjustment angle, which can affect the quality of the adjustment.
Different manufacturers, one way or another, announce the conditions under which the headlights of a car should be adjusted. As a rule, the car must be filled to 1/2 tank, and also loaded in a certain way. It happens that due to a defect in the lamp itself, it is impossible to achieve the correct adjustment.
Checking and adjusting headlights
It is also worth knowing that light lamps come in two types: separate or with combined low and high beams . In the first, the headlights are adjusted separately for the low beam and the high beam. In the second case, you only need to adjust the low beam, and the high beam will adjust itself automatically.
Checking and adjusting the headlights will require:
- vertical and flat wall;
- a flat, horizontal section in front of this wall, 7-8 meters long;
- some material for marking the screen (some kind of adhesive tape).
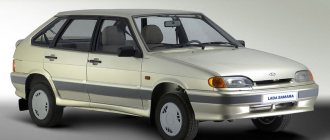
In order for a car to be driven not only during daylight hours, but also at night, it must always have working headlights. And they are not just serviceable, but correctly adjusted, which is very important for overall traffic safety on the road. Below we will study in detail the question of how to adjust the headlights on a VAZ-2114 and why this needs to be done.
- Is adjustment necessary?
- What to do before starting the adjustment
- How to adjust headlights on a VAZ-2114
- Description of the adjustment process
- Why is light control so important?
Is adjustment necessary?
Adjusting the VAZ-2114 headlights is not always mandatory. After all, if you become the owner of a completely new car, then its headlights will be perfectly adjusted at the factory, which was done not without the participation of the designers. However, there are a number of situations in which it is simply impossible to do without improving the headlights of the VAZ-2114:
• if a used car was purchased, on which the former owner adjusted the headlights himself;
• if the headlights have been damaged and have been replaced;
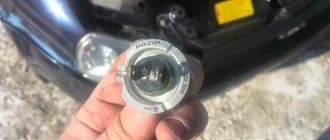
• if the car owner decides to replace the headlight bulbs (especially if a different type of bulb is installed);
Important! Particular attention should be paid to adjusting the headlights if you have installed xenon lamps. The fact is that the light of such headlights can greatly dazzle oncoming drivers, and if you do not take the necessary measures, you may become the culprit of an accident. If you happen to encounter the police, you may even be fined.
• if modifications were made to the front part of the car body, including the headlight mounting locations;
• if the car is operated for a long time without adjustment.
In all these cases, adjusting the headlights is mandatory, since without it, the illumination of the road surface will be of poor quality and can bring discomfort not only to the driver, but also to other road users. It is also worth understanding that when driving a car frequently, especially if you have to drive on rough country roads, the location of parts in the headlights may change, as a result of which the light becomes confused and its angle of inclination changes. As a result, the field of vision is significantly narrowed, making the driver feel very insecure on the road. For this reason, experts recommend adjusting the headlights on a VAZ every 2 months.
What to do before starting the adjustment
Setting up headlights on VAZ cars necessarily begins with checking their condition. It is especially important to assess their integrity, since if there is damage in the form of chips or cracks on the headlamp’s protective housing, adjusting their light is unlikely to lead to a positive result. It is worth understanding that if there is damage to the headlight, even a correctly set light will still provide poor illumination of the road surface, since the light will be refracted at each crack.
A similar situation occurs if there is dirt on the surface or inside the headlight - dust, sand and especially moisture (water ingress can even lead to a short circuit and failure of the entire electrical network of the car). Therefore, before adjusting the VAZ-2114 headlights, it is imperative to wash them. Moreover, it is necessary to wash not only the outside, but also the inside, for which you will have to disassemble the headlights. Make sure that after washing there are no soap stains left on their surface. Before assembly, the headlights must dry thoroughly.
The main goal of every adjustment made should be to ensure that the headlights illuminate the road directly in front of the vehicle. Headlights should not cast light on the surroundings, since the driver needs to concentrate on the level strip in front of his car while driving. It is also important that the stream of light from the headlights of your car should “spread” along the road, and not hit directly into the windshield of oncoming traffic, which can disorient drivers. At the same time, the car's light must provide maximum visibility so that you, as the driver of the car, can notice in time all obstacles moving ahead.
How to adjust headlights on a VAZ-2114
Not all experienced car enthusiasts know how headlight adjustment works on VAZ cars. After all, although this task is relatively simple, its implementation on each car may involve different manipulations. In particular, there are three ways in which you can improve the light of the VAZ-2114 headlights:
We recommend: What does the Priora steering wheel hide?
• Contacting a specialized car service center, where the work is performed by trained workers and will be able to give you a guarantee for it.
• Use of special equipment for adjustment.
• With your own hands at home.
We are, of course, interested in the last option, which is quite effective and also free. For VAZ-2114 cars it fits perfectly, since on this model the auto adjustment is carried out using special screws. By rotating these screws, you can change the direction of the light in both the horizontal and vertical planes. You will not need professional optical instruments, since to improve the light of the headlights on the VAZ-2114, you can use a screen drawn with your own hands.
Important! If you decide to start adjusting your headlights because they emit too dim light, first make sure that the reason for this is not the lamps installed in the headlights themselves. Dim light from the headlights will also occur if the car battery is discharged.
Description of the adjustment process
Before you begin the adjustment, you should find the most even wall in front of which you can install your car at a distance of exactly 5 meters. In this case, the surface on which the machine stands must be perfectly flat. Before starting the adjustment, it is also important to evenly inflate the wheels of the car and fill the tank to ensure the usual load of the car. Since you yourself will not be able to sit in the cabin during the adjustment, you need to place either a load in the region of 70-80 kg or your assistant in the driver’s seat.
Important! During work, set the headlight hydraulic adjustment knob to the “0” position.
Having placed the car in front of the wall, turn on the low beam and, using ordinary chalk and a ruler, draw a “screen” on the wall opposite the car, with which you can adjust the headlights:
1. First, one vertical line is drawn, which should correspond to the vertical axis of the car, that is, pass through its center.
2. On both sides of this line it is necessary to draw two more verticals, which, in turn, must correspond to the line of the headlights.
3. Also draw a horizontal line, the height of which should also correspond to the height of the car's lighting fixtures.
4. Go down 6.5 cm from the horizontal line and draw another horizontal line, thanks to which you can determine the centers of the light spots emitted by the headlights.
5. Next, you need to adjust each headlight one by one, while not forgetting to cover the headlight that is not involved in the work with a thick piece of cardboard. You need to adjust the headlights using the above-mentioned screws, tightening each of them in turn until the desired result is visible.
6. You can complete the work if you achieve the following result of the headlights:
• the upper limit of the light emitted by the headlights should coincide with the center horizontal axis (the line that we lowered 6.5 cm from the first horizontal axis we drew);
• those points at which the verticals and horizontals intersect on the screen we have drawn must coincide with the points at which the inclined and horizontal sections of the spots of light from the headlights intersect.
A car light with similar characteristics will be very convenient both for the driver and other road users, since it will not dazzle them. If you draw such a “screen” for adjusting the VAZ-2114 headlights, then you can check the correctness of their light literally every day, thanks to which you will always drive with excellent and safe light.
Why is light control so important?
Knowing how to improve the light on a VAZ-2114, it is also important to understand why this is all being done. After all, such a need is primarily dictated by road safety, which every driver and car owner should think about first.
It is worth understanding that if the light from the headlights scatters too much to the sides, then, firstly, its range will decrease, and it will be difficult for the driver to notice obstacles on the road - pedestrians or animals. Secondly, if the driver’s field of vision includes not only the road surface, but also the surrounding area, he will not be able to concentrate on the road. And since at night the headlights can create various light illusions, this can also lead to an accident. Similar inconveniences can be caused by too dim light from headlights.
Did you know? Today, there are special matrix headlights that are equipped with special sensors that can automatically respond to weather conditions and control the headlights. Although such lighting for a car is not suitable for all models and is very expensive, thanks to its installation the driver can forget about such a procedure as adjusting the headlights.
If the light from the headlights is sufficiently bright and distant, but it spreads very high above the road, this will cause inconvenience not only to the driver of the car, but also to other road users. The driver will feel discomfort when driving in rainy or foggy weather. In such situations, it is very important that the strip of light lies as low as possible on the road and shows the driver not only its direction, but also all possible irregularities. As for other drivers, due to the too high position and setting of the lighting on the car, they can be blinded even by low beams.
Thus, in no case should you ignore adjusting the headlights, since such a car function can not only help you out in a difficult situation, but also save your life.
Subscribe to our feeds on social networks such as Facebook, Vkontakte, Instagram, Pinterest, Yandex Zen, Twitter and Telegram: all the most interesting automotive events collected in one place.
As you know, car headlights play a big role when traveling, especially if you are traveling at night or in bad weather conditions, so you should pay special attention to adjusting the headlights.
How to identify problems with optics
It is quite easy to understand that the headlights are not adjusted correctly. The main features are:
- poor visibility of the road surface at night;
- when the low beam is turned on, a bright stripe appears above the hood;
- Oncoming cars honk when the lights are too bright.
We recommend: How to make a crankcase gas filter with your own hands?
Manufacturers install and configure optics in such a way that the lighting maximizes the view of the road. During operation, the installations get a little confused, and the equipment directs the light flux above or below the required level. Such situations happen due to poor road surfaces or after minor accidents when the front part of the car body is deformed.
Before you start adjusting the headlights with your own hands, you need to normalize and check the following car systems:
- Suspension elements (springs and shock absorbers) must be in good condition.
- Tire pressure should advise technical requirements and time of year.
- An incomplete tank of gasoline and no third-party cargo in the trunk so that there is no additional load on the suspension.
Rules for adjusting car headlights
Changing the direction of the axis of the light beam when adjusting the headlights is ensured by rotating the parabolic reflector, the focus of which is the light bulb, by moving it relative to the vertical and horizontal planes.
The correct position of the reflector is established by two vertical and horizontal adjustment screws, which are located on the rear surface of the headlight unit.
To correctly adjust the headlights, it is necessary to combine the light spot formed by the optics with the reference adjustment diagram, which is usually provided by the car manufacturer (in our case, the headlight adjustment diagram for Tavria and Slavuta cars).
Car headlight adjustment diagram
The headlights are adjusted in the following order:
- An unloaded car is placed on a flat horizontal platform at a distance of 5 meters from the screen. Any wall or low fence (up to one meter) is quite suitable as a screen.
- A vertical line “0” is applied to the screen, lying in the plane of symmetry of the machine (look at the adjustment diagram). To the left and right of it, two more symmetrical lines “L” and “R” are drawn, which should coincide with the centers of the left and right headlights.
- At a height corresponding to the distance of the centers of the headlights from the ground, a horizontal line “1” is applied, and a line “2” is applied 50 mm below it.
- When the preparation is complete, turn on the low beam headlights and begin adjusting.
- Closing each headlight in turn, check the location of the light border relative to the adjustment diagram printed on the screen. It should run along line “2”, with the inclined segments starting at points “E”.
- If this does not happen, then you should adjust the headlights using the horizontal and vertical adjustment screws.
The process of adjusting the headlights is shown more clearly in the video below. However, even if after adjustment you still do not have enough illumination of the road, perhaps polishing the headlights will help correct the situation.
First adjustment method
VAZ 2114 cars are equipped with a standard headlight unit, which is simultaneously responsible for high and low beam. Therefore, it is enough to adjust the low beam - the high beam will automatically return to the correct position. The fog lights are adjusted separately.
The setup procedure follows the following principle:
- Drive the car onto the found horizontal surface that was chosen for setting up the lights.
- Stop the car directly in front of the wall.
- Using chalk, make marks on the wall that will correspond to the center point of the car and the centers of the lights.
- Mark the distance from the ground to each headlight.
- Mark the distance from the center axis of the car to each of the headlights.
- Draw a line five centimeters below.
Adjusting the headlights using the wall
- Next you need to drive away and stop at a distance of 7.5 m from the wall.
- Connect the points of the centers of the lanterns in the drawing with one straight line.
- Draw a pair of vertical lines through the same centers;
- Draw a line parallel to the ground through the center point of the machine.
- At this point, the drawing is considered complete - turn on the headlights close to you.
- The angle of inclination of the lanterns should coincide with the horizontal line, and the beginning where the border of the light will rise should be aligned with the intersection of the lines.
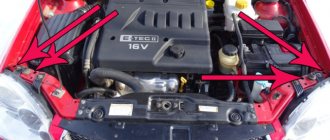
- Adjust the headlights by turning a pair of screws - you will find them on the rear panel in the engine compartment. The beam should be located slightly below the headlight point designation on the drawing.
Step-by-step setup procedure
- First of all, we place the car as close to the wall as possible.
- Then we mark a point on the wall so that a conventional line passing through it divides the car exactly in half.
- Next, draw a straight vertical line through this point, thereby indicating the central axis.
- The next step will be to mark two more parallel lines, on the left and right sides of the central one, at a distance of 4 meters 82 cm .
- Then measure the distance from the headlight to the surface of the roadway and mark the result on all vertical lines by sketching the horizontal one.
Thus, the screen can be considered ready.
The procedure for adjusting the headlights on a VAZ-2114
- Before you start making adjustments, drive the car at least 5 meters from the wall and place an assistant in the driver’s seat (this will simulate the presence of the driver in place - approx.).
- Then, in the cabin, turn the hydraulic corrector lever and turn on the low beam.
- Further, under the hood, next to the headlights, you will notice two adjustment screws, allowing you to make adjustments in both the horizontal and vertical planes. When checking, do not forget to cover each headlight one by one with thick cardboard.
Two headlight adjustment screws
Upon completion of work, the light from the adjusted headlights should not go beyond the horizontal line, and at the edges it should touch the vertical lines at the intersection of the light circles.
This is what it should look like after adjustment.
Requirements of legislative documents
The design features of fog lights are regulated by several laws. The most important of them are:
- Traffic Laws;
- UNECE Regulations;
- GOST 8769-75.
These documents indicate the following basic requirements regarding the settings of fog lights.
- Optical devices must be installed on the vehicle at a height of more than 250 mm from the road surface.
- The maximum distance from the fog lamp to the external dimensions of the vehicle should not exceed 400 mm.
The following requirements are imposed on the light beam:
- the beam should be directed downwards, and its upper boundary should have a clear outline;
- The horizontal dispersion angle should not exceed 700.
Therefore, the fog lights are adjusted taking into account these parameters that affect driving safety.
The rules also define the mode of use of fog lights. These are conditions of limited (sharp turns, mountain serpentines) and insufficient (fog, snow, rain) visibility.
Instructions for adjusting VAZ 2114 headlights with your own hands
Creating an improvised screen
When all the requirements described above are met, find a flat wall with sufficient space in front of it. It is most convenient to use the wall of your garage, but only if the road in front of it is strictly perpendicular to it; if not, it is better to look for another wall, maybe a concrete fence.
So, let’s say you have a wall and a free area of at least 8 meters in front of it, which are strictly perpendicular to each other. Arm yourself with duct tape or chalk and mark this wall to create a makeshift screen for adjustment.
How?
- Drive the car close to the wall and mark a point on the wall so that a line drawn through it divides your car in half. Draw a vertical line through this point on the wall. This will be the central axis.
- Next, at a distance of 482 cm in both directions, lay down one more vertical line, parallel to the existing one.
- Next, measure the distance from the center of the headlight to the ground and mark it on all three verticals. Draw a horizontal line through the obtained points. And then another one - 65 cm lower than this one.
The screen is ready.
Main stage
Drive the car to a distance of about 5 meters from the wall. Have a helper sit behind the wheel or place a replacement bag on the seat. Turn the headlight hydraulic adjustment wheel to the “driver, front passenger” position. Turn on the low beam switch. Covering each of the headlights in turn with a dense material that does not transmit light, adjust their glow on the screen using the horizontal and vertical plane adjustment screws, which you will find on the sides of the upper side of the headlight protective casing by opening the hood.
As a result, your headlights should shine so that:
- the upper boundary of the light spots did not extend beyond the upper horizontal line;
- the extreme verticals passed through the intersections of the inclined and horizontal sections of the light circles.
Adjustment process
First of all, you need to cover the light of one of the headlights so that it does not interfere. To do this, it will be convenient to use a dark fabric or, for example, a jacket.
Next, you will need to open the hood and find the screws responsible for the position of the lighting fixtures. The upper left one is responsible for the vertical movement of the lantern, the right one is responsible for the horizontal movement, respectively.
There are three more screws located at the bottom - it is better not to touch them.
By turning the knobs manually, adjust the headlights according to the pattern previously drawn on the wall, so that the center of the light spot falls at the intersection of the upper horizontal side and vertical lines.
After this, the entire procedure is repeated with another headlight.
Setting the fog lights
Adjusting the fog lights involves several steps:
- vehicle preparation;
- drawing up a diagram;
- adjustment.
The preparatory steps are no different from the actions performed before adjusting the main headlights. The fog lights should be clean, the tires should be inflated, and the trunk should be empty.
When setting up fog lights, you should use a special diagram that you create yourself. This requires:
- Place the car at a distance of 5-10 meters from the wall.
- Measure the height of the center of the headlight and mark it with a line on the diagram.
- Transfer the marks of the center of the car and the fog lamps to the wall.
- Draw a line 10-12 centimeters below the height mark of the fog lights.
To adjust the optics, you need to turn the screw until the beam reaches the level marked on the plan. If the headlight cannot be adjusted, you should clean the bolt head and inspect it for souring. You can use WD-40 aerosol to lubricate the parts. If the bolt rotates but the reflector remains in place, you will need to dismantle the fog lamp and check the integrity of the mechanism.
Correct adjustment of headlights on a VAZ 2114
Adjusting the headlights on the VAZ 2114 is done by rotating screws that adjust the vertical and horizontal planes and the optical element located in them. For more precise adjustment, mobile optical devices are used; if they are not available, the adjustment is made using the screen.
To adjust, you need to place a fully fueled car with a load on the driver's seat of 750 N (75 kg), on an absolutely equal surface in front of a wall or in front of a screen. The axis of the car should be at an angle of 90 degrees with respect to the wall. You also need to completely check the car - the tire pressure is normal, the springs should be installed (to do this, just rock the car from the side).
Once the car is fully tuned, we move on to setting up the screen. Draw two vertical lines O (axial), A and B - the lines should pass through point E, which corresponds to the center of the headlight. Lines O, A and B must be absolutely symmetrical to the center line of the car.
You need to draw two horizontal lines: line No. 1 corresponds to the distance from the floor to the center of the headlights, and draw line No. 2
If you have a hydraulic corrector, then you need to install it on the instrument panel in a position corresponding to the position of the car when loaded by one driver.
Everything is set up, let's move on to adjustments. Consistently turn on the low beam , first the right headlight (cover the left one with cardboard), then turn on the left one (the right one is closed), adjust the light beams with screws until the top point of the light beams coincides with line No. 2, and the points of the horizontal light beams coincide with points E. If this advice helped you, we recommend that you familiarize yourself with the electric power steering on the VAZ, which will be useful for the driver.
Second adjustment method
To configure the lighting sources using the second method, you will need the same platform, wall and chalk. Pre-prepare the car:
- inflate tires evenly;
- check how well the suspension is;
- distribute the load evenly across all wheels;
- Fill the tank completely with fuel.
Adjusting headlights at a service station
Then proceed according to the following scheme:
- Mark the spots on the wall that define the centers of both headlights.
- Lay a line through them.
- Below, 12 centimeters, draw a segment parallel to the first.
- Set the light control to o.
- By controlling a pair of adjustment screws, we adjust the beam to such a position that its upper limit is very close to the lower line.
- The lateral border of the beam is located at the intersection of the lower straight line and the vertical axis of the lantern.
Setting up fog lights on VAZ 2114 and 2115
Do-it-yourself headlight adjustment technology
The adjustment must be carried out on a flat surface without tilting. The test screen can be installed at a distance of 5-6 meters. If you don't have a screen, you can use a flat brick wall, a garage door, or a large sheet of plywood. Headlight glasses must be clean, without cracks or chips. Also pay attention to the condition of the reflectors.
The design of optical devices has two adjustment screws, one of which directs the light beam in a vertical position, and the other in a horizontal position. With their help, we make adjustments as indicated in the diagram.
The headlight beam should be directed by the adjusting screw to point E
For convenience, we draw vertical lines A, O and B on the wall with chalk. They will serve as the necessary guidelines when adjusting the optics. We also draw horizontal lines 1 and 2. The distance between them should be 65 centimeters.
Next, we go into the interior and set the headlight hydrocorrector control to position 0. This is necessary to eliminate the influence of the device on the luminous flux during adjustment. The regulator is located under the dashboard, to the right of the steering wheel.
The procedure is as follows:
- We cover one headlight with dense material that does not transmit light.
- We turn on the near one.
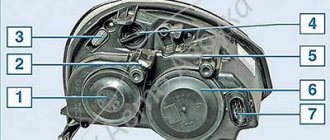
- Open the hood and find the regulators on the back side of the headlight (in the figure below, numbered 1 and 2). One of them responds to the vertical movement of the light beam, and the second to the horizontal movement.
- Using adjusting screws 1 and 2, we direct the beam of light to point E. We adjust the indicator to the desired value.
By turning the screws counterclockwise or clockwise, we position the beam of light at the desired point - We repeat the procedure, turning on the high beams.
- We carry out a similar adjustment for the other headlight.
Adjusting the headlights does not take much time, so in poor lighting, do not delay this procedure. When working, you should take the advice of experts. In this case, you can adjust the light beam as accurately as possible.
Preparing for adjustment
Of course, many may say that it is easier to adjust the external light by eye, but will this be correct?
In no case. It is with the help of a special scheme that this will be easiest to do. You will need to do the following:
- the car is installed on a flat, preferably asphalt or concrete area with the headlights facing the wall;
- the distance to it should be exactly five meters;
On the surface of the wall (or fence, fiberboard sheets, etc. are also suitable), three lines are drawn strictly vertically:
- one runs clearly through the center of the car’s hood and starts from the ground;
- the second - on the right side along the axis of the corresponding headlight;
- third - on the left;
- the distance between them should be 96.4 centimeters.
Next, horizontal lines are drawn:
- the first - strictly along the axis of the headlights;
- the second is 65 centimeters below her.
Their length should be sufficient to completely cover the illuminated area of the wall. It is also necessary to perform the following procedures before starting to adjust the lighting:
- see how well the wheels are inflated;
- thoroughly clean the headlight lenses from dirt;
- Fill the gas tank with fuel at least halfway (preferably completely);
- You should seat a friend whose weight matches yours behind the wheel;
- rock the car so that the suspension stabilizes.
And finally, all that remains is to set the hydraulic corrector handle to 0 (zero). This mark corresponds to the value “one person in the cabin”.
For those who are not in the know, the hydraulic corrector is controlled directly from the passenger compartment; the regulator is located to the left of the steering wheel, under the ventilation deflector grille.
Preparatory work
In order for the work on adjusting the headlights on the VAZ-2114 to be done as correctly as possible, and the results to be only positive, the following conditions must be met:
- Make sure that the tire pressure is as specified in the technical documentation of the car, that is, 1.8-2 atmospheres on each wheel.
- The car must be loaded as much as possible, that is, with a filled tank, spare tire, tools, etc.
Creating the right conditions for regulation
Marking the wall for adjustment
If you have fulfilled all the above conditions, then you can proceed to the next step, namely finding a flat wall and a platform in front of it. A garage wall or any concrete fence is ideal for this.
When the wall and the area in front of it have been found, all that remains is to draw markings on it, thereby creating a homemade screen; for this work we will need ordinary chalk.
How to prepare for work
Before adjusting the VAZ 2114 headlights, you will need to perform a number of preparatory operations. First of all, prepare the car - to do this, follow the following algorithm:
- Inflate the tires and make sure that the air pressure in them is the same.
- Check the condition of the suspension.
- Fill the fuel tank to the maximum.
- Make sure that the load on all four wheels is distributed evenly.
Make sure the air pressure in the tires is the same
What do you need to know?
In order to adjust the headlights in the VAZ 2114 or, as motorists also like to call this model, “Samara-2” as competently as possible, it is first necessary to ensure that the following conditions are met:
- The tire pressure should be as required by the operating instructions for your car;
- the car must be in running order, that is, its fuel tank must be more than half full, or better yet, full, the car must have a spare tire and a set of tools;
- If you will be setting up alone, without an assistant, take with you a bag of something heavy that weighs the same as you (for example, a bag of potatoes).
How to identify problems with optics
The need to adjust the light will be required in the following cases:
- lamps shine strongly up or down;
- the beam is shifted to one side;
- uneven brightness of headlights when inspecting the car;
- insufficient light intensity, a clear jackdaw is not visible;
- One of the headlights does not work.
The tuned optics of the VAZ 2114 or model 2115 cope perfectly with any weather conditions. To identify deficiencies, a visual inspection of the performance of the lamps should be carried out once a week, and adjustments should be made at least once a season.