1200 rub. for the photo report
We pay for photo reports on car repairs. Earnings from 10,000 rubles/month.
Write:
It will not be news to anyone that an incorrectly adjusted wheel alignment can lead not only to a deterioration in the quality of the tire, but also to an increase in fuel consumption. That is why it is worth approaching the camber alignment responsibly.
Setting up the wheel alignment on your own is not at all difficult, as it might seem at first. We will try to consider this issue in detail and give the best advice to new mechanics. Stabilization of a pair of steering wheels is the most important aspect that affects the stability of the car on the road. What does it mean? The wheels should move in a straight line and, bypassing the turn, return to their original position.
Following from this, the urgent need for the wheel stabilization procedure is explained very simply. When the car is moving, the wheels, which are not stabilized, move to the side as a result of shocks from the road. Then the driver must return the wheels to the desired (straight) position. Considering that this happens constantly, the person driving gets more tired. In addition, the steering contacts wear out faster. And with increasing speed, the growing instability becomes unsafe.
What determines the stabilization of steered wheels? The answer is simple: from their alignment or collapse. alignment can be adjusted in auto repair shops, but it is quite possible to solve this problem yourself .
The first thing to do is determine the need to adjust the camber.
Let's look at this point by point:
- Continuous movement of a car from a given course of straight-line movement in one direction or another.
- Uneven tire wear.
- When inspecting the front wheel tread groove along the axis of rotation, it is necessary to inspect the edges of this groove. The edges are the same - this means there is no cause for concern, but if one of them has some sharpness and the other does not, then you have a problem. But you should pay attention to this only when driving calmly. If you are a fan of fast speed, then this condition can be deceptive.
- Difficulty in controlling maneuvers. The presence of at least one of these symptoms indicates that it is necessary to install a wheel alignment. Drivers who have some experience in repairing cars with their own hands, if they really want to, can perform wheel alignment themselves.
How is wheel alignment adjusted?
For repairs you will need:
- ruler;
- chalk;
- standard set of tools;
- cord with a plumb line;
- flat area with a pit or lift.
First you need to find out how accurately the convergence was performed earlier. Those. Is the steering rack in a “zero” position during straight-line motion? How to do it? We follow further instructions: place the car on a flat surface. Then turn the steering wheel as far as possible in one direction, making a mark on the top of the steering wheel (in the middle of the circle) and turn the steering wheel all the way in the other direction. In this case, it is necessary to count the number of whole revolutions and parts of a whole circle (shares). When you have calculated, divide the resulting amount by 2 and turn the steering wheel to this position. If this result coincides with the usual position of the steering wheel, then the “zero” position of the rack is set. If not, you will have to do it yourself.
Advantages and disadvantages of plate installation
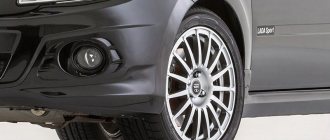
VAZ 2114 with negative camber
Negative camber for the VAZ 2114 has the following advantages:
- increased cornering stability;
- reduced tire wear during maneuvers.
And the only disadvantages are:
- the driver’s overconfidence in the car’s stability when cornering, which can lead to unforeseen situations.
How to set the “zero” position?
It is necessary to remove the steering wheel; to do this, unscrew the nut. Afterwards, fix it in the “zero” position we calculated (the steering wheel spokes should be positioned symmetrically). Now we will be guided by this position. In order to test yourself, you need to alternately rotate the steering wheel left/right - it should turn the same number of revolutions in both directions, so turn the wheel to the sides as far as possible, protecting them.
Next, you need to loosen the tie rod end lock nuts. One rod should be unscrewed a little, and the second should be tightened by the same number of revolutions (this is very important!). This procedure can be done once and no longer change the position of the steering wheel. And in the future - just adjust the convergence.
How to adjust wheel alignment?
After checking straightness, you need to check the degree of vehicle load, tire pressure, whether the suspension and steering mechanism are securely fastened. After this, you can proceed directly to checking and adjusting the toe.
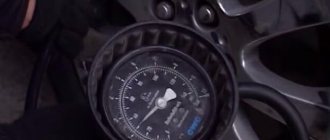
To determine the wheel toe level, you should calculate the difference between points on the rim in front and behind its geometry axis. To do this, you need to use a special chain with a ruler or a tension device.
To measure toe-in, a ruler is placed between the wheels so that the tips of the pipes rest against the side of the tires and the chains touch the ground. When you set the arrow to the zero position, the car should be rolled forward a little so that the ruler is behind the wheel axle. In this case, the arrow should show the level of convergence. If there is a discrepancy with the norm, it must be adjusted.
In order to adjust the toe-in of the wheels, you need to rotate the connecting couplings of the side steering rods. When this operation is carried out, the control nuts must be tightened securely.
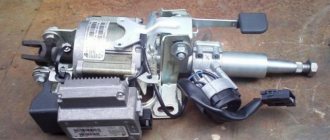
Malfunctions
The reasons for steering rack failure may be:
- spent resource;
- regular driving on uneven roads;
- sudden acceleration of the car with the steering wheel turned to its extreme position;
- mechanical damage due to wheels falling into deep holes or a traffic accident.
Symptoms of a failed steering rack:
- knocking in the area where the rack is located when turning the steering wheel;
- difficulty turning the steering wheel (“biting” or jamming);
- vibration and knocking while driving;
- increased steering play;
- violation of the wheel alignment angle (determined by uneven tire wear).
When to change the steering rack
The listed rack faults require immediate repair or replacement. If this is not done, the steering may fail at any time, putting the lives of the driver and passengers of the car at risk.
There are three options for troubleshooting the steering rack:
- adjustment (performed after a complete diagnosis if the rack does not require repair or replacement);
- repair (includes replacement of repair kit);
- replacement of the entire assembly (involves the installation of a new rack with or without rods).
If a faulty steering rack has a service life of more than 100 thousand km, a repair kit is not always able to change the situation for the better. In this case, it needs to be replaced.
Cost of steering rack and its replacement
The cost of a steering rack for a VAZ 2114 car ranges from 2300 to 3500 rubles. The average price for replacing it at a service station is 1,200 rubles.
The catalog number of the standard steering rack with rods for the VAZ 2114 is 2108-3400012 or 21080-3400120-00.
Adjusting the camber angle
The most difficult process is checking and adjusting wheel camber, but it can also be done on your own. To do this, the car is raised so that the wheels do not touch the ground. After this, you need to calculate the places of equal runout on the side parts of the tires. With the wheels in a straight line position, hang a weight next to the wheel. Marks are made with chalk around the circumference of the wheel at the top and bottom. Using a plumb line, calculate the distance from the rim to the cord.
The difference in distances between the weight thread and the top of the rim is the camber level. To accurately perform the procedure, roll the car so that the wheel turns 90. Repeat several times and write down the results.
Next, remove the car wheel and loosen the 2 bolts securing the shock absorber strut bracket to the steering knuckle. Then we move the steering knuckle inward or outward, in which direction and by what distance, depends on the results of your measurements. This is how you can set the required camber angle. After the procedure, you need to tighten the bolts, install the wheel and take measurements again.
When doing wheel alignment yourself, remember that it is necessary to take measurements several times (at least three), and then take the arithmetic average value. If the wheel alignment is adjusted correctly, the vehicle will not pull to the side when driving, and the tire tread will wear evenly.
The entire adjustment procedure is carried out again if, after the work has been carried out, the machine still “moves away” from the trajectory of straight-line motion. Uneven tire wear will also indicate improper camber or toe-in, so tire diagnostics will also be useful.
Carrying out such a difficult procedure on your own will save you a decent amount of money, but remember that for most modern cars, it is recommended to have an alignment performed at a car service center.
It can be said with great confidence that among experienced drivers who have just received a “driving license”, there are those who are hearing about this for the first time. For the majority of car owners who do not service and repair their “iron horses” themselves, there is no need to know about this. For those who like to tinker and look after their car themselves, this article may be useful.
Diagnostics and regulation
To identify discrepancies in the VAZ's wheel alignment, you will need to have a special ruler on hand, and it is better to drive the car into a pit. We check the location of the steering wheel - it must strictly correspond to the straight-line movement of the car. It also doesn’t hurt to check the tire pressure and equalize it. After these simple steps, you can begin to diagnose and change the VAZ wheel alignment yourself.
To determine this indicator, it is necessary to compare the distance between the rims of the front and rear wheels. We put a mark on the inside of each wheel; regular chalk is good for this. Then we take a ruler and create tension in it. You also need to organize a tensioning mechanism with a chain that will touch the ground. In this position, it is necessary to place the ruler so that both ends rest against the marks on the wheels. Lightly shake the ruler and align the zero value with the pointer. Remember that the scale must be fixed.
After these manipulations, you need to set the car in motion and drive forward a little. The ruler should move after the wheels so that the suspension and body are not affected. Time to take measurements and draw conclusions about the necessary alignment. The arrow will point to a value by which the alignment condition can be judged.
You can influence the toe-in performance by rotating the connecting couplings, which are located on the side steering rods. At the end of the work, be sure to tighten the locknuts.
Alignment problems are a little more difficult to diagnose and fix. To diagnose existing discrepancies, the car must be raised so that the wheels are in the air. On the side of each wheel we determine the places of equal runout. To do this, you will need to organize a hand rest and stock up on chalk. We fix the hand and put marks on those areas that protrude in diameter. After this, we turn the wheel so that the mark is located vertically.
We prepare a rectangular stand or a suspension with a load. We note the difference that results between the suspension (stand) and the top point of the rim. It is this value that will reflect the collapse. Regulation must be carried out if the difference exceeds half a centimeter. Spacers or shims are suitable for these purposes, they strengthen the gap between the lever axle and the cross member. Spacers allow for more precise adjustment, since when using one washer, the camber changes immediately by 8 degrees.
The distance between the front pair of wheels and the rear one should be the same. If the rear wheels are closer than the front wheels, then the tie rods should be shortened. Otherwise, they need to be lengthened.
The VAZ wheel alignment must be adjusted after any repair work related to the chassis. As a preventative measure, such adjustments should be made once every six months.
What is meant by toe-in and camber of the front wheels?
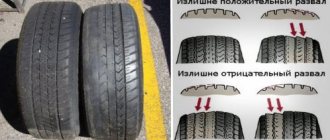
When the camber and toe of the wheels on the car are installed correctly, all recommendations of the vehicle manufacturer are followed, this will ensure good stability when driving on any road. Rubber wear will occur evenly over the entire area of the wheel, control will become easy and reliable.
Camber refers to the position of the wheel in relation to the road. The normal position is considered to be when the top of the wheel is tilted outward. This value is determined by the factory and has a certain meaning for different car models. It is bad for the car and for the wheel itself when the tilt of its upper part is directed inward. In this case, you have to forget about good stability and controllability, and tire wear is greatly accelerated.
Toe-in refers to the distance between the front and rear points of the front wheel rims. Wheel camber is measured in degrees, and wheel toe-in, in addition to degrees, can be determined using distances in millimeters.
Installing spacers
Spacers on the VAZ 2114 are installed between the rear beam and the rear hubs of the car. Camber plates must be installed correctly, that is, the thicker part of the plate must be at the bottom of the beam.
To install the rear camber plates, you will need the following tool:
- Balloon key;
- Hammer;
- Combination wrench 12;
- Socket wrench or wrench with 14mm head;
- A wooden block or a soft metal drift (in case the brake drum is difficult to remove);
- Pliers.
A bottle of WD-40 will also come in handy, which will help unscrew soured bolts without breaking off the heads.
It is a good idea to use a lift to carry out the work. But if you don’t have one, you can get by with a jack. Only then will you have to carry out the work in stages - first do one side, and then start working on the other.
To install spacers, we perform the following operations:
- Install the jack and remove the rear wheel;
- Unscrew the two bolts on the brake drum;
- Remove the brake drum;
- We dismantle the pads;
- Unscrew the four bolts securing the rear axle and hub assembly. Often these fasteners stick, so before dismantling it is better to treat it with WD-40 and wait a while until the bolts “come off”;
- Having unscrewed the bolts, carefully move the hub to the side, trying not to damage the brake pipe;
- Install the plate and assemble everything in reverse order.
The bolts that come with the negative camber plates are usually too long and have a head that is inconvenient for tightening with a wrench, so it makes sense to purchase additional fasteners separately, a little shorter in length than these. It should be noted that for the VAZ 2114 sets of plates are provided only for the rear wheels.
To ensure good stability and controllability of the car, the front wheels are installed at certain angles relative to the body and suspension elements. Three parameters are adjusted: toe
,
wheel camber angle
,
caster angle
.
The casting angle of the steering axis (Fig. 1) is the angle between the vertical and the line passing through the centers of rotation of the ball joint and the bearing of the telescopic strut support, in a plane parallel to the longitudinal axis of the vehicle. It helps stabilize the steered wheels in the direction of straight motion. This angle depends on the number of adjusting washers at the ends of the extension. To decrease the angle, washers are added, and to increase it, they are removed. When installing/removing one washer, the angle changes by approximately 19′. Symptoms of deviation of the angle from the norm: the car pulls to the side when driving, different forces on the steering wheel in left and right turns, one-sided tread wear.
The camber angle of the wheel (Fig. 2) is the angle between the plane of rotation of the wheel and the vertical. It promotes the correct position of the rolling wheel during suspension operation. The angle is adjusted by turning the top bolt securing the telescopic strut to the steering knuckle. If this angle deviates greatly from the norm, the vehicle may deviate from straight-line motion and cause one-sided wear of the tread.
Wheel toe (Fig. 3) is the angle between the plane of rotation of the wheel and the longitudinal axis of the car. Convergence
can also be defined as the difference in distances between the flanges of the rims, measured from the rear and front of the wheels at the level of their centers.
Wheel toe
ensures the correct position of the steered wheels at various vehicle speeds and turning angles.
Rice. 1. Casting angle of the wheel axis
Rice. 2. Wheel camber angle
Rice. 3. Wheel alignment
Convergence
is changed by rotating the adjusting couplings when the locknuts of the tie rod ends are loosened. Before adjustment, the steering rack is set to the middle position (steering wheel spokes are horizontal). Signs of toe deviation from the norm: severe saw-tooth wear of tires in the transverse direction (even with small deviations), squealing of tires when cornering, increased fuel consumption due to high rolling resistance of the front wheels (the vehicle's run-out is much less than required).
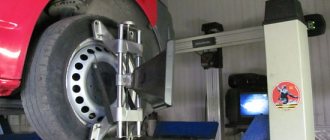
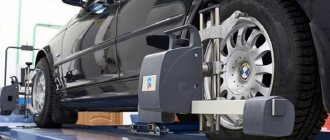
It is recommended to check and adjust the angles of the front wheels at a service station. The car is placed on a horizontal platform and loaded in accordance with the manufacturer's recommendations (see below). Checking and adjusting the angles on an unloaded vehicle is acceptable, but will give less accurate results. Before doing this, you should make sure that the tire pressure is normal, the tread wear on the left and right wheels is approximately the same, there is no play in the bearings and steering, the wheel rims are not deformed (radial runout - no more than 0.7 mm, axial runout - no more than 1 mm).
Checking the wheel alignment angles is mandatory if suspension parts that affect these angles have been replaced or repaired. Due to the fact that the installation angles of the front wheels are interconnected, first of all, check and adjust the longitudinal inclination of the turning axis, then the camber and, lastly, the toe.
For a run-in vehicle in running order and with a payload of 320 kg (4 people) in the cabin and 40 kg of cargo in the trunk, the wheel alignment angles should be within the following limits: camber angle 0°±30′ toe 0°00'±10′ (0 ±1 mm) longitudinal inclination angle of the turning axis 1°30'±30′ Vehicle wheel alignment angles in running order: camber angle 0°30'±30′ toe 0°15'±10′ (1.5±1 mm) angle longitudinal inclination of the turning axis 0°20'±30'
In this article we will look at the most frequently asked questions about wheel alignment. Let's talk directly about the theory: what is wheel alignment, when to adjust it, what parameters to set. Then we’ll move on to the practical part: what are the advantages and disadvantages of different wheel alignment variations, how to avoid getting scammed by a service center, and much more.
When is it necessary to check camber and toe.
Various sources recommend adjustments at approximately 12-15 thousand kilometers, or once a year. Sometimes there are cases when it is necessary to perform such an operation ahead of schedule. The reason for this in most cases is the condition of our roads. It is enough to “catch” a good pothole once to require checking and adjusting the camber and toe of the front wheels.
If the owner plans to use his car for a long time without any problems, then it is not worth saving on this operation. After each replacement of ball joints, silent blocks, steering rods, shock absorbers, it is necessary to check and adjust the camber and toe of the wheels.
Performing this operation today is quite simple. You just need to go to a service center that performs such an operation, and specialists will quickly and efficiently complete this work. But there are times when such work must be done independently in a garage.
Symptoms of a problem
The following signs indicate the need to replace shock absorber struts on VAZ 2113-2115:
- Oil leaks on the strut rod near the oil seal;
- Steering wheel vibration when turning and braking;
- Strong vibrations in the body while driving on poor road surfaces;
- Increased braking distance;
- The car pulls to the side if you release the steering wheel while driving straight;
- Knocks and impacts periodically come from the front suspension.
The upper support of the rack may also wear out and make a crunching noise. There are two reasons for replacement:
- Cracks and torn fragments of the rubber support. Most often this occurs due to aging rubber. A worn-out support absorbs noise and shock less well.
- Worn upper support bearing. When turning a steering wheel with a worn bearing, a crunching sound is heard, and it also knocks loudly on uneven surfaces.
We carry out the camber and alignment ourselves.
We will not repeat the importance of this operation. This process is important and must be taken seriously. To perform it you need tools and accessories:
- Availability of inspection hole.
- Plumb.
- Chalk or felt-tip pen.
- A set of keys.
- Sliding ruler with scale.
Carrying out the operation of checking and adjusting camber and toe for cars with front-wheel drive and “classics” have some differences. To perform this operation at home, it is necessary to ensure the presence of a flat, horizontal platform. Checking and adjustment is carried out in several stages:
- The car is installed on the site so that the front wheels are straight. There are two marks on the outside of the tire, one at the top and the other at the bottom.
- Apply a plumb line to the wing so that it is in the plane with the applied marks. Next, use a caliper or other measuring tool to measure the distance from the cord to the wheel disk near the upper and lower marks. If the difference is about 3 millimeters, this is normal.
- Next, you need to turn the wheels, rolling the car forward so that the applied marks are located horizontally.
- Again, measurements are taken from the cord to the wheel disk in the vertical plane.
- To obtain more accurate measurement data, this operation must be performed several times.
The difference in size between the upper and lower marks for cars with front-wheel drive should be no more than 1 mm, and for “classics” - 3 mm. If the obtained measurement results do not fit into these standards, adjustments are made. For cars with front-wheel drive, the desired result is obtained by moving the strut forward or backward, while for “classics” the shims for the lower control arm of the front suspension are added or removed. If the “classic” front suspension has a MacPherson strut, the strut is also moved for adjustment.
Wheel alignment is checked using a sliding ruler. To do this, make two marks on the inside of the wheels in front of the car and measure the distance. Next, you need to roll the car so that the marks are at the rear along the direction of the car. The measurement obtained between the marks should be approximately 1 mm larger than the previous one. This can be achieved by turning the steering rods.
I would like to remind you that such independent adjustments are temporary, therefore, do not put off checking the front suspension of your car using special equipment for too long. Good luck on the roads!
The review discusses how to check wheel alignment on a VAZ-2112 and how to make adjustments if necessary. On passenger cars of the tenth family (2110-2112), every parameter is adjusted: toe-in, camber and even the angle of inclination of the steering axis. The adjustment is carried out in the standard sequence - start with adjusting the rotary axis. Lastly, the toe angles are aligned. Those who violate this sequence will “walk in circles.”
Example in the video: what will happen if the suspension geometry is not checked and adjusted.
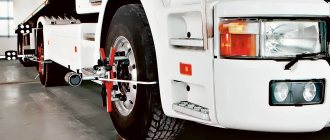
How does the procedure work on trucks?
Setting camber angles
On cars with a front axle and on trucks with a beam, this parameter is unregulated. The camber angle is set by the position of the kingpin at the factory and can only change due to its wear. We can only check it using a plumb line using the method described above. Eliminating wear and tear is a purely plumbing issue.
Setting toe angles
To take measurements on trucks, it is better to use a telescopic ruler, since due to the large wheelbase, when measuring with a tape measure, you can get an error due to its deflection.
Most likely, most will have problems finding a telescopic ruler. I offer my solutions to the problem:
Make a ruler from a bathroom curtain rod;
Curtain rod
Attach a caliper to the pipe/bar/stick (underline as appropriate);
Or don’t bother at all and ask the schoolchildren for a simple ruler.
- We draw a mark line inside the tires parallel to the ground along the entire length of the wheel and take readings with a ruler on both sides of the rim.
- In the case of a telescopic ruler:
- We install a telescopic ruler and take readings from one side, in front;
- After rolling the car half a turn of the wheel, we take readings from the opposite side, from the rear;
- We calculate the difference and, if necessary, adjust the thrust;
- We repeat the steps to avoid errors.
On some cars, in addition to the locknuts, it is often necessary to loosen the bolts of the adjusting clutch, after which turning it in any direction changes the wheel toe value.
On trucks, it is necessary to loosen the coupling bolts (1) of the ends (2) and turn the transverse rod (3) with a pipe wrench (4), as indicated in the diagram.
Moreover, the average value of the toe angle on trucks is two mm. For those who are interested in more details, the video is below.
How to make adjustments on the front wheels of trucks
Unfortunately, it is impossible to analyze in detail the entire process of adjusting wheel alignment angles for all types of cars; there is too much variety in the technical solutions of the chassis at the moment. In addition, the installation angles differ significantly in each specific model.
How and what to measure
Caster angle cannot be measured. Decreasing it leads to the inability to take a turn at speed, and increasing it leads to a “heavier” steering wheel. Usually 2-3 degrees is considered a “sporty” option. This is what we need to build on.
To measure toe and camber angles, it is enough to place a thread and a weight. Zero camber corresponds to the fact that the values of A and B are equal (Fig. 52).
Measuring with a thread
“Zero toe” is also easy to check: measure distance B (Fig. 51), knowing that the track of the front and rear wheels differs by 30 mm. The rear wheel is “recessed” inward compared to the front.
To accurately measure the toe angle, you will need equipment: a sliding ruler or a chain with a dynamometer. Only one thing is used.
Measuring the toe angle
The “measuring device” itself is brought in front and behind, then the obtained values are compared. For zero degrees, the two digits should not be different.
The car must be placed on a surface whose inclination angle is zero! In practice, to take measurements, plates are placed under the wheels. The steering wheel must be turned to the “0 degrees” position - this is also important.
Plate design
Spacers for wheels VAZ 2114
Spacers for negative camber of the rear wheels are so-called plates, with holes for fastening with wedge-shaped bolts. It is installed between the beam and the rear wheel hub. Washers were previously used as an alternative to these plates. But their use was often impractical, because the stiffness of the suspension as a whole changed for the worse. And this in turn can lead to undesirable consequences.
Adjustment
If the caster angle changes, self-locking nuts M12x1.25 will be needed. VAZ has a suitable article number - 16105011. If the angle is reduced, washers “2108-2904225” (part 24) are also needed. Installing one washer leads to a decrease in caster by 19 arc minutes.
Stretch (saber) and lever
To adjust any parameter, the wheel is hung up and removed. And when adjusting the caster, each of the two wheels is hung in turn. In general, the work ahead is long.
Caster angle
To add or remove washers, you need to remove the stretcher: use a flat 24 wrench to hold the stretcher itself, and use another wrench to unscrew the nut.
Removing suspension braces
Having unscrewed the nuts on both sides, the part cannot be removed immediately. You also need to unscrew the fastening of the lever to the stabilizer link (key “17”). To knock out the mounting pin, use an aluminum spacer.
The maximum number of washers is two in front and four in back (near the fist). Recommended tightening force – 43-52 N*m (stabilizer thrust), 160-176 N*m (stretch).
Camber angle
On all Tens, including the VAZ-2112, the camber is easily adjusted. The upper bolt, which holds the fist, is equipped with an eccentric. The nut on the bolt needs to be loosened and then rotated with a wrench - the camber angle will change.
Adjusting the right wheel camber
Mark the standard position of the adjusting screw cap (Fig. 1). Loosen the nut on the bottom screw. The same must be done with the top screw - do not unscrew the nut completely! After completing the adjustment, tighten the fastener. You need two keys “19” (Fig. 2).
The recommended torque when tightening the nuts is 78-96 N*m.
Toe angle
The photo shows how the steering rod assembly with tips is arranged. The hexagon is designed for a 17mm wrench, but before you rotate it, you need to loosen the tightening screw on each of the ends - internal and external.
Steering rod and its ends
If you look at the arch from the outside, then by rotating the hexagon clockwise, we reduce the length of the tie rod. And vice versa.
When unscrewing the screw marked with an arrow in the photo, the tip “a” must be held. The same applies to the adjustment operation - the plane of the ball joint must remain parallel to the plane of the lever “b”.
External tip and swing arm
Anyone who ignores our advice will change the tips every other day.
- To adjust the right thrust, the steering wheel must be turned to the left;
- Taking the key “13”, loosen the two tightening screws;
Outer Tip Pinch Screw
The tightening force for the coupling screws is 27-33 N*m.
Deciding on the wording
Camber angle
The exact definition is the angle between the vertical plane and the straight line along which the wheel rotates.
Or, in other words, the angle of inclination of the wheel relative to the side of the car.
Toe angle
The exact definition is the angle between the trajectory of the car and the plane along which the wheel rotates.
Or, in other words, this is the difference in distances between wheels in one axle, measured at the two extreme points of the wheel.
Let's imagine two imaginary lines: one vertical, and the other directed along the rotation of the wheel.
Custer
Another characteristic of the position of the car’s wheels is caster, which is the angle between the shock absorber in the MacPherson strut suspension and the inclination of the wheel knuckle.
. Caster is also defined as the inclined angle of the steering axis of the wheel. Drawing an analogy with the front wheel of a bicycle, this is the angle of the steering fork: the more the fork “lies”, the more the bicycle handlebar will tend to take a “straight” position. Most car models are designed in such a way that the caster is 6 degrees and cannot be adjusted, so further we will only consider working with wheel alignment.
What does caster affect?
The situation with the caster is no less interesting. A little higher, we remembered that at zero tilt angle the stand stands strictly vertical - that is, the wheel with the hub does not move anywhere relative to the vertical. With negative caster, the rack at the top seems to lean forward, and the wheel, accordingly, goes back. If it's positive, it's the other way around.
On front-wheel drive VAZs, for example, the caster parameter is changed using adjusting washers, which are placed under the front suspension elements - the trailing arm brackets (braces).
Caster in Samara is set using several washers
The longitudinal braces of the VAZ-2108 suspension are attached to the brackets at the front, and to the transverse arms at the rear. That's why they affect caster
By removing the washers, the rack can be tilted back within a degree, and the wheel, on the contrary, can be shifted relative to the center of the arch towards the front bumper. In reality, however, the opposite picture is usually observed - on many “older” Samaras, “tens”, Priors and Kalinas, the wheel “moves” towards the front door due to impacts and metal fatigue, and it is not always possible to return it to its place, even if you remove all the washers.
This is what zero caster looks like: the wheel stands in the wheel arch symmetrically with respect to the bumper and fender
This is no longer a caster, but a death sentence on the front suspension and even the body. It won't be possible to put the wheel back in place with a little effort.
The greater the angle of inclination of the rack, the more stable a front-wheel drive (and not only) car behaves at high speeds. Positive caster contributes to less “wobble” of the car, which becomes less sensitive to ruts and irregularities.
Caster is important not only for its direct impact on the speed characteristics of the car, but also because it affects the toe and camber angles, which change depending on the inclination of the strut. Therefore, you need to start adjusting the angles of the front wheels with the caster. Then comes the camber adjustment, and lastly it is necessary to adjust the toe-in, remembering the interconnection of these parameters with each other.
When changing caster, you need to unwind the longitudinal braces of the suspension. This takes time and effort - especially if the car is old
The importance of the correct position of the car wheels
Adjusting wheel alignment and camber is very important. A number of characteristics of the car will depend on how correctly the position of the car’s wheels is adjusted:
- the vehicle's resistance to skidding and overturning while driving;
- vehicle maneuverability and controllability;
- efficiency in terms of fuel consumption;
- car tire resource.
This is interesting: Checking diesel engine injectors, malfunctions and cleaning The position of the car wheels changes if:
- repair operations were performed that affected the suspension or steering system of the vehicle;
- the car on the road “caught” a hole, as a result of which the disk was deformed;
- the car received a strong blow;
- the car moved for a long time on an uneven road;
- the rods and steering tips have become unusable;
- the play of the longitudinal and transverse rods and the silent blocks of the levers has increased;
- the bridge is bent (in the case of models with a continuous bridge);
- the wheel bearing is worn out;
- the ball joint of the steering knuckle is faulty;
- The shock absorber support in the body cup is faulty.