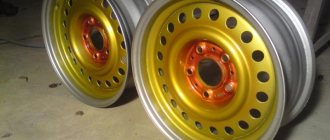
The body paints used on trucks, SUVs, and cars are different, but all are susceptible to external damage. Specialized markets offer motorists a variety of products to combat body corrosion. Among this huge selection, the high-quality Raptor coating for cars, produced by U-POL, stands out. This manufacturer has more than sixty years of experience working with damaged cars.
What primer to use with Raptor!
I will try to briefly summarize the answers to numerous questions!
First of all, an introduction:
RAPTOR or any other protective coating, according to the manufacturer’s advertising, has good adhesion to any type of materials, preliminary preparation (
Soils, including old paintwork
) The main thing is to prepare this coating correctly!
Briefly about preparation:
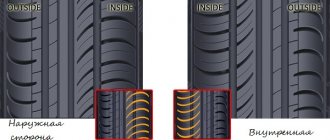
Straight surfaces - mechanically, radial eccentric machine - wheels P80 grain. Curves and decorative elements, by hand P100-P120 (I use Mirka mesh) Edges and ribs, by hand, FINE sponges.
Now about the main thing, soils, theory:
There are three main types of primers: - acrylic filler or leveling - epoxy primer - acid primer
Acrylic primer:
performs only a leveling function or can be an insulator of one layer from another.
Hygroscopic - permeable to moisture, which, in case of damage to the protective layer ( Paint
), accumulates in the form of microdrops on the metal surface under the soil. Acrylic primers are used only for filling/leveling, on putties or old paintwork.
Epoxy primer
: Also used as an insulator. It does not allow evaporation and moisture to pass through. It is also used as a primary primer when painting aluminum and galvanized parts. I recommend using it on parts where different materials are found in spots, somewhere putty, somewhere sanded down to primer or metal, somewhere old paintwork remains.
Acidic soil:
Phosphating or reactive primer. Provides chemical adhesion and also contributes to the formation of a protective layer on the metal. On parts with severe corrosion, where rust can remain in pores and microcracks, acid primer is used. It converts the remaining corrosion, turning it into a phosphate film that will protect the metal from subsequent oxidation. By the term acid soil, I mean acidic soil, not acid-containing soil.
When working with old parts, you can use either acid or epoxy primer, whichever is more convenient for you. Read on carefully, RESULT!
In case of severe corrosion or after sandblasting - acid, which is then covered with acrylic! In other cases, epoxy! I’ll try to chew it up, if there is corrosion on the parts, there’s not a lot of it, I don’t want to bother, epoxy wet-on-wet and paint. If you want to do it well, then treat the corrosion areas locally with acid, then with acrylic, dry, sand, epoxy wet-on-wet, paint...
What not to do!
You cannot use acid and epoxy at the same time. Epoxy dissolves the acid agent and erodes the phosphating layer, in fact, in this case it neutralizes the acid agent, and such use is pointless. You can't apply putty to acid-based putty, but acid-based putty to putty!
Wet-on-wet:
This is a method of applying material (
paint
) to the ground without sanding the ground.
That is, we apply the primer, wait 10-30 minutes between layers ( read the instructions for the primer
) and immediately paint.
Now in relation, for example, to the REOFLEX
!
What primers from this line do I personally use: Reoflex RX CF 1+1 ACID,
you cannot apply RX F-02 primer on it, it peels off!
Reoflex RX F-01
acrylic primer with anti-corrosion properties, acid-filled, applied directly to metal wet-on-wet, can be applied on RX CF 1+1
Reoflex RX F-06
wet-on-wet on RX CF 1+1
Reoflex RX P -03
Epoxy wet-on-wet do not apply to CF1+1
Source
Advantages and disadvantages of paint
Before you decide to paint your car with Raptor, you should take into account all the nuances and weigh all the pros and cons. Let's talk about it. Raptor painting reviews, pros and cons.
The advantages of Raptor auto paint are as follows:
- No special qualifications are required for application; it can be applied manually with a brush or gun;
- The coating increases the sound insulation of the body;
- Raptor paint for cars protects the body from moisture, reagents and extreme temperatures, etc.;
- The coating protects the body from corrosion;
- The composition is easily applied to various types of surfaces, metals and other materials, has a high degree of adhesion;
- No special room or conditions are required for application; you can even paint in the garage;
- Various application methods: gun, roller, brush;
- No careful preparation of the body is required before applying paint;
- Cost reduction of 20% compared to traditional coatings due to reduced application time and longer service life.
Flaws:
- Only one type of surface is possible - matte;
- Inherent roughness of the coating;
- The composition gains full strength only 21 days after application;
- It is difficult to remove from the surface if necessary.
Talking about Raptor, Preparing the car for applying RAPTOR protective coating
Preparing a machine for RAPTOR and applying material, a universal scheme or what needs to be done...
Sandpaper circles P80-P120 (if you don’t have it, rent a vibratory grinder for circles with a diameter of 150), open each “spider”. You coat the entire body with this abrasive, some areas of increased corrosion, loose rust, a drill with a brush and a rust converter, you spray it on the rust, wait a minute and clean it with a brush. On baked rust, it will remain dark, black growths, you can tap it with a small hammer with a chisel sharpened to the tip, and then repeat, etching the cartsovka, etc. To speed up and improve the activation of the converter, you can warm up the treated areas with a hairdryer, then after finishing the work, again dry the treated surface with a hairdryer so that not a drop of moisture remains. We pre-sand the transitions from carving to paintwork on P80, removing burrs...
After the corrosion area, cover with acid, buy a can of BODY960 or Sikkens Washprimer 1K CF ( I use Reoflex CF1+1 phosphating primer
), Then putty, Glass or hair filler, polyester putty with fiber filler, and Soft leveling putty. Use according to technology, well, or according to the principle, large dents, deep wormholes of rust, hair, abrasive, then software, we use software to level out small dents, abrasive... You can mix soft and glass, and thereby achieve some advantages, stretches well, stronger than just soft, you can apply a larger layer, it’s easier to sand than just a hair...
Next, the places where the rubber-rubber sealant has peeled off at the joints of the parts, it must be replaced, and it is better to apply the sealant to all the joints of the welded parts, before doing this, clean it well with a carving tool, for this use a brush sealant, or in a BODY992 tube
Then ACID#8 ( Acid, although translated as acid, I would not call it a full-fledged acid primer, and to be more precise, I would not call it a cold phosphating or metal passivation primer
), instead of ACID#8, you can use any etching or one-component primer, which can be applied according to the wet-on-wet principle (
that is, apply the primer, wait until it dries, and without using an abrasive, immediately apply a protective coating
). If they tell me that there are protective coatings directly on metal, or even more so directly on rust, then I hardly believe it, rust cannot be stopped with paint, it can only be preserved, and rust under any paint, like metal under plastic film, will continue to develop stronger!
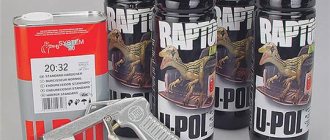
Next, we dilute the raptor with a hardener according to the scheme 750+250, add 100 grams of colourant material, a special pigment, or base, or acrylic paint pre-mixed with the hardener ( the latter will take a little longer to rise in total than the pigments, until the Raptor is completely crystallized
)
Well, we actually paint... That's it!
Yes, don’t forget, we pickled it, degreased it, treated it with a phosphating compound, degreased it, finished puttingtying and sanding, degreased it, primed it, if we decided to repaint the soil, degrease it, and then paint! It is better to use two types of degreaser, the so-called anti-silicone, which works well for removing oils and other chemical compounds, and an alcohol-based degreaser that removes organic fats ( Seven sweats of a tinsmith))))
) Well, if you really bother, there are degreasers that eliminate efflorescence from water spots
And the result depends on the experience of the painter, and this determines complete coverage of the surface, smooth shagreen, no sagging or overspray, no streaks or halos, no paint marks, etc. You can get used to it and paint it yourself, especially since there are no secrets in this, and be content with the result obtained, they say, what the hell with it, it’s a little untidy, but at least you yourself, but I like to say this, a baker should bake bread, a tailor should sew pants , doctor - to treat, etc. In short, trust the work to professionals, regardless of whether it is a professional technical center, or Vasily’s acquaintance from a neighboring garage. Most often, there is a guy sitting in the next garage who is more experienced than a painter with a crust from some technical center