Reupholstering car seats is a great way to return the interior to an aesthetically pleasing appearance, because old, worn covers in a car can ruin the entire design. This is especially necessary for a light-colored interior, the upholstery of which has lost its brightness, become stained and cannot be cleaned. Fortunately, now there are many materials and tools that allow you to do the reupholstery yourself. This is not as complicated a procedure as it might seem at first glance; you just need to have basic technical skills and the necessary tools.
Do-it-yourself car seat reupholstery
DIY car seat reupholstery technology
Reupholstering car seats with your own hands is within the capabilities of diligent and persistent people. Since the average car owner does not have the skills to do this kind of work, everything needs to be done slowly, following proven technology.
Preparing to reupholster the seats
Before you start updating your car seats, you first need to do some simple preparatory work:
- Removing seats. Usually fastening is carried out with 4 bolts, but you must first disconnect the negative terminal of the battery in order to de-energize the security system (airbags). Under the seat, you also need to disconnect the electrical wiring terminals, if any, for example, from the electric seat heating.
- Each part of the standard case is signed with a regular marker. You can also indicate the name of the material that will be used in this area of the cover.
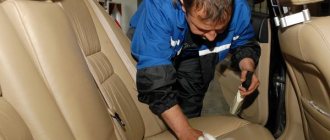
- Removing the standard cover from the chair. To carefully remove the old seat trim, you need to press the metal clips on the back of the chair.
- The old cover is cut at the seams into separate parts that will be used as patterns.
- Material calculation. Now each piece of the old cover can be measured and its area can be calculated. The total area of the material must be increased by 20-40%!, which depends on the accuracy of measurements and cutting options.
Making new cases from leather or Alcantara
To make new seat covers you will need some tools and materials:
- gel pen,
- scissors,
- sewing machine,
- foam rubber 5 mm thick,
- glue in a can,
- hammer.
The sequence of actions is as follows.
- Each piece of the old cover is placed on new material and pressed with weights. Use a gel pen to mark with short dashed lines. The marked elements of the new cover are cut out with scissors. When cutting, it is important to take into account such a feature of Alcantara as the direction of the pile. When all elements are combined, the result should be a surface with the same direction of the pile.
- Alcantara and leather are reinforced using fabric-based foam rubber. The connection of the cut parts with the foam rubber is done using glue. You cannot apply the adhesive composition with a brush or roller to the surface of the foam rubber. Therefore, the glue is sprayed evenly from the can.
- The next important step is stitching the patches together. It is important to ensure that the edges of adjacent elements are accurately aligned. This will require some skill in using a sewing machine.
- The seam flaps, spread to the sides, must be glued on the wrong side. First, excess strips of foam rubber and material are cut off, and the lapels are cleaned and degreased. All that remains is to apply glue and press the lapels together.
- An important point in reupholstering the seats will be beating off the seams with a regular hammer.
- The lapels are sewn with a double finishing stitch, and the free edges behind the stitching are not trimmed.
Installing a car seat cover
Installation of a new car seat cover is carried out in the following sequence:
- Before installing the new seat cover, you need to thread the straps. The product is turned inside out and straightened out. The cover is first pulled over the back of the seat.
- Now it’s the “seat’s” turn. Usually this stage does not cause any problems. You need to use plastic clamps threaded through special holes to pull the cover to the base of the chair and secure it by the spoke. The edges of the new cover are stretched evenly along the contour of the seat.
- The leather covering should be completed by heating the material with a stream of hot air. An electric hair dryer is used for this; the main thing is not to overdo it and not burn the case. Gradually drying, the material will stretch like a drum. After this, each chair is steamed using an iron and a damp cloth. Thanks to these thermal operations, the chair cover becomes taut and absolutely smooth.
- The final operation of reupholstering the seats will be to clean the light leather or Alcantara from glue residues, abrasions and fingerprints.
We recommend: Is it possible to flush the cooling system with Coca-Cola or citric acid?
Carefully reupholstered car seats will please the car owner for a long time. During the update process, you can change the design of the car seats, as well as update the upholstery of the doors, ceiling and panels. The comprehensive tuning will change the shabby interior beyond recognition, add elegance to the car and increase its value.
Variations of patterns
There are several ways to take measurements of your car seats:
- If you have old, unnecessary car covers, you can use them as the basis for the pattern. Remove the old covers, split them at the seams, and you will have ready-made patterns;
- When taking measurements directly from the seat, you will need regular greenhouse film (it will be more convenient to take measurements with it than with newspaper or any other paper).
The film must be placed on the seat and secured with pins. Using a marker or felt-tip pen, trace along the outline and cut with scissors. It is recommended to double-check the accuracy of the measurement using a ruler. We do the same with the back, sides, and pillows.
An approximate pattern for car seat covers looks like this:
We transfer the finished pattern to the selected material, not forgetting to leave 1.5-2 cm for seam allowances. Next we proceed to sweeping away all the details. It is advisable, after the product has been pre-swept, to try it on your chair, so you will see all the flaws and shortcomings that can be easily corrected. If the cover fits perfectly, then you can proceed directly to stitching the seams using a sewing machine. Also, don’t forget to use special ropes or hooks that will ensure a secure fit for your case.
Since our covers are made by hand, it would be appropriate to add individuality to them: add decorative elements, using additional decorative seams to create a unique ornament or design.
Examples in the photo:
Required tools and materials
If you have already decided on the material in which you will reupholster the interior, it’s time to calculate its approximate volume. In total you may need from 6 to 25 meters. But these figures are very approximate: it all depends on the specific car model. So, a crossover or SUV will require much more material than a coupe car. Therefore, do not be lazy and measure the length of the ceiling, the length of the cushions and backrests, the size of the front panel, as well as the width and height of the car doors. Add up all the resulting numbers and add at least a meter as an error. Believe me, you will need it.
In addition to the material itself, you will need other tools:
A set of screwdrivers with straight and Phillips slots for dismantling some elements;
- foam;
- sandpaper;
- degreaser;
- meter tape;
- masking tape;
- cling film;
- marker;
- chalk;
- stationery knife and sharp scissors;
- reinforced threads for stitching leather products;
- sewing machine with a needle and foot for working with leather;
- special high-temperature glue for leather;
- rollers and spatulas with rubber cloth;
- industrial dryer.
Separately, I would like to dwell on the choice of glue. Do not use Moment glue or other similar superglues. Universal glue 88 is often used for reupholstering, but it also has a number of disadvantages. Buy quality glue that can withstand high temperatures. MAH is well suited for these purposes. Its price is quite high, but if you don’t want to see the coating swell and come off after just a few months, spend money on it.
Use high temperature adhesive to bond leather to plastic parts.
We analyze the sewing of car covers in the form of seat covers
Car seat covers in the form of capes look no worse than regular covers and also protect well from dirt, abrasions and water, are easily removed if necessary and can be easily machine washed. Such covers are suitable for lovers of outdoor recreation. In this case, you can choose any fabric to your taste and color. Capes do not take much time to make and cut, and if necessary, they can be easily replaced with new ones. Below is a photo of the finished work.
Take a piece of fabric equal in width and length to the car seat. We retreat 25 centimeters from the edge of the fabric and make a mark, measuring the middle along the width. Then we take measurements of the headrest of your car - the circumference and divide this number in half. Using the mark made, we mark the calculated number on both sides of it. Draw a line and make a cut along it. We make edging along the cut and along the entire perimeter of the fabric. We put the resulting cape on the chair. Also, for convenience, you can sew a pocket on the back of the case, in which you can put various small things you need on a trip. Similar covers can be made for rear car seats by first taking the dimensions. At the end of the article you can watch a video on sewing covers.
Who would have thought that crocheted covers would gain great popularity.
The work is very labor-intensive and will take a lot of time, but you will be the owner of completely unique car covers. First, you need to decide on the choice of yarn, since the item is not made for one season, it is worth comparing all the pros and cons. The yarn should be strong, moderately soft and not scratchy. Macrame yarn is ideal for these purposes. We do all the necessary calculations for the car seat. As for crocheting itself, there’s a lot of skill here. You can crochet flowers or just diamonds, squares, or make a grid. The choice of patterns that can be crocheted is huge. And in this case, everyone chooses what he likes best.
Preparing for reupholstery
Working on reupholstery requires perseverance, patience and following recommendations.
Before you start updating the seats, it is necessary to carry out preparatory work:
- dismantle the seats, which are secured with four bolts. Before doing this, disconnect the battery terminal and electrical wiring terminals.
- remove all fragments of old covers and sign them. In addition, it is better to write the name of the material that will be replaced in this place.
- remove the standard cover from the seat, first bend the metal clips from the back. cut the cover at the seams, it will be used to cut a new one.
- calculate the material. Take measurements of each part of the old cover. Make a pattern, leaving at least a few centimeters at the edges.
Main stages
- The first stage is the analysis of the Salon. The seats need to be removed from the car. The car seats are bolted through the runners to the floor. To remove the seat with your own hands, just unscrew the four bolts and disconnect the electrical connectors.
- We dismantle the fabric (old leather). The material is attached to latches and brackets, and removal does not cause any particular difficulties.
- After removing the cover, we number each of the stitched parts on the inside (with a marker), after which we carefully cut the seams into pieces.
- We apply part of the old material (pattern) to the material we have chosen, trace it and cut it out. (if necessary, you need to smooth the pattern using a warm iron)
- We place the cut out parts on the backing and glue them with glue.
- After the glue has dried, cut out the parts (remember to number the parts for further sewing)
- Sew the resulting parts. Also, don’t forget to sew on the original fastening parts (if any).
- After we have sewn the seat parts, we can make beautiful contour seams to give the seats a more beautiful appearance.
- We stretch the resulting cover onto the seat frame, smooth the skin using a hair dryer to give it shape.
- We install the seat in the car and connect the corresponding connectors.
Soft backing
A soft lining can be glued to the back of the upholstery. It is especially relevant for the skin. This is a foam material with fabric. The material helps to hold the thread, and it does not fall through the material when sewing. This soft material performs three functions. Firstly, it helps to eliminate wrinkles on the fairly thin upholstery material, and secondly, the soft lining gives better tactile sensations to the surface. Thirdly, this material provides a smooth, even appearance and fullness of the upholstery after installation.
The soft backing is glued with special glue from a can with the soft part to the upholstery, and the fabric outside. The principle of gluing and leveling is the same as when repairing ceiling trim. In addition to gluing, you can additionally stitch along the very edge of the upholstery part. This way the backing is guaranteed not to come off. After this, the excess along the edges of the upholstery part is cut off and the individual upholstery piece can be considered finished.
Chair installation
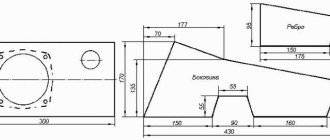
Before assembly, it is necessary to prepare the base for the future chair. Since its standard height turned out to be too large, I had to seriously modify it:
- First you need to completely disassemble it, leaving only the “spider”: legs with wheels and a central pipe.
- Cut off the central pipe, leaving approximately 20 cm of its length, then drill it along its entire length.
- Prepare a piece of pipe of similar length and diameter, allowing it to be inserted into the central pipe of the base.
- Prepare a platform for mounting a car seat. Using a welding machine, weld the pipe to the platform, then install the resulting structure into the base.
At this point, the work on preparing the legs of the future chair is completed. All that remains is to modify the seat a little:
- Weld crossbars from the corner to the “sled”: they will be needed to secure the platform.
- You should remember to trim the shelf along the edges of the crossbars: otherwise it will interfere with the seat adjustment mechanism.
Then you need to make the armrests. I will have them of the telescopic type, with height adjustments. To do this you need:
- Take 2 pairs of pipe sections for the telescopic mechanism.
- Drill a hole in the main pipes and weld nuts to them to install the adjusting bolts.
- Weld a platform for the armrests to the upper pipes, and corners for attaching to the “sled” to the lower pipes.
- Weld the armrest fastenings to the “sled”.
- To make the armrests themselves, I used 10 mm plywood, foam rubber, then covered it all with leather.
After assembly, the result was a very nice and practical chair. It’s a pleasure to work with and it’s easy to sit at the computer for hours without feeling tired at all.
Advantages of reupholstering car seats in a studio
We recommend: DIY tips for replacing the Granta liftback fuel filter
If you need to update the seats in a short time and the money issue is not of decisive importance, then it is best to contact a specialized sewing studio.
Among the main advantages of reupholstering seats in a workshop are:
- work performed by qualified specialists with many years of experience,
- use of proven quality materials,
- choosing the preferred option,
- providing a guarantee for the service,
- Minimum turnaround time for reupholstery.
But all these advantages of reupholstering in a workshop can be reduced to zero due to the high cost of the service, which may not be affordable for a simple car enthusiast.
What can be done
If the salon has lost its attractive appearance, you can go one of several ways:
Let it be as it is. Not the best solution, because when worn, the upholstery deteriorates even faster:
- Use T-shirts and covers. They will only hide existing shortcomings. If you expect long-term use or then want to sell the car at a profit, it would be better to restore the interior
- Contact the studio. A good option, but very expensive. In addition to paying for materials, you will also have to pay for the work.
- Pull it yourself. It doesn't save time, but it saves money. You will only have to spend money on consumables.
Which option to choose, everyone decides for himself. Even partially self-performed reupholstery will be much more economical than completely entrusting the work to specialists. They can help you make the covers, and you can do the dismantling, reupholstery and assembly yourself.
Selection of cladding material
Natural and artificial automobile leather are best suited for reupholstering car interiors. Both materials are characterized by high performance qualities, which sets them apart from the less popular carpet or velor. At the same time, leather covering is much easier to do with your own hands than, for example, flocking the interior. The reason for this is the high elasticity of the material, as well as the usual set of necessary tools. Recently, motorists are increasingly choosing Alcantara. However, the price for the original material is almost higher than the cost of genuine leather, while its cheaper substitutes cannot boast of high quality.
For these reasons, we will dwell in more detail on materials such as genuine leather and eco-leather.
Genuine Leather
Genuine automobile leather will become a real decoration of the interior. Is it possible to imagine a luxury car covered with a hard carpet or covered with multi-colored vinyl film?
However, a beautiful appearance is not the only advantage of genuine leather. It can withstand both frost and heat. Cracks will not appear on it due to temperature changes. Another positive property is resistance to ultraviolet radiation. Many materials fade in the sun, so after just a few years of use, the control panel and front seats, which are located directly under the windshield, become noticeably paler compared to the rest of the trim. But this will not affect natural leather. You can be sure that the interior will retain its color.
The interior of the car, covered in leather, looks expensive and solid.
Do not forget about the fire resistance of the material. Accidentally dropped cigarette ash will not harm the interior. Moreover, genuine leather does not absorb foreign odors, which is very important for those who like to smoke inside the car. The skin is also not afraid of other mechanical damage: it will take a lot of effort to scratch or tear such a coating.
On sale you can find material of various textures, including crocodile or ostrich leather. However, when choosing between smooth and perforated leather, it is better to give preference to the latter type. It is softer and more pleasant to the touch. In addition, its wear resistance is noticeably higher.
Perforated leather is softer and more pleasant to the touch
The only thing that can discourage you from upholstering the interior with genuine leather is its price. Its use becomes especially risky when you tighten it yourself. After all, if at some point something goes wrong, a large amount will be thrown away. If you are not ready to take such a risk, turn your attention to eco-leather.
Eco leather
Currently, artificial leather has practically received a second life. Outdated technologies have been replaced by newer ones. Low-quality leatherette is no longer used for upholstery of car interiors, giving way to eco-leather.
Eco leather is a synthetic material. During its manufacture, a thin layer of polyurethane is applied to a woven cotton or polyester base. At the same time, the characteristics of the material directly depend on the thickness of the layer: the thicker it is, the stronger the eco-leather is, but at the same time tougher. For car upholstery, the optimal thickness of polyurethane was experimentally determined.
The material received the name “eco leather” for two reasons. Firstly, during operation it does not emit toxic substances that adversely affect vehicle passengers. And secondly, after its invention, the number of animals killed for their skin decreased sharply, which pleased animal rights activists.
In terms of its external qualities, eco-leather is very close to its natural ancestor. Using special technologies, embossing is applied to the material, making it quite difficult to distinguish it from genuine leather. Moreover, the higher the price of the material, the more identical their appearance.
The appearance of eco-leather is very close to the appearance of natural material
Eco leather has a rich palette. You can use classic black or extreme red in the interior, or you can combine colors to your liking. But coloring natural material will cost you a pretty penny.
In terms of other characteristics, artificial leather is also not inferior to natural leather: wear resistance, moisture resistance and fire resistance are its strong qualities. Both of these materials remain clean for a long time, and if necessary, stains and dust can be easily removed with a wet sponge and soft cloth. It's no secret that many people are allergic to animal fur and skin, as well as the chemicals used in tanning. Eco-leather is perfect for them, as it is absolutely hypoallergenic.
We recommend: Penalty for installing LED lamps in headlights in 2019
At the same time, the cost of eco-leather is several times lower than natural leather, which makes it more accessible to the general public. You can safely take one or two meters in reserve if you are doing self-upholstery for the first time. The remaining material can be used to make a cover for the steering wheel, gear shift lever and other small elements of the car.
Regardless of whether you choose natural or eco-leather, purchase the material from specialized automotive stores. There are many reasons why leather used for making furniture, clothing and shoes is not suitable for upholstery. For example, its instability to temperature changes and reduced wear resistance.
Both natural and artificial materials have drawbacks that may seem insignificant to some. In cold weather, the coating quickly cools down, and in the sun it gets very hot. Accordingly, this slightly reduces the level of comfort. Whether it is worth paying attention to this feature of materials is up to you to decide. In any case, leather is one of the best solutions for interior decoration of a car.
Putting on new upholstery and assembling seats
- When all parts of the upholstery are sewn together, it can be put on the seat and back.
- When installing the upholstery, restore all fasteners that were cut off when disassembling the seat. As you assemble, refer to the photographs taken while disassembling the seats.
- The traditional method of fastening upholstery is the use of special rings. As an alternative method for fastening, you can use nylon zip ties of the required size (10 - 20 cm). They must be of good quality and not break.
Start tightening the seat back upholstery by turning it in the opposite direction and gradually unroll it.
- The upholstery on the back of the seat is a little more difficult to install than on the seat itself. It takes some effort to tighten it. The upholstery should be with the back side facing out. It is placed on the upper part of the backrest and unfolds in stages.
- When putting on leather upholstery, it must be treated with hot steam. This is necessary so that the skin “sits” well and tightly into place. Exposure to heat dries out the skin. When heated, the skin weakens and becomes much more pliable. After cooling, it contracts and tightens the seat. If you don't have a steam generator, you can use a hair dryer as an alternative. When using a hair dryer, adjust the temperature so as not to overheat your skin. If there are no adjustments on the hairdryer, then change the heating by changing the distance from the surface. When heating, you don't need to stay in one place for a long time. Faux leather is less sensitive to heat, but also requires caution when heating.
- A safer option would be to steam the inside of the upholstery before putting it on. This way the steam will not damage the front part. After drying, the leather will lie flat on the seat, without folds or wrinkles.
- If the seat has an airbag, the battery must be disconnected when connecting the seat plugs.
How to remove a burn
To carry out restoration work, the seat should be disassembled and brought home. You can't make repairs without removing the car seat. To remove the burn, you will need an iron, TERMOTEKS powdered hot melt adhesive, and pieces of upholstery fabric. The product for gluing leather and textiles is inexpensive.
The work sequence is as follows:
- clean the edges of the burn with scissors;
- cut a circle from thick fabric with a diameter 2-3 times larger than the hole;
- put under the defect;
- pour glue under the edges, remove excess;
- cover with a sheet of whatman paper A4 folded in half;
- iron with a hot iron;
- cut out a patch from upholstery fabric with a diameter corresponding to the hole, first add glue, then put it on;
- iron.
The more accurate the patch size, the better the repair.