The controller continuously performs self-diagnosis on certain control functions. The language of the VAZ 2110, - 2111, - 2112 controller is used to indicate the source of the malfunction using diagnostic codes. Codes are two-digit numbers ranging from 12 to 61. For different controllers, fault codes may differ slightly from each other. In table 9-3 shows a breakdown of the fault codes for the “errors” of the “January-4” type controller installed on VAZ 2110, VAZ 2111 or VAZ 2112 vehicles, for a distributed fuel injection system without feedback and with domestic components. When a malfunction is detected by the controller, the code is stored in memory and the “CHECK ENGINE” indicator light turns on. This does not mean that the engine should be stopped immediately, but the reason for the CHECK ENGINE warning light should be discovered as soon as possible.
Table 9-3 Fault codes for the “January-4” type controller
Indicator lamp diagnostic circuit fault
High signal level of the coolant temperature sensor
Coolant temperature sensor signal low
Increased voltage of the on-board network
Reduced voltage on-board network
Incorrect crankshaft position sensor signal
Throttle position sensor signal voltage too high
Insufficient throttle position sensor signal voltage
There is no signal from the vehicle speed sensor
High signal level of the CO potentiometer
Low signal level of the CO potentiometer
Incorrect signal from the mass air flow sensor (high frequency signal at the sensor output)
Incorrect signal from the mass air flow sensor (low signal frequency at the sensor output)
Idle speed deviation
Invalid knock sensor signal
Programmable read only memory (PROM) error
Controller error (RAM error)
Electrically programmable memory (EPROM) error
Immobilizer communication error
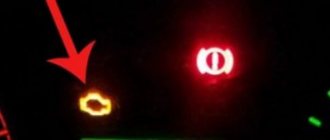
CHECK ENGINE lamp
The lamp is located in the instrument panel combination of VAZ 2110, VAZ 2111, VAZ 2112 cars and performs the following functions: informs the driver that there is a malfunction in the engine control system and the car needs to be checked as quickly as possible; issues diagnostic codes stored in the controller's memory to help a technician find a malfunction. When the ignition is turned on, the “CHECK ENGINE” lamp lights up and, while the engine is not yet running, the lamp and systems are checked for serviceability. After starting the engine, the “CHECK ENGINE” lamp should go out. If the lamp continues to light, then the self-diagnosis system has detected a malfunction. If the fault disappears, the lamp usually goes out after 10 seconds, but the fault code will be stored in the controller’s memory. In the case of an “intermittent” malfunction, the “CHECK ENGINE” lamp will light for about 10 seconds and then go out. However, the corresponding fault code will be stored in the memory of the controller installed on VAZ 2110, VAZ 2111, VAZ 2112 cars until its power is turned off. When unexpected codes are detected during the reading of error codes, it can be assumed that these error codes are caused by an intermittent malfunction and can help in diagnosing the system.
Reading error codes on VAZ 2110, VAZ 2111, VAZ 2112 cars
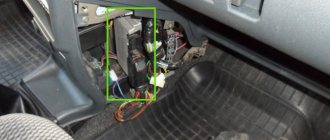
A diagnostic block is used to communicate with the controller. It is located under the instrument panel console on the left side. Fault codes stored in the controller's memory can be read either with a special diagnostic tool or by counting the number of flashes of the "CHECK ENGINE" lamp. To read error codes using the “CHECK ENGINE” lamp, you must connect contact “B” (Fig. 9-31) of the diagnostic block to ground. The easiest way is to short it to ground by connecting it to contact “A”, which is connected to the engine ground. When contacts “A” and “B” are connected to each other, the key in the ignition switch must be turned to position III (Ignition), but the engine should not run. Under these conditions, the “CHECK ENGINE” lamp should flash code 12 three times in a row. This should happen in this order: flash, pause (1-2 sec), flash, flash - long pause (2-3 sec), and so on. twice (Fig. 9-32). Code 12 indicates that the controller diagnostic system is working. If code 12 is not displayed, then there is a problem with the diagnostic system itself. After code 12 is displayed, the CHECK ENGINE lamp flashes fault codes three times, if they exist, or simply continues to display code 12 if there are no fault codes. If more than one fault code is stored in the controller’s memory, they are displayed 3 times each. Attention! Upon completion of the diagnostics, it is allowed to open contacts “A” and “B” of the diagnostic block 10 seconds after turning off the ignition.
Erasing codes
Codes are erased from the controller’s memory either after repairs are completed or to see if the malfunction occurs again. To erase, you must turn off the controller's power for at least 10 seconds. Power can be turned off either by disconnecting the wire from the negative terminal of the battery, or by removing the controller protection fuse from the fuse box. WARNING To avoid damaging the controller, turn its power off and on only with the ignition off.
All fuel-injected VAZ 2110, 2111 and 2112 cars have a function such as self-diagnosis of the instrument cluster and even detection of certain errors with codes displayed on the display.
To start this function, you need to hold down the daily mileage reset button and turn on the car's ignition. So that you don’t have to think for a long time about what and how to do, I advise you to watch the detailed video review that I recorded for this topic. The video was made using the example of a VAZ 2112.
As for decoding errors, I will try to make a text description of them below to make it more clear and accessible to everyone.
Decoding error codes on the instrument panel of the VAZ-2112
Car : VAZ-2112. Asks : Maxim Perepelkin. The essence of the question : How to decipher error codes on the instrument panel of a VAZ-2112?
Good day, please help me understand my situation, and more precisely, the error codes on the instrument panel . No matter how much I try, nothing comes of it, everything is somehow too complicated for me, I don’t understand the Internet well enough to find it, but then a friend recommended your site, they say you will find everything there and if you need anything, they will personally help you.
So I decided to ask this question, I hope for a complete schedule of each code and what it is responsible for, so that I could look at it, so to speak, and understand what’s what, and not sit like I did and think, what the hell is this and why. Traveling constantly for diagnostics turns out to be very expensive, thanks in advance.
What does error 4 mean?
Fault code 4 indicates that the refrigerant temperature control regulator is not functioning correctly. In most cases, this code lights up on the dashboard if, within 20-30 seconds, the electronic control unit detects a break in the regulator wiring.
- After analyzing your problem, we turned to many sources on the Internet and consulted with the owners of Lad Kalin. As it turns out, the number 4 often appears on the instrument panel, this can be considered one of the most common errors in these vehicles. Replacing the antifreeze temperature regulator in the cooling system in some cases will help cause the error to disappear. However, according to most potassium growers, in fact, in most cases it does not give a good result.
- If you believe the reviews of car enthusiasts, then such an error, as a rule, appears mainly during cold weather. If there are no signs of breakdowns, then perhaps you have no reason to worry.
- It is likely that over time the vehicle has been used, the sensor itself has oxidized. As a result, a poor contact is formed, which does not allow signal transmission in normal mode. Sometimes this happens after you have washed your car. We recommend that you carry out a visual diagnosis of the regulator - if you notice that the contact has really oxidized, then it needs to be cleaned.
- If there is continuity, if cleaning the contacts does not help, you need to check the car wiring. It is quite possible that the reason for the appearance of the code on the device is a broken wiring or short circuit. In the case of a break, it will be enough to replace the wires or eliminate the cause of the short circuit.
Excerpt from open sources
2 - Excessive voltage. 3 - Fuel level sensor error*. 4 — Coolant temperature sensor error*. 5 — Outside temperature sensor error**. 6 — Engine overheating***. 7 - Emergency oil pressure***. 8 - Brake defect***. 9 - Low batteries***. E - Recognition of an error in a data packet stored in EEPROM.
Note: * – an error is registered if within 20 seconds. a sensor break is detected; ** – an error is registered if within 20 seconds. The actual sensor data is not recognized (indication on the LCD is “— °C”); *** – accompanied by an acoustic signaling device.
Source
How to check the sensor
Since the cause of error 4 on the Lada Kalina is not always the failure of the controller, you need to learn how to diagnose it. First of all, inspect the wiring; if there are no breaks in it, then you need to move on to checking the sensor itself. Follow the instructions:
- Turn off the ignition and disconnect the wire connector from the coolant sensor. For the convenience of motorists, the block is marked “AB”.
- Place the probes of the electronic tester on contact B of this block and on engine ground. If the power circuit is not broken, the tester will show a voltage of 4.8 to 5.2 V. Otherwise, you need to check the power circuit.
- If the device shows sufficient voltage in the circuit, then you need to check the controller itself. To do this, place the tester probes on contact A and engine ground. Switch it to resistance measurement mode. If the circuit is grounded, the device will show a resistance of less than 1 ohm.
- The following measurements should be carried out on a warm and slightly cooled engine. The probes of the device are placed on the contacts of the sensor itself to measure its resistance. It is also important to know the temperature of the coolant; the hotter it is, the lower the resistance should be. The maximum resistance is achieved at negative temperatures, and at 100 degrees it is minimal - 180 Ohms.
If the sensor does not pass the warm-up test, it must be replaced. There are more complex ways to check the sensor, but to do this you will have to unscrew it and test it.
- VDO Panel Errors and Fault Codes
VAZ (LADA) errors via OBDI protocol. Self-diagnosis.
1 — Malfunction of the engine control unit.
2 — The voltage in the on-board network is too high.
3 — Malfunction in the electrical circuit of the fuel level sensor.
4 — Malfunction in the electrical circuit of the antifreeze controller.
5 — Error in external temperature controller.
6 — Overheating of the engine (power unit)
7 — Emergency oil pressure in the engine.
8 — The voltage in the vehicle's electrical network is too low.
9 — Low battery level (battery is discharged)
12 — Malfunction in the electrical circuit of the malfunction indicator located on the instrument panel.
13 — No data (loss of communication) from the oxygen sensor (lambda probe)
14 — High signal level of the coolant temperature sensor (antifreeze).
15 — Malfunction in the electrical circuit of the coolant temperature controller.
16 — Increased voltage in the vehicle’s electrical network
17 — Low voltage in the on-board network
19 — Malfunction in the electrical circuit of the crankshaft position sensor.
21 — Malfunction in the throttle position regulator.
22 — Low signal level of the throttle position sensor
23 — High signal level of the intake air temperature sensor
24 — Malfunction in the electrical circuit of the vehicle speed sensor.
25 — Low signal level of the intake air temperature sensor
27 — Incorrect signal from the exhaust gas system sensor
How to replace the coolant sensor
To work on removing the coolant temperature sensor, you need to remove at least part of the antifreeze from the system. The easiest way is to drain it from the radiator, but you will have to unscrew the plug on the cylinder block, since the sensor is located not far from this unit. Let's figure out how to drain the liquid from the system completely:
- Remove the negative terminal of the battery. Remove the middle mudguard in the engine compartment.
- Close the cap of the expansion tank tightly, place a container with a volume of at least 6 liters under the hole in the radiator, and remove the plug. To make the fluid drain faster, unscrew the cap on the expansion tank.
- To remove antifreeze from the cylinder block, you must additionally unscrew the plug on it. The exact instructions will depend on the number of valves in the engine. If your Kalina has an eight-valve system with a traction drive gearbox, then you need to find the drain hole under the ignition coil on the front side of the cylinder block. After this, place the container under it and remove the stopper. After this, all you have to do is unscrew the sensor, having first disconnected the block with wires from it.
If your Lada Kalina has a sixteen-valve system with a cable-driven gearbox, then you will need to remove the starter before draining the antifreeze. If you do not do this, you will fill this unit with coolant. The starter is held on by three bolts, but before removing them you need to disconnect the wiring.
Once you have removed the fluid, replace the plugs. Now you can start replacing the sensor itself. Remove the wire block from it, if you did not do this to check, then unscrew the controller using a 21 key. In its place you need to install a new element, having previously treated the thread with heat sealant. Connecting the wiring to the new sensor is not at all difficult - the chips have special notches for proper installation.
Return fluid to the cooling system through the expansion tank. It is necessary to use new antifreeze; the manufacturer recommends using red “Felix” for this. Then reassemble, warm up the engine to bleed the system. Check to see if antifreeze is leaking from the plugs or through the threads of the sensor. After the engine has warmed up, touch the pipes - they should all become warm. If everything is normal, you can begin testing the system and making a test drive. If the error persists, then most likely the on-board computer provided false information.
29 December 2014 566 240
In the event of malfunctions in the operation of the vehicle, the engine electronic control unit (ECU) stores errors in memory. In the future, Kalina ECU errors can be read using an on-board computer or special equipment for car diagnostics. In addition to controller error codes, it is possible to perform Kalina self-diagnosis on the dashboard.
Advice
: To read errors in electronic units, car owners often use the ELM327 adapter (buy on Ali) and the OpenDiag application in their smartphone.
Error Diagnosis Methods
In 2022, errors on the VAZ 2110 on-board computer can be identified in two ways.
- Self-diagnosis. The method is feasible thanks to a special option in the on-board computer. The principle is that the system shows faults in the main circuits and mechanisms. The advantage is that there is no need for additional equipment or special programs - everything that is needed is already “hardwired” into the on-board computer. The disadvantages include the low accuracy of the readings.
- With the help of auxiliary equipment. This type of procedure is characterized by high accuracy of the read data. Thanks to a third-party analyzer, you can find out exactly where the breakdown occurred, which simplifies the repair process. An obvious disadvantage is the need to connect a computer with a special program. Such equipment is present only in specialized service stations.
Self-diagnosis VAZ 2110: error codes
To enable self-diagnosis mode, the driver or technician will need to perform a certain sequence of actions.
- Turn off the engine ignition.
- Press the daily mileage reset button and, without releasing it, turn on the ignition. In this case, all digital cells should light up on the display.
- Click on any module control button twice.
- The device will display the error number.
If everything is done correctly, one of the following symbols will light up on the device:
- 2 – critical excess of the rated voltage of the on-board network, a short circuit of the main line or loaded components is possible;
- 3 – a similar error on the instrument panel of the VAZ 2110 indicates that the gasoline level sensor is damaged or there are problems in the sensor’s power supply; to check, you can replace the part with a new one and ring the circuit;
- 4 - error 4 VAZ 2110 indicates that the antifreeze temperature sensor is broken or its wiring is broken, the problem is resolved in the same way;
- 5 – the thermometer designed to measure the temperature outside is faulty;
- 6 – the engine is very overheated, you need to stop and wait for it to cool down, and there should be a sound signal (add antifreeze/water into the radiator);
- 7 – the lubricant pressure in the crankcase compartment of the engine is below the established norm, the losses must be urgently replenished;
- 8 – error 8 VAZ 2110, interpretation shows that the brake system is damaged, possibly a drop in the fluid level in the expansion tank or severe wear of the pads;
- 9 – the battery is completely discharged, the element needs to be charged or replaced with a new module;
- E – software failure of the on-board computer firmware; complete diagnostics with a scanner and qualified repairs in a workshop will help here.
Video “Do-it-yourself diagnostics of a Kalina car”
To learn how to properly perform computer diagnostics at home, watch the video.
All fuel-injected VAZ 2110, 2111 and 2112 cars have a function such as self-diagnosis of the instrument cluster and even detection of certain errors with codes displayed on the display.
To start this function, you need to hold down the daily mileage reset button and turn on the car's ignition. So that you don’t have to think for a long time about what and how to do, I advise you to watch the detailed video review that I recorded for this topic. The video was made using the example of a VAZ 2112.
As for decoding errors, I will try to make a text description of them below to make it more clear and accessible to everyone.
Diagnostics using a scanner
The method involves connecting an external computer with the program installed. This opens up more opportunities for car diagnostics. In this case, error codes for VAZ 2110 and VAZ 2112 consist of 5 characters.
- P – failure or malfunction of the power plant, transmission;
- B – body systems are damaged;
- C – a problem has been detected in the vehicle’s chassis;
- U – violation of pairing of different modules.
- 0 – general value;
- 1/2 – manufacturer code;
- 3 – reserve.
- 1-2 – violation in the air-fuel mixture supply devices;
- 3 – malfunction of the ignition units;
- 4 – atmospheric emissions control device;
- 5 – malfunction of the engine speed or engine speed meters;
- 6 – failures in electronics;
- 7-8 – malfunction of the gearbox module;
- 9-0 – reserve unit.
The last two digits give the serial number of the breakdown and its location.
Symptoms
If a fault is detected in the oxygen sensor circuit, the Check Engine light comes on. Once the Check Engine Light comes on, the ECU puts the vehicle into a no-fail mode, setting the fuel-air mixture to a fixed ratio and leaning it to prevent damage to the catalytic converter.
A lean mixture can cause increased fuel consumption. The car may run rough or jerk when driving with a faulty oxygen sensor. In extreme cases, the engine may stall.
Decoding error codes for VAZ 2110
Next, we consider the decoding of VAZ 2110 error codes that occur most frequently. For ease of reading, the information is divided into logical blocks.
Sensor failures
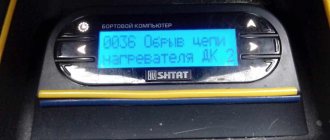
- 0030 – the control controller for the temperature of the air entering the intake manifold is damaged;
- 0032 – a short circuit occurred in the lambda probe lines touching the on-board circuit;
- 0036 – open circuit of the heater sensor installed after the catalyst;
- 0102 – Mass air flow sensor does not respond or is damaged, can also be caused by a malfunction of the flow meter, replacing the air filter may help;
- 0103 – erroneous signal from the mass air flow sensor, the faulty module may need to be replaced;
- 0112-113 – air temperature controller on the intake manifold – a defect has been detected;
- 0116 – DTOZh signal is interrupted or does not arrive evenly, the wiring may be damaged;
- 0117/118 – similar sensor, erroneous/too high signal;
- 0122/123 – TPS has failed or is acting up, the entire circuit will need to be fully diagnosed;
- 0130-132 – problems in the oxygen controller circuits;
- 0133 – slow response from control center 1;
- 0134 – the voltage in the lambda probe circuit has critically decreased;
- 0135 – the oxygen controller heater is damaged;
- 0140 - a similar error on the VAZ 2110 computer indicates a break in the DK2 control circuit;
- 0222 – TPS, open circuit or short circuit;
- 0325 – DD is damaged or the power line is ruptured;
- 0326/0327/0328 – the signal from the knock sensor has exceeded the maximum limit or is too low/line broken;
- 0336-337 – DPKV is broken or the wires are shorted;
- 0340/341 – DPRV is out of order or there is damage to the cables;
- 0342/343/346 – phase distribution sensor failed/control break/short circuit;
- 0500/0501 – the speedometer sensor is broken or shows incorrect data;
- 0504 – the actual position of the brake pedal does not correspond to the calculated indicator;
- 0505/0511 – DXH has failed, the engine speed may fluctuate, you also need to check the lines;
- 0830 – data from the clutch pedal position sensor is incorrectly read;
- 1135 – DK1 is damaged, line diagnostics are required;
- 1141 – the heater of the lambda probe installed in front of the catalyst is faulty;
- 1513/1514 – the XX sensor is damaged or the wires are shorted;
- 1617 – the rough road controller produces a value exceeding the nominal thresholds; it does not affect the operation of the internal combustion engine;
- 2020 – the position dampers of the intake elements do not work correctly;
- 2122/2127 – the gas pedal position sensor gives incorrect signals, the calculated position differs from the actual one;
- 2138 - the same, with a violation of pairing with each other.
How to fix the problem?
To fix the problem, you should diagnose the car again. This can be done either by self-diagnosis or using a scanner. In the first case, the check is carried out using the following algorithm:
- On the speedometer, firmly press the odometer button.
- Insert the key into the ignition switch and turn it to the first position.
- Release the pressed button. After this, the arrows on all instruments will begin to move actively.
- Press the key again and release it. Information about the firmware version should appear on the dashboard.
- Repeat the procedure. After this, error information will be available.
If the problem reappears, it is a good idea to test the car using a special scanner. You will also need a laptop for this. The scanning device should be connected to the diagnostic connector on the car and laptop. Fault codes will be visible on the latter's screen.
If an error is detected repeatedly, it is recommended to reset the negative terminal of the battery for a few minutes and then repeat the test again. If it again reveals a problem, an inspection of the associated machine components is required to determine the malfunction.
First of all, it is recommended to check the control light, its wires and the block. All wiring of the instrument should be inspected. Sometimes the defect can be noticed visually. If the lamp burns out, it must be replaced. It is recommended to install a regular one rather than a diode one. It is a good idea to clean the connections, removing oxides and other contaminants. Often, when checking, you can see an incorrect connection of the control lamp or damage to the wiring. The latter could break, rot or receive other damage. If no visible defects are found, you need to test the wires with a multitester. If you have no experience, it is better to sign up for a car service.
If, in addition to the code, the owner is concerned about problems with starting the engine, low or constantly changing voltage, or charging the battery, the generator needs to be diagnosed. It will be checked by a multitester. Often, a malfunction of the autogenerator is indicated by extraneous sounds emanating from it when the engine is running. This part can often be repaired, but replacement may also be required.
Motorists can identify and fix most of the above breakdowns on their own. But identifying defects in an electronic control unit usually requires a professional approach. Therefore, if you were unable to find the cause on your own, you should contact an electrician within a reasonable time. It is worth noting that in case of failure, the unit is most often replaced.
In addition, a specialist will help you find rarer causes of this fault code.
Prevention of breakdowns of electrical appliances
To prevent breakdowns of electrical circuits, you must follow a number of simple rules.
- Periodically check the contact connectors for oxidation or overheating. Rust disrupts the passage of impulses, which can be read by instruments as damage to the unit.
- Once a year, treat contacts with special oils. Lubricants prevent moisture from entering metals, which prolongs their service life.
- Replace dry wires in a timely manner. Cracked insulation can cause a short circuit.
Errors on the VAZ 2110 (2112) panel provide the user with complete information about the condition of the vehicle’s components and assemblies. If you know the decryptions, the driver can independently fix the breakdown of the vehicle electronics.
Source
On which cars is this problem most common?
The problem with code P0131 can occur on different machines, but there are always statistics on which brands this error occurs more often. Here is a list of some of them:
- Audi (Audi a4)
- BMW
- Buick (Buick LeSabre, Park Avenue, Regal)
- Chery
- Chevrolet (Chevrolet Aveo, Camaro, Cruz, Lanos, Lacetti, Rezzo, Silverado, Tahoe, Express)
- Chrysler
- Citroen
- Daewoo (Daewoo Matiz, Nexia)
- Ford (Ford Mondeo, Fiesta, Focus, Fusion)
- Geely (Emgrand)
- Great Wall (Hover H3, Hover H5)
- Honda (Honda Accord, Odyssey, SRV, Fit, Civic, HR-V)
- Hyundai (Hyundai Solaris)
- Infiniti
- Kia (Kia Rio)
- Lifan (Lifan x60)
- Mazda (Mazda 3, Mazda 6, Mazda cx7, Protege)
- Mercedes
- Mitsubishi (Mitsubishi Outlander, Pajero)
- Nissan
- Opel (Opel Antara, Astra, Zafira, Corsa)
- Peugeot (Peugeot 207)
- Skoda
- Ssangyong
- Subaru (Subaru Outback, Impreza, Legacy, Forester)
- Suzuki
- Toyota
- Volkswagen (Volkswagen Polo Sedan)
- Volvo
- VAZ 2107, 2110, 2112, 2114, 2115
- Lada Granta, Kalina, Niva, Priora
With fault code P0131, you can sometimes encounter other errors. The most common ones are: P0130, P0132, P0134, P0171, P0336, P0480, P0506, P0742.
Source
conclusions
Finding and eliminating the cause of error 4 on the Lada Kalina turned out to be quite easy. Although deciphering error codes requires special knowledge, the necessary information can be found in this article.
Everything is written correctly. But everyone forgets what a gigantic percentage of parts are defective. Personally, only the third sensor from the store worked for me.
the device on the panel (arrow) is controlled by another sensor
Perhaps the wiring connected to the sensor has broken, and hence the emergency mode with increased fuel consumption.
We forgot another option for this error to occur, it is a bad mass, or rather a parasitic influence on the computer on board due to mass from other systems. In the harness that goes to the computer there is a twist of masses, they need to be untied, as you look for on the Internet.
Hello, Vladimir Did you have such a problem when the engine overheated above normal? I changed the thermostat, pump, cylinder head gasket, but the problem does not go away.
Am I having the same problem? Have you solved the problem?
Masses see 100%
You need to connect through the test connector and look at the real code, for me the error on panel 4 turned into code P0343.
Is Code P0131 Serious?
DTC P0131 is generally considered to be quite serious in nature.
This is because the P0131 code can eventually cause engine stalling and other serious drivability problems. Therefore, an unresolved condition of this type can put the driver in a difficult situation, possibly in the flow of traffic. In any case, DTC P0131 should be taken seriously and resolved as soon as possible. If you are not comfortable diagnosing and fixing such a problem yourself, you should make an appointment with a reliable service center of your choice at your earliest convenience.
How does a mechanic diagnose a P0131 code?
To properly diagnose the P0131 , you will need an advanced diagnostic scanner that can not only read stored error codes, but also view readings from various sensors in real time.
First, the mechanic reads all the stored data and error codes using an OBD-II scanner to find out when and under what circumstances the P0131 . He will then clear the error codes from the computer's memory and test drive the vehicle to see if the P0131 again.
If the error code appears again, a mechanic will check the electrical wires and oxygen sensor connector for damage.
If the oxygen sensor wiring is OK, the mechanic will measure the voltage and resistance of the sensor and compare the readings to the manufacturer's specifications.