The Chevrolet Niva lambda probe, together with a sensor system, helps to properly regulate engine operation and use fuel extremely efficiently. This affects the amount of harmful emissions into the atmosphere.
On the Shnivy, the sensor is designed to transmit information to the computer regarding the amount of air coming out after combustion of the fuel. The information helps to adjust the composition of the fuel mixture and unlock the potential of the engine. It also significantly increases the life of the catalytic converter.
Where is it installed, types
This element is located in the exhaust manifold (the so-called “spider”), where the exhaust system pipes are connected. In some cases, the sensor is installed closer to the catalyst. But this arrangement does not affect the overall performance of the device. There are several types of oxygen sensors:
- Broadband type.
- With two-channel layout.
The latter were installed on old cars (before the 90s). Modern cars are equipped with a broadband lambda probe. Such a sensor is able to accurately detect deviations in the composition of exhaust gases and quickly balance this ratio by reducing or increasing oxygen in the mixture. A working sensor can reduce fuel consumption. Also, its work is aimed at maintaining optimal idle speed.
Why is a lambda probe needed in a car, location
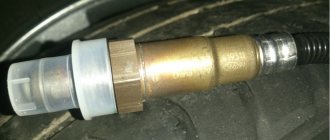
A lambda probe is necessary to measure the oxygen content coefficient in a combustible mixture. It is always installed in the area of the exhaust pipe before the catalyst and measures the volume of unburned oxygen in the combustion products. This information will allow the ECU to prepare the optimal mixture.
A mixture containing 14.7 parts air and one part fuel burns most efficiently. These are optimal indicators; if oxygen is present in large quantities, then the mixture is lean; if there is less air, then it is rich.
Why does the oxygen sensor (Kalina) fail?
Signs of a malfunction may vary. First of all, this concerns the quality of the combustible mixture itself. Various deposits can worsen the performance of the oxygen sensor. The element also malfunctions due to depressurization of the housing.
This often happens due to obsolescence of the element. Less often, the housing is damaged mechanically, since it is located in a fairly safe place. Another reason is improper power supply. The sensor contacts may move away, as a result of which information is received incorrectly by the control unit. The composition of the fuel-air mixture is disturbed (too lean or rich). Another cause of malfunctions is an incorrectly set advance angle. This applies to cars with a distributor ignition system. Interruptions can also occur due to problems with high-voltage wires, or due to spark plugs. The engine begins to stall at idle and operate incorrectly at high speeds.
Symptoms of a problem
Characteristic symptoms of lambda failure are factors.
- Cold and hot starts of the power plant become more difficult. The car starts the second or third time, and the starter has to be turned for a long time. This is a clear sign that the heater is faulty.
- Increased fuel consumption, the system constantly thinks that the mixture is too rich and adds gasoline to the injector.
- Acceleration is greatly reduced.
- Violation of the engine stroke. The electronic control unit incorrectly adjusts the adjustments, which affects the stability of the power plant.
- Shooting and popping noises are heard from the exhaust system. The problem is specific to lambdas 1 and 2.
How to identify the problem?
Let's look at possible signs of a malfunctioning oxygen sensor:
- Increased fuel consumption.
- Jerking when moving.
- Noticeable drop in power.
- Unstable engine operation at idle.
- Increased toxicity of exhaust gases.
Note that these symptoms do not always occur specifically because of the oxygen sensor.
Therefore, having identified one of the above symptoms, we proceed to a more detailed check of the device. We'll look at how to do this below.
Is it possible to clean the probe?
If the oxygen sensor fails, it cannot be replaced, since there are no restoration methods. Given the high cost of the replacement part, repairs can be expensive.
But there are other options:
- choose a universal sensor, which is much cheaper than the original one, suitable for most car models;
- I'm looking for a used spare part with a warranty; an exhaust manifold with a sensor installed will also work.
But changing a part is not always necessary. It is enough to know how to clean the lambda probe. In addition, situations of severe contamination cannot be ruled out. Soot and carbon particles may be deposited on the sensing element, which is covered with a protective cap. Because of this, failures and errors appear in the work. Once the plaque is removed, the effectiveness of the device is restored.
Subtleties of cleaning:
- The procedure begins with dismantling, for which the surface of the part is heated to 50 degrees. After pulling out the sensor, remove the protective cap.
- The work uses orthophosphoric acid, which is capable of removing carbon particles and impurities without damaging the electrodes and important elements. Soaking is carried out for 10-20 minutes.
- A more complex option involves removing the protective cap and cleaning with a finer brush. After removing impurities, the part is washed and dried.
Washing is carried out if it is possible to reinstall the protection, which involves performing argon welding. The cost of cleaning is much lower than replacement. This solution is only suitable for useful but dirty sensors. When reassembling, it is important to lubricate the threaded connection with mounting paste. When installing a new element, no lubrication is required; the connection is processed during the production process.
Purpose and operation of the sensor
To understand what the lambda probe is responsible for, you need to pay attention to the operation of the fuel system. The oxygen sensor is an important element in maximizing engine efficiency on fuel-injected cars.
High performance is possible with complete combustion of the air-fuel mixture. Therefore, it is important to determine the optimal ratio of components. In connection with the correct assessment of the oxygen content in the exhaust, a subsequent calculation of the fuel mixture is carried out.
A properly functioning probe provides:
- reduction in fuel consumption up to 15%;
- improve the environmental friendliness of exhaust gases;
- the factory service life of the catalyst is preserved;
- excellent dynamics, remains responsive when driving.
The best performance is typical for cars with two sensors, one of which is located before the catalyst, and the second after it.
When studying the principle of operation of a lambda probe, it is worth considering that the operating pattern differs depending on the type.
Device types:
- Two-point models include two electrodes in their design. This allows you to estimate the coefficient of excess oxygen in the fuel mixture, determining its content in the exhaust. The action occurs during the passage of exhaust gases. Here the first element is sensitive to oxygen. The second one is made of zirconium. As the discharge passes between the electrodes, the potential is measured. An increase in the indicator means excess oxygen.
- Broadband probes are a new type of probe. A voltage of 450 mV is maintained here. The device includes ceramic components: colon and injection. The latter sucks in the oxygen present in the exhaust. In this case, a certain amount of current is used. A drop in oxygen level leads to an increase in voltage, which is accompanied by a corresponding signal being sent to the ECU.
Maintenance, timely diagnostics, and troubleshooting allow you to eliminate most unforeseen situations, save the factory resource, and the performance of the units.
Detailed diagnostics
How to check the lambda probe (oxygen sensor) with your own hands? You can do this in two ways:
- Visually.
- Using a multimeter.
Let's look at the first method first. So, first we remove the connector from the lambda probe. We examine all contacts. The wires must not be broken or damaged. If the contacts do not fit tightly against each other, this issue needs to be corrected. Next, we check the oxygen sensor itself. A Priora, the signs of a sensor malfunction may include the presence of soot, must be urgently repaired.
This is due to the combustion of a rich fuel mixture. Because of this, the device becomes dirty and cannot quickly respond to all changes. If there are shiny deposits (this is lead), the oxygen sensor is replaced. Lead damages both the probe itself and the catalyst. What are the signs of a bad oxygen sensor? The presence of lead indicates the use of excess fuel additives or low-quality motor oil.
Lambda probe errors in the vehicle's on-board system
In most cases, the internal combustion engine itself tells you whether there are any malfunctions in the operation of the sensors. It is enough to connect the diagnostic equipment and read the fault codes.
If everything is bad, then the ECU will display the following errors - P0131, P0134, P0171. More details about them in the video below.
The “check engine” light will also come on, but here the exact cause can only be determined using diagnostics. The check also lights up in case of other problems.
Diagnostics with a multimeter
How to check a lambda probe (oxygen sensor) with a multimeter? To do this, we need to connect the signal wire from the oxygen probe connector to our measuring device. Next, we start the engine and keep the speed around 2.5 thousand. Let's release the gas pedal. We pull out the vacuum tube from the fuel regulator and look at the readings of the device.
If the voltage is less than 0.8 V (or absent at all), signs of a malfunction of the oxygen sensor have been confirmed. There is no point in repairing it. Due to the design features, the element can only be replaced. The cost of this element ranges from two to three thousand rubles for VAZ cars. How to change the oxygen sensor yourself, see below.
Regulator replacement
Replacing an oxygen sensor on domestic cars, as a rule, does not cause any particular difficulties. The only difficulty may be boiling of the probe, after which it is practically not amenable to mechanical influence. But even for these cases there are effective and step-by-step instructions. This is shown below.
- The car climbs onto the overpass.
- The power supply protection has been removed.
- The hood opens and work begins with the probe wires. The oxygen sensor harness is located on the CO (cooling system) pipes. They are fixed with clamps.
- The plastic clip holding the wiring is cut;
- The sensor is unscrewed with a key set to “22”.
If the device is not removed, then the sensor is boiling. We proceed according to the following scheme. Spray the regulator with WD-40, wait a moment and try removing it again. If it still doesn’t work, start the engine and warm up the exhaust system a little, pour water on the regulator and try again. If that doesn’t help, you’ll have to heat the sensor directly with a soldering iron, hit it with a hammer (not too hard) and unscrew it.
The regulator is installed in the reverse order of removal. Don't forget to connect the connector and secure the wiring to the pipes.
Knowing the signs of a malfunctioning lambda probe, you can react in time and replace it. A normally functioning sensor means high-quality, trouble-free operation of the engine. A motorist should never forget about this.
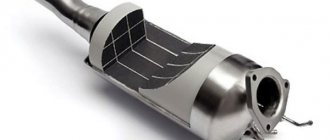
The exhaust system of cars has changed significantly in recent years; several additional elements have appeared in its design, allowing the use of cars without violating international environmental standards.
For example, one of such elements is an oxygen sensor, the signs of malfunction of which should be known to every car owner. We will consider in detail the purpose, design features and common malfunctions of the lambda probe within the framework of this publication.
DIY replacement
First, disconnect the terminal on the battery. Next, disconnect the block from the sensor itself. Sometimes it is attached using clamps - we also unscrew them. After this, we pick up the “22” or “24” key (depending on the make of the car) and unscrew the probe. Please note that the sensor is part of the exhaust system and, accordingly, operates under extreme load conditions. It is very difficult to unscrew it the first time. Use universal lubricant VD-40. Try not to damage the threads and edges of the stuck sensor itself. As a last resort, you can use a hammer, screwdriver and gas wrench.
With light blows we move the element from side to side. You can pry it out with a screwdriver. If this does not help, use a drill to drill a hole in the probe in place of the nut. We insert a screwdriver inside and try to pull it back out. This should help. We screw a new one in place of the old element. Try to ensure that the part fits snugly against the surface of the exhaust manifold pipe (but do not overtighten the element).
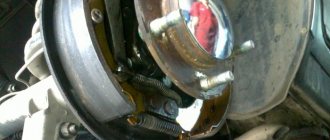
Where is the oxygen sensor located?
On Chevrolet Niva models up to 1995. The controller is installed on the metal body of the exhaust manifold. The second generation Chevrolet Niva (after 1995) is equipped with two DCs: diagnostic and control.
The first is located in the exhaust manifold housing, the second is after the manifold coupling.
Access to equipment for preventive maintenance from under the bottom of the car, as well as through the top of the engine compartment.
Also interesting: Checking control devices and their sensors Niva 2121, Niva 2131
The average service life of the recreation center is 80 – 110 thousand km. depending on the driver's compliance with the manufacturer's recommendations.
What is an oxygen concentration sensor used for?
In practice, many vehicle owners are not even aware of the existence of this element. Its purpose is to determine the oxygen concentration in the exhaust gases and subsequently transmit this information to the ECU. Based on this, according to the algorithms embedded in the system’s memory, the fuel-air mixture is corrected for its complete combustion in the cylinders of the power unit.
The location of the oxygen sensor is the exhaust manifold. On most models, the lambda is mounted directly in the area of the catalytic converter. Regardless of where the sensor is installed, the correctness of its readings and system performance will not be affected. There are two types of lambda probe:
Note that the second type is included in the design of older vehicle models that were produced before the 90s. All modern models have a broadband lambda, which accurately records all deviations to ensure the most correct mixture formation. At the same time, a properly functioning sensor of such a system can actually reduce fuel consumption and ensure optimal crankshaft speed of the power unit.
Electric snag
The emulator has a microprocessor that corrects the signal for the ECU. The latter “believes” that the sensor is working and passes the data without interpreting it as an error.
In fact, there is no longer a catalyst in the design; instead, a section of the exhaust pipe is welded in.
The cost of the emulator varies from 1,500 rubles, which is 85–90% of the price of a new recreation center. Unlike a standard controller, the emulator has an unlimited service life.
| Catalog article/marking | Price in rubles |
| BOSCH Euro III, up to car 0258005133 | From 1800 |
| After catalyst 0258045197 | From 1800 |
| Fion | From 1400 - 1500 |
| ZVT | From 1400 - 1500 |
| Krayd | From 1400 - 1500 |
| HW-QNT | From 1400 - 1500 |
| Metal spacer | 250-330 |
| Electronic emulator | From 1600 |
| *prices are as of May 2022 | |
Detailed problem definition
Common signs of a malfunctioning lambda probe include the following:
- increased fuel consumption;
- the occurrence of jerking while driving;
- a sharp decrease in the power of the power unit;
- unstable idle;
- the appearance of a sharp, toxic odor in the exhaust gases of a car.
It must be emphasized that the symptoms listed above are not always the result of a malfunction of the oxygen concentration sensor. If these symptoms are detected, the lambda probe must be thoroughly checked. Let's take a closer look at this process.
Do-it-yourself controller diagnostics on a Chevrolet Niva
To check the equipment we use a multimeter. Most motorists have the device in their garage. The sequence of actions is as follows:
- We place the car above the inspection hole;
- Remove the limit switches;
- Connect the multimeter terminals;
- We activate the device to the “Resistance measurement” position;
- We analyze the received data.
If the arrow tends to infinity, the lambda probe is working; if the arrow drops to zero, the part is damaged. Remember that the controller is non-separable and cannot be prevented.
Methods for diagnosing a lambda probe
You can test the sensor in one of the following ways:
- During a visual inspection
- Checking with a multimeter
Let's start with the first method. First, you need to disconnect the connector from the sensor and inspect the condition of the contacts; the integrity of the wires should not be compromised, and all connections should be held tightly. After this, we inspect the sensor itself. There should be no deposits or damage to the integrity of the structure.
Soot deposits can be cleaned; its formation is caused by the combustion of a too rich fuel mixture, as a result of which the lambda patency is impaired. This leads to the device beginning to function incorrectly. Lead deposits, which have a silvery-shiny color and are caused by the use of low-quality fuel and motor oil, are considered the most destructive for the sensor. There is no way to get rid of them; a complete replacement of the device is recommended.
The process of checking a lambda probe using a multimeter is not particularly difficult. To carry it out, you need to connect the signal wires of the sensor with the probes of the tester, then start the power unit and hold its speed at 2.5 thousand. Next, we drop the accelerator, pull out the choke and look at the multimeter scale.
A complete failure of the oxygen concentration sensor is indicated by the absence of voltage or its low value (less than 0.8V). Since the design features do not allow the lambda probe to fully restore functionality, a complete replacement of the worn-out element will be required.
Signs and causes of sensor malfunction
According to statistics, oxygen sensors fail gradually, so you can identify its malfunction if you pay attention to the following “symptoms” in time:
- The idle speed began to drop or “float”.
- The car jerks, and after starting the engine, popping noises uncharacteristic of the engine are heard.
- The engine power has decreased and when you press the gas pedal there is a slow response.
- The engine overheats greatly and fuel consumption has increased.
- The smell in the exhaust pipe has changed (exhaust gases have become more toxic).
Also interesting: Oxygen sensor on a Chevrolet Niva: where is it located, replacement
As a result of a failed sensor, the quality of the fuel mixture entering the combustion chamber deteriorates, which disrupts the smooth operation of the engine. There can be many reasons for this:
- Incorrect operation of the filament circuit or reduced sensitivity of the sensor tip.
- Low-quality fuel with a high content of iron, lead, oil decay particles and other harmful inclusions. All these substances stick to the platinum electrodes, causing the sensor to malfunction.
- Problems with the lambda probe heating system. If the heating stops functioning as it should, the oxygen sensor will produce inaccurate data.
- Overheating of the regulator housing. This happens if the ignition timing is incorrectly set.
- Worn oil scraper rings. In this case, engine fluid enters the exhaust pipe, which affects the lambda probe.
- If the engine is started repeatedly.
- Using sealants (especially silicone) to install lambda probes.
- The compression level in the engine cylinders is impaired. In this case, the combustible mixture burns unevenly.
- Clogged engine petrol injectors.
If you notice that the lambda probe is not working, you should not ignore the symptoms, as otherwise you will cause yourself a lot of problems with your car. The fact is that most modern cars are equipped with an emergency locking unit, which can work at the most unfortunate moment. However, the impossibility of further movement is not the worst thing. If the sensor becomes depressurized, the injection system will fail and you will have to pay for expensive repairs to a more serious unit.
Therefore, it is recommended to periodically check the condition of the lambda probe. You can do this yourself.
If the lambda probe is faulty, the exhaust gases become more toxic. This can be determined using special diagnostic equipment. In this case, there will be no external signs, just as there will be no special smell.
Fuel consumption increases. Drivers, as a rule, monitor how full the fuel tank is and try to determine the speed at which consumption is minimal. The increased consumption will be immediately noticeable. Depending on the severity of the oxygen sensor failure, the flow rate will increase from 1 liter to 4 liters.
Catalytic converter overheating. If the lambda is faulty, an incorrect signal is sent to the ECU. This may cause the catalyst to malfunction. It overheats until it turns red and fails.
How to replace it yourself?
As you can see, in most cases of lambda probe failure, repairing it makes no sense, so the best solution to the problem would be to replace the faulty element, especially since this process is not complicated.
Before replacement, it is necessary to turn off the power to the vehicle's on-board network, and then remove the block from the sensor (on some models it can be additionally secured with clamps). Since lambda is included in the design of the exhaust system, the element therefore constantly operates under high loads. It is not always possible to unscrew it the first time. This should be done carefully so as not to damage the threads in the exhaust manifold pipe.
After the failed element is removed from its seat, we clean the threads from dirt, install a new lambda probe and screw it in, being careful not to overtighten.
The importance of the oxygen concentration sensor in the exhaust system of a car cannot be overestimated, since its failure will provoke incorrect operation of the power unit, which is extremely detrimental to its elements. For this reason, you need to learn to identify its breakdowns in a timely and correct manner.
Operating principle of the oxygen sensor
The principle of operation of the oxygen sensor is quite simple. The lambda probe must compare the readings with some ideal results in order to understand how the percentage of oxygen in the mixture changes, so measurements are taken in two places - atmospheric air and combustion products are measured.
This approach allows the sensor to feel the difference if the fuel mixture ratio changes.
The ECU must receive an electrical impulse from the lambda probe. To do this, the sensor must be able to convert measurements into electrical signals. For measurements, special electrodes are used that can react with oxygen.
Lambda uses the principle of galvanic cells - changing the conditions of chemical reactions leads to a change in the voltage between the two electrodes. When the mixture is rich and the oxygen content is below the lower threshold, then the voltage rises. If the mixture is lean, the voltage will drop.
Next, the impulse that occurs at the stage of chemical reactions is sent to the ECU, where the parameters are compared with the fuel maps stored in the memory. As a result, the operation of the power system is adjusted.
Also interesting: Why is the abs icon on - Auto Workshop Online
The oxygen sensor operates on chemical reactions, but its design is relatively simple. The main element is a special tip made of ceramic materials. Zirconium dioxide and, less commonly, titanium dioxide are used as raw materials.
The tip is coated with platinum - it is this layer that reacts with oxygen. One side of this tip is in contact with the exhaust gases, the other side with the air in the atmosphere.
The lambda probe electrodes have one feature. So that the reaction is more efficient and the indicators are accurate, measurements of the oxygen content in the exhaust are carried out under certain temperatures.
In order for the tip to reach the performance characteristics and the required electrical conductivity, the temperature of the environment should be 300-400 degrees.
To ensure the required temperature regime, the lambda probe was initially installed in close proximity to the exhaust manifold. This ensured the desired temperature after warming up the internal combustion engine. The sensor did not start working immediately. Before the lambda warmed up enough and began to produce accurate parameters, the ECU used signals from other sensors. The optimal mixture was not prepared during the heating process.
Some oxygen sensor models are equipped with electric heaters. Thanks to them, the lambda can quickly reach operating temperature conditions. Heating uses energy from the vehicle's on-board network.