Hello!
In this article we will look at how to coat headlights with varnish.
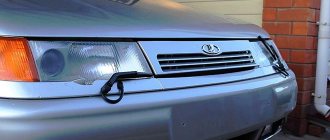
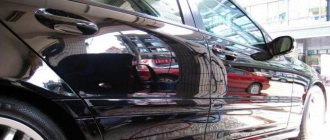
The transparent part of the headlights (lenses) of most modern cars is made of polycarbonate. This is a durable, inexpensive plastic that allows you to make headlights of various shapes and sizes. It has high mechanical strength even at very low temperatures (down to – 100 degrees Celsius). The transparency of headlights with polycarbonate lenses is superior even to glass. Such headlights can withstand impacts from stones flying from the road while driving. Meanwhile, polycarbonate is susceptible to scratches, oxidation and dulling when exposed to sunlight and weathering. At the factory, plastic lenses are coated with a coating designed to protect the plastic from scratches and ultraviolet rays. Over time, this coating deteriorates and the headlights become cloudy.
In order for the lenses to become transparent again, the old protective coating must be completely removed using fine-grained sandpaper. Next, you can either polish the headlights (see article) and protect them with a temporary solution, or cover them with a permanent coating. A temporary protectant, such as synthetic wax, provides the necessary protection, but requires periodic renewal. In this article we will look at long-term protection - varnishing headlights.
Causes of cloudiness
Yellow headlights, if this is not a special type of tuning, cause sympathetic glances from drivers and problems with traffic police inspectors. The requirements for the quality of road lighting are high, and if the lights have dimmed significantly, this is a direct violation of traffic regulations.
The cases are made of glass and plastic. Optics manufacturers refuse to use glass for many reasons:
- expensive;
- glass blocks are heavy;
- do not require frequent replacement and are not profitable to produce.
It takes more than one year for headlights made of glass to become cloudy. Plastic cases are 70% lighter and 560% softer than glass. It is beneficial for manufacturers to use plastic, because car owners have to spend more time and money on maintaining them. Reasons why optics units turned yellow or cloudy:
- Systematic impact of gravel, which hits the lights at speed.
- Using light bulbs of unspecified power: the protective coating in the plastic peels off from the inside.
- Dust accumulates in microscopic cracks.
- Overheating during polishing causes the plastic to become cloudy and dark.
If the lights have lost their transparency, you can restore the optics with varnish, after polishing the surface.
Materials and tools
Polishing varnished headlights can be done using 2 main methods: with dismantling the optics and in the installed state directly on the car. The first option will require more time due to removal and installation work, but will allow you to restore the optics even with significant damage. There is no need to remove the headlight if the damage is subtle.
Regardless of the chosen direction, coating headlights with varnish after polishing will require the following materials and tools from the performer:
- napkins and rags;
- detergent;
- masking tape;
- solvent for degreasing the surface;
- grinding machine, it is better to equip it with a soft nozzle, this will speed up the process;
- abrasive paper marked 320, 600, 1000, 1200, 2000 and 2500;
- varnish If it is 2-component, you need to prepare a container in which the working solution will be prepared;
- A hairdryer will speed up the drying time.
Solvent "Solvent"
How to restore the transparency of headlights using varnish
Restoring headlights under varnish is an alternative way to return proper lighting to your car. The method is suitable for glass and plastic headlights only if the optics are not significant, more than 3 mm. into the depth of scratches and chips.
Before varnishing, it is necessary to remove the yellowness of the headlights by simple, non-machine polishing.
Restoring headlight lenses with significant scratches and chips requires machine grinding and polishing.
Before varnishing, it is necessary to drive the car into a garage, the air temperature is at least 20 ° C. You can remove the running lights from the car; in this case, you will not need to protect the body during polishing and varnishing. The whole work will take an hour and a half. The coating will dry for at least a day. During this time, you must not touch the surface, try to correct it, etc.
The restoration process step by step, if you do not want to remove the headlights:
- Use masking tape to cover the paintwork near the optics unit.
- Use 400 grit sandpaper to remove large scratches. You can clean it manually for 3-5 minutes.
- Using 1200 grit sandpaper, re-treat the surface. You can use a polishing machine.
- While cleaning, water the block generously. It is not recommended to use polishes: they are difficult to wash off.
- Clean the surface from dust and polish, if used with a hairdryer.
- Degrease the surface and dry thoroughly.
To restore transparency, either a two-component varnish or a special one in cylinders is used. Two-component, consisting of resin and solvent, pre-filtered. Apply to the surface via sprayer.
- Cover the car with film to prevent the varnish from damaging the bodywork.
- Spray a thin layer of varnish over the entire surface. Try to complete the procedure in one step, making the layer of varnish the same over the entire surface.
The composition will fill all cracks and roughness on the body, making the outer wall smooth. This will ensure optimal refraction of light through a uniform coating. The material will harden in 50-60 minutes and completely dry in 48 hours.
Tinting the glass of your optics is a beautiful tuning effect
There is a way to improve the appearance of the headlights even more, they will not only have a shine, but also a special color. Tinting is used to enhance visual qualities. The headlights get a dramatic look and add tint to the headlights. The only drawback is the complexity of the procedure. To create a tint, you will need high-quality polishing and subsequent frosting of the glass. Only after preparation is the material applied.
The method of applying all types of tint is described in the instructions for the product or on the official resource. To determine the best tinting varnish with the optimal combination of price and quality, you can use customer reviews, but it is not recommended to buy cheap options. Regardless of your choice, you must adhere to the following application principle.
Car optics tinting
Which varnish to choose
Depending on the surface material, the varnish for the headlights is also selected. For glass bodies, acrylic, two-component, polyurethane compounds are used; for plastic optics, only two-component, aerosol ones are used.
Purpose of coverage:
- tinting;
- protective.
The composition for restoring the capacity of a clouded headlight is marked according to the classification. When choosing an aerosol or two-component material, it is recommended to pay attention to the ratio of active substances. Drying time and shine depend on the amount of polymer compounds:
- UHS. The varnish contains less than 15% polymers. The material dries quickly and is often used as a tint or protective after polishing.
- H.S. More than 70% polymers. The material dries slowly and can be used to polish headlights and restore full transparency. It is recommended to apply in 1 layer.
- MS. Equal amount of polymers, solvent. The material is suitable for restoring throughput and for tinting. Apply in 2 layers and dry in 24 hours.
- The two-component composition is available in two containers: dry residue and solvent. Before work, it is necessary to mix the substances and filter the material through a sieve.
- Polyurethane is available in aerosol cans, completely ready for application to the surface.
- It is recommended to varnish the block with your own hands using aerosols. There is no need to mix components, calculate proportions, or look for a spray bottle.
Benefits of the solution
Coating headlights with varnish serves the following purposes:
- reducing the intensity of aging;
- formation of a reliable protective layer that protects the base from mechanical contacts, scratches and chips;
- improvement of appearance;
- financial savings, the part lasts longer, and therefore it is possible to get rid of unnecessary costs associated with its replacement;
- Dirt sticks to the varnish layer less easily, making it much easier to wash the car;
- protection from chemical exposure and ultraviolet radiation, which is dangerous for optical elements.
Main varieties
After polishing, headlight varnish is classified according to a whole set of characteristics, the main one of which is the material on which it can be safely applied:
- glass;
- polymers, acrylics or polycarbonates.
Classification is also allowed in accordance with the functional purpose of the product:
- protective composition. It can be in aerosol form or be presented in two components, which are mixed immediately before processing;
- toning composition.
Protective varnishes are cataloged by main components:
- Acrylic one-component varnish . The product may have some shade or be completely transparent. It is extremely easy to apply, no additional mixing is required, all work can be easily done on your own in a garage. The substance has a minimal drying time and acquires a gloss as it hardens. The main disadvantage is that acrylic does not fill large chips and cracks very well and cannot firmly attach to a polycarbonate base.
- Two-component varnish . Such products are supplied in two containers. The first container contains the varnish itself, the second contains a special substance, thanks to which it gains strength. Mixing of the components is carried out immediately before processing. This feature somewhat complicates the work process, but is fully compensated by the quality of the result; the finished coating is extremely durable and visually attractive. Professionals recommend choosing this type of varnish for processing.
- Urethane varnish . This composition is presented in aerosol form and has ideal transparency. Before processing, it is necessary to thoroughly treat the base, remove all contaminants and degrease. Motorists appreciate this varnish for its ease of application, as well as for its decent performance characteristics. The substance provides a high degree of protection and demonstrates resistance to any influences, mechanical and atmospheric.
Substances used after the polishing procedure can also be divided according to hardness parameters, which depend on the volume of the polymer fraction in the composition.
The following groups are distinguished:
- HS indicates that the varnish has a significant dry matter content with a minimum volume of solvent. A distinctive feature is a bright and rich shine. Experts recommend applying this composition in one and a half layers to achieve maximum strength and visual appeal;
- MS – average content of dry substances and solvents. When applied, 2-3 layers are formed, with each new layer applied after the previous one has completely dried;
- UHS is a solution with the highest percentage of dry polymer substance. This feature ensures maximum resistance to mechanical stress, as well as minimal drying time.
The varnish can also be transparent or tinted. The second option is used to improve the overall appearance of the car; the headlight covers can be painted in an unusual shade, which must be indicated on the packaging.
This video talks about Body Clear protective varnish for headlights:
Process Features
So, we figured out what varnish to coat the headlights after polishing. Now it’s worth paying attention to a number of points, the observance of which will help improve the quality of the result.
- Before applying the varnish layer, you must thoroughly clean the surface of the headlight. The greatest danger is posed by traces of bitumen-based sealant, which significantly impairs the quality of adhesion. After washing and degreasing, the surface is dried for several hours.
- If a two-component type of protective varnish is used, it is recommended to dilute it in small portions, which will be used within the next 10 minutes.
- If you plan to polish and varnish acrylic-based headlights, then it is better not to use paste during the initial processing. They form a surface microrelief, which impairs further adhesion to the varnish.
- The composition gains full strength within 24 hours, during which it cannot be subjected to any processing, washing or polishing.
- If the treatment is carried out with a spray can, then the direction of the jet should be perpendicular to the plane of the headlight. Deviations provoke the formation of sagging and worsen the overall appearance of the part after hardening.
Watch this useful video that shows how to paint headlights with varnish:
To summarize , it should be said that varnishing is just as important a stage in the processing of a headlight as pre-polishing. Additional protection will significantly increase the overall service life of the part, eliminating unnecessary financial costs and problems.
Ceramic varnish
Car enthusiasts who believe that the chemical composition of polycarbonate ceramic varnish contains elements of ceramics are mistaken. The material received its name due to the great similarity of the hardened varnish to natural ceramics. More often used for painting the body, it has up to hundreds of shades from matte to chameleon.
Ceramic varnish to restore the transparency of headlights is more often used in garage repairs. A transparent composition is selected that gives shine and gloss to the glass surface. Apply with a brush or spray.
Ceramic varnish “heals” microcracks and completely restores the surface due to its non-uniform hardness. The outer microlayer has increased hardness, the inner one is elastic. When a scratch occurs, the inner layer fills the crack, restoring the original appearance.
Before applying ceramic varnish, it is necessary to completely remove the factory varnish.
Polyurethane varnish
One of the most common types of protective chemicals for automotive optics. It consists of a solvent and a varnish base mixed in different proportions.
It is necessary to restore the optics and remove yellowness only after polishing the headlight, washing and drying it. The quality of the brightness of the optics and the durability of the coating depend on the adhesion strength of the surface and the varnish composition.
Polyurethane varnishes are equally suitable for restoring plastic and glass cases. If the interior of the polycarbonate headlight peels off and the optics become cloudy, replacement is recommended. It will no longer be possible to restore the quality of light output.
Application process
Glass running lights that have lost their transparency are often processed only on the outside. Glass, as one of the hardest materials, is practically not subject to clouding due to a burnt-out light bulb in the unit or a short circuit. The external varnish coating of the headlights is made from a spray can.
In the case of plastic blocks, there is a possibility that the outer surface is damaged by scratches, and the inner surface begins to peel off due to frequent overheating. In this case, the optics are dismantled from the car, internal and external restoration and polishing are carried out.
Grinding, coating the plastic of rear lights, dimensions, head lighting in steps:
- Dismantle the headlights, remove the lamps and blocks from the housing.
- Separate the plastic part by preheating it with a hairdryer.
- Wash the headlight.
- Sand the outer and inner surfaces.
- Wash and dry the block.
- Degrease the surface.
- Treat the outer and inner surfaces with an activator.
Recommendations from experts
If the buyer wants to make the most of his money and get the best result, he should:
- ensure maximum cleanliness of the room and good exhaust;
- carry out work only with personal protective equipment - gloves and a respirator;
- Before varnishing, glass should be especially carefully examined for the presence of sealant particles; bitumen is especially harmful. It is recommended to dry the glass surface in a thermostat set at 110 °C for 3 hours. When working with a construction hair dryer, this will prevent the appearance of cracks and boiling;
- It is better to avoid polishing pastes before varnishing plastic headlights. The plastic base reacts poorly to pastes and impairs adhesion to the varnish;
- To prevent the appearance of abrasions and stripes, you need to perform the procedure in several stages, gradually changing the direction. Each subsequent abrasive material is used for perpendicular grinding. With a sharp transition to a larger grain size of paper, clouding or a holographic effect appears;
- if the optics cannot be removed, for ease of operation it is better to raise the hood;
- two-component varnish should be diluted in small portions so that each part can be used for 5–10 minutes;
- To speed up the hardening of the varnish, you can warm up the headlight with a hairdryer for 10 minutes, only at a low temperature. The procedure is carried out only immediately after gluing;
- Do not wash or treat headlights for 1 day after application;
- To enhance the protection of the varnish, it is necessary to apply an anti-gravel film on top.
Using special wipes
Wipes for restoring headlights can only be used as an aid. They will quickly restore only slightly tarnished glass or plastic. Before use, it is also necessary to treat the surface with fine-grained sandpaper (from 1800 grit). Cleansing takes no more than a minute.
The manufacturer recommends washing and drying the headlight before using the wipes. Experienced drivers prefer to additionally sand the surface with sandpaper of more than 2000 grit, or pre-polish with toothpaste.
It is necessary to wipe the cleaned and dry headlight with a special cloth without rubbing the varnish. Apply the product with gloves. The DOVLight coating lasts on the headlight for up to 7 months.
Other means
Glass housings can be cleaned of plaque through steam restoration of headlights. The ribbed surface inside is quickly cleaned of yellowness and dust. The outer surface is polished and varnished.
You can restore the original shine of the optics by chemically restoring the headlight. Meguir's set will do. The kit includes:
- headlight cleaner;
- degreaser;
- varnish cloth.
There is no need to grind the optics: the cleaner will remove all dirt, and the polyurethane varnish will quickly fill microcracks.
Vinyl models
Initially, only outdoor advertising banners were covered with a vinyl protective layer. The material protected the design well from fading and mechanical damage. Using vinyl as an armor film for headlights, drivers do not reduce the luminous flux of the lighting device: the material transmittance is 99%. The advantages of this option:
Price. You can use vinyl coating for optics and bodywork after preliminary polishing. The assortment includes color film models
It is important to take into account the reduction in track lighting parameters by 10% after using any colored coating. The material is much thinner than its polyurethane counterpart and can be used for gluing ribbed surfaces.
Among the disadvantages, owners of vinyl armor note:
- The appearance of a yellow coating (on average after 12-16 months of operation).
- At air temperatures below -25 °C it may crack. This was discovered by those drivers whose cars were outside in the cold.
- When gluing a ribbed surface, the material must be constantly heated.
How to clean headlights with toothpaste
You can restore the original appearance of a glass or plastic case with toothpaste. If the clouding of the optics unit is associated with peeling of the polycarbonate layer inside the plastic headlight, no method of external cleaning of the housing will help.
To clean headlights with toothpaste in no more than 30 minutes, you will need:
- any paste with a whitening effect;
- polishing machine with a soft felt nozzle;
- pure water;
- degreaser;
- rags for wiping.
Cleaning process in stages:
- Wash the headlights and wipe dry.
- Treat with a degreaser.
- Apply the paste directly to the body or to the surface of the sponge of the polishing machine.
- Thoroughly clean the surface with the paste for 3–5 minutes if using a machine, 12–15 minutes if cleaning by hand.
- Rinse off the paste with clean water and wipe dry.
After cleaning with toothpaste, they pass over the surface with special varnish wipes. Applying the varnish takes a few minutes, and the optics restore their original shine and brightness.
Safety precautions
When performing work, it is important not only to do everything according to the instructions, but also to adhere to safety rules:
- When applying varnish, protective clothing is worn. Gloves and safety glasses are required, and protective overalls will also be useful. Additionally, you should take care of the respiratory tract; paint and varnish materials can only be applied in a respirator.
- Preparing the premises. The room where work will be carried out must be clean and have good ventilation.
- Fire safety. There should be no open flame sources near the headlight varnishing area. It is advisable to have a fire extinguisher on hand.
- No outsiders allowed. It is important that children do not have access to the place of work; it is also advisable to limit access to pets.
At the end there is a thematic video.
Manufacturers
The Delta Kits company produces single varnishing kits. The set includes:
- two-component varnish;
- degreaser:
- polishing paper in calibration 320,500,800,1200,1500,3000 grit.
- felt lint-free napkin.
With one set you can polish your optics yourself and apply Delta Kits varnish. Its main advantage is the protection of plastic from UV, maintaining the transparency of the restored headlight for up to 22 months.
The manufacturer Dovlight produces kits for restoring car optics, two-part and aerosol varnishes, headlight cleaners, and anti-rain. Polyurethane varnishes are characterized by a small percentage of solids, dry quickly, hardening occurs in 20 minutes, complete drying in 24 hours. Restores initial light penetration by 98%. Well-known manufacturers:
- Diamond Vision;
- Meguir's;
- Philips Headlight;
- Presto.
The degree of wear of the block affects the choice of reducing agent. Depending on the number of scratches and chips, the restoration option will depend: napkins without sanding, light sanding, polishing or serious restoration.