The need for audio training of the Lada Grant, as well as determining its volume, completely depends on the configuration in which the car was produced. For example, in cars with the “Norma” configuration, the manufacturer has already carried out all the basic work on audio preparation. So, the car owner can only install the audio system by connecting it to the standard control. This is not the worst option, since many people deliberately choose those car configurations that can later be modified to exactly meet their requirements for sound quality and the like.
Features of audio system installation
When connecting the stereo system wiring, it is necessary to take into account certain features of the electrical supply.
This is provided using red and yellow wires. The first is responsible for remembering the audio system settings, the second is for turning off the radio, which is controlled by the car’s ignition. It is recommended to use a parallel connection type for both wires so that the audio system can only be turned off manually. In this case, it will not be affected by the car’s ignition key, but there will be a problem of excessive electricity consumption in parking mode, which is solved by installing a special regulator for the red electrical wire. With its help, you can turn off the radio by hardware when leaving the car for a long time. This regulator can be connected to the alarm system, that is, when the vehicle is locked, the audio system will turn off automatically.
The disadvantage of this system is the extra current consumption, but in any case it is much less than the indicators that provide power to the radio during standby mode.
If the audio system suddenly turns off due to excessive volume, display flickering, or high-pitched sounds, it is not due to a power failure. This situation occurs when the car battery is discharged and the current ceases to be constant. The problem is solved by connecting an additional capacitor, which provides constant power to the radio.
Once you have successfully connected all the necessary connectors to the car's electrical wiring, you can begin installing the front and rear speakers.
What is a standard audio system?
Let's be realistic - we are unlikely to be offered anything good in the budget segment. Let's take, for example, the familiar Renault Logan 2 in the Privilege configuration: • The head unit (GU) is either a double-din radio, familiar from Dusters, or an LG touchscreen multimedia center, which has become famous for “glitches”, freezes and lack of sensor response to cold (and you will also have to pay extra for this). The ability to customize the sound in them is minimal, the quality is at the level of a regular budget device like Prology. • Front speakers – paper, 16 cm in size, with a proprietary connector and fastening with rivets. The rear ones are 13 cm, and that’s where the differences end. Both magnets are worthy of “tweeters”, but not wideband speakers; the diffuser is reminiscent of Soviet speakers from low-class radios. • Wiring - thin wires in rigid insulation, which, with decent power, will already cause serious drawdowns.
As a result, this entire system will only satisfy the sound of a person playing a radio in the background. In the Confort package, we will be offered a standard audio system as an additional package - 10,990 rubles for all the same primitive speakers and a 1-din radio, which used to be standard for the maximum configuration of the previous generation. At the same time, the car already has audio preparation - it’s enough just to install a head unit and speakers, even if you don’t bother with component acoustics and external amplifiers.
The same situation can be seen on other budget cars - a standard audio system, at best, will have a multimedia head unit (possibly with navigation), but the least attention will be paid to sound quality. The point here is that it is not difficult to teach the “head” to recognize different formats or receive calls via Bluetooth, but to make it sound requires a high-quality decoder, complex audio processing code (equalizer and sound effects), and a high-class final amplifier
And this is a completely different cost of design and production, which is critical in the budget segment.
How to choose a speaker system?
If the owner of a LADA Vesta needs high-quality sound, we recommend choosing two-component speakers. For these accessories, the high-frequency emitter is placed in a separate unit in relation to the low and mid-frequency head.
It is advisable to install such components in the front doors. The rear door panels can be "addressed" with lower quality coaxial speakers, which will serve as an expansion of the sound theater. To install high-frequency heads, additional cabling will be required. This is how the speakers are installed.
How to remove the trim?
This is necessary for installing speakers. Here, the Lada Vesta owner will need maximum care and attention to eliminate the risk of scratching the plastic panels. Using a screwdriver is highly undesirable. It is better to arm yourself with a plastic card.
To remove the plug located on the end of the door, you will need to use a card to pry it through special recesses. Using the same principle, we dismantle the buttons for electric window lifts. Fastening components in the form of tendrils are located on the front, rear and side sections of the MUS.
The fastening of the casing is represented not only by screws, but also by 4 “hedgehogs”. The risk of breaking them is quite high if the owner does not use a specialized tool during dismantling. These “hedgehogs” are borrowed from cars from Renault-Nissan. You can use elements from Grants instead, but minor preliminary modifications will be required. Such “hedgehogs” are stronger and their price is several times lower.
According to these manipulations, the upholstery on the driver's side is dismantled. Removing the trim from the right door panel has its own peculiarities. There is no need to remove the window lift button. There is also no need to look for a self-tapping screw plug. A sufficient measure would be to remove the handle cover.
Review of prices of audio products manufacturers
| Name / characteristics / article number | Price, rub.) |
| Comprehensive budget solution | |
| Radio tape recorder PIONEER MVH-150UBG | from 1500 – 1700 |
| Speakers Pioneer TS-1339 (13cm) | from 2000 |
| Speaker trim | from 450 – 500 |
| Additional noise/vibration insulation of doors | from 1200 |
| Consumables, bolts, screws for vinyl (wood) spacers | from 100 – 150 |
| Car radios | |
| Pioneer SPX-HUD01 | from 10000 |
| Pioneer DVH-345UB | from 12000 |
| Sony XAV-65 | From 15000 |
| Pioneer SPH-DA230DAB | —/— |
| Pioneer SPH-DA120 | from 12000 |
| Pioneer MVH-X585BT | —/— |
| Pioneer MVH-X580BT | —/— |
| Pioneer MVH-S300BT | —/— |
| Auto acoustics coaxial | |
| Two-way coaxial acoustics URAL AK-M | from 7000 |
| URAL AK-74 | —/— |
| Coaxial acoustics URAL AS-C6947 | from 5200 |
| URAL AS-C1647 | —/— |
| URAL AS-C1347 | —/— |
| Four-way acoustics German Maestro AC6511 | from 7500 |
| Focal Performance PC 130 | —/— |
| Dragster DCB 5 | —/—7 |
| Dragster DCA 943 | from 6800 |
| Dragster DC 572.2 | —/— |
| Dragster DC 502.2 | —/— |
| Auto acoustics component | |
| 2-component acoustics Dragster DSB 5 | from 4000 |
| URAL AS-C1627K | —/— |
| URAL AS-C1327k | —/— |
| URAL AK-74.C | —/— |
| URAL AK-47.C | —/— |
| Avatar CBR-6.21L | from 5000 |
| German Maestro MB 4.2 FR | —/— |
| German Maestro 2S 6512 | —/— |
| Dragster DSC 592.2 | —/— |
| Dragster DSA 582 | —/— |
| Dragster DS 532.3 | —/— |
| Alphard Machete MC-6.2A | —/— |
| Amplifiers single / multi-channel | |
| Machete MFC-650.1D | from 10000 |
| Taramps DSP 3000 | —/— |
| Taramps TS2000x4 | —/— |
| Taramps TL500 | —/— |
| Taramps TL1800 | —/— |
| Taramps TL1500 | —/— |
| Taramps DS800x4 | —/— |
| Taramps DS800x2 | —/— |
| Taramps DS440x4 | —/— |
*prices are as of September 20, 2018.
Installation of 1 din radio in Grantu standard and norm
What is needed to install a radio in a VAZ 2190:
- The radio itself is also the head unit;
- flat screwdriver;
- Straight arms.
Abbreviations and symbols in the text:
- GU – head unit;
- MMS – multimedia system;
- DIN (din) – installation size for acoustics in a car.
Lada Granta Standard
The audio preparation of the Lada Granta Standard is arranged as follows: the car has power wiring harnesses connected to the head unit. Such wires are present only in the radio; there are no visible outputs of wires for the speaker on the doors.
Therefore, on the basic configuration of the car, the wires do not reach the audio system speakers. Under the panel on the driver's seat side there are wire outlets for the radio.
In order to connect them into one system, you need to find the corresponding audio system wire outputs on the Lada doors. After finding all the necessary outputs, the wires located on the panel are connected to the wires that are built into the doors.
On a car of this configuration, you will need to run the wires to the dashboard alone.
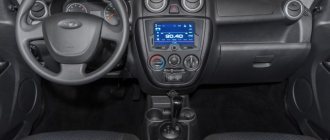
A few words about this configuration. The “Lux” assembly has a factory pre-installed radio with speakers. The radio has at its disposal such additional functions as a 5-inch touch screen, which also has a line input, a Bluetooth headset, and the ability to read flash media.
Lada Granta Norma
In the Lada Grant Norma, the audio preparation is configured in such a way that the door wires are connected to the head unit, which already powers the audio system itself. The car owner will only have to connect the radio and speakers.
The Lada Granta series has a flaw: the AvtoVAZ connectors for audio systems do not match the connectors of audio equipment manufacturers. Because of this, you have to additionally purchase the necessary wires and connect them directly, while paying attention to the corresponding symbols.
We recommend: Replacing the Lada Priora heater radiator without air conditioning
For example, the space for the speakers on the Norma doors is indicated by a corrugated pattern. It will be necessary to cut an opening to connect the speakers.
Step-by-step instructions for installing the head unit
Required:
- a narrow flat screwdriver or plastic spatula for installing acoustics;
- 1-din radio with frame.
The seat in Grant is designed for 1 din.
To work with large 2-din sizes, you will need to cut out the partition and install a decorative frame. Step 1 . Using a flat-head screwdriver, remove the plastic plug for the radio. To do this, carefully pry it around the edges and pull it towards you.
The placeholder for the radio is installed from the factory.
Step 2 . On the back of the plug there is a mount for ISO connectors. There are two connectors: music power and wires for the speakers.
When connecting the pads, you can’t confuse them - they have fastenings of different shapes. 8 wires at the speaker terminal. The second power connector.
Step 3 . If necessary, connect an adapter for your radio to the ISO. Usually it comes included .
If an adapter is not needed , proceed to step 4.
If an adapter is needed for acoustics, it is included in the kit. Example in the picture.
Step 4 . We remove the glove compartment. Holding the glove compartment clamps in the upper position, forcefully lower the glove compartment down.
Overcoming resistance, we pull the lid towards ourselves - the glove compartment is removed.
Removing the glove box on a Grant is easy when you know where its latches are located.
Step 5 . We climb under the panel in the area of the front right passenger's feet with a flashlight. Behind the felt on top we find a thick black wire - at its end there is a plug for the factory antenna.
We extend the plug to the installation location of the radio.
Here we are looking for the antenna wire.
Step 6 . We install metal slides for the radio. a screwdriver to bend the fastenings of the slide at the top and bottom to ensure secure fastening.
These fasteners secure the slide into the panel opening.
Step 7 . We connect the power connectors, speakers, antennas to the radio. We insert it into the slide all the way. We attach a decorative plastic frame.
If you plan to install an amplifier, you must first stretch the wires under the panel and bring them to the installation site of the power unit.
What to do if the length of the wires and antenna is not enough
To get by without extending the wires , you will have to suffer:
- We put our hand under the panel in the glove compartment area;
- We put the radio in the slide and connect it to the plugs;
- We blindly connect the power, the connector for the speakers, the wires for the amplifier, and the antenna.
Disadvantages of the method : we spend a lot of time, the process is dreary and inconvenient. We'll probably rip off your wrist.
Plus : there is no need to build up wires, which will then interfere with the installation of the PG, resting against the back wall.
If, after installing the acoustics, the alternator belt begins to whistle, the solution to the problem is here.
As you can see, immediately behind the GU in Grant there is a vertical partition, which greatly interferes with blind installation.
If the radio tape recorder dangles in the slide and rattles
It happens that the acoustics hold weakly in the sled , although they sit firmly. Solving the problem:
- Using the keys for dismantling (included with the control unit), remove the radio;
- We take a small piece of vibroplast (resin-based foil) and glue it onto the slide from the inside, top or bottom - this way we will ensure that the tape recorder is completely pressed against the slide without unnecessary vibrations;
- Once again, use a screwdriver to press down all the fastenings of the slide: some might have been under-tightened;
- We put the acoustics back and check - all unnecessary vibrations during shaking should disappear.
Vibroplast helps not only with soundproofing a car.
Installation of acoustics on Granta
Speaker in the car door
First of all, you will need to dismantle the plastic pocket that covers the compartment for the stereo system. Use a screwdriver for flat type screws. When the pocket is removed, you will see that behind it there are special sockets where ISO plugs from the future speaker system will be placed.
After this, you need to remove the protective metal frame from the radio. We install it in the vacated opening under the plastic pocket. Successful fixation of the equipment is usually accompanied by a characteristic click.
Now you will need to connect the plugs in accordance with the existing ISO standard, to which the electrical wiring of all international format radios meets. Incorrect connection of the audio system connectors can lead to malfunction of all electrical devices in the car, including the radio.
It is worth noting that many car radio manufacturers make individual connectors for them. In this case, the kit almost always includes a special adapter for ISO standard plugs. If your radio does not comply with the ISO standard and does not come with an adapter, you can consider cutting the wires from the radio plugs or from the car's electrical wiring. After this, you will need to properly solder the wires in accordance with the color pinout.
It is strictly not recommended to resort to simply twisting the wires with adhesive insulating tape. This type of connection is impractical, since in winter the tape freezes and cracks, which can cause the wiring to short out and electrical appliances to fail. For a high-quality connection, you can use terminals that are designed for clamping wires.
ISO standard connectors are prepared only once. After this, you will not have to deal with selecting plugs and pinouts when installing a new radio. This procedure should take no more than 3 minutes.
The ISO standard uses 2 types of connectors: brown and black. The first is intended to ensure the operation of all the acoustics of the car. The second is for special functions of the stereo system and its electrical power supply. The pinout diagram for ISO is shown in the figure.
ISO pinout diagram
Types of car acoustics
Today there are two types of speaker systems on the market:
Coaxial acoustics are made in the form of speakers. It consists of 2-3 speakers of different frequencies. The main advantage of the technology is ease of installation. There is no need to drill anything or make additional holes in the panels. But due to the desire to simplify the design, the main drawback of such systems “comes to light” - low quality of workmanship. But there is no certainty here. If you choose acoustics from a well-known brand and at an affordable price, then the design and quality will be excellent
The main thing when choosing is to pay attention to the technical characteristics, material and workmanship of the speaker base. This is what coaxial car speakers look like
Component acoustics belong to the category of composite ones. This means that the speakers will have to be mounted separately, and each of them will have its own sound frequency
This system has several disadvantages:
- high price;
- the need to install speakers, which requires special fastenings and cutting suitable holes.
This is what component acoustics looks like
But there are also advantages - with proper installation, you can achieve purity and maximum sound power
The main thing is to pay attention to the sensitivity and power of the device. An important issue is the dimensions of the speakers, which should look good in the interior of the cabin
Do-it-yourself installation
Next, we will look in detail at how to correctly install the radio on the Lada Granta manually. If you are not a fan of the standard audio preparation of the Lada Grant, pay attention to this algorithm.
We recommend: Electric additional pump for the heater of VAZ and other cars: selection and installation
As stated earlier, the power wires are initially wired, and all that remains is to understand how to properly connect them to the radio.
After removing the cover that covers the radio, two connectors will be visible in front of you. One connector is intended for connecting speakers in the doors, the second is for power supply.
The black and pink wires indicate ground and plus, and at the same time they are the main ones for power supply. If the connection is incorrect, the audio system will at least not work; in the worst case scenario, you will short-circuit the “–” and “+” terminals, which will result in the fuse blowing.
When connecting directly, be sure to insulate all wires, not just those used, to avoid a short circuit.
After connecting the necessary wires, we secure the speaker with self-tapping screws or screws and close the mesh.
It is recommended to install 5-inch speakers (12.5 cm) on the front doors of Lada Granta cars, but if desired, you can insert 16 cm, as a result of which the sound quality will only increase. Choose speakers so that the glove compartment can open completely. This problem often exists when owners choose larger speakers.
Some craftsmen cut out the trim on the rear doors and install pancakes (6x9), which sound even better. With this option, a teardrop-shaped mesh is purchased in the standard factory place for speakers, and speakers measuring 13 cm are installed.
After doing all this grant-audio preparation, all that remains is to turn on the speaker and wait for the radio to turn on.
For those who prefer radio
There are drivers who enjoy following world events even in the car, so a radio is important to them as a tuner that actively receives signals from radio stations.
By the way, the popularity of musical frequencies today is quite high due to the variety of compositions presented, which are replaced by five-minute news clips.
So, a specialized store can tell you how to choose a radio for your car in order to listen to radio stations with good sound quality. The fact is that such a system must accept an extended VHF range. Almost all models have this feature, but those that cost more have additional functions that improve sound quality.
For example, such radios have a switch from stereo to mono, which improves the quality of signal reception in case of strong interference
When choosing a tuner, you should pay attention to the long-distance/local reception switch, which allows you to receive only those signals that are strong enough. And more expensive systems provide several levels of sensitivity
And this, of course, makes the operation of the car radio even more comfortable.
Almost all tuner models are equipped with a function for quickly searching for channels and automatically storing them.
Only expensive models have a significantly higher quality of performance of this task, so you should pay special attention to this when purchasing a radio.
In recent years, the RDS function has become very popular among radio enthusiasts. Its essence is that when the tuner receives information, it can be displayed on the monitor and reproduced on it in the form of a ticker. But this button only works if the radio station provides the function in its broadcast. As a rule, the information concerns air temperature and exchange rates.
Features of audio preparation of Lada Granta “Norma”
The acoustic wires are laid under the door seal. There is no such audio preparation in the Standard package.
In this case, on the car, the door wires are already routed directly to the head unit, which supplies power to the audio system. The owner of the car will only need to connect the speakers to the radio.
Often, Lada Granta is produced with audio system connectors, which do not always match those from the manufacturers of the audio equipment itself. And then you have to buy the necessary wires yourself in order to connect the system directly, in strict accordance with the designations. However, nothing prevents you from using simple adapters that swap the contact locations to connect any radio available on the market to your car.
16 cm speakers in the front door. To install such a speaker, you need to cut the decorative cover in the door trim with a utility knife.
On the front doors of the Lada Granta “Norma” car, the place for installing speakers on the trim is marked with a pattern in the form of a relief surface. It is there that, in order to connect the speaker, you will need to cut an opening.
Audio system installation
The installation of the audio system itself is very simple, which cannot even be compared with how it was done on previous AvtoVAZ models. The fact is that the car owner no longer needs to worry about laying the wires correctly. All he needs to do is connect the appropriate wires to the power connector of the radio.
After this, the speakers are installed in the pre-cut opening, secured with complete fasteners. As a rule, standard five-inch speakers are used on the doors.
Decorative element in the rear door trim. There is nothing here in Standard.
Unlike the Standard configuration, where the audio preparation is limited only to the wires to the steering column, in the Norma configuration the wires are laid both in the front and rear doors. Also in the rear door there are decorative elements for installing a speaker, whereas in the “standard” configuration the door is “empty”.
It must also be said that self-installation of speakers and radio is not considered a reason for refusal of subsequent warranty service.
Replacing the standard MMC in Grant
The process - after removing the acoustics, we install a new system.
Difficulties : you may have to finish the fastenings of the new system for VAZ ones. Plus you need the right frame. The factory MMC frame may not fit.
When you buy a new PG for your car, you need to buy a frame for it specifically for Grants. Otherwise there will be holes in the panel.
Have you bought a new 2 din radio, but there is no frame for sale? You can do it yourself . Example at the link.
Reviews
| № | Positive |
| 1. | Kirill , 33 years old: the standard front speakers are quite enough for me. To add volume to the sound, I installed a couple on the rear shelf. |
| 2. | Vasily , 44 years old: The standard radio on the Lada Granta Liftback is not bad, the sound is good. There are not enough speakers in the back row. I didn’t bother, I set the speakers to “13”. |
| 3. | Vitaly , 33 years old: after purchasing the Lada Granta Liftback, I supplemented the standard audio system with only two rear speakers, that’s enough for me. |
| 4. | Gennady , 41 years old: to increase the volume of sound, he added two speakers to the rear side doors and the rear parcel shelf. The standard radio works, no problems. |
| 5. | Mikhail , 35 years old: I heard a lot of complaints about the standard system, my feedback is positive. Yes, it is not super powerful, but it is enough for the average driver. |
| 6. | Gennady , 29 years old: the standard 2-DIMM radio on the Lada Granta Liftback is quite enough for good sound. Anyone who wants a concert hall should buy it separately. |
| 7. | Vyacheslav , 38 years old: I heard that they install rear speakers on the Grant at “16”, but did not bother. I bought it on “13”, I’m happy, there are no complaints about the sound, it’s not ideal, but it’s enough for me. |
| Negative | |
| 1. | Vasily , 28 years old: I didn’t believe the negative reviews until I bought the Lada Granta Liftback. Weak and terrible. Change the speakers and radio. |
| 2. | Kirill , 33 years old: I took the car with me, it had a standard radio, I replaced it with a new one from Pioneer. It's a completely different matter. |
| 3. | Georgy , 41 years old: when buying Grants, I knew in advance about problems with acoustics. I bought coaxial speakers and a good radio. |
Conclusion In general, the sound quality of the standard speakers on the Lada Granta liftback is good. Lovers of high quality and cleanliness do not like this, so they strive to replace it with expensive models.
It is necessary to start from the fact that the car is in the budget segment, which means there is no point in demanding the best. If desired, install 16 speakers on the rear side doors to enhance the sound quality.
vote
Article rating
Removing the standard radio in Grant Lux
The difference between grants of the luxury configuration: the MMS (multimedia system) installed from the factory. This is a 2 din device.
To remove standard acoustic grants :
- take a knife or plastic spatula to dismantle the acoustics and disconnect the decorative trims to the right and left of the radio. It is not necessary to take pictures;
- in the gap between the cover and the panel we find the head unit lock. There are two of them on both sides. Press it out with a screwdriver;
- we take out the GU on ourselves.
Everything is described in detail in the video:
Installing a radio
We pry the plug of the car radio socket from below and take it out. The socket contains plugs for connecting: USB, ISO, AUX, FAKRA (antenna).
To replace the standard audio system, you need to remove the trim and deflectors. To do this, you will need to disconnect the ground (disconnect the minus terminal from the battery). Next, remove the trim, prying it from below, and disconnect the block from the emergency parking button of the car. Remove the deflectors (4 screws for the T20 head).
Behind the air ducts, again unscrew the 4 screws. We drag the car radio towards us, disconnect the connectors with the wires. That's it, they took it off. Installation of an alternative radio takes place in the reverse order. Watch the wires during installation, try not to pinch them. Please note that a 1DIN radio is suitable for Lada Vesta.
Installing speakers in a car
In addition to the radio itself, you will need to correctly place and connect the audio speakers.
We recommend: How to properly operate a purchased car
Installation of the rear and front speakers is carried out according to the same scheme. To do this, you will need to cut openings in the door trim, so for ease of installation you need to remove them. The upholstery is removed in the following sequence:
- the door handle is removed;
- The plastic casing under the handle is removed;
- the adjusting handle for raising the glass is removed (only for Lada Granta Standard).
The stock upholstery has 16 cm diameter openings that are specifically designed for speakers. Certain difficulties may arise if you decide to install speakers of other sizes.
For speakers with a diameter of 13 cm, you will need to cut out the central plug in the door trim. The layout diagram is included with the speaker kit. Having understood the intricacies of a particular model, you will have to slightly increase the plane of fastening of the tongues, since standard openings are larger.
Speakers on the rear parcel shelf of a car
Speakers with a diameter of 16 cm are most often easy to install, but sometimes the sizes do not match. In this case, it is necessary to adjust the metal opening allocated for installing the speaker using an electric jigsaw. After each adjustment, be sure to try on the column, as it is very important not to overdo it in this matter.
After successful installation, you will need to connect power and check the functionality of the speaker. Then you can install the door trim back. A protective grille is placed over the column, which must be secured with self-tapping bolts.
Choose speakers with a flat surface. Otherwise, they will interfere with looking into the glove compartment; to do this, you will have to open the front right door every time.
Audio preparation Grants of different configurations
In the “standard” configuration, the Lada Granta has pre-installed power wiring harnesses, which are located in the console opening. Electrical wires are connected only to the radio, so don’t be surprised if you don’t find them in the doorways. To wire to the doors, you will need to pull power wires, which are located under the console panel. In this configuration of the Lada Granta, the stereo system can be installed independently if due attention is paid to it.
In the Lada Granta Norma, the power wires coming from the console are already routed to the doorways. You only need to connect the audio system in accordance with the assembly diagram. It's not uncommon for the stock door wiring to not match up with some speaker connectors. To solve this problem, you need to purchase suitable wires and replace them in the doorway. Lada Granta Norma has a trim with a special pattern for the speakers. Based on it, you can cut the opening yourself.
During assembly at the factory, the Lada Granta luxury version is equipped with a touchscreen multimedia system and speakers. The improved radio tape recorder is complemented by Bluetooth function and a 5-inch display with line output. In addition, the built-in radio allows you to connect a USB 2.0 flash card, through which you can listen to recorded music.
Continuing the topic of audio, we recommend interesting information on the topic of Fm Radio not only for cars.
Standard audio preparation
Using my station wagon as an example, I would like to write a little about the standard audio preparation of the Lada Kalina. As far as I know now, all cars, starting with the “norm” configuration, have audio preparation, which includes:
- Plugs for connecting the radio
- Wires for front speakers
- Wires for rear speakers
Now I will describe everything with photographs and in more detail below. So, the plugs for connecting the radio are located under the plug below the heater control unit. If you remove this plug, there will be two gray and brown connectors.
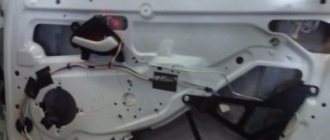
The radio is connected very simply, gray color is up, brown color is down. As for the wires in the front doors, to get to them you need to remove the front door trim. The example below shows the conclusions already in the door trim cut under the column:
But at first we had to search a little for the rear ones; on the left side the wire was quickly found, since it was located near the trunk light:
And the right one is located under the trunk trim, glued with tape to the metal of the rear arch, so you will first have to look for it with your hand under the trim or remove it altogether. Here is an example of the already routed wires:
Many potassium growers wrote that they don’t have any wires even at the “normal” level, but I was convinced of the opposite. For example, my 2011 Kalina Station Wagon. I tried to connect the rear wires to the speaker, everything works fine, the music flows. So installing music with standard audio preparation is as easy as shelling pears.
How to install 2 din in grant norm or standard
Everything is more complicated here. Need to:
- dismantle the center console trim - unclip the fastenings, move it forward and disconnect the buttons and heater handles;
- cut out a vertical plastic partition that will not allow you to install a 2 din device;
- cut down the plastic casing of the central air duct;
- try on a new acoustic unit, adjust the fastenings if necessary;
- install adapters from the delivery kit on the wiring (if required);
- install the device;
- if we leave the old center console trim: we cut out the partition, try it on, put it in place with the buttons and handles connected, adjust the decorative frame of the control unit, install it;
- if we install a new trim on the console under a 2 din device: we transfer the heater control unit and buttons from the old trim, install them in place, and put a decorative frame on the control unit.
Tips when installing an audio system
As we can see, the installation of acoustic components in the LADA Vesta interior is not capable of generating difficulties and dead ends. The main thing for the owner is to adhere to simple but useful rules, namely:
- We carry out the entire list of manipulations extremely carefully, without breaking the fasteners or scratching the panels.
- Since audio preparation is initially present, we just need to connect the speakers and head unit.
- We do not cut off the standard connectors, but stock up on the previously specified adapters.
- Before directly installing the dynamic heads, we soundproof the door panels.
- Installation of the speakers is carried out on previously prepared gaskets.
How to connect your phone to the radio via a USB cable
The most common way to connect a phone to a radio is using a USB connector. Not a single modern radio is produced without a standard USB output on the panel. This output allows you to use a regular computer flash card as a music storage medium. But you can easily connect your mobile phone to it via a computer connection cord
The arrows indicate the USB cable connecting the radio to the phone.
This cord has a standard USB plug at one end, and an output for connecting to a smartphone at the other. Simple radio tape recorders are not able to integrate with the phone, and in this case the latter acts only as a storage medium, that is, as a regular flash drive.
To play music, just connect the cord to the smartphone and to the output of the radio, and then in the phone settings in the “USB connection” item, select “Data transfer”, after which the radio will be able to read all music files. In this case, music files will be managed only from the radio. More modern radios integrate with your phone, allowing you to control music from both devices. In this case, it is possible to launch applications on a smartphone, for example, some special player, and in this case it will act as a regular amplifier.
How to connect your phone to the radio via USB
Connecting via a USB cable is quite convenient; it allows you to manage files directly from the radio; in addition, many smartphones are recharged with this connection, although not as quickly as from a conventional charger. And yet there is a double benefit - the music plays, and at least the phone doesn’t run out of charge. The disadvantage of this connection is the presence of the cord itself, which will have to be pulled to the location of the phone. Moreover, if the cord is short, you will have to disconnect the cord every time you make a call.
Bottom line
As a result, it must be said that in the “Norma” configuration, Lada Granta owners can count on a ready-made 1-DIN type connector (to install a double-width radio, you will have to saw the partition inside the console, and this may entail the manufacturer’s refusal of warranty service ). Next come the wires themselves, which go to the doorways and the fastening elements themselves. The car owner can purchase everything else on his own, depending on his preferences.
Audio preparation is the basis of car audio
It is worth understanding what audio preparation is in a car. This may mean both work on installing audio equipment, and the presence of a special place for an audio system, speaker jacks, and wiring for further installation of acoustic equipment. Such a concept as standard audio preparation is an integral part of the car’s equipment. Its level affects the final cost of the new car and the owner’s further costs for acoustics. The manufacturer can install either simply a wiring harness with the necessary plugs and connectors, or additional elements: speakers, a radio antenna and the radio itself. Expensive versions even have high-frequency beepers and audio system control keys located on the steering wheel.
Selecting a speaker system
Having assessed the audio preparation of the car, you can begin selecting equipment. Depending on personal preferences and financial capabilities, a minimum set is determined - in fact, a radio tape recorder (or, as it is called, a head unit) and a set of speakers. A true car audio connoisseur will select equipment with increased power, as well as taking into account the possibility of installing additional devices: subwoofer, amplifier. Typically such a complete audio system requires the purchase of an auxiliary battery. When choosing acoustics, beginners should consider the following main characteristics of the equipment.
For the head unit - available media formats (CD, MP3) and output sound power. It is worth focusing on the average value of 25 W for a standard four-channel device.
For speakers:
- dimensions of standard sockets and the possibility of changing them;
- power (take into account comparability with GI);
- frequency range during playback;
- sensitivity.
Audio system installation
After purchasing the equipment, the question of installation arises. This event is not easy and requires special technical skills. In most cases, in order to avoid unnecessary headaches, car enthusiasts turn to certified service centers, where experienced specialists will perform the necessary work and provide a guarantee. Undoubtedly, there are people for whom everything related to the car is their hobby. For them, self-installation of sound equipment will be not so much saving money as it will be a pleasant pastime with a further reason for pride. In this case, what does audio preparation mean? In a nutshell, the higher the vehicle’s equipment level, the lower the additional costs for acoustics.
Conclusions and recommendations
Conducting standard audio preparation in cars such as, for example, the Lada Granta has now become much easier, because there is no need to conduct the wires themselves and the owners only have to make their proper connection.
Thus, the corresponding wires are connected to the power connector of the radio, as well as the connector for the speakers. Do not forget about the insulation of wires that are supplied directly.
After this, we cut out an opening in the door, where we insert the speaker and secure them with the appropriate fasteners. Most often, 5-inch speakers are mounted in doors.
Remember that independently connecting an audio system to existing factory outputs is in no way considered an excuse for refusing warranty service.
Sources
- https://expertVAZ.ru/lada-granta/audiopodgotovka-ustanovka-muzyki-magnitoly-norma-lyuks.html
- https://new-lada.ru/audiopodgotovka-lada-vesta-chto-vkhodit/
- https://car-fact.ru/marki-i-modeli/otechestvennye/lada-granta/magnitola-granta.html
- https://la-granta.ru/audiopodgotovka-i-audiosistema-komplektacij-lada-granta.html
- https://carfrance.ru/chto-vxodit-v-audiopodgotovku-lada-granta-v-komplektacii-norma/