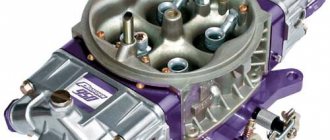
Lada 2103 “beginning of the journey” › Logbook › carburetor DAAZ 2107-1107010-20 (part 4 - setup)
I won’t repeat about the level in the float chamber (I think everyone knows this),
but many have forgotten about adjusting the dampers and some don’t even know (and there are some among those who do it for others’ money)
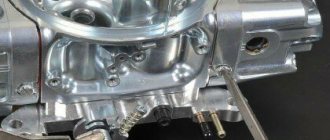
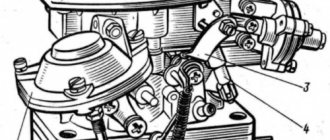
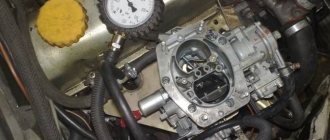
Well, let's start with the main dampers
open the damper until the tendril on lever 3 (black arrow in the photo) touches lever 2 (red arrow)
in this position, measure the gap between the edge of the damper and the body
it should be 6mm, the gap can be adjusted by bending the tendril (black arrow in the photo) of the lever3
with a full opening, I do it much easier at the moment of the correct distances (b top photo) the flaps occupy a perpendicular position with the lower plane of the carb
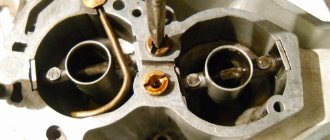
and setting up the launcher
and check the gap using a drill with a diameter of 5.5 mm
Purpose of an important node
Many motorists who have no idea how to adjust the carburetor on a VAZ-2103 simply do not understand the principle of operation and design of this device. The function of any carburetor is to mix gasoline and air together. Thanks to this simple device, a special mixture appears in the car at the moment the power unit is activated, transported into the engine cylinders. In fact, how efficiently the vehicle itself operates depends on how well the engine is supplied with gasoline.
Among other components of the device in question, it is worth noting such elements as air and throttle valves, mixing chambers and idle air valve. Of course, these are not all the components of the VAZ-2103 carburetor; in the material below we will consider in detail the operation and principle of setting each individual unit.
The function of the VAZ-2103 carburetor is to mix gasoline and air together
The functionality of any power unit that interacts with a carburetor depends on several important criteria:
- starting and warming up the engine;
- idle devices;
- design responsible for controlling the amount of fuel;
- accelerator pump (how quickly the car can accelerate depends on it);
- the performance of the elements located in the central dosing chamber;
- econostat (located in one of the internal combustion chambers of the engine).
Introduction
Owners of domestic vehicles, such as, for example, the VAZ-2103, quite often try to fix the car with their own hands. Despite the fact that modern service stations are located on almost every corner and by turning to qualified specialists one could avoid wasting one’s own time, many are in no hurry to solve their problems in this way. Some self-taught craftsmen independently carry out such complex operations, which include adjusting the VAZ-2103 carburetor. Of course, in order to do something like this with your own hands, you need not only free time and patience, but also important and useful knowledge regarding the design features of the device in question.
To adjust the VAZ-2103 carburetor, free time, patience and knowledge are required
In the material below, we will consider the principle of the design of the carburetor of the domestic VAZ-2103, its configuration and adjustment.
Adjusting the fuel level in the float chamber
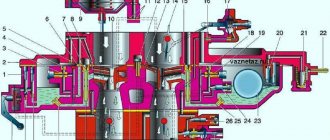
The free play of the float should be 6.5 mm on one side and 14 on the other. This can be adjusted using a checking template by placing the camera vertically. In this position, the float slightly touches, but does not press on the valve ball.
If the distance does not correspond to the required 6.5 mm, then you need to slightly bend the tongue of the valve (needle-shaped), adjusting the size to the required one, indicated in the figure by the arrow under the letter “A”.
The next step is to adjust the degree of opening of the needle valve through which gasoline enters the float chamber. When the chamber is filled, the float rises and the flow of fuel decreases; when you sharply press the accelerator pedal and open the throttle, the fuel goes into the cylinders, the float drops and gasoline enters the float chamber.
Next, we adjust the deflection of the float in the opposite direction. To do this, move it away from the lid as much as possible and measure it with a template, the thickness of which should be 14 mm with a certain tolerance (Fig. above, picture on the right).
If the distance is greater or less, you need to bend the stop of the float mounting bracket and set it to no more than 14 mm.
Now, after the adjustments have been made, the free play of the float should be within 8 mm. Adjusting the VAZ 2107 carburetor also includes checking fuel filters and incoming screens to maintain a good supply of fuel.
Technical characteristics of the engine 2103
In the third ICE 2103, the manufacturer AvtoVAZ returned the original cylinder diameter of 76 mm and increased the volume of the combustion chamber, so the technical characteristics of the engine are as follows:
| Manufacturer | VAZ |
| Engine brand | VAZ-2103 |
| Years of production | 1972 – 1983 |
| Volume | 1.5 l (1452 cm3) |
| Power | 52.4 kW (71.4 hp) |
| Torque | 106 Nm (3400 rpm) |
| Weight | 120.7 kg |
| Compression ratio | 8,5 |
| Nutrition | carburetor DAAZ-2103 Solex (1972 - 1974), then Ozone 2107-1107010-20 |
| Motor type | in-line |
| Number of cylinders | 4 |
| Location of the first cylinder | near the timing chain |
| Number of valves on each cylinder | 2 |
| Cylinder head material | aluminum alloy |
| Allowable warpage | manifold gaskets (intake/exhaust) 0.08 mm cylinder head gasket 0.05 mm |
| Valve seat | width 2 – 2.4 mm, angle 45° |
| Camshaft | one upper cylinder head inside, phase width 232°, exhaust valve advance 42°, intake valve lag 40° |
| Camshaft oil seal | diameters – 40 mm, 56 mm, width 7 mm |
| Cylinder block material | cast iron |
| Cylinder diameter | class A – 76 – 76.01 mm class B – 76.01 – 76.02 mm class C – 76.02 – 76.03 mm class D – 76.03 – 76.04 mm class E – 76.04 – 76.05 mm |
| Pistons and rings | piston made of aluminum alloy with tin coating, cast iron rings, compression outside chrome plated (top) and beveled (bottom) |
| Piston diameter | class A – 75.94 – 75.95 mm class C – 75.96 – 75.97 mm class E – 75.98 – 75.99 mm |
| Gaps | piston/cylinder wall – 0.153 – 0.173 mm (standard) or 0.19 mm (maximum) piston rings – 110 mm relative to the cut plane |
| Upper compression ring | 1.535 – 1.555 mm |
| Lower compression ring | 3.957 – 3.977 mm |
| Oil scraper ring | 2.015 – 2.035 mm |
| Gap between piston groove and ring | 0.03 – 0.07 mm |
| Crankshaft | cast iron, casting |
| Number of main bearings | 5 |
| Gearbox neck diameter | 50.795 – 50.775 mm |
| Main journal gap | 0.1 – 0.5 mm |
| Connecting rod bearings | shaft journal diameter – 47.814 mm liner thickness – 1.448 mm liner width – 28.025 – 28.975 mm |
| Crankshaft oil seals | front – diameters 42 mm, 60 mm, width 7 mm rear – diameters 85 mm, 105 mm, width 10 mm |
| Piston stroke | 80 mm |
| Fuel | AI-92 |
| Environmental standards | Euro 2 |
| Fuel consumption | highway – 6.9 l/100 km combined cycle 8.9 l/100 km city – 9.4 l/100 km |
| Oil consumption | maximum 0.7 l/1000 km |
| Engine oil for 2103 | 5W-30 and 15W-40 |
| Engine oil volume | 3.75 l |
| Replacement frequency | every 55,000 km |
| Working temperature | 80° |
| Motor life | declared 125,000 km actual 200,000 km |
| Adjustment of valves | nuts and feeler gauge |
| Cooling system | forced, antifreeze-A40 |
| Coolant quantity | 9.75 l |
| water pump | polymer impeller, mounted on a block |
| Ignition | transistor contactless, coil B117A and distributor 30.3706 |
| Candles for 2103 | original – A17-DV |
| Gap between spark plug electrodes | 0.5 – 0.6 mm |
| Valve train chain | double-row roller, 116 links, length 49.54 – 49.58 cm |
| Cylinder operating order | 1-3-4-2 |
| Air filter | dry with replaceable cardboard cartridge and pre-cleaner, temperature adjustment according to the season |
| Oil filter | recommended Mann W914/2 |
| Flywheel | 129 teeth, 0.62 kg internal hole diameter – 25.67 mm outer diameter – 27.75 mm number of mounting holes – 6 pieces no offsets |
| Flywheel mounting bolts | M10x1.25 mm, length 23.5 mm, |
| Valve stem seals | Manufacturers Horse or Corteco |
| Compression | pressure in the cylinders from 10 bar, pressure difference in individual cylinders within 1 bar |
| Oil temperature | 80°С |
| Thermostat temperature | 80 – 84°С |
| Valve pressure inside the radiator cap | 0.7 – 1 bar |
| Content of harmful products in the exhaust | CH |
| XX speed | 850 – 900 min-1 |
| Tightening force of threaded connections | spark plug – 37.24 Nm flywheel – 83.3 – 84.38 Nm clutch bolt - 29.4 Nm bearing cover – 80.36 – 84.38 Nm (main) and 51 – 53.5 Nm (connecting rod) cylinder head - two stages 39.2 Nm, 112.7 Nm |
Design of internal combustion engine 2103
Adjusting the performance of the accelerator pump
At the third stage, work should begin with checking the functionality of the pump. To do this, the fuel generated during ten full cycles of operation of the throttle valve control lever is collected in a special beaker. If everything is functioning normally, you will have approximately 5.25-8.75 cubic centimeters of fuel mass. Otherwise, the pump must be completely pumped (about 9-10 times), after which the check is repeated. In that situation, if bleeding does not help, the fuel pump accelerator should be replaced with a new one.
Adjusting the float of the "nine" carburetor
Setting up floats in Solex chambers is a simple procedure that does not require the use of specialized tools or special skills.
However, in the factory, this procedure is partially automated and is performed using a special template, which significantly simplifies the adjustment. But if you do the work yourself, you don’t need a template, but we will need the following tools and equipment:
- two screwdrivers, with a flat head and a Phillips head;
- a caliper or ruler (it is better not to use metal, wood or plastic);
- a piece of wire with a diameter of no more than 2 mm (you can use a thin drill or a similar round rod).
This set is sufficient to perform the entire range of adjustment procedures.
Adjustment process
The VAZ-2106 carburetor can be adjusted personally by the car owner or at a specialized station. It should be remembered that the operation of the vehicle in any driving modes, in any weather and under various conditions will depend on the quality and correctness of the procedure performed. Therefore, before starting repairs, it is important to acquire certain skills. You need to know well the structure of the carburetor and the principle of its operation. You also need to have a certain set of devices and tools:
- various screwdrivers;
- keys of various sizes;
- drills and probes (round);
- toothpicks;
- rubber bulb;
- ruler;
- tweezers;
- calipers;
- rags;
- special containers for washing.
If you have a full set of tools, you can make high-quality adjustments quite quickly.
Adjusting the starter
The starting device is adjusted by opening or closing the air damper. This operation can be carried out directly on the car; you just need to remove the air filter. In addition, you will need:
- Unscrew the plug of the starter, since there is a special screw under it.
- Press the three-arm lever. To do this, pull out the choke lever in the cabin, then close the damper and push the rod into the body of the starter all the way.
- Using a drill with a diameter of 5.5 mm, check the size of the gap from the lower edge of the damper to the chamber wall.
- Using a thin screwdriver, turn the adjustment screw, thereby changing the clearance value.
- Next, you need to hold the air damper by the three-arm lever in the closed position and use a 1 mm drill to check the gap between the chamber wall and the throttle valve.
- Adjust the gap by installing the lever in another hole or by bending the rod.
Shifting the lever to adjust the gap
Float adjustment
This stage is one of the most important processes of general configuration. The carburetor float is an element of the so-called float chamber. If an increased amount of air or gasoline in the mixture enters the combustion chamber, the engine will run unevenly. This increases both gasoline consumption and its toxicity when there is a lot of fuel supplied. Conversely, there will not be enough fuel for normal combustion if there is little supply. The correct amount of mixture requires adjustment of the float. It is recommended to set its stroke to 8 mm.
In addition, before installing the indicator, it is advisable to remove it and check for the absence of various violations, defects and other problems.
If a car enthusiast suspects poor quality work, the float needs to be replaced altogether.
Mixture adjustment
All actions are carried out using control screws. They have a factory press-fit made of plastic, which limits their speed in the range from 50 to 70°. If the presented range is not enough, you can break off the press-on and set the required value. However, this must be done on a warm engine.
Adjusting the throttle valves
Idling
- Start the engine and wait until it warms up to a normal temperature of 90 °C. After this you need to turn it off.
- Find the screws on the carburetor and tighten them completely. After that, unscrew the quality screw by five turns, and loosen the quantity screw by three.
- Start the engine and use the speed screw to set the speed on the tachometer to 800 rpm.
- Tighten the quality screw until the number of revolutions begins to drop. Periodically you should stop and add half a revolution.
Engine tuning 2103
The potential of the VAZ 2103 engine is so high that it is difficult to resist the temptation to squeeze more out of it. There are craftsmen who squeeze up to 200 horsepower out of a car. This kind of tuning of the VAZ 2103 engine is extreme in nature and is not recommended for everyday driving on regular roads.
There are many options for boosting an engine. One way to increase engine power and improve other performance characteristics is to convert the engine into a VAZ 2106 engine. To do this, you need to bore the cylinders to a diameter of 79 mm and replace the piston group with parts from a six. The remaining elements remain the same, the units are unified in all parts. Assembly of the VAZ 2103 engine after such tuning is carried out without problems.
If you take care of your car and timely repair the VAZ 2103 engine, the car will not let you down on the road. And it will delight its owners for many years with its reliability and excellent driving performance.
Adjusting the choke or trigger
Install the carb, but do not install the air filter. Pull the choke out completely and close the valve. In this position, you need to adjust the air damper cable.
Try pulling out and removing the choke several times. The damper should open and close completely without jamming. If everything is done correctly, you can install the air filter in place, connect all the hoses and carburetor drives. It's time to start adjusting the idle speed of the VAZ 2109. Don't forget about connecting the EPHH.
How does a carburetor work in a VAZ-2106 car?
Before proceeding directly to setting up the carburetor, we will describe its structure in detail. Since about 1980, the manufacturer began installing such devices known to our compatriots as Solex and Ozone on VAZ-2106 cars, so we will focus your attention on them.
The following elements are used in the design of these carburetors:
- float chamber in which the needle valve is located. Its main task is to maintain a stable level of fuel entering the device;
- a dosing system in which the required amount of fuel is set using a special throttle valve;
- control mechanisms that regulate the position of the throttle valves and enrichment of the air-fuel mixture;
- an econostat designed to use fuel wisely, as well as an accelerator pump;
- idle system.
The carburetor works on a very simple principle. The fuel moves from the float chamber to a special compartment in which it is mixed with air.
All proportions are regulated by dampers. If the settings are made correctly, a mixture is obtained that ensures normal engine starting. Otherwise, you will encounter the following problems:
- severe overheating of the engine even at low load;
- the appearance of black smoke from the exhaust pipe;
- excessive fuel consumption;
- a significant reduction in the power of the power unit.
To fix these problems, you need to properly adjust the carburetor, which we will do below.
Before you properly adjust the carburetor on a VAZ 2106 with your own hands , it is important to carry out a number of work steps:
- Adjust the thermal clearances of the gas distribution mechanism.
- Set the optimal ignition timing.
- Open the air damper completely.
All work on setting up the carburetor unit is carried out on a warm engine. Do not forget that during the process you may need new parts and rubber products, so it is better to purchase a repair kit in advance.
Tuning the VAZ 2103 engine
The characteristics of the VAZ engine that the VAZ 1.5 2103 engine has do not always satisfy their owners. Many people want to have a tuning, souped-up engine.
For this purpose, the following modernization operations are performed:
- Each cylinder is bored three millimeters under a piston with a diameter of 79 mm, resulting in a volume of 1.6 liters instead of the previous version of 1.5 liters. Thin cylinder walls do not allow further boring.
- To increase volume and power more, the piston stroke is increased so that its length reaches 84 mm, while the engine speed is reduced.
- To further increase power, a crankshaft taken from the VAZ 2130 model is used.
- Finishing of the cylinder head, which consists of polishing and boring the channels, which reduces intake resistance, increases power by another 10 percent.
- Installing a 0.5 bar compressor also allows you to add additional power. The new power becomes 125 hp. With.
- Correct selection of camshaft.
The camshaft is selected according to certain rules so that the piston has an increased stroke (for example, a camshaft from Niva).
Features of do-it-yourself setup
Before adjusting the carburetor, the power unit should be warmed up. You cannot make adjustments on a cold engine, because... it will not bring positive change. In addition, you will need to remove the gas pedal linkage from the throttle valve, disconnect the ventilation tube from the crankcase and make sure that there is no vacuum in the advance regulator tube.
After this, you should find the screws that are responsible for adjusting the composition of the mixture (they are also called quality screws) and begin to tighten them clockwise. Do this until you hear a strange and intermittent noise from the engine. When this happens, you need to stop tightening and unscrew the screw one turn to its previous position. Make sure the unit runs smoothly.
The action is repeated with all screws until the problem is resolved. In addition, it is recommended to clean the carburetor, which is preventative in nature and is aimed at preventing problems with the unit in the future.
Typical faults
The DAAZ carburetor is distinguished by some typical “diseases”. To successfully configure it, you need to see and remember its problems. This device is responsible for the dynamics characteristics of the car. Therefore, malfunctions manifest themselves in the form of any problems of this nature.
If there is a problem with this device, the engine may have difficulty starting and may sneeze.
The car will start to move jerkily, the driver will observe a characteristic dip when pressing the gas pedal. The car simply will not be able to gain enough speed, and the engine’s “appetite” will increase.
If at least one of these problems is observed, then adjustment operations need to be performed.