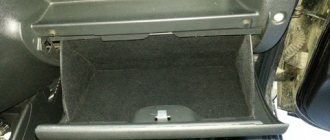
The Priora model car is an inexpensive, popular option for economy class passenger transport. Its interior is made of thin plastic, which is not covered with fabric. The glove compartment is a place to store documents, small digital equipment and other personal items. Consequently, the plastic may become dirty, break, or make annoying sounds. In such situations, the glove box is removed and unpleasant moments are eliminated.
How to remove the glove compartment on Kalina and Priora? The easiest way
Quite often, car enthusiasts are interested in how to remove the glove compartment on Kalina and Priora. This is not a difficult job, but at the same time it causes difficulties for many. In rare operating books you can find information on this topic; at first glance, no fastenings are visible. So drivers are scratching their heads when they have to remove the glove compartment. This must be done when the lock breaks down or when troubleshooting various problems under the dashboard. Also, many people are annoyed by the high noise of this interior element. The fact is that it is made of fairly hard plastic. Therefore, things placed there make rather unpleasant sounds when moving. In this regard, many motorists prefer to soundproof the glove box.
Glove compartment (the latch is broken), but how to open it
PS> Well, there is absolutely nowhere else to store rubber, you need to open it.
Yes, there’s nothing special to break except this very tongue, the mating part is a metal bracket, I generally drove without it for a week and a half! (on the doors, and on the seats I pushed everything)
How he opened it: Without much ceremony, he took two screwdrivers, picked up the left edge of the glove compartment and began to bend it back. Then I stuck a second screwdriver near the lock and thought about whether to break it or not to break it. At the same time, apparently due to the pressure on the tongue, the lock handle tilted slightly, I pulled it, and it opened. (there the lever of the tongue simply does not touch, due to the fact that part of the plastic has come off from the latter).
They also write that you can be perverted and use something thin (two objects) to feel the spring in the hole under the handle. Theoretically, if you squeeze it gradually, the tongue will lower and the lock will open, but I haven’t tried it myself.
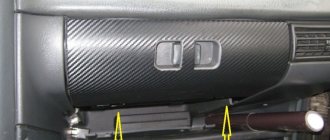
The glove compartment is attached from below with two screws, you need to unscrew them, and it will fall out on its own :-))
recently opened on the L-200, everything is the same (Japanese), only the cover had to be removed before that, the clips i.e. tear off.
Malfunctions
Most often, problems arise with the latch lock. In some cases, the tongue simply does not fit into the groove. Official dealers recommend replacing the entire torpedo. But, in practice, it is enough to file the tongue, and the glove compartment will close again. In other cases, the problem turns out to be in the lock itself. Removing it is not as easy as it seems.
First you need to get to the mount. To do this, bend the handle on one side of the removed box. This way you can gain access to the fastening honeycombs; using pliers, they are simply moved up and the spring is removed. Next, repeat the action on the reverse side. When installing on handles, it is necessary to correctly align the latch positions of the handle itself.
Communities › Lada Priora Club › Blog › Sagging glove box
People help me how to remove it! and how can it be set so that it is level or sag a little on the side closer to the driver, a gap has appeared on top!
Comments 12
a hinge onto which the lid snaps on (it’s also called a “glove box”) You need a short Phillips screwdriver. You’ll see the hinge when you look into the box from below
After the purchase, I leveled the gap in the glove compartment using the top latch loop.
what a loop I looked at and still didn’t understand! =) tell me where to look, I just can’t figure it out!
You open the lid, you see guides on the left and right: s3.images.drive2.ru/car.j...8ce7679203a1792-large.jpg You move them apart in the grooves, as if turning them inside out, and the lid opens all the way, then you pull it off the axles.
and what next?
Maybe! and I did this - I opened it, and there at the top, in the iron latch, there were two self-tapping screws, I loosened it and adjusted it so that it pressed tightly)
Source
Improvements
The glove compartment on Kalinas and Priors has many jambs that significantly reduce the comfort of driving. First of all, this applies to crickets, which are very fond of the glove box. Plastic also interacts quite noisily with the objects in it. Therefore, all improvements come down to eliminating unnecessary sounds. Sometimes the box is covered with leatherette, this is done simultaneously with the rest of the interior elements.
It's best to start by eliminating crickets. The biggest source of squeaks is the metal axle of the glove box. To do this, it is removed from the case and wrapped with electrical tape. This eliminates the gap that causes the noise. Usually, after this action, crickets are no longer observed. Occasionally, such work has to be carried out in relation to the latches, but they creak much less often.
Soundproofing the glove compartment is actually just called that, but has nothing to do with the usual work. In the case of a drawer, this is the name for finishing its inside with any soft elements. Most often, various fabrics are used for this. You need to start work by preparing patterns. To do this, measure the dimensions of the glove compartment. After that, we try on the pieces to specific parts. If everything fits, we put them on superglue. After it dries, we install the glove box in place.
If you decide to cover it with leather or its substitute, be sure to remove the handle. It will interfere with the work process. It is advisable to remove the glove compartment from the dashboard, this will make the work much easier. Next, it is covered with leather or other material. After tightening, wait until it dries and put it in place.
Torpedo
The glove compartment is part of the car's dashboard, and accordingly also affects the attractive appearance of the interior. Therefore, it is important to monitor her condition. The main factor reducing the effectiveness of a torpedo is dust. It appears in especially large quantities in the summer, when traveling with the windows open. It is its accumulations that must be dealt with first.
The main means of keeping the panel clean is a regular cotton rag. Use it to wipe the dashboard; it is recommended to do this daily. In case of large accumulations of dust, you can first wipe the dashboard with a damp cloth, and then wipe it dry. Polishes are used to add shine. They process the torpedo according to the instructions. A cheaper option is shoe shine. This sponge costs a penny, but the result is in no way inferior to polish. Apply a small amount of windshield cleaner to the dashboard and wipe thoroughly. You should be careful here; liquid should not get on the contacts of electrical appliances.
How to quickly remove the glove box on a Priora model car
In order not to damage the car interior, you need to know how to remove the glove compartment on a Priora correctly. The design of this part of a passenger car interior is more than simple. The procedure for removing the glove box will take several minutes. Sequencing:
- Open the box lid by pressing the special button and lower it down until it stops.
- There are restraints on the left and right sides of the trunk lid. After opening the lid, you need to release the right stopper with light finger pressure.
- Then you need to do the same procedure with the second, left, limiter. Only after it is released it is necessary to move the part to the left.
- Next, the glove compartment lid can be easily removed. If after all the manipulations it does not want to be released, you just need to gently pull it down.
After all the planned actions have been completed, you need to attach the cover to the front panel in reverse order.
Vesta cooled glove box
The glove compartment, also known as the glove box and glove box, is a container to the right of the panel of the Vesta car for all sorts of small things. On luxury models, such as cross, it can be cooled. Removing the glove compartment on a Vesta is easy; below the article there are 7-step instructions. Read the article to the end and study the topic of squeaks. Removing the glove compartment on a Lada Vesta car may be necessary: to eliminate squeaks and noises, replace a light bulb if the light in the glove compartment does not light up, or the lid does not fit well to the limit switch.
The main element of the interior of the Lada Vesta is the dashboard (dashboard). After some time in the car, squeaks and rattles appear under it. New Vesta brand cars are no exception.
The so-called “crickets” and other sounds in the cabin are unpleasant phenomena that bother drivers. Lada Vesta is a new model, so some technical shortcomings may be acceptable here. Some causes can be eliminated on your own, and sometimes you may need the help of a specialist.
Some extraneous noise in the car interior may be reflective. It is often difficult to determine the real source of an unpleasant sound. It may seem that the squeaks are coming from the side of the panel, but in fact the culprit is the door trim or the lock that needs lubrication. Therefore, at first it is worth eliminating such situations so as not to create extra work for yourself to eliminate them.
Drivers notice that squeaks and rattles mainly occur on the right side of the instrument panel.
If, after checking, it turns out that the “cricket has started” under the trunk of the front panel, before disassembling it, let’s find out what the reasons for this may be.
Standard glove compartment - article number and price
Standard glove box - article number 8450031277 Cover - article number 8450031890
A glove compartment for an AvtoVAZ Lada Vesta car produced in 2016 costs 2000-2600 rubles. It can be ordered through auto parts stores, or contact an authorized dealer directly.
The main malfunctions of the glove box (glove compartment) on a Lada Vesta car
- One of the reasons for extraneous sounds may be an insufficiently tight fit of the glove compartment dampers to its lid when closed. Because of this, while the car is moving, it can squeak and rattle. There are no adjusters on the cover, so you won't be able to tighten the rubber dampers.
- “Crickets” may appear when the glove box cooling air duct is loosely secured.
- If the limit switch is loosely attached under the glove compartment.
- Loose fastenings of the air duct directed towards the feet of the front passenger are another reason for the formation of extraneous sounds in the interior of the Lada Vesta car.
- The air duct is attached under the lower part of the glove compartment (glove box); when the vehicle is moving, play may occur between the parts.
- If cold air begins to blow under the front passenger's feet, the tube corrugation is most likely damaged.
How to remove the glove compartment (glove box) on a Lada Vesta, what to disassemble in order to glue it with madeline
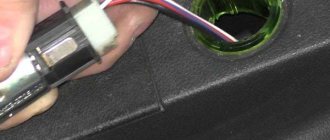
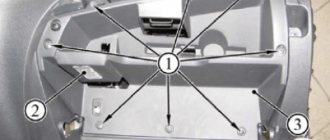
To remove the glove compartment, unclip the side trim, which is secured with clips. Unfasten the cover by releasing the clips on the top edge. Pull towards you to remove it from the latches. After characteristic clicks, it will be removed. Open the box lid, remove the backlight by pressing out the fastening element. Now remove the five retaining bolts using a torx-20 screwdriver. Four are regular, the fifth is with a washer. On the right under the glove box, disconnect the connector from the limit switch. Having carefully unhooked it, move the side wall with the passenger airbag deactivation lever towards the door.
Now remove the cooled glove compartment from its mountings. Place one hand on the keyhole, the other on the right side
Holding it on both sides, gently pull it towards you, freeing it from the fasteners. Before removing the box completely, disconnect the wires connected to it and the light bulb by carefully bending the lock. Now the glove compartment on the Vesta can be removed.
Extraneous noise comes from the front passenger's foot warmer air duct element
- After unhooking the air duct, unscrew the two bolts. Then use adhesive material - “Madeline” to glue it.
- Now put the glove compartment back.
- Screw the air duct and connect all the wires.
- Install on the dashboard, placing it strictly on the clamps. Even with a slight displacement, the air supply may be disrupted.
- Once installed correctly, tighten the bolts and snap the side panel into place.
Non-standard reasons for removing the glove compartment on a Priora
Any part of the engine, trunk and interior of the car periodically needs a “shake-up”.
This can be either regular cleaning or a complete replacement or adding new components. In the Lada Priora car, the interior is a solid “4”, and this seems to be enough. But some owners want to somehow improve their “swallow”. What could be improved in the glove compartment? The first is bright lighting. When the car is assembled at the manufacturing plant, standard lighting is installed in the glove compartment - an incandescent lamp, which lights up when the dimensions are on. An alternative to this conservative design is an LED lamp. The color of its rays can be standard white or multi-colored. The main advantage of this modification is that the lighting works even when the dimensions are not turned on.
The second is painting in different colors. To diversify the interior of your Priora, you should use cans of paint (liquid dyes can leave streaks). To do this, you need to purchase the desired paint, remove the glove box, and paint it. Then, after complete drying, install it in place. This “tuning move” can be used not only to paint it one color, but also to create a pattern or design on the lid or inside the glove compartment.
Third, pasting the inner surface of the glove compartment with fabric. Many people consider one of the disadvantages of the Priora to be the nondescript plastic interior (dashboard). The glove compartment of a car, made of plastic without softening upholstery, creates a lot of noise and looks unattractive. To correct this drawback, you can cover the glove compartment yourself with soft material. Most often, carpet is used for these purposes - an artificial finishing fabric that is easy to clean and
can last several decades. An analogue of carpet is considered to be artificial stretch suede - Alcantara. This material looks more respectable and expensive.
Most car enthusiasts still use carpet to improve the glove compartment. It comes in two types: regular and self-adhesive. To carry out finishing with the first type, you need to buy additional glue, which is not necessary for the second type. When working with regular carpet, unpleasant moments may arise: for example, too much glue gets on the material and it bleeds through the front side. To avoid such troubles, it is better to use self-adhesive carpet.
Work on the glove compartment and armrests
Work on the glove compartment can go in several directions:
- You can cover the glove compartment with self-adhesive film or other material.
- You can use electrical tape to remove the rattling of the glove compartment, which sooner or later appears in any car after prolonged use.
- Improving the glove compartment lighting is also a common option for tuning the Priora's interior.
Armrests
Armrests are usually covered with leather or leatherette. The interior space can be covered with carpet. The material, despite the fact that in terms of softness is very good, is inexpensive, its price per linear meter is about 150–200 rubles. Thanks to this, those little things that are stored in the armrest will no longer rattle when the car moves, as was the case with bare plastic.
How to remove the glove compartment of a Priora car - instructions, cooled box
Glove box, glove compartment, or glove box - all these words designate one important place for storing small items in a Lada Priora car. It contains everything: from wet wipes to a minimal set of tools and wires for charging mobile devices. This is a very useful compartment built into the dashboard on the passenger side.
The small storage compartment on the dashboard of the car is equipped with an electric light - in the dark, by its light you can find everything you need.
see also
Comments 10
where should the mass be attached? I specifically removed the standard radio for this purpose, but I couldn’t find anything there
Is there any power to it at all?
Guys, sorry for the stupid question! But my glove compartment light is constantly on in the interior, along with the dimensions. And I only found out from this topic that there is a limit switch))) Where is it located?
It's right behind the glove compartment! Closer to the radio, just stick some kind of gasket on it and it will turn off the lights! I did it to myself!
two options: easy, try spilling the limit switch with water. difficult: try another mixture
Has the radio been changed recently by chance? There is a mass of glove compartment light going through the radio harness. I solved this problem somewhat in this place.
same problem, changed the radio, the light doesn't come on now
Has the radio been changed recently by chance? There is a mass of glove compartment light going through the radio harness. I solved this problem somewhat in this place.
What could be there? Can the mass come off? and where to connect it then?
Personally, my mass was destroyed by the previous owner when installing music. Call and look for the masses. The mass can be connected at any known point, or directly to the body (some kind of pin).
Glove box, glove compartment, or glove box - all these words designate one important place for storing small items in a Lada Priora car. It contains everything: from wet wipes to a minimal set of tools and wires for charging mobile devices. This is a very useful compartment built into the dashboard on the passenger side.
The small storage compartment on the dashboard of the car is equipped with an electric light - in the dark, by its light you can find everything you need.
How to remove the glove compartment on Priora 1 and 2
To remove the glove compartment of a Priora car, you do not need to make any preparations. It's simple and can be done in 2 minutes leisurely. Usually the glove compartment on Priora 1 and 2 is removed when it is necessary to get to the diagnostic connector. There is only one goal - to find out what errors appeared in the operation of the machine. But it’s not enough to just remove the glove compartment on a Priora - you need to install it correctly.
If a fastener becomes damaged, it is unlikely that it will be found anywhere. Therefore, you will have to go in search of a new storage compartment, which will take your time and cause inconvenience. Removing the glove compartment on a Priora car is carried out according to the following algorithm:
- Open the glove compartment.
- Stretch your hand inward, closer to the right edge. Press down on the right stopper and pull it out of the engagement.
- While holding the cover, disengage the left stopper.
- Pull the glove compartment cover towards you, slightly downwards, while moving it out of the fastening axes.
The glove box is part of the “torpedo” - the facing elements of the interior. The glove compartment lid allows you to keep all the contents in one place without creating clutter in the car interior. The Priora is not a spacious car, so get ready to save space here too.
Video for Lada Priora 1
Video for Lada Priora 2
If the light does not come on, how to change the light bulb in the glove compartment
A small lamp in the storage compartment built into the instrument panel on the passenger side of the Lada Priora car works to perform a useful function. At night, instead of illuminating the space with a flashlight and trying to reach something important with your other hand, you can calmly use the light that this small source creates. When the Priora's glove compartment light doesn't come on, it becomes very unusual.
Some car owners go further - they install additional lighting, like a small tuning, so that the contents of the pocket are much more visible. If the light does not work, the reason may be several problems. The lampshade is “recessed” inside the system, and therefore you will have to get close to it.
When the glove compartment light does not light up, we are talking about two items - the limit switch and the lampshade. The glove compartment switch of a Priora car wears out over time. In such cases, even if everything is fine with the light bulb, there will still be no light inside the box. When the light does not light, they begin to disassemble the structure.
You can replace the light bulb in the glove compartment in the following order:
- Open the glove compartment cover. There is no need to remove it.
- Using a flat-head screwdriver, pry up the lampshade without letting it fall.
- Replace the light bulb or limit switch.
Some owners replace the old light bulb, which gives a warm light with a yellowish tint, with a part that is installed for the Lada Vesta. The new car's lampshades provide cold light with a white tint, which allows you to see everything much better, and the text on paper is more legible.
How to make a cooled glove box on a Priora: instructions - homemade
The glove box can be made even more practical. Since documents must be carried with you and tools are often relegated to the trunk, you can skip the cooler bag. It is enough to connect the cooling to the glove box. To carry out the work you will need:
- headlight corrector handle;
- insulation (about 2m by 1m);
- two fittings, two connecting rubber bands;
- a hose about 0.5 m long, suitable in diameter for the fitting;
- old, unnecessary disc box;
- two clamps.
To make a cooling glove box for a Priora, follow these steps:
- Remove the glove box cover.
- From the disc box, cut out the core - a round valve gate. It has a central hole. You yourself need to make holes in the form of sectors, which will occupy about a quarter of the total area of the circle opposite each other.
- Next, from the same box, cut out two strips in the shape of the letter “L” and use them to make a stand for the resulting plastic blank. Glue the letters “G” with “Moment”.
- Attach the resulting installation to the square handle rod. Strengthen the connections using a stapler. Cover the valve with madeleine (otherwise it will creak during operation).
- Inside the box, in the round recess, make two holes in the shape of sectors - exactly the same as on the valve.
- Also screw two self-tapping screws into the round recess to hold the valve in place.
- Place the valve, additionally securing it with a screw. It is driven through the central hole of the valve. The valve handle should turn easily, without squeaking.
- The fittings must be brought to the required dimensions using a knife (in accordance with the hole that appears). Attach the fitting using glue.
- Cover the inside of the glove box lid with insulation.
- Make a hole in the upper passenger air duct by inserting a fitting.
- First attach the hose to one fitting. Then cover its “body” with madeleine to prevent squeaks. Connect the hose to the second fitting. Tighten the connections with clamps.
The system is ready for use and will be turned on manually.