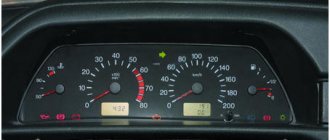
Review of the dashboard of the Lada Granta car
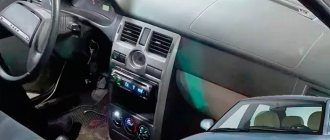
For the high-quality functioning of all vehicle systems, it is necessary to ensure correct and reliable control over a number of basic parameters. This is the instrument panel on the Lada Grant. It clearly and timely informs the driver about the operating status of all components of the machine, the speed of movement, and the equipment currently turned on.
Tips and tricks
How to properly remove the front and rear bumpers of a Lada Granta
To achieve an optimal result, you need to follow these tips:
- If even the smallest fragment with rust and other defects is detected, it is better to remove the door completely to eliminate the defects. The same is true with internal elements, which must be located in strictly designated areas;
- colored electrical tape will help to temporarily fix small parts while working on doors that have not been removed from their hinges;
- After such work, you will need to adjust the fit of the door, especially after installing additional devices and trim inside. If there is more weight, the door will go down, making it difficult to open/close the lock. Thanks to the intervention of the master after working with the cladding, the presence of such problems is eliminated.
It is worth remembering that hermetically sealing the door trim not only allows you to insulate/isolate from unnecessary noise and vibration, but also improves the sound quality of speaker systems. Dense low frequencies directly depend on the presence of material inside, and the presence of extra gaps will add unpleasant ringing and resonance when the speakers are operating.
It is best to test the reliability of the work performed by opening and closing the doors several times and testing the installed elements while driving. If possible, you can take a passenger with you who would monitor how the sound comes in and whether there is a draft through the casing and cracks.
LADA Granta from 2011, removal of instrument cluster instructions online
Payment for goods and downloading of the book in electronic form (PDF format) is made on the website.
To do this, you need to find the book you are interested in and click on the “Buy” button. The price of the book is indicated on the button.
For convenience, the price on the website for residents of Russia, Belarus and Kazakhstan is presented in rubles.
For residents of Ukraine in hryvnias, and for all other countries - dollars.
After clicking on the “BUY” button, a payment window will open where you can select a payment system with which you can pay for the selected book using any bank card (Visa, MasterCard, MIR, etc.)
When you click on the “Pay by bank card” button, the Portmone payment system will open, which is the easiest way to make a payment.
In addition, the website offers four payment systems for payment:
- Yandex (payment from any bank cards, Yandex Money account, QIWI Wallet, terminals, etc.);
- Portmone (payment from any bank cards, Portmone account);
- PayPal (payment from any bank cards, PayPal account);
- WebMoney (payment from any bank cards, payment from WebMoney wallets).
Payment via Yandex Cashier
After selecting payment via Yandex, the Yandex Cashier payment system will launch, where you need to select a convenient payment method (bank card, QIWI, Yandex Money account, etc.)
After specifying payment details and confirming payment, payment for the goods will occur.
If you have a bank card in a currency other than the ruble, then the money will be debited from the card at the rate of the Central Bank of Russia at the time of the purchase.
This payment method is optimal for residents of Russia, Kazakhstan and Belarus.
Official website of the Yandex Kassa payment system https://kassa.yandex.ru
Payment via Portmone
After selecting payment through Portmone, the payment system will launch, where you need to select the payment method: bank card or Portmone account.
The price in the Portmone payment system is converted into dollars at the exchange rate of the Central Bank of the country where you are located.
If you have a bank card in a currency other than the dollar, then the money will be debited from the card at the rate of the Central Bank of your country at the time of the purchase.
After specifying payment details and confirming payment, payment for the goods will occur.
Official website of the Portmone payment system https://www.portmone.com
Payment via PayPal
After selecting payment via PayPal, the PayPal payment system will launch, where you need to select the payment method: bank card or PayPal account.
If you already have a PayPal account, then you need to log into it and make a payment.
If you do not have a PayPal account and you want to pay using a bank card via PayPal, you need to click on the “Create an Account” button - shown with an arrow in the picture.
PayPal will then prompt you to select your country and provide your credit card information.
After specifying the information required to make the payment, you must click on the “Pay Now” button.
Official website of the PayPal payment system https://www.paypal.com
Payment via WebMoney
After selecting payment via WebMoney, the payment system will launch, where you need to select the payment method: bank card or WebMoney wallet.
If you already have a WebMoney wallet, then you need to log into it and make a payment.
If you do not have a WebMoney wallet and you want to pay in another way, you need to select any of the methods that WebMoney offers and make the payment
After specifying payment details and confirming payment, payment for the goods will occur.
Official website of the WebMoney payment system https://www.webmoney.ru/
Downloading a book
After successfully completing the payment (by any method) and returning to the KrutilVertel store from the payment system website, you will be taken to the successful payment page:
On this page you need to indicate your e-mail, where access to download the book will be sent.
If you are already registered on our website, then simply follow the link to your personal account.
The book you purchased will be in your personal account, from where you can always download it.
Please note that after making the payment, you need to return back from the payment system website to the KrutilVertel website.
If for some reason you did not return back to the site and closed the payment system tab with a message about the successful completion of the payment, please let us know - we will send you a letter indicating access to download the book.
Problems when paying with bank cards
Sometimes difficulties may arise when paying with Visa/MasterCard bank cards. The most common of them:
- There is a restriction on the card for paying for online purchases
- A plastic card is not intended for making payments online.
- The plastic card is not activated for making payments online.
- There are not enough funds on the plastic card.
In order to solve these problems, you need to call or write to the technical support of the bank where you are served. Bank specialists will help you resolve them and make payments.
That's basically it. The entire process of paying for a book in PDF format on car repair on our website takes 1-2 minutes.
If you still have any questions, you can ask them using the feedback form, or write us an email at [email protected] .
Source: https://krutilvertel.com/lada-granta-2011-glava9-modul-upravlenija-svetotehnikoj-kombinacija-priborov
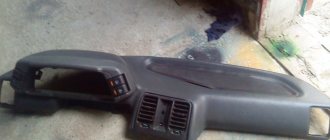
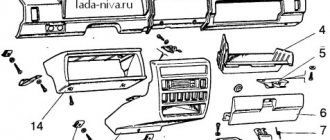
Removing the center console of Lada Granta
Before starting work, I highly recommend purchasing a set of plastic spatulas for working with car plastic to avoid damaging the plastic with rough objects such as a screwdriver.
If such a set is not at hand, or it is not possible to buy it, then wrap the tip of a flat-head screwdriver with strong electrical tape or a roll of adhesive tape.
To properly dismantle the lining you need to perform a number of simple steps:
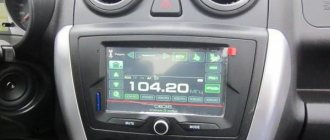
- Remove the head unit (car radio) and disconnect all connectors with wires from it. If you cannot remove the radio, you can leave it on the panel, but do not pull sharply when you snap off the cover. Remember, the wires for the radio are not that long.
- Pry off and dismantle the handles of the air temperature and air distribution regulators using a mounting spatula or a flat-head screwdriver.
- Remove the handle of the recirculation flap control lever. To remove it, simply pull it towards you.
After removing all the necessary levers, use a plastic spatula or flathead screwdriver to pry the panel off from the lower right edge, as shown in the image below. Next, we unclip all the other latches and remove the trim from the instrument panel, do not forget that the wires are still connected to the instruments.
After disconnecting all the necessary wiring, we can remove the trim completely.
On Luxury cars with a painted trim, removal is identical to the above instructions, with the only exception that the painted part is snapped off first, and the central part is unscrewed.
Installation is performed in the reverse order of removal.
Don’t forget to look at other useful articles on servicing the Lada Granta on our website, as well as take part in the discussion on our forum.
How to remove the dashboard for sizing
Recently a guy asked how to remove the dashboard for sizing. I want to share my impressions about this process. Suddenly someone wants to do this too. So here it is. I removed the panel last summer. Also for sizing. I did everything alone. I’ll say this: you can remove/install it alone, but it’s very messy. It's easier with two people, but I don't think it's much easier. Don't believe the repair book, it's much more complicated than it says. Too much will have to be removed in addition to the panel itself: the central trim, air duct tubes, gearbox housing, handbrake housing, floor tunnel, passenger airbag (if equipped), A-pillar trims, tidy. There are a lot of different screws and self-tapping screws, during assembly it is easy to get confused as to which ones were screwed in where. If I'm not mistaken, there are 26 screws alone for securing the panel itself! There are two treacherous screws on the left and right right under the windshield, which you can’t unscrew with a regular screwdriver, you can’t get under them. While the panel is being removed, you are left without glass blowing, and in current weather conditions this is fraught with consequences, including an accident due to fogged windows. If you just park the car. In terms of time: removal took 3 hours, installation took 4 kopecks. The steering wheel gets in the way. The left air duct pipe did not want to fall into place, it rested either on the body or on the windshield, it took me a whole hour just to do this. According to the results: the panel became a little more assembled, but after a WEEK it began to crunch again. In addition to this, the airflow on the windshield has become uneven - it blows weaker in the middle than at the edges. I’m generally silent about the numerous scratches on the dashboard and front door trims. You can remove them with an autogen lighter, but still the appearance is no longer marketable. Summarizing all of the above, from the bottom of my heart I HIGHLY DO NOT RECOMMEND doing this. You'll only make it worse. But this is purely my opinion, and then see for yourself. Maybe if you have experience in this matter, it will be easier for you. But I wouldn’t do this again now for any money, there are too many body movements and nuances
Similar articles
Removing the Lada Granta instrument panel
Tools:
- Open-end wrench 10 mm
- Ratchet wrench
- Extension
- 8 mm head
- 10 mm high head
- 13 mm head
- 21 mm head
- Torx T20 socket
- Medium Phillips screwdriver
- Large flat screwdriver
Parts and consumables:
- Technical capacity
- Coolant
Notes:
Carry out work if it is necessary to replace the instrument panel, panel wiring harness and elements of the heating and ventilation system.
1. Disconnect the wire terminal from the negative terminal of the battery.
2. Drain the engine cooling system as described in this article.
3. In the engine compartment, remove the heating and ventilation system filter as described here.
4. Using a Phillips screwdriver, unscrew the four self-tapping screws securing the heating and ventilation system filter casing to the instrument panel and remove the casing.
5. Loosen the clamps securing the heater inlet and outlet hoses and remove the hoses from pipes 2 of the heater radiator. Using a 10 mm high socket with an extension, unscrew nut 1 of the stud securing the flange of the heater radiator pipes to the front panel.
6. Inside the car, remove the mounting block cover as described in this article.
7. Remove the instrument cluster as described here.
8. Remove the floor tunnel lining as described in this article.
9. Disconnect the steering column from the instrument panel frame and lower it to the floor or remove the button completely, as described in this article.
10. Remove the instrument panel center trim as described here.
11. Remove the seals for the right and left door openings at the installation locations of the instrument panel and the A-pillar upholstery.
12. After overcoming the resistance of the clamps, remove the left side trim of the instrument panel.
13. Similarly, remove the right side trim of the instrument panel.
14. Use a screwdriver to pry up the upholstery of the left front pillar and, overcoming the resistance of the pistons, remove the upholstery.
15. Similarly, remove the right front pillar trim.
16. Remove the headlight beam adjustment knob by pulling it towards you.
17. Using a 21 mm socket, unscrew the nut securing the regulator to the instrument panel and remove the nut.
18. Remove the headlight beam adjustment control from the instrument panel hole.
19. Using a screwdriver, press out the two latches on the glove box and remove the top edge of the box from the instrument panel.
20. Open the glove box to a large angle and, applying the necessary force, pull the four split hinges of the box from their axes.
21. Near the opening of the left door, use a 10 mm socket to unscrew nut 1 securing the tip of the “mass” wire and remove it from the stud.
22. Using a 10 mm socket, unscrew the two nuts securing the ground wire lugs to the right bracket of the instrument panel console and remove the wire lugs from the studs.
23. Using a 13 mm socket, unscrew the bolt securing the right bracket of the instrument panel console to the body bracket.
24. Similarly, unscrew the bolt securing the left bracket of the instrument panel console to the body bracket.
25. Squeeze the two clips and disconnect the wiring harness connector from the brake light switch.
26. By pressing the latch, disconnect the wiring harness block from the gas pedal module.
27. Disconnect the instrument panel wiring harness connector from the clutch pedal position sensor wiring harness connector.
28. On the right side of the instrument panel, pressing the latch, disconnect one block of the wiring harness from the controller.
29. Using a screwdriver, use a screwdriver to slide the block clamps and disconnect the two wiring harness blocks from the fuse and relay mounting block.
30. Disconnect the two front engine compartment wiring harness connectors.
31. Using a 13 mm socket, unscrew the two bolts securing the instrument panel frame to the front panel bracket (for clarity, the instrument panel trim has been removed). The arrows show the bolts securing the instrument panel frame to the front panel bracket (for clarity, the instrument panel trim has been removed).
32. Using a 13 mm socket, unscrew the two bolts on the left securing the instrument panel frame to the side panel bracket.
33. Similarly, unscrew the two bolts of the right fastening of the instrument panel frame to the side panel bracket.
34. Remove the instrument panel assembly with frame, heater and air ducts through the doorway.
Note:
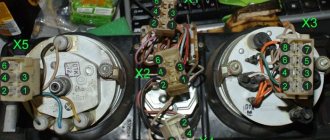
The numbers in the two photos show the connecting blocks of the wiring harnesses on the instrument panel and the front panel.
35. To remove the plastic trim of the instrument panel, use a Phillips screwdriver to unscrew the two screws under the instrument cluster.
36. Under the mounting block cover, use a Phillips screwdriver to unscrew three screws on the left side and one screw on the right side.
37. Using the same tool, remove the five screws on the right side of the instrument panel.
38. Under the center trim of the instrument panel, remove the two screws in the center and one screw on the top.
39. Using a Phillips screwdriver, unscrew the four self-tapping screws securing the heating and ventilation control unit to the instrument panel trim.
40. Disconnect the wiring harness connector from the cigarette lighter.
41. Remove the two screws that secure the instrument panel trim to the frame at the bottom.
42. Using a Phillips screwdriver, unscrew the screw of the upper left fastening of the instrument panel trim to the frame.
43. Similarly, unscrew the screw of the upper right fastening of the cladding.
44. Using a Phillips screwdriver, unscrew the two self-tapping screws securing the windshield defogger duct and remove it.
45. Using the same tool, unscrew the self-tapping screw securing the air duct of the right side deflector and remove it.
46. Unscrew the screw securing the air duct of the left side deflector and remove it.
47. Remove the instrument panel trim from the frame.
48. Install the instrument panel trim and the instrument panel assembly with frame and heater in the reverse order.
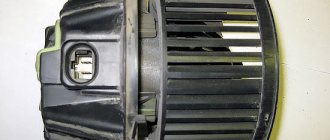
We dismantle the radiator of the Lada Granta stove
This radiator eventually leaked into the car interior. And antifreeze vapors are harmful!
Despite the fact that there are usually no complaints about the quality of the stove, breakdowns can still occur. If you focus on the radiator, it may clog or leak. In any case, you need to immediately begin dismantling the stove, after which it will be possible to inspect it in detail and understand the causes of the breakdown.
Most of the work will have to be done on the top of the engine compartment, as well as from inside the car. In fact, in this case we will not need a pit, a jack, or a lift. Just keep in mind that access to the engine compartment will be extremely difficult.
- To begin, unscrew a couple of clamps that secure the heater pipes to the heater radiator. This frees them up so we can remove the pipes completely.
- Now we will have access to draining the coolant from the radiator. Naturally, you will have to take care in advance of the container where this liquid will be drained.
- If possible, we move the pipes to the side. In principle, most of the work in the engine compartment is completed here.
- Next comes work from inside the car. Near the handbrake you can find one self-tapping screw that secures the tunnel, as well as another self-tapping screw for fixing the parking brake housing. Unscrew them completely. In addition, on the driver's side and on the passenger's side there will be two more screws that secure the tunnel on both sides.
One self-tapping screw under the handbrake tunnel
Unscrew the two screws. One is visible in the photo, the second is to the right, closer to the gearshift knob
Three pedal mounting bolts
Gained access to the heater radiator pipes
We saw off the radiator tubes to remove it
Installation of a new Lada Granta radiator
We carefully cover its perimeter with foam rubber, after which we begin to work with the window in the stove body.
Carefully cut a small window of a suitable size, closer to the bottom of the stove body.
After this, the new radiator will fit into place very well. All other parts are assembled in reverse order.
Selecting a new heater radiator (verified articles)
A model specifically for the Lada Granta Luzar under the symbol LRh 0190b would be a good fit for the role of a standard heater radiator.
It is completely made of aluminum alloy, and the price of this radiator is about one and a half thousand rubles. In addition to the Lada Grant, it is also suitable for installation in the second version of the Lada Kalina.
In general, so far, alternatives are rarely found on the domestic market. So car enthusiasts have to be content with this radiator. However, it performs quite well, especially if you do not use special additives to “repair” it, which seal the liquid supply channels.
Radiators of the so-called new type are characterized by mounting features. In addition, such radiators are not solid, but consist of two parts. They are assembled together using three self-tapping screws.
As for the “old” radiator model, it has a completely solid structure. However, most of the fastening elements are the same as the new type, so installing any of them should not lead to any difficulties.