We will take care of a good view from the car in winter, we will understand the design and installation of heated mirrors ourselves. To do this, consider a universal heater, which is installed additionally on cars without this option.
The heating element, without consuming much electricity, is able to operate effectively down to very low temperatures (some manufacturers claim down to minus 50 °C). The heated spiral located on the film contributes to the melting of ice and evaporation of moisture from the side mirrors.
Varieties
There are several options for organizing heated exterior rear-view mirrors, which are conventionally divided into electrically dependent and independent of the on-board power supply at 12 V or 24 V.
The implementation of heating depends on the specific material you will use.
The following varieties are distinguished:
- Film heaters. Very easy to use, easy to install and at the same time quite effective. An option for the lazy, if you will;
- Heating from light bulbs. Initially, all motorists who did not have standard heating, but wanted to get it, used light bulbs. Today the technology is outdated, but still relevant;
- Conductor elements. It uses a special board that has heating elements. There is nothing difficult to install, and the range is extensive;
- Wire. A special wire is used as heating. It can also be implemented if you follow some rules.
To provide some clarity, I propose to now consider each option separately.
Based on the information received, you can decide what suits you and which idea is better to abandon.
You can organize homemade heating on any mirror. It all depends on your wishes, skills and financial capabilities.
Judging by publications on Drive2, homemade heating systems are most often found:
- for VAZ 2110;
- Daewoo Nexia;
- Daewoo Lanos;
- VAZ classic;
- Lada Kalina;
- Renault Logan;
- on Gazelle trucks;
- VAZ 2109;
- Renault Sandero;
- Chevrolet Aveo, etc.
If you want something similar for yourself, I suggest you get acquainted with short excursions into the issues of creating heating using one method or another.
Using light bulbs
This is the oldest method among all existing ones. But there is absolutely nothing surprising about the fact that incandescent lamps are used for heating.
In fact, such light bulbs are heating devices. They spend about 90% of electricity on heat, and only 10% goes to light emissions. To create a heating system, it is best to take a pair of low-power 10-watt light bulbs, or 1 double-filament light bulb, which will allow each spiral to be connected separately. Usually their size fits perfectly into the mirror body. It is only important to place the lamp so that it does not touch the internal surfaces of the mirror and the body itself.
The process of installing the heater itself is quite labor-intensive. But many cope on their own.
If you are interested in the details of the process, it can be divided into several stages. Think carefully before using lamps. However, the method is outdated and there are a number of alternative solutions.
But I will still describe the process step by step. It looks something like this:
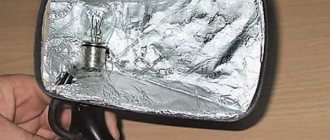
the mirror housing is removed; the body is disassembled; the front wall is treated with heat-resistant material; a layer of foil is applied on top of the insulation to reflect heat; the light bulb is fixed with wires using a socket or clamps; everything is carefully isolated; connect to power; display button; assemble everything in reverse order; check functionality; start heating.
Usually there is a separate button to activate heating. When using 2 10-watt lamps, the mirror can warm up and get rid of ice in about 2-5 minutes.
But such lamps require a lot of energy and cannot be left on for a long time.
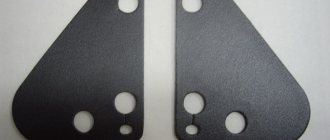
Printed circuit boards
This option is simpler and more effective than lamp heaters. They are not difficult to find on the market or order through Aliexpress.
In fact, here we are talking about 2 layers of polymer material, between which there are conductors made of nichrome or other material. Such products can be model-based, designed for mirrors of specific cars, or universal. If necessary, they are trimmed and adapted to any mirror.
The installation itself looks like this:
see also
- the mirror housing is removed and disassembled;
- the inner side is degreased;
- then the board is glued with Moment type glue;
- wires are connected to the side terminals on the heater;
- they are soldered and insulated;
- the wires are led to the car wiring;
- a control button is displayed on the panel;
- To improve efficiency, it is worth treating the inside of the body with thermal insulation and foil.
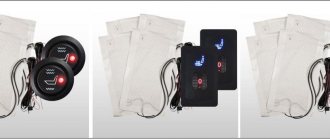
It is better to take such products as a kit, as is the case with Defogger DC12.
With your permission, I will not consider installing wire heaters. It is based on tungsten filaments, which provide high temperatures and require an extremely careful approach to organizing heating. There are too many risks when trying to assemble it yourself.
Films
See also:
In my opinion, for independent implementation, films will be the simplest and most correct solution. Just keep in mind that there are 2 types of films for heating mirrors.
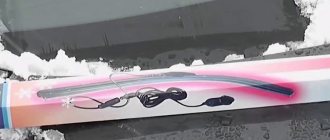
- Film resistor materials. Considered reliable, easy to install and effective. Installation is not much different from fixing boards. The film is attached to the back of the mirror using glue or double-sided tape. The kit already includes outlet wires that connect to the car’s wiring and the button is displayed on the panel in a convenient place;
- Simple films. No electrical connection is required here. This is an option for the lazy, since everything is done in a couple of minutes without much effort and dismantling the mirror. Such films, called anti-rain, are installed in several steps. First, the mirror is cleaned, the marks are checked, the label is separated, a film is glued to the center, air bubbles are removed and the top protective layer is removed.
With the second version of the film, we are not talking about heating, but about creating a special water-repellent layer. At the same time, the film works well, many who managed to buy it remain satisfied. Plus no work with connections, insulation, foiling, etc.
Have you used any heaters? How do you generally solve the problem of icing and fogging of the side rear view mirrors? Share your secrets and observations in the comments.
Thank you for your attention! Be sure to subscribe, leave reviews, and ask relevant questions if you have them!
How it works
In winter, the windshield washer often fails. This is largely due to the fact that ordinary water or special liquids, but of low quality, are poured into the tank.
As a result, the system does not work because the water freezes, turns into ice, and clogs the nozzle tubes, as well as the nozzles themselves.
Some motorists, in order to avoid such troubles, use antifreeze for windshield washer in winter. The same antifreeze that is designed to operate the engine cooling system. Yes, the freezing threshold for this composition is higher. But globally this does not solve the problem. The liquid often freezes inside the nozzle (nozzle), which can negatively affect the operation of the washer motor and damage the entire system. We definitely don't need this.
In order for injectors to operate correctly at low temperatures, they require a heat source.
In favor of modern cars, we can say that the problem has been largely solved. This was done by installing a special heating system. That is, special sprayers are used, with a heating system already provided by the automaker.
But this heating of the liquid is not found on all cars.
I think it’s not difficult to figure out how to check whether the injectors have heating for your specific car. If they are frozen in winter and the nozzles need to be cleaned and adjusted, then there is probably no heating there.
A similar problem occurs for many cars:
- Kia Rio;
- Ford Focus;
- Lada Vesta;
- Lada Kalina;
- VAZ 2114;
- VAZ 2105;
- Daewoo Nexia;
- Renault Logan;
- Lada Priora;
- VAZ 2110, etc.
Just because there is a problem doesn't mean it can't be solved.
There are several ways. Let's consider them separately.
What you need
To make a heater you only need:
- Nichrome wire;
- Double-sided and regular tape;
- Wires;
- Sealant;
- Soldering iron;
- Multimeter;
A wire with a cross section of 0.4-05 mm and a length of 1-1.3 m is suitable for the heater. For normal functioning of the heating system, the resistance of the piece of wire must be 12 Ohms. This is exactly what a multimeter is for. That is, we took a section of 1.5 meters and measured the resistance. If it exceeds the specified value, cut off 10 cm and measure again. Thus, we select the desired segment.
Benefits of heating
The main side mirrors contain a single element in a protective housing that is customizable to the driver. Some car manufacturers provide additional features to make them easier to use. One such feature is adding a heat source to the side reflectors. This is an ideal option for those drivers who live in cold regions and for those who do not have a garage to accommodate their vehicle during snowy weather. The heated element increases the temperature, melting snow, moisture, and condensation. This means that the driver does not have to waste time cleaning components and improving visibility.
On vehicles that have heated side mirrors as standard equipment, most have a separate heated button for the driver's side. If there is no such control panel, the driver turns the part every time he turns the car mirror heater.
Advantages
Some manufacturers offer heated mirrors as standard on their cars, thus attracting customers. But on older or economical modern models there is no such function.
Installing heated mirrors makes it easier to drive cars in winter. You will no longer need to waste time cleaning them manually. Some cars have a button for heated mirrors. Otherwise it will start. The heating element melts the snow, evaporates condensation moisture and makes driving much safer.
Do-it-yourself heated mirrors: an alternative option for lazy people
Hello, dear friends! I think many of you drivers are familiar with the problem of fogging and freezing of side mirrors. Therefore, today it would be logical to talk about heating mirrors with your own hands.
This is not just an additional option, but sometimes an extreme necessity. It allows you to constantly be aware of what is happening behind you due to a clear picture without distortion from moisture, condensation and stuck snow.
At the same time, heating for a mirror can be implemented in different ways. Before you take the first step in this rule, I suggest exploring several possible options. I’ll briefly tell you what they look like, what they are and how to connect them without turning to specialists for help, who will obviously demand an impressive amount of money to complete the work.
Method 1
To install heated rearview mirrors, you will need some wire, two 12-volt light bulbs, some tools and some free time. In this case, the light bulbs are not intended to illuminate, but to serve as heating elements inside the housings. The heat generated by the bulbs is enough to warm up frozen or foggy mirrors in a matter of minutes.
Installation process for heated mirrors
You can disassemble the mirror using a screwdriver
To make heated mirrors yourself, you must first remove and disassemble them. In order to ensure better heat retention inside the mirror, the front wall should be insulated from the inside using heat-resistant material. The following materials can serve as insulation:
- electrical cardboard;
- varnished fabric in several layers;
- paronitis:
- textolite;
- getinaks.
Any of the selected insulation materials will also act as an insulating material if the “+” of the light bulb comes into contact with the mirror body. Of course, such insulating properties of these materials are relevant for mirrors with metal bodies. In plastic products, such a layer will protect the body from contact of a hot light bulb with it, which can cause it to melt. Foil should be glued over the thermal insulation, since it has the ability to reflect heat. In this case, the foil layer will be able to reflect heat from the light bulb directly to the back side of the mirror element.
Heating the mirror using a light bulb and a heat screen
If there is not enough space inside the mirror housing to place the socket corresponding to the light bulb, you can use a heat-resistant clamp to fix the light bulb. Also, the wires suitable for the light bulb can be simply soldered to its contacts, and then carefully insulate the base with adhesive tape. However, regardless of the method of fixing the light bulb inside the housing, you must remember that it should not touch the mirror. Otherwise, the reflective layer of the mirror element may be damaged or, when the car moves over uneven surfaces, the light bulb itself may break.
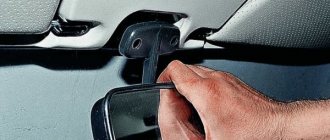
In order to connect the heated side mirrors and the vehicle's electrical system, 2 insulated wires with a durable and flexible outer sheath are required. Most often, wiring is routed through mirror pillars (or mounts) and interior door cavities. The wires should not be stretched and should not be broken, since the mirror should be freely adjustable.
Nuances of lamp heating
The effectiveness of such heating will depend on the performance of the light bulb, as well as on the internal volume of the housing of the mirrors themselves. For example, a 12-volt light bulb with a power of 21 watts, subject to the above-mentioned installation conditions, can warm up a standard-looking mirror covered with ice in just 2-3 minutes. Here it should be noted that you should not leave the heated mirrors on all the time, since excessive heat inside the case can harm both the plastic of this rear view element and its mirror coating.
12V halogen bulb
In some cases, a 2-filament lamp with a power of 21+5 Watts, which has a special circuit that allows you to use only one of the spirals, is used for heating. If necessary, after a long stay in the cold, for example, you can use a second spiral for faster and more efficient heating. After warming up, you can leave the weaker spiral of the light bulb working, which will prevent the mirror from freezing again and fogging up.
The most effective would be to install two low-power (10 Watt) light bulbs at once in one mirror body with the possibility of turning them on together or alternately. Such a scheme would make it possible to best select the appropriate mode, which, depending on weather conditions, would ensure optimal heating operation.
Requirements
Heated side mirrors must be connected to the vehicle electrical network through the appropriate fuse. If there are any cracks or holes in the mirror housing, then during the installation of electric heating it is necessary to seal it
Such precautions are necessary to avoid moisture getting inside the mirrors and, as a result, the possibility of a short circuit. It is advisable to place the heating switch near the point of its connection to the machine’s electrical network and in a place convenient for the driver
Remember, this method of installing heated mirrors with your own hands is described only as one of the possible options. It is your responsibility to resolve this issue yourself. This can only be done with strict adherence to safety precautions!
Principle of operation
At its core, heated side mirrors consist of any electric heater (low temperature), electrical wiring, and a control button (panel). The electrical circuit for heating the mirrors is connected to the vehicle's on-board 12-volt network. When the contacts of the power button are closed, the heating of the mirrors (heating element) is connected, the current heats the surface of the mirror, it heats up, and the resulting ice begins to melt, and the mirror also stops fogging up.
Structurally, the universal heated mirrors look like an electric heating element, a cable, and a control system. The system is connected to the standard electrical circuit of the machine, the power of which is twelve volts. By closing the push-button contacts to turn on, the heating system is activated, the incoming current heats the mirror surfaces, the icing begins to thaw, and the mirror fogs up.
Progress
All work can be divided into 2 stages:
- assembly;
- installation.
Assembly
The heating element assembly is formed by the new contents of the switch block, which is shown in the mirror heating diagram.
Removing the door card.
To remove the door card, unscrew all the screws at the end of the card, in the handle and the screws securing the speakers. After that, remove the handle and unscrew the screws hidden behind it. Next, from the mirror side, start removing the card.
Removing a mirror.
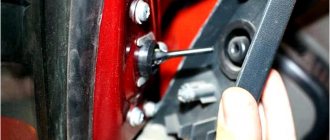
Remove the side mirrors in the folded position. To do this, you need to unscrew the screws that secure it to the door.
Disconnect the wires. Next, detach the mirror element by pulling its bottom part. The mirror itself is attached to a plastic frame, which needs to be removed using a hairdryer.
After this, the heating element must be attached to the plastic and the corresponding holes for the contacts must be cut. Next, remove the protective layer and glue the heating element to the mirror, and then to the plastic.
First you need to pull the wires through the side mirror housing, crimping and connecting the contacts. After this, you need to install the mirror element in place. Next, we install the structure on our turntable.
Heated side mirrors are ideal for drivers who live in cold climates and who often have to spend time scraping ice or removing moisture from the glass. Heating coils automatically clean the surface so drivers can see the rear of the road clearly. Since the price of ready-made heated side mirrors is quite high, many craftsmen install the heating themselves. Having the necessary tools, you can do this yourself at home. Have you already installed heated rear view mirrors?
Malfunctions of standard heating
The presence of a heated rear view mirror cannot always be detected at first glance. The fact is that there is often no separate button to turn it on, and many car owners wonder how the heated exterior mirrors are turned on. The function is activated automatically when the rear window heating is turned on. To check if the mirror heater is present:
- Start the engine;
- Turn on the rear window heating;
- Spray the mirrors with water or blow on them;
- Touch it with your hand.
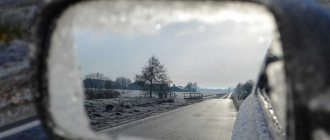
When the heating is running, the water drops dry within 1-2 minutes; when you breathe, the mirror does not fog up, and it is warm to the touch. In the cold season, you can verify the presence of heating by simply observing how long it takes for the mirror to thaw after being parked overnight. If a heating element is located underneath, the defrosting process takes only a few minutes.
| Possible malfunction | How to repair heating |
| Heating element burnt out | Disassemble the mirror and replace the part |
| The integrity of the wiring is broken | Check the wiring with a multitester, clean, connect and insulate the wires at the damage site |
| The power button combined with the rear window heating is faulty | Check if the rear window heating works. If not, replace the button |
| Heating relay is faulty | “Ring” and replace the faulty relay |
| Fuse burned out | Replace fuse, check wiring for short circuit |
It’s not difficult to make heated mirrors with your own hands today. Heating components are sold in stores, so all the work comes down to assembling a simple structure and connecting it to the car's electrical network. An assembled and well-functioning device will significantly increase driving comfort in winter and make life easier for owners of any type of car.
Tube heater
Self-production of lamp-heated mirrors
We will look at heating made from improvised materials. One of the simplest types of heating is the use of ordinary 12-volt incandescent lamps. When such a lamp burns, enough heat will be released to warm the mirror. At the same time, to create a heater you will not need so many materials:
- two automobile incandescent lamps;
- cartridges for them;
- wires;
- foil;
- insulation (varnished fabric, paronite, textolite);
To install the heating, you need to remove the mirror along with the housing from the car, and then disassemble it so that you can install the bulbs inside. Insulation is needed in order to reduce heat loss from the housing. It needs to be glued from the inside to the body. Then foil is glued to the insulation, which will act as a reflector, providing heat flow towards the mirror.
Next, the light bulb socket is installed inside the housing and secured. This can be done in different ways, but it is important that the installed light bulb does not touch the mirror and reflector, so the light bulb also needs to be selected in the optimal size.
If there is not enough space in the case, you can simply solder wires to the lamp and insulate the base. The lamp itself can be secured in the housing using a heat-resistant clamp and glue. Then the mirror is assembled and installed on the car.
The wiring from the light bulb can be pulled through the mirror mounting post into the interior. One of the wires is connected to ground, and the second is stretched to the button for turning on the heated rear window and connected to it.
This type of heating is good because it can be tweaked and improved. For example, install a two-pin lamp, making dual-mode heating, display a separate key, etc.
Video: Heating mirrors with your own hands, from start to result Passat 3
About safety rules
We have already figured out a little about how to use the first method to heat mirrors with your own hands. “Kalina” or “seven” - you must not forget about safety rules.
Firstly, the connection must be made only through a special fuse, and secondly, the cracks and holes in the side mirror housing must be completely sealed. This is necessary in order to prevent moisture from entering and the possibility of a short circuit.
In addition, always remember not to leave the wires exposed, as this may cause a short circuit in the housing, etc. It is advisable to place the switch in a place convenient for you so that you do not need to be distracted from the road. In principle, following these simple rules is not so difficult.
Preparing for work
To design heated mirrors with your own hands, you need to select suitable materials and tools.
What is needed for work:
- heating elements for each mirror;
- hot water, hair dryer for heating the surface;
- scissors or a knife for cutting the heater according to the shape and dimensions of the mirror itself;
- drill with an attachment for making holes;
- to connect the system you will need wiring, bolt terminals, electrical tape;
- a button that allows you to start the device;
- fuse, relay.
Types of heating
Wire-based heating
It is necessary to purchase tungsten filaments. They must be laid between two layers of insulating material. This creates a spiral. It is necessary to make two conclusions (for plus and minus). When choosing this heating option, you need to have a good understanding of mechanics. The spiral must be insulated; there should be no gaps between the two layers of insulating material.
On printed conductors
This is an easy option for installing heated mirrors since every car market has heated units. They consist of two layers of polymer material, between which conductors are located. Such parts are made for a specific model. They can be found according to the desired size; for this you need to know the parameters of the car.
To install the heating, you will need to disassemble the mirror housing. This is necessary in order to get to the other side. The inner part must be degreased and the board glued to it.
We recommend: How and where to fill the brake fluid
The heaters have two terminals on the sides (wires are connected to them), they must be soldered and insulated. The wires are connected to the wiring, and the heating regulator is displayed on the panel.
Important! Efficiency will be higher if the internal cavity of the housing is covered with foil or heat-insulating material.
Video “Heating the side reflectors”
A short video on how to make heating of reflectors with your own hands from a film heater (the author of the video is I Ko).
Preparing Honda Civic for Russian winter
Hello Honda drivers! So, the cold is actively setting in in Russia, the side mirrors are covered with a crust of ice, which is difficult to scrape off. It is quite difficult to remove ice from mirrors, sometimes not without consequences - peeling off the top layer of the mirror coating. Today I dedicated the whole day to installing a DIY mirror heating system in my Honda Civic! Now I can show you a full photo report on the installation of heating elements on the mirrors.
Iced mirror Honda Civic
Mirror analysis
First, we need to completely remove the mirrors from the car. To remove the mirror element of a Honda Civic, you need to bend it in any direction and use a flat tool to remove the iron clamp from the middle of the body (you can see it in the photo below), I used a regular knife. Next you will need hot water, a large saucepan or a bathtub will do, put our mirror in bitter water for a few minutes. I hope that before this the mirror element was warm and not from frost, otherwise it will simply crack from the temperature difference. At a high enough temperature, the glue that holds the mirror element to the plastic backing will soften and the mirror itself can be easily detached from the plastic backing. Next, carefully pull out the entire structure. If the glass is difficult to come off, then put it under hot water, do not use force! Otherwise, you may be left without mirrors. The second option is to warm up the mirror element with a hot air gun. So the mirror comes out of the mandrel, take it out of the plastic holder, clean and degrease the back of the mirror with a degreaser, and we will glue the heating element to the back side.
Independent heating equipment
Factory universal heating element
But that’s all – standard heaters that cars are equipped with from the factory, and not all models have them. And this option is really very necessary, because visibility depends on it. But it is quite possible to make heaters for side mirrors yourself.
Of course, you can buy all the necessary equipment and install it on your car, saving yourself the need to invent something. There are ready-made kits on sale that can be installed in standard mirrors, or you can purchase tuning mirrors that are already equipped with heating, but these are additional costs.
Instructions for installing ready-made components
Installing commercial heated mirrors is a relatively simple operation. To carry it out, it is necessary to remove the part from the car and disassemble it. Glued products are heated with a hair dryer or by soaking in boiling water, after which the reflective overlay is easily removed.
Products fastened with bolts are disassembled using the appropriate tool. Do-it-yourself installation of heated rear-view mirrors purchased in a store is permissible only on clean and dry surfaces.
The boards are glued to the inside of the case with glue, the films are fixed directly to the reverse side. In both cases, wires are soldered to the contacts of the thermoelement, which go to the power source.
Read more: Detailed guide to replacing the heater valve on a VAZ 2115 car
Heating lamps
In this case, lamps are installed in the mirror body, which warm it up. 2 lamps of 10 watts are enough to thaw the mirror in a couple of minutes. If you use this method, then the housing should be insulated from the inside. Lacquered fabric or textolite are suitable for these purposes. Other similar materials can be used as insulation. A layer of thin foil should be glued on top of the insulation as a reflector.
The heating efficiency will increase several times. If there is not enough space to place the lamp socket, use a special heat-resistant clamp. It will take up virtually no space. Solder all wires and carefully insulate them. Remember, most importantly, the lamps should not touch the mirror itself. Do not use this type of heating for a long time. Otherwise, you will have overheating instead of heating.
Conclusion
. To avoid problems with frozen and fogged mirrors in your car, just find out how to make heated mirrors with your own hands. There is nothing complicated about this, but if you have absolutely no experience working with electricians, then it is better to entrust the process of connecting or soldering wires to a knowledgeable person.
Installation of finished components
The installation is clear even to a car driver who has recently driven the car.
Procedure:
- Find a device to close and open the circuit (relay). Open the hood of the vehicle, find the black box and relay. There are indications on the box which relay is for what. You need to find one for the mirrors and remove it. Next, replace the relay with the mirror element, connect the wire, and close the hood.
- Remove old mirrors. Open the doors, unscrew the screws. Find mounting locations for rearview mirrors. Remove old components and disconnect wires.
- Supply purchased components.
We recommend: How to quickly and easily replace a generator bearing on a VAZ 2110?
How to make reflector heating yourself?
What materials will you need?
- plugs for wiring;
- insulating tape;
- cable fastenings;
- screwdriver;
- spiral;
- wiring;
- soldering iron;
- wire stripper;
- construction hair dryer;
- ten and twelve mm sockets;
- relay;
- clamps.
Procedure
First you need to assemble the heating element and make switching elements to control the heating. After this, you can begin installation on the car.
How to install:
- Start by removing the door trim, screws and handle. Also remove the trim from the side of the mirror.
- Dismantle all mirrors and remove self-tapping screws. After this, disconnect all wires. Remove the mirror element; this can be done using a hair dryer. Place the heater on the plastic and create holes for the contacts. Remove the protective layer, glue the heating element to the mirror and plastic.
- The leads must be mounted through the side glass and all contacts must be connected.
- Install the mirror element.
Watch the video on how else you can make heated mirrors yourself
Make heated mirrors yourself or buy a universal option - the choice is yours. Whatever you decide, carry out the installation correctly and in compliance with all necessary standards. Only in this case will you be able to enjoy an excellent view in any weather. Good luck on the roads!
The cold season is ahead, creating additional difficulties for motorists, including fogging and freezing of side mirrors. Driving with such mirrors is not only inconvenient, but also dangerous. And opening the window every time to clean and wipe is not much fun, especially if it’s cold and rainy outside.
Many foreign cars are equipped with a heated mirror system. It is really very convenient because it allows you to keep your mirrors clean in any weather. But only on budget models, as well as on domestic cars, such equipment is very rare.
There is still a way out of the situation, and more than one:
- Purchasing mirrors with an integrated heating system;
- Purchase and installation of factory heating products (film, printed heaters);
- Folk remedies;
A few important details
To disassemble the mirrors, you will need screwdrivers of different sizes, as well as hex keys. You will need to find a place in the car to set the heating to turn on and off.
To disassemble the side window, first loosen the mounting screws. Use a hair dryer to soften the mirror elements. If this tool is not available, the driver can use hot water. The mirror must be completely placed in water, after which the analysis will be much easier.
Important! When dismantling, you must use plastic elements so as not to damage the structure or scratch the glass.
To get the maximum effect from the heating operation, the elements must be prepared so that the contacts do not touch the coating. Contact between heat and coating results in burnout. All work can be done independently. However, it is better to contact a specialist, he will help with installation and perform the correct installation, so that unforeseen situations do not arise during the operation of the mirror heaters.
Installation and assembly must be performed sequentially. Each stage is performed one after another (certain actions cannot be skipped). Thus, heated mirrors will bring the driver the necessary comfort. In wet weather and frost, the mirrors will always be clean and dry.
How to install heated mirrors
An alternative to repairing or installing a defroster is to replace the existing glass. The old window is then completely removed at a specialist workshop and replaced with a new heated rear window to the extent that the vehicle manufacturer offered it to them from the factory at the time, or the current manufacturer has suitable copies in stock.
The price is determined depending on the car model. To this are added the costs of dismantling and installation in a specialized workshop. Because the heating cables in the window must be connected to the mains. To do this, the glass connecting cable must be connected to the vehicle.
Another option is to use a special film for gluing, often an option for the rear window. This film has built-in heating cables that heat the glass accordingly and prevent the glass from fogging up. The special film is extremely easy to use during installation.
It is simply glued to the inside of the car to the existing rear window. There is nothing more to do for installation. In order for the heating cables in the film to also receive electricity, a cable must be laid. Electricity can be supplied to the heating cables of the film through the car's cigarette lighter.
Modifying heated mirrors is much simpler. In addition, there are many suppliers who stock a self-adhesive polyester surface that simply sticks to a part of the car's exterior mirror. Depending on the version, this film is suitable for many brands of cars, and can also be used for other purposes.
You can also install a replacement mirror glass (clip-on), all you have to do is connect the wires and then install the mirror. This mirror is easy to install, but professional installation is recommended.
Selecting a heating element
Universal heating elements are most often found on sale; they are easily installed in the side mirrors of most cars. But if there are any differences in the size or shape of the heating element compared to the back surface of the mirrors, then you need to discuss this problem with the seller.
If the choice is limited to several models that do not quite fit your car, then it is better to give preference to heating elements with smaller dimensions than the size of the mirror on the car. In this case, you will not have to trim the base of the heater, which can lead to depressurization and subsequent burnout of the heating element during operation.
When purchasing a heating element, you should pay attention to such characteristics as:
- current strength;
- voltage;
- power.
Precautions and Operation
In order to protect the heater from short circuits and burnout, you need to connect it through a fuse and carefully insulate places through which moisture can get to the contacts or the heater. To do this, you can use regular silicone glue, which can be used to seal the hole through which you passed the wiring. Also, for reliability, you can use sealant to seal the seam between the halves of the rear view mirror housing.
And of course, if you used a container of hot water to disassemble the mirror, before checking the operation of the heater, you need to thoroughly dry the rear view mirror so that a short circuit does not occur. For this, it is best to use a household hair dryer. And of course, you can't use hot water to soften the mirror frame after the heater is glued to the mirror, so you'll need a hair dryer anyway.
If you did everything correctly, then the improved mirrors can be used as usual without any restrictions. Almost any person who is not afraid to modify the car themselves can cope with such a task as installing heated rear view mirrors. And the pleasure of driving with clean mirrors in any weather is worth spending about an hour on such a simple procedure.
Choosing a possible solution for making or repairing heated mirrors with your own hands
So, heated mirrors will be useful to you not only in winter, but also in the off-season, when the glass can cool down significantly, which will lead to the accumulation of condensation on them. We will not focus our attention on the possible options when you need heated mirrors, but will immediately proceed to alternatives that will correct the existing state of affairs. Yes, of course, most cars sold on our market already have such an option as heated mirrors, but if you still don’t have such an option or it’s broken, then this can be fixed. Before you start doing something, try to do it according to the rule of “least resistance” to the existing circumstances. So it is necessary to check whether there are “ready-made” offers on the market, that is, already pre-assembled heating blocks (platforms) that can be installed in standard mirrors. If there are any, then purchasing and installing them would be a better option, but if not, then welcome to the club of “crazy hands.”
How to check for a function?
You should not begin work on installing such a system unless you are sure that you no longer have heated mirrors. You can check it very simply. If you have a heating button in your car, or the mirrors get warmer a couple of minutes after turning on the car, then you have it.
You can also check if the wires go to the mirror housing and if there is a heating element in them. Heated side mirrors can be easily connected to a similar system for the rear mirror. This way you can control everything with one button. The main thing is not to mix up the wires.