Bored with your car's interior? There is a simple way to update interior parts, which, if necessary, allows you to return everything to its original condition. Let's consider the process of pasting plastic elements with vinyl (film), and also learn about the most popular colors of this material.
Question to AVTOVAZ: Will paint be added to the dashboard or the structure of the plastic changed?
Answer: It is planned to use decorative inserts and cladding with original designs for the Exclusive LADA Vesta package.
Conditions for gluing carbon film on a car
Before gluing carbon fiber, you need to prepare a place to work, as well as a set of tools:
- Vinyl pasting is carried out at positive temperatures up to 20° C in a ventilated dry room;
- It is very difficult to work alone on tuning, so it is better to agree in advance with a partner;
- You will need scissors, a scalpel for cutting the film in hard-to-reach places, a construction knife, a tape measure and a hair dryer for drying the surface, a set of polymer spatulas for smoothing and removing air bubbles.
Wet method
For those new to film wrapping, the wet method will be easier and faster.
Procedure:
- You need to cut a piece of film to the required size, taking into account a turn of 8 mm on each side. In large areas, it is allowed to leave folds up to 5-6 cm.
- The surface is degreased with a soap solution and washed with clean water.
- If there are uneven spots and scratches, then before applying the sticker you need to restore the structure of the surfaces using a primer or automotive putty. It is important to consider the following: if the primer dries in 5-7 minutes, then the putty takes up to several hours, and then it must be sanded with fine sandpaper.
- Afterwards, a soap solution is applied again - the carbon fiber will be attached to it. In order for the film to fit tightly, you must check that there are no contaminants left. And to apply the soap solution evenly, it makes sense to use a spray bottle.
- The film must be applied to the surface, having first removed the backing from it, and pressed step by step onto the paintwork, smoothing with a soft polymer spatula or felt squeegee.
- For fixation, the front part is heated with a hair dryer. The final gluing process should begin from the center of the element, gradually moving to the edges.
Important! Moisture should not be allowed to dry out during the first gluing process, so there is no need to apply the soap solution to too large an area at once.
To properly glue carbon fiber using the wet method, uniform heating must be observed, otherwise both the film and the car’s paintwork will be damaged. The minimum setting of a hair dryer in the range from +50 to +70° C is sufficient.
Application
In order to properly cover with carbon film, you need to follow the sequence of work. Do-it-yourself car wrapping with carbon film begins with preparation. It consists of cleaning the working surface and degreasing it. If there are uneven areas, you should prime them with a primer, since in this case the coating will adhere more tightly to the surface. The material must be cut into fragments for pasted body elements. They are correlated with the parts to determine cutting accuracy.
Next, the coating, without peeling off the base, is applied to the work surface and secured with masking tape. Then the base is removed, stretching the coating to prevent it from sticking. Then spray the surface with a soap solution, leaving no dry areas. After this, the material is applied to the surface and bubbles and liquid are removed from underneath it, smoothing it with squeegees: first with plastic, then with felt. Finally, the coating is heated with a hairdryer and smoothed again. Pasting rounded surfaces involves heating and smoothing the material throughout the entire work process. In any case, it is especially important to warm up critical areas of the film. Warming up allows you to more thoroughly attach the coating to the work surface, adjusting its shape. Heating efficiency is determined by temperature, so low-temperature household hair dryers are not suitable for this purpose. However, overheating is also unacceptable, as it leads to stretching of the material. Warming up is carried out gradually, treating each area. The whole process lasts 5 - 7 minutes. Finally, excess material is trimmed off with a utility knife. The free edges and joints should be treated with sealant to protect them from the mechanical influence of environmental factors. After the gluing is completed, the car is left for a day. During the week, washing can only be done using a non-contact method.
The wet method of film application is discussed above. It is widely used due to its simplicity. In addition to this technology, there is a dry method. Such work is more complex and takes more time, so usually experienced performers apply the film using this method. Application must be carried out at a temperature of at least 22°C in a dry and clean room. The main difference between the dry method and the wet method is that the material is applied to a dry work surface without using a soap solution. Otherwise, the technologies under consideration are similar, but the second is more effective.
You can cover the interior plastic with film yourself using the same methods as the hood and other body elements. The pre-glued parts are dismantled. Before you start covering the interior with carbon film, you should also watch the video.
0 0 votes
Article rating
Dry method
Dry carbon fiber pasting has its advantages:
- the film does not move during installation;
- adhesion to the paintwork of the car is higher than with the wet method;
- vinyl stretches less.
Instructions:
- Preparation for pasting using the dry method is not fundamentally different from the wet method. But after removing contaminants with a wet solution, you need to dry everything thoroughly and then treat the surface with White Spirit.
- The film is applied to the element and smoothed.
- Heat the film with a hairdryer over the entire area and gently smooth it again with a spatula.
- After careful smoothing and heating, excess carbon is cut off.
It is worth considering that 3D class carbon films are more durable than 2D and are more suitable for the dry method. High-quality films have special perforations, and these channels help to expel air evenly.
Advantages and disadvantages
Provided that high-quality vinyl film is used and the rules for its application are followed, the motorist will receive many more advantages than disadvantages.
The main positive points include the following:
- Due to the effect of masking defects, vinyl will hide not only scratches and chips, but even dents. Yes, they can be seen, but only from a certain angle.
- This is an effective protection against the vagaries of nature. The material resists solar radiation well, protects the body from hail, rain, various types of mechanical damage from falling branches, etc.
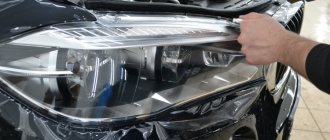
- Vinyl can be used to cover front and rear optics. The material is transparent, but has excellent protective properties.
- If applied correctly, the film can last 5-7 years.
- Vinyl coating is inexpensive and available to every motorist.
- The current range allows you to choose a film for every taste. There are many shades, colors, textures. One of the most popular is a film that imitates carbon coating.
There is no need to talk about any serious shortcomings.
Basically, problems arise if you use a low-quality coating or violate the application technology.
In this case, motorists face the following problems:
- the material quickly deforms and lags behind the surfaces of the car;
- under the influence of sunlight, the adhesive layer dries;
- due to the bright sun the film fades;
- the surface is characterized by roughness.
Therefore, motorists generally prefer to cover the car in the same color as the body, or use shades that are as similar as possible to the original color. If the documents indicate that the car is blue, there are many shades of this color, and in this case nothing in the documentation will have to be changed. But when the car is white and the film is black, then immediately go to the traffic police.
Features of gluing with carbon-look vinyl film
Even the dry method requires drying for 4-6 hours, and a visit to a contactless car wash will have to be postponed for a couple of weeks. Otherwise, the coating will quickly come off or become covered with bubbles.
If you manage to purchase an inexpensive 2D film, then during the installation process it is better to make perforations in it yourself to remove air. For this purpose, you need to heat a thin needle and make holes in the film in a checkerboard pattern at a distance of 3-5 cm.
Using the dry and wet method, you can glue carbon film to plastic inside the car. The principle and procedure is no different from body wrapping. The difficulty lies in the geometry of the elements. In places where it is difficult to go through with a spatula, you need to roll the film with your finger to avoid uneven tension and tears.
The plastic must be cleaned of dirt and be sure to degrease before gluing the film.
After ironing with a spatula and heating with a hair dryer, it would not hurt to fix the edges of the film on the plastic with heat-resistant glue, because It can peel off when turning.
Important! Do not overheat the plastic with a hairdryer; due to high temperatures, the polymer elements can melt and deform.
Covering with corbon-look film allows you to emphasize the individuality of the car without resorting to repainting. Beginners should choose the wet method of fixing the film - it allows you to easily adjust the position of the part. Craftsmen prefer the dry method, which does not require constantly updating the layer of soap solution. The film is suitable for use both outside and inside the car. The main thing is to thoroughly clean and degrease the surface and expel all drops of air during the smoothing process. The finished tuning will last an average of 5 years.
Self-adhesive film is a good option to update furniture, walls, office equipment (laptop, phone), refrigerator and even a car without investing a lot of money. The principle of pasting is based on combining two layers: the top - wallpaper and the bottom - an analogue of adhesive tape. The advantage of using this material is undoubtedly the variety of surfaces on which it can be used: metal, wood, glass, plastic and many others. In addition, the film has a number of useful properties: moisture resistance, ease of care, ease of use, resistance to high temperatures. It is not surprising that more and more people are interested in how to glue it and where it can be used.
Selecting material for reupholstering the front panel of the machine
The torpedo is constantly in sight, which means its appearance and quality will be striking both to you and to other passengers. The selection of material for reupholstering the front panel should be approached responsibly. Most often, the following materials are used in the interior design of a car:
- leather (artificial and natural);
- Alcantara (another name is artificial suede);
- vinyl.
You should not select material via the Internet. Pictures and descriptions will not give you a complete picture of the product. Before making a purchase, stop by a specialized store and feel each of the materials offered. It is also worth writing down the manufacturer and name of the shade. After this, you can order goods from the online store with peace of mind.
Genuine Leather
Genuine leather is a good choice for upholstering the front panel. This is a durable material that is not afraid of temperature changes, getting wet and fire. In addition, its surface is resistant to mechanical damage. Of course, you shouldn’t deliberately scratch the skin with a nail, but white stripes won’t appear on it by themselves either. The leather can be easily cleaned of dirt by regularly wiping it with a damp cloth. You don’t have to worry about the panel fading in the sun—it’s not afraid of ultraviolet radiation. And there’s no point in talking about the appearance of genuine leather: it will fit perfectly into the interior of even the most expensive and pretentious car.
Genuine leather gives the car interior a sophisticated look
Eco leather
If you can’t afford genuine leather, use its modern substitute - eco-leather. This type of material is called environmental because it does not emit harmful substances during operation. It doesn't look at all like the cheap leatherette of the late 90s. This is a durable, moisture-resistant and vapor-proof material that can maintain its appearance for a long time. Do not be afraid that the eco-leather coating will crack in a short time. In terms of its performance qualities, the material is not inferior to genuine leather. In addition, eco-leather is suitable for drivers with allergies.
eco-leather has good performance characteristics, but is much cheaper than natural leather
Alcantara
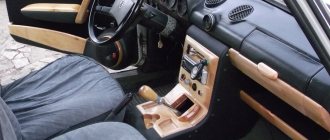
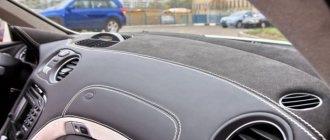
Recently, Alcantara has become one of the most popular materials for interior upholstery, including the dashboard. This is a non-woven synthetic material that feels like suede. It combines a velvety soft surface with easy care and high wear resistance. Just like skin, it does not fade in the sun. High humidity and temperature changes also do not affect it negatively. Many drivers prefer to cover the entire interior with Alcantara to create an atmosphere of home comfort. Others use it to design individual elements to dilute the severity of the leather. In any case, Alcantara is perfect for covering a dashboard.
Alcantara is a synthetic fabric similar to suede
Vinyl
If you want to create an unusual interior design, consider using vinyl films. There is a rich variety of textures and colors on the market today. You can choose a calm black or gray color, or you can find an imitation python fabric in an acid green color. Chrome-plated films, as well as films with a carbon or metallic effect, are very popular. They are even easier to care for than leather. Vinyl films have, perhaps, only one drawback: they are easy to accidentally scratch. But the low price allows you to re-tighten the panel as often as you want.
Using vinyl film you can imitate various materials, including carbon fiber
In order to save money, some motorists do not purchase special automotive material, but a similar one intended for reupholstering furniture. At first glance, it seems that there is no difference between them. However, this is not true: furniture leather and other materials are designed for use at constant and comfortable indoor temperatures. The car heats up in the bright sun and cools down in the cold. Furniture materials will quickly crack under such conditions.
Scope of application
The most commonly used film is vinyl film. It is used for various purposes - in baths, kitchens, living rooms and even children's rooms. The safety of its use and beneficial properties allow you to update the design of your home, office, etc. The variety of colors will satisfy any, even the most fastidious, buyer.
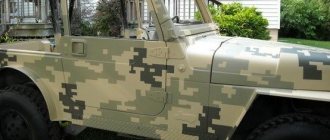
A type of vinyl film is carbon-effect film. Carbon film is used to change the appearance of the car. Its versatility allows you to stick the film on the outside of the car and update the interior. On the one hand, carbon film is economical, durable, and on the other hand, it is easy to remove. Therefore, if you get tired of the color of your car, you can easily change it at low cost.
Let's look at how to properly glue vinyl and carbon film to plastic.
Purpose
Covering a car with this material has both practical and aesthetic meaning. From a functional point of view, gluing carbon film is beneficial in that it protects the car’s paintwork from the effects of external factors, such as precipitation, grains of sand and stones, ultraviolet rays, and chemically active substances. This is especially true for parts exposed to road particles, such as the hood. Externally, the coating in question quite reliably imitates carbon, as evidenced by photos and videos. Therefore, it is usually applied to those parts that are most often represented by carbon analogues, that is, the hood, mirrors, etc. The film can also be used to cover plastic in the interior. Moreover, this coating is much cheaper than the original material. You can learn about the various options for applying film both on body parts and in the interior from photos and videos. In addition, if the hood or other parts already have damage to the paintwork, they can be covered with film to hide the defects.
That is, carbon film has attractive aesthetic qualities and at the same time is strong enough to protect the car’s paintwork from various environmental factors. In addition, this material is suitable for application to various materials, such as metal or plastic, so it can be used both for coating body parts and for interior decoration.
Subject to compliance with operating rules, the service life of carbon film is up to 10 years.
Surface preparation
A properly prepared surface is the key to a long service life of the glued parts. First, the plastic must be thoroughly washed to remove dirt, dust, and debris. It is most convenient to use a soap solution made from neutral liquids for washing dishes. In this case, you need to ensure that streaks do not form. It is best to first wash with soapy water, then with water and finally wipe with a dry, lint-free cloth. After this, you need to treat the plastic with isopropyl alcohol or white spirit.
The next step is to check how smooth the surface is. If necessary, sand it, apply a primer for plastic to further ensure adhesion to the primer, treat it with a primer and sand it again. Do not neglect at least one of the listed stages. This will help make working with self-adhesive film easier.
Required Tools
When working with film you will need:
- Pencil;
- Ruler or masking tape;
- A stationery or mounting knife (scissors are not advisable, there will be uneven edges);
- A rubber or felt spatula or squeegee, or a soft, lint-free cloth;
- Hairdryer, preferably industrial. For the wet method, you will need a spray bottle with soapy water.
How to glue carbon or vinyl film to plastic without bubbles
First of all, you need to carefully mark the film and try it on the desired surface. When cutting, leave a margin of 2 cm in places where the film is folded.
It is advisable to carry out this work indoors at temperatures from +8°C to +30°C. If you glue the film on the outside, there is a high probability that particles of dirt, debris, and sand will get in. This will negate all the work, since any grain of sand can lead to swelling of the film, and, as a result, you will have to re-glue it again.
These are general requirements.
There are two ways to glue film to plastic:
Dry method. More suitable for professionals. The difference from the wet method is that a soap solution is not used. As a result, it is more difficult to correct unevenness, since the film sticks faster, but in this case it also holds better.
The wet method is more suitable for beginners who have no experience working with self-adhesive film. In this case, it is recommended that two people work together. If possible, lay the film on a flat surface with the backing facing up. Carefully remove the backing. If the surface is large, then it is better to remove it gradually, starting from the top edge and smoothing from the middle to the edges. This will push the bubbles to the edges and prevent their further appearance. If the surface is small, then remove the backing completely. Spray the adhesive surface freed from paper with soapy liquid from a spray bottle (proportion 1 part liquid to 10 parts water). We turn the film over and begin gluing from the middle to the edges, smoothing it with a cloth or squeegee.
The most important thing is to correct all noticed irregularities and bubbles immediately. To do this, lift the film and re-glue it, and push out the air bubbles to the edges. If suddenly the bubble cannot be removed, do not worry, a regular needle will help you. Pierce the surface near the bubble with it, but not the bubble itself, and glue. On an uneven surface, you must first heat the film, but do not overdo it, and then carefully stretch it, achieving a perfect fit to the part without bubbles.
When finished, use a roller and then a hair dryer over the entire covered surface. Pay special attention to irregularities, bulges, and folded edges.
If you decide to glue film to a car, then now you know how to glue carbon film to plastic and more. The work is complete, but don't rush to use the car. It is recommended to leave it in a warm room for at least a day, and wash the car no earlier than after a week.
Carbon film is used mainly for pasting plastic parts of car interiors, as well as bumpers and mirrors. The difference from parts made of carbon is not noticeable, and the cost is an order of magnitude different.
As you have seen, it is not difficult to properly glue carbon or vinyl film onto plastic without bubbles. The main thing is to comply with all requirements. For clarity, you can watch how to glue film to plastic in the video.
If you want to bring a bit of high-tech aesthetics to your car's interior, then it's time to pay attention to carbon fiber vinyl film . With its help, you can tune (see Tuning Aveo photo) and transform both small and large interior parts (center console, doors, etc.).
Key stages of work
Car wrapping, like any other work, requires serious preliminary preparation. Conventionally, all work can be divided into three main stages:
- preparation of material and tools;
- cleaning of surfaces to be pasted;
- covering the car with film.
The more thoroughly the surface of the body and other structural elements on which you plan to stick vinyl is prepared, the better the material will lie on it and it will be easier to cover them with high quality. Some people prefer to visit a car wash before starting work, but you can clean the vehicle yourself. Depending on the degree of contamination of the car, various solvents and soapy water may be needed. To make the surface perfect, you can use abrasive clay. It is necessary to clean not only the outer surfaces of the car, but also the structural areas of the body and interior where the edges of the vinyl film will be wrapped.
Aveo carbon fiber trim
If you are dealing with carbon-look film for the first time, then first master the principles of working with it by gluing small parts.
For example, the linings on the front door handles in a Chevrolet Aveo quickly lose their attractive appearance, because... The silver coating on them quickly wears off from the knees. You can also use film to cover inserts on the steering wheel, plastic in the area of the handbrake, door handles, a panel with a switch for adjusting the side mirrors and the angle of low beam lamps, panels in the area of the audio system, glove compartment, etc.
Trimming the interior with carbon fiber inserts will definitely improve the interior of the Aveo.
How to glue carbon film
As mentioned above, the process of gluing the film is simple. Tools you will need:
- Sharp knife.
- Ruler.
- Rubber spatula (called a squeegee; some people use plastic cards from mobile operator starter packs instead of spatulas).
- Construction hairdryer.
Carry out all work related to gluing the film, preferably in a dry room with a temperature in the region of 17-22 degrees C.
There are two methods of gluing carbon film: dry and wet. Taking into account the fact that the interior parts are small, it is more convenient to glue the film on them using a dry method. Therefore, we will dwell on it in more detail.
The procedure for pasting small parts of the Aveo interior using the dry method:
- Remove the part you are going to cover.
- Attach a sheet of carbon film to it and cut out the desired shape with scissors, but with a small margin (1.5-2 cm).
- Using WHITE SPIRIT, degrease the part (you can use any other degreaser).
- Remove the protective backing from the film.
- When gluing the film to the surface of the part, smooth it from the middle to the edges.
If bubbles or folds appear, carefully peel off the film and re-glue it.
- To smooth the film on bends and edges, use a hairdryer (when heated, the adhesive base on the film is activated, which will allow it to be glued more efficiently, and the film will also smooth out and tightly fit the part).
When gluing the edges of the film, it is advisable to use 3m Primer 94 (a film adhesive surface enhancer).
- At the very end, trim off the excess or long edges of the film, and then heat them with a hairdryer and glue them. Do not install parts covered with carbon fiber immediately; let the film settle for 2-3 hours.
The wet method of gluing film is more often used on large and complexly shaped surfaces. It differs from dry in the use of a water-soap solution, which allows you to adjust the film.
You can familiarize yourself with the process of gluing car parts with carbon-look film in the following videos. The guy shows and explains clearly.
How? Haven't you read it yet? Well, it's in vain...
We will be grateful for the social buttons you pressed!
Necessary equipment
To cover a car with carbon fiber yourself, you will need:
- the film itself;
- degreaser;
- clean rags;
- stationery knife;
- squeegee made of rubber or plastic;
- masking tape;
- car shampoo or detergent;
- industrial dryer;
- primer
To cover the car body with your own hands, it is better to choose a room (garage).
Work is usually not carried out outdoors, since the slightest wind can cause dust on a newly washed and prepared car, and the film itself cannot be applied at temperatures below +5 and above +30 degrees, as it may simply fall off over time.
Necessary tool for gluing carbon fiber