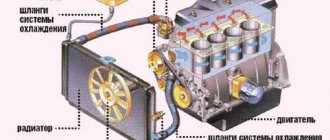
The fan switching sensor is an element of the carburetor engine cooling system (2108, 21081, 21083) of VAZ 2108, 2109, 21099 cars. Purpose of the fan switching sensor
The fan switch on in the cooling system of a carburetor engine is designed to turn on or off depending on the coolant temperature of the fan on the radiator.
Location by car
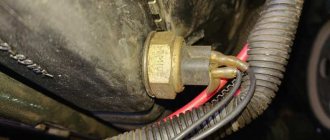
The fan switch sensor is screwed into the threaded hole of the right (in the direction of the car) radiator cooling tank.
Fan sensor device
The sensor body is made of brass or bronze. This is an oblong cylindrical cylinder with a nut at the top, a thread in the middle, and a flat surface at the bottom. The connection between the sensor and the radiator is sealed with an aluminum or copper O-ring. The sensor has two outputs: one current is supplied (minus), the other goes to the fan switch relay (113.3747) in the mounting block (also minus). Inside the housing, the leads have two contacts. There is also a bimetallic plate located inside the case (attached to the bottom); as it heats up, it changes its curvature and closes the contacts.
Operating principle of the fan switch sensor
On VAZ 2108, 2109, 21099 cars until 1998. with mounting fuse block 17.3722 (finger type fuses).
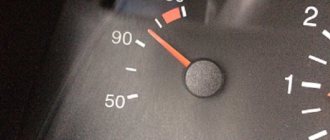
The fan switch sensor is installed in the gap in the negative wire leading to the fan switch relay in the mounting block. When the temperature in the radiator of the cooling system rises to 99±3º C, the contacts inside the fan switch sensor are closed by a bimetallic plate, and an electric current (minus) flows through it to a relay in the mounting block. From the relay, the current (already a plus) goes to the electric motor of the fan on the radiator and turns it on.
On VAZ 2108, 2109, 21099 cars after 1998. with mounting blocks 2114, the fan switch relay is removed from the electrical circuit. The fan switch sensor is also installed in the gap of the negative wire, but this time goes directly to the fan. The contact closure temperature is similar.
If the temperature in the radiator drops below 93±3º C, the bimetallic plate opens the contacts and the fan electric motor is de-energized.
Malfunction of the fan switch sensor
The fan switch sensor rarely fails, since there is practically nothing to break there. The reasons for its failure may be poor workmanship or mechanical deformation. If you have problems turning on the fan on the radiator, you should first check its electrical connections. Having removed both wires from the sensor, we connect them together. Turn on the ignition. If the fan starts working, the on/off sensor is faulty. If not, the fault should be sought in other elements of the circuit.
Applicability of the fan switch sensor
The cooling system of the carburetor engine of VAZ 2108, 2109, 21099 cars uses the TM 108 sensor with markings on the body “99-94”. It works both through a relay in the mounting block in cars before 1998, and without a relay in cars of later years. Analogues of this sensor from different manufacturers are also available for sale.
Notes and additions
— On the injection engine of VAZ 2108, 2109, 21099 cars, the cooling system fan is turned on at the command of the control unit (ECU), which analyzes the readings of the coolant temperature sensor (DTOS).
— There is another temperature sensor in the cooling system of carburetor and injection engines of VAZ 2108, 2109, 21099 cars. This is the temperature indicator sensor in the instrument panel (TM 106). It only works on the temperature indicator.
More articles on the engine cooling system of VAZ 2108, 2109, 21099 cars
The essence of the post is already visible in the title. So the question is - why does the fan come on late?
A friend advised me to replace the temperature sensor, the one located near the thermostat.
see also
Comments 60
It always shows like this for me. I set the BC to 95 degrees and everything is fine
The expansion tank cap solved everything))
in the brain it is written to turn on the fan somewhere around 100-103 (personally, the electronic instrument shows me the 103 limit and it turns off at 98 degrees. As an option, re-flash the brains or buy an on-board vehicle with a “safari” function, something like that_ in general, the gist there is this , it is possible to change the temperature at which the fan turns on through it... the sensors are all the same, there is no difference _ it will turn on at the same temperature)))
Thanks for the advice, that's what I'll do)
This is a normal temperature, on all Eng 09 the ventilator turns on like this, don’t worry, it was 2 09 and on both of them it’s like that
They are simply afraid that the cylinder head will lead)))
Don’t suffer from bullshit, don’t interfere with the car’s work, everything is fine with your temperature)
I also want to think so, but the rising coolant level in the expansion tank does not give me peace of mind)))
I don’t know, I’ve been driving like this for a long time and in more than one car, a friend’s 9 does the same thing) and the flight is normal, it’s warm in winter)
Modernization
If you want to improve the operation of your radiator fan on the VAZ 2109, we offer the appropriate instructions.
To upgrade, you will need to install a second sensor and modify the system somewhat.
- The standard power sensor will be responsible for the operation of the fan at maximum speed.
- An additional sensor will include a reduced speed. It is installed at the top of the cooling system.
Now let’s talk more specifically about how to organize all this.
- Take a temperature sensor whose response temperature is similar to the standard regulator.
- Install it in the upper pipe fitting to the radiator.
- To mount the element, you will need a pair of washers and a nut. Be sure to lubricate the washer with sealant to prevent leakage from the installation hole.
- Buy a resistor to install on the stove fan. It has several outputs, so if desired, you can make several operating speeds.
- It is necessary to make an additional control circuit. Through it, less voltage will be supplied to the motor winding.
- The temperature sensor located in the upper part of the cooling system is responsible for turning it on.
- It is better to do control not by plus, but by weight.
- The system will work through a button in the cabin. To the left of the dashboard there is a grille with two plugs. Cut out one of them and set it to turn off on two modes. You can take the heater switch from a VAZ 2107.
- In the first position the low frequency will be switched on, and in the second – the maximum speed.
- One common wire is fed to the minus.
Such modernization is not provided for by the design of the VAZ 2109. These are modifications made by car enthusiasts. Therefore, installing a second sensor is entirely your personal responsibility.
The fan is an important component of the cooling system of VAZ 2109 injection and carburetor engines. If you wish and have time, you can easily replace or repair it yourself.
Coolant temperature sensor for VAZ 2109 and 21099 cars
To begin with, it is advisable to know where it is located. On models 2108, 21099 and VAZ 2109, the coolant temperature sensor is installed between the cylinder head and the thermostat, in the exhaust pipe.
Device and principle of operation
The engine temperature controller itself is a thermistor-resistor device characterized by a negative temperature coefficient. The resistance parameter itself can be measured only when the temperature decreases or increases.
When the power unit heats up as a result of operation, the resistance indicator decreases; if the engine cools down, this parameter increases. For example, at the operating temperature of the engine on a VAZ 2109, the resistance is equal to 180 Ohms, and if it is 40 degrees cold outside, then the resistance will be equal to 100,700 Ohms. On one side of the DTOZH VAZ 2109 injector there are two contacts, and on the other there is a sensitive component, which is located directly in the flow of consumables.
As for the principle of operation, when the driver turns on the ignition, the control unit transmits voltage to the regulator via a resistor. Since the DTOZH itself is a thermistor, the voltage supplied from the control unit changes immediately taking into account the temperature of the consumable. When the parameter decreases, the unit analyzes the temperature and, in accordance with these data, determines the required volume of gasoline for injection. As the power unit warms up, the volume of gasoline that is transferred to the cylinders will decrease.
In addition to starting, according to the readings of the regulator, the ECU adjusts the operation of the power unit at idle speed. As a result, he independently makes decisions on enriching the combustible mixture at high and medium loads on the internal combustion engine. This indicator can be changed depending on the ignition timing.
There are two temperature sensors on a carburetor car. One turns on the fan, the other is responsible for indicating the temperature on the dashboard.
Possible faults
There are several reasons why the regulator on the VAZ 21099 refuses to work.
So, why DTOZH does not work:
- An electrical contact is located inside the device structure. Over time, this contact may simply break or cracks may form on it. If a break occurs inside the structure, this may cause complete failure. That is, the DTOZH will simply burn out. If there are cracks on the contact, the DTOZH, in principle, can work, but as a result of the lack of normal contact, the regulator will transmit incorrect data about antifreeze.
- Poor device insulation. If the insulation is broken, short circuits may occur in the operation of the device. Accordingly, ultimately, these short circuits can lead to the DTOZH, again, burning out and having to be replaced.
- There was a broken wire near the regulator. As a result of the break, the regulator will not be able to activate the fan designed to cool the power unit. Accordingly, this will lead to the engine overheating and may even boil (the author of the video is a Mechanical Technician).
Fan diagnostics
In order to check the operation of the unit, you will need a one and a half meter wire, preferably with “crocodiles” at the ends. With the engine off, connect a wire from the plus terminal of the battery to the fan contact directly. A working unit should begin to rotate. If it doesn't start, it's faulty. If the cooling fan does not turn on when the engine overheats, although diagnostics indicate that they are working properly, you should check the DTOZH.
When testing, you will need an ohmmeter to measure the resistance of the sensor. An ohmmeter is included in any, even the simplest portable digital multimeter. The procedure is as follows:
- With the cold engine turned off, remove the wires from the DTOZh contacts.
- Set the multimeter mode switch to the “resistance measurement” position.
- Measure the sensor resistance. At room temperature it should be approximately 2,200 - 2,800 ohms.
- Reinstall the sensor wires.
- Start the engine and let it warm up at idle speed to about 80 degrees.
- Turn off the engine. Remove the wires from the sensor contacts.
- Measure the sensor resistance. At 80 degrees, the resistance should be in the range of 270 - 389 Ohms.
If for some reason the sensor resistance does not meet the standard, the part must be changed. And if it does, but the unit does not turn on, something is not working in the electronic engine control unit. This should be addressed to a service station. To diagnose and flash the ECU, you need special equipment.
Checking and replacing DTOZH
There are several options for diagnosing the device - the first one:
- The negative probe from the voltmeter must be connected to the engine and turn on the ignition.
- Using a tester, it is necessary to determine what voltage parameter is generated during movement.
- If the DTOZH is working, then the voltage should be at least 12 volts when the battery is fully charged. If the obtained indicators are lower, it is necessary to replace or repair the device.
Second diagnostic method:
- You will need to set the multimeter to voltmeter mode - measurements are carried out in the range from 100 Ohms to 10 kOhms. Also prepare a thermometer that can measure temperatures greater than one hundred degrees. The regulator should be removed and placed in a container with antifreeze.
- You need to warm up the coolant. As a result of an increase in temperature indicators, you need to monitor the readings given by the thermometer.
- Using a multimeter, you should measure the resistance of the DTOZH at different temperature conditions. The obtained parameters should be compared with those indicated in the table above.
How to make the replacement yourself:
- First of all, all the coolant must be drained from the radiator. Then disconnect the negative terminal from the battery, simply unscrew the nut with a wrench and disconnect it.
- Next, you need to disconnect the block with wires that connects to the DTOZH.
- Use a wrench to completely unscrew the device. Next, the regulator is removed from its seat; as mentioned above, this is the cylinder head exhaust hose. There is a rubber seal on the device itself; it cannot be lost when dismantling the DTOZH, especially if you have a new sensor without a seal.
- Then install the new regulator in its seat, in the outlet hose. Using a wrench, tighten the adjuster all the way. After installation and tightening, the previously disconnected wiring harness should be connected to the DTOZH. The final step in this process is to pour the antifreeze back into the radiator and reinstall the disconnected negative battery terminal.
VAZ 2109 and 21099 cars are equipped with a variety of sensors and regulators designed to ensure proper operation of the power unit as a whole. One of such devices is the sensor for turning on the VAZ 2109 carburetor fan, as well as the DTOZH - antifreeze temperature controller. Find out more about the devices in this article.
If the cooling fan does not work
To drive the fan, a DC electric motor with excitation from permanent magnets ME-272 or similar is installed. Technical data of the electric fan and fan switch sensor:
- Rated rotation speed of the electric motor shaft with impeller, 2500 – 2800 rpm.
- Electric motor current consumption, 14 A
- Sensor contact closure temperature, 82±2 degrees.
- Sensor contact opening temperature, 87±2 degrees.
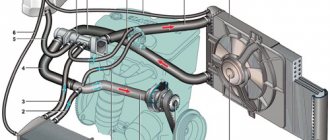
Description of DTOZH and DVV
Where is the fan located and turned on in 2109 with an engine injector or carburetor, what should I do if the device does not work? First, let's look at the basic questions regarding the purpose, device and principle of operation.
Purpose and functions
The main purpose of the DVV is to activate and deactivate the ventilation device on the engine radiator in order to cool the power unit. The device turns the fan on and off based on the temperature of the liquid in the cooling system. On injection machines, this is DTOZH; turning the fan on and off is controlled by the brain according to the readings of this sensor.
As for the TOZh controller in the VAZ 21093, this device is intended to display readings about the antifreeze temperature on the car’s dashboard in the cabin. With its help, the driver can find out about possible overheating of the power unit.
Location
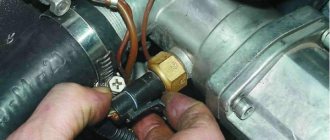
As for the location, in models 2108, 2109 and 21099 the DTOZH is located between the engine cylinder head and the thermostat, in particular, on the intake hose. The DVV is installed in the threaded hole of the expansion tank with coolant. If you look in the direction of travel of the car, the refrigerant container is installed on the right.
Principle of operation
First, let's look at the operating principle of the antifreeze temperature controller. This device is a thermistor-resistor that operates with a negative coefficient. The amount of resistance in this case can be measured as a result of a decrease or increase in the temperature range. When the car engine heats up, the resistance on the device decreases, and when the power unit cools down, this value increases. For example, when the engine is fully warmed up, the resistance value on the device is 180 Ohms, and at low negative temperatures (-40 degrees) this figure will increase to 100,700 Ohms.
When the driver activates the ignition by turning the key in the lock, the control module (ECU) begins to supply voltage to the controller using a resistor. The DTOZH itself, as mentioned above, is a thermistor; accordingly, the incoming voltage will change in accordance with the temperature of the liquid. When this value decreases, the control module analyzes this, according to which the required volume of fuel for injection into the cylinders is determined. As the car engine warms up, the volume of fuel used for injection will drop.
Spare part device
This sensor is installed on VAZ-2108, 2109 and 21099 cars with a carburetor. The part is a brass or bronze cylinder with a nut skirt. In its upper part there is a plastic cup, inside of which there are two terminals. One input (minus) and the second output (plus). The DVV is connected to the break in the negative wire leading to the electric fan relay.
Under the nut there is a thread with which the device is screwed into the seat on the radiator. An aluminum or copper sealing ring is placed on the thread. At the bottom of the case there is a bimetallic plate that rests on the bottom terminal.
Sensor internals:
It should be noted that after 2004, when the VAZ-2108, 2109 and 21099 models were released, an injector began to be installed on the engine instead of a carburetor. The use of DVV has ceased to be relevant, since the electronic control unit (ECU) has become involved in rotating the propeller.
Methods for checking DTOZH
How to check the TOZ index on your own? To do this, you can use one of several methods; diagnostics are performed using a multimeter.
- First, the negative probe of the tester should be connected to the cylinder head, and then activate the ignition by turning the key in the lock.
- Then, using a multimeter, you need to determine exactly what voltage appears at the output.
- If the controller is working, then the value of this parameter should be at least 12 volts, of course, if the battery is fully charged. If the diagnostics showed that the obtained values were lower, then you need to do repairs or change the regulator (the author of the video about diagnostics is the Mechanical Technician channel).
Another check option:
- To implement it, you will need to configure the tester in voltmeter operating mode. The measurement procedure should be carried out in the operating range from 100 Ohm to 10 kOhm. In addition, for diagnosis you will need a thermometer, and it is important that it can determine a temperature value of more than 100 degrees. The controller itself is removed from its seat and lowered into a reservoir with refrigerant, which you will heat. This point must be taken into account when choosing a container for coolant.
- Now you will need to warm up the refrigerant in the system. When the temperature value increases, you need to carefully monitor the values produced by the tester and the thermometer placed in the container.
- Using a tester, you will need to check the fluid resistance level at different temperatures. The readings obtained as a result of the diagnosis must be compared with the normalized ones, which are indicated in the table.
Photo gallery “Self-diagnosis”
A little theory
Characteristic
Explanation
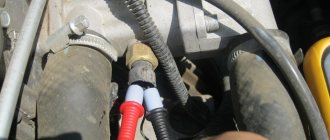
The sensor is located in the heater radiator. It is not difficult to determine that this is the one in front of you, since in the radiator it is the only element to which the wires are connected. And if you take a 30 key, then only the sensor has the appropriate fastener size.
Sensors may have different temperature limits. But for the VAZ 2114, switching on occurs at 102-105 degrees Celsius, and switching off occurs at 85-87 degrees. When choosing a new meter, focus on the one that has failed, or purchase one with an on and off indicator of 102 and 87 degrees, respectively
There is a special contact group inside the sensor. When the coolant in the radiator heats up, this group heats up and expands. When the expansion reaches a certain limit, the contacts close, they transmit a signal to the wiring and the fan turns on
Possible malfunctions and ways to eliminate them
For what reasons may the device stop functioning:
- Internal damage to the contact located inside the device. In practice, as a result of prolonged use, this contact may break, and intensive use of the DTOZH may lead to the appearance of cracks on it. If the reason lies in a break, then this is fraught with complete breakdown of the controller - the sensor will simply burn out. If the problem is cracks, then the device may work, but not correctly. Due to the lack of contact, the controller will transmit incorrect information about the liquid, that is, incorrect values will be displayed on the instrument panel.
- Another reason is damage to the device’s insulation. If the device insulation is broken, the controller may operate with short circuits. Short circuits in its operation can cause complete failure of the device.
- There is a break in the electrical circuit near the controller. Due to damaged wiring, the device will not be able to transmit antifreeze data to the dashboard. Accordingly, if the engine overheats, the driver may not even know about it.
What symptoms can you use to determine if this device is not working:
- The car engine became difficult to start when hot. That is, you can start it in the morning, but when the unit warms up, problems appear.
- Increased fuel consumption. You can only identify such a sign when you carefully monitor the car’s performance. The increased fuel consumption is due to overload of the power unit when it is warmed up.
- If the DTOZH breaks down and no longer functions, then the control panel will display incorrect data on the engine temperature. It usually takes no more than 10 minutes to fully warm up the internal combustion engine. If 10 minutes after starting you notice that the arrow on the indicator on the dashboard has not gone up, then most likely the DTOZH needs to be changed (video shot by Dmitry Yakovlev).
If the cooling fan does not work
To drive the fan, a DC electric motor with excitation from permanent magnets ME-272 or similar is installed. Technical data of the electric fan and fan switch sensor:
- Rated rotation speed of the electric motor shaft with impeller, 2500 – 2800 rpm.
- Electric motor current consumption, 14 A
- Sensor contact closure temperature, 82±2 degrees.
- Sensor contact opening temperature, 87±2 degrees.
The cooling system fan may not turn on due to:
- electric drive malfunctions;
- blown fuse;
- faulty thermostat;
- a failed thermal sensor for turning on the cooler;
- faulty VO relay;
- broken electrical wiring;
- faulty expansion tank plug.
To check the VAZ fan electric motor itself, we apply 12 V voltage from the battery to its terminals - a working motor will work. If the problem is with the fan, you can try to repair it. The problem is usually the brushes or bearings. But it happens that the electric motor fails due to a short circuit or break in the windings. In such cases, it is better to replace the entire drive.
The BO fuse is located in the mounting block of the car's engine compartment and is designated F7 (20 A). The test is carried out using a car tester turned on in probe mode.
- In a car with a carburetor engine, you need to check the sensor - turn on the ignition and short-circuit the two wires going to the sensor. The fan should turn on. If this does not happen, the problem is definitely not with the sensor.
- For injection cars, it is necessary to warm up the engine to operating temperature and disconnect the sensor connector, disconnecting it from the vehicle’s on-board network. In this case, the controller must start the fan in emergency mode. The electronic unit perceives this as a failure in the cooling system and forces the fan drive to operate in constant mode. If the drive starts, the sensor is faulty.
Instructions for replacing the TOZh sensor with your own hands
Replacing the DTOZH is carried out as follows:
- First you need to turn off the ignition and open the hood of your car.
- Next, you need to place a container under the drain hole of the engine radiator; all the coolant will collect in it. Open the plug and drain the antifreeze, then find the DTOZH and disconnect the connector from it.
- Using a wrench, you will need to dismantle the controller. The device is removed from its installation location. When removing you can see the rubberized seal, when you remove the regulator, do not lose it. If you notice that the rubber band is very worn, it will need to be replaced.
- After this, you will need to install the new controller in the installation location. Using a wrench, screw the device all the way, and then connect the connector with the wire that you disconnected when dismantling. Now all you have to do is pour the working fluid into the radiator device and turn on the ignition, start the engine and check the operation of the device.
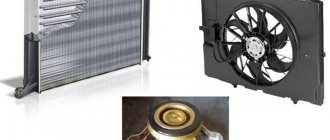
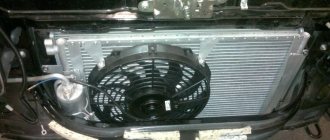
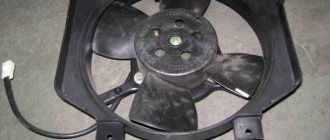
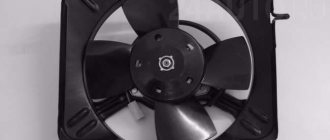
Fan
If the problem lies in the injector or carburetor cooling fan, then you will have to remove it. It is quite possible to repair the unit by replacing the electric motor or impeller.
Diagram with casing, radiator, fan and impeller
To remove the valve, perform the following operations:
- Disconnect the negative terminal from the battery;
- Disconnect the wire terminals. One of them is mounted on the fan casing;
- Take a wrench and unscrew a couple of connecting bolts. They fix the vent casing on the left tank;
- Next, unscrew another lower nut holding the device casing;
- Now you will need a socket extension to unscrew the right nut on top that secures the vent housing to the radiator;
- All that remains is to unscrew the fan pressure plate. To do this, remove the pair of left nuts;
- Remove the pressure plate by hand;
- Now remove the fan along with the casing.
You have removed the unit. Now you have a choice - change the entire unit, or try to repair it by replacing the electric motor or impeller if they are damaged.
Replacing the electric motor
- Disconnect the fan motor wire that is held in place by a clamp on the casing.
- The electric motor is held on the casing by three nuts. They all need to be unscrewed.
- Remove the electric motor from the fan housing.
- Be sure to check the condition of the rubber bushings of the electric motor, which will remain on the casing. If cracks or signs of deformation are detected, they must be replaced.
- Check the electric motor for functionality. If it fails, you can purchase a new one and insert it into the old casing.
How to balance an impeller
There are two balancing options:
- The first is to twist a thin wire onto the fan blade. See on which side the imbalance is more pronounced. Try to align the impeller with a smooth movement until the extraneous sounds disappear.
- The second is to insert an axis into the hole, the diameter of which is similar to the diameter of the hole. Install the impeller on two supports located in a horizontal position. If there is an imbalance, you can get rid of it by grinding a heavier blade, or by gluing a small weight to a blade with less mass.
You can replace the four-blade impeller (this is a standard part) with an eight-blade one.
On sale you can find both individual impellers and complete with a motor. The latter, naturally, are much more expensive. Therefore, you should not choose the second option if the motor is working properly (usually it just needs to be lubricated so that it works better). You should not buy the cheapest impellers. They usually have minor defects.
General characteristics of the model
Dream car in the 90s
The dimensions of the car have changed somewhat due to the lengthening of the wing and enlargement of the hood. In addition, a completely new, improved VAZ radiator grille and, of course, an updated dashboard appeared. The length of the VAZ 21099 compared to other cars in this group has increased by 20 cm.
The VAZ 21099, like other models of this family, has many advantages:
- it is capable of developing a fairly high speed;
- has excellent controllability when driving;
- Stable on completely different types of roads.
Work completion time
Installation time – around 1 hour
.
Cost of work
For replacement or installation, check with the car service technician.
At your own risk, you must do the following: drain the antifreeze from the radiator, disconnect the sensor power wires, and then unscrew the sensor from the radiator housing. Then install the new sensor and perform all steps in reverse order. Before installing a new sensor, it must be checked for functionality using an ohmmeter - lower the sensor into water and heat it until the sensor responds. If the sensor is working properly, then after completing the steps described above, the sensor replacement can be considered complete.
Don't play with fire, make an appointment with us and rest assured about the performance of your car! Call us now.
We replace sensors on all cars listed below:
| Volkswagen | Audi | BMW |
| TRANSPORTER | A3 | 1 series |
| TOURAN | A4 | 3 series |
| TOUAREG | A5 | 5 series |
| TIGUAN | A6 | 7 series |
| SHARAN | A7 | X1 |
| POLO | A8 | X3 |
| PASSAT CC | Q3 | X5 |
| PASSAT | Q5 | X6 |
| GOLF | Q7 | Z4 |
The design of modern cars involves the use of an electric drive for the engine cooling fan. An electric drive can provide more comfortable conditions for engine operation: the use of an electric fan allows not only to reduce fuel consumption, but also to completely eliminate forced cooling of the engine at high speeds.