Drums, of course, long ago lost the evolutionary war to discs, but to this day they are quite actively used on inexpensive and lightweight machines. All Ladas, Renault Logan, VW Polo sedan, Skoda Rapid, Daewoo Matiz - the list of completely modern models using these archaic but durable brake mechanisms will be very long. This means it’s useful to know how they work, why they break and how they are repaired. After theoretical preparation, we will go to the repair zone, where we will examine the drums of a rare Chinese sedan Chery Jaggi, better known in Russia under the name QQ.
Device
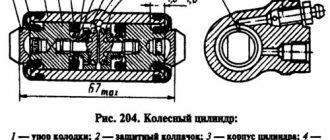
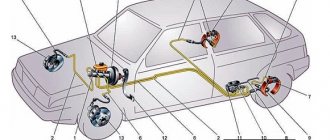
The rear drum brakes are shown in the picture below. This type of brake mechanism has a drum as a rotating element. In the fixed part there is a support shield and pads.
In the figure, elements 1 and 3 are stationary, and element 2 rotates.
This type of brake device includes:
- A drum that is attached to the wheel hub;
- Pads with linings;
- Brake working cylinder, which has 2 pistons with cuffs and boots;
- There is also a fitting screwed into it, with the help of which the liquid is pumped;
- Compression (return) springs that cling to the pads and hold them in the desired position;
- Brake support plate attached to the bridge beam;
- Stand support pads;
- The lower support for the pads with adjustment is an adjustment of the rear pads, allowing you to set the desired gap between the drum and the pad so that the brakes work well and at the same time they do not touch when it is not necessary;
- Brake fluid mechanism;
In addition to standard devices with one cylinder, as in the photo above, there are mechanisms with two cylinders.
Their effectiveness is recognized to be higher than the first option. The principle of operation of drum brakes with two cylinders is the same, only a second cylinder is installed instead of the lower support. In such a mechanism, the surface area of contact between the shoe and the drum is larger, which means the braking is stronger.
Caring for the drum brake system
The main elements of the device are pads and brake cylinders. The main concern of the car owner is the timely replacement of worn-out friction elements, inspection and repair of damaged brake parts, adjusting the gaps inside the drum and adjusting the parking brake.
The need to replace the pads is indicated by their thinning to a critical level of 0.8-1.6 mm. A special service hole located on the inside of the shield will help determine the degree of wear.
If the brake cylinder does not visually show any signs of leaks or wear on the cuffs, then you can check its operation by simply pressing the right and left pads. Both are moving, which means the shopping center is fine.
In the event of a brake fluid leak and/or air in the hydraulic system, the brake pedal may become soft and “sink.” In this case, it is necessary to bleed the brakes.
Principle of operation
Here's how these devices work: Brake fluid, after the driver presses the brake pedal, flows from the master cylinder to the working cylinders, squeezing out their pistons. These pistons extend and force the pads against the drum. Thereby reducing its rotation and stopping the wheels. This will happen due to friction of the linings on the surface of the drum. After the pressure on the brake pedal stops, the pads are pulled back by springs. And the braking stops. Fluid from the slave cylinders is pushed back into the master cylinder. The wear of the pads will be uneven on the front and rear wheels, which should be taken into account when replacing.
basic information
Any car, both small and large, must be equipped with a braking system. The main task of the braking system is to change the speed of movement of vehicles, at the command of the car owner or the electronic guidance system. The second purpose of the braking system is to keep the car stationary in relation to the road while it is parked.
Depending on the design of the friction part, a distinction is made between disc and brake drum mechanisms. The braking mechanism has a fixed and rotating part. The role of the moving part of the drum braking structure is played by the stopping drum, and not by the rotating band or braking pad. The moving part of the brake disc design has the form of a disk, and is not rotated by the brake pads. The axles of modern passenger cars usually have a disc braking structure.
Drum brake diagram
The disc braking mechanism consists of the following elements:
- Brake disc;
- Two non-rotating pads that are installed in the middle of the caliper on both sides.
Let's look at the main advantages and disadvantages of drum and disc brakes. So, the advantages of drum brakes:
- Long service life, since dirt and dust do not penetrate into the drum;
- Greater braking effort, which is good for trucks;
- Not an expensive repair kit.
Disadvantages include:
- Slowness;
- Pads sticking.
Advantages of disc brakes:
- Greater braking efficiency;
- Small mass;
- Small sizes;
- Low brake fluid temperature;
- High level of reliability;
- Stability.
The only drawback is poor protection from dirt and dust.
What is the principle of operation of the braking system?
Let's look at the principle of operation of the braking system using the example of a hydraulic operating unit. When the brake is pressed, the load is transferred to the amplifier, which creates additional reinforcement on the main cylinder. The piston of the main brake cylinder collects all the fluid in the car wheel cylinders using pipelines. Moreover, at the same moment, the fluid pressure in the brake drive increases. Thanks to the pistons of the car wheel cylinders, the brake pads move to the discs, or as they are also called drums.
After pressing the brake, the fluid pressure increases, as a result of which the braking mechanisms are activated, causing the rotation of the car wheels to slow down and generate braking force at the point of contact of the car tires with the road surface.
Moreover, the more force is applied to the brake pedal, the more efficiently and quickly the car wheels will stop. The liquid pressure at the moment of stopping can reach from ten to fifteen megapascals.
At the end of braking, the pedal moves to the reverse position under the influence of the return spring. The piston of the main braking cylinder also switches to the reverse position. Parts of the springs are retracted from the drums using blocks. Brake fluid passes into the main braking cylinder from the car wheel cylinders thanks to pipelines. Thus, the pressure of the braking system decreases.
Drum brakes squeak
To eliminate the squeaking of rear drum brakes, you need to purchase a suitable repair kit. So, what repair kit should you buy if your drum brakes squeak?
- Anti-recoil struts;
- Set of socket heads;
- Coarse-grained skin;
- Hammer;
- Balloon wrench;
- Torque wrench;
- Screwdriver;
- Support stands;
- Jack.
So, what should you do if your drum brakes squeak?
- First of all, prepare the repair kit;
- Place the car on a flat surface and remove the parking brake;
- Place wheel chocks under the car wheels;
- Loosen the bolts securing the car wheels;
- Place the car on a jack;
- Remove the wheel;
- Carefully remove the protective cap that covers the wheel bearing. To do this you will need a screwdriver and a hammer.
- Unscrew the nut that secures the drum;
- Remove the drum;
- Using coarse sandpaper, remove the edge created by the functioning of the pads;
- Clean the drum from rust;
- Install everything in reverse order. Use a torque wrench when tightening the bearings.
- Check if the rear brakes are squealing.
We recommend: Front wheel hub bearing - what is it?
Algorithm for replacing rear drum brakes with disc brakes
Before you proceed to replacing the rear drum brakes, you need to purchase a repair kit. So, how do you replace brakes with disc brakes?
- First, we prepare the repair kit;
- Raise the back side of the car on a jack;
- Remove the corresponding wheel;
- Release the handbrake;
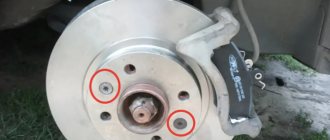
- Mark the location of the drum and hubs;
- Insert 2 screwdrivers into the holes of the brake flap;
- We clean the brakes using a special fluid;
- Remove the return spring from above in front of the block;
- Remove the spring plate that secures the block. To do this, you need to press the plate and rotate it ninety degrees.
- Remove the block and the adjusting bar;
- Disconnect the handbrake cable from the rear shoe lever;
- Remove the adjusting bar spring;
- Disconnect the return spring;
- Remove the adjusting bar;
- Remove the bracket that secures the pad;
- Remove the adjusting lever;
- Remove the handbrake lever;
- We install new parts, doing everything in reverse order;
- We install the wheel on the vehicle.
Advantages and disadvantages
This device has its pros and cons. Let's start with the cons:
- It has been proven that the braking efficiency of this type of mechanism is slightly lower than that of disc mechanisms. The braking distance is almost 20% longer. This is due to the following reasons: insufficient contact area, which is not provided even by two cylinders, and the resulting slipping, which is caused by dust that has penetrated into the mechanism.
- Overheating of the drums due to lack of cooling; when braking, the temperature of the drums can rise to 6000 degrees.
- A reduced maximum load value, at high pressure, can rupture the drums with liquid pressure.
However, not everything is so bad; there are also undeniable advantages of this mechanism:
- The closed design allows you to get good braking force, and you can increase the friction surface by making the drum wider and the pads too. This is what ensured the widespread use of such a mechanism on all trucks and buses.
- The degree of resistance to wear and the service life of the linings is increased, which is caused by less frictional contact than with a disc brake.
- Good protection against dirt getting inside, which the disk version does not have.
I won’t say whether disc or drum brakes are better; passenger cars mostly have disc brakes, but they are not suitable for buses and trucks.
Advantages and disadvantages
Drum brakes are used on many trucks, and less commonly on cars and all-terrain vehicles. The main advantage of the drum brake mechanism is that its power (determined by the area of the contact patch of the pads with the surface of the drum) can be very easily increased by increasing both the diameter of the drum and its width (while a disc brake can only be increased by increasing the diameter disc, which in most cases is limited by the size of the wheel rim within which the brake disc is installed). This makes it possible, even with not too high specific efficiency (braking force per unit pad area), to achieve very high absolute values of braking force necessary to slow down and stop heavy vehicles, for example, trucks or buses. The drum mechanism is relatively well protected from water and dust, its pads wear out much less on dusty or dirt roads than openly installed disc mechanism pads, which makes it more durable and generally more suitable for poor road conditions. Using drum brakes makes it easier to equip your vehicle with a parking brake. Drum brakes do not emit much heat, which makes it possible to use relatively cheap, safe to handle and non-hygroscopic oil-alcohol based brake fluids (ESC, BSC and the like), which have a low boiling point.
At the same time, drum brakes operate less uniformly and are generally slower than disc brakes, have less stable characteristics (which is primarily due to the variability of the contact patch between the pad and the inner surface of the brake drum) and have fewer possibilities for adjustment; the force on their pads is limited by the strength drum to break (while in a disc brake the disc is loaded in compression, which can significantly increase the force with which the pads are pressed against it). Therefore, high-speed passenger cars usually use at least front disc brakes.
Differences
How are disc brakes different from drum brakes? The main difference is the braking element; in disc models it is a disc, in drum models it is obviously a drum. The device is also different, the disc brake has a special brake caliper, and the drum brake has a brake cylinder. The pads used are also different. In a drum they expand, pressing against it, but in a disk they compress and clamp the disk. Which works better? To understand this you need to become at least a mechanic or brake tester.
Both mechanisms have their pros and cons, but both are still quite effective, otherwise they would have been abandoned long ago.
Signs of trouble
If these signs appear, you should check the condition of the entire brake system:
- When braking, the vehicle pulls to the side, which means a malfunction of one of the braking mechanisms.
- The creaking of the rear mechanisms can be caused by the separation of the linings from the pads, deformation or breakage of the springs, as a result of which the pads are skewed.
- It is possible for the clamps to jump off the supporting posts; squeaks are caused by them getting between the drum and the pad linings.
- The appearance of jerking or vibration of the pedal when braking is caused by deformation of the drum.
Tips for use
Car care includes periodic inspection of important components and mechanisms of the vehicle. The brake system is one of the most important; its inspection for wear and possible malfunctions is mandatory.
Every 20 thousand km you should check the pads, springs, levers, etc., measure the brake fluid level, check the condition of the cylinders, seals and pipes for integrity and possible leaks.
When installing new pads, experts advise “rolling in” them:
- Find an empty section of road.
- Accelerate to the permitted city speed and slow down to 10 km/h, repeat the acceleration and reduce the speed at least 10 times. At the end of the procedure, drive another 5 km at a calm pace.
Malfunctions
There are seven main problems:
- Worn drum or pads. The most dangerous thing will be the simultaneous wear of these parts, then the wheel can simply block tightly. If there is slight wear on the drum walls, a groove is needed to grind off the sides and level the surface. After this, the pad tension system should be adjusted. They are replaced when:
- For glued ones, the thickness of the friction layer reached 1.6 millimeters.
- For riveted linings, wear reaches 0.8 millimeters from the rivet. Warping of the pads is a fairly common cause of damage to the drum, its uneven grinding, as a result of which it has to be replaced.
- Springs, struts or spacers break.
- Cable rupture or handbrake lever breaking off
- Peeling of linings from pads
- Destruction of the cuff, scuffing of the cylinder, rupture of the hose, depressurization of the pipeline, resulting in fluid leakage from the system and its airing. Brake failures occur.
- Corrosion of springs, resulting in them not working as expected.
To avoid troubles associated with brake system malfunctions, it is recommended:
Check the condition of the linings every 20 thousand mileage, change if necessary; buy a repair kit for the rear pads in the store. Here it is important not to make a mistake with the brand and model, the similarity is confusing, so it is better to have old pads with you for a sample. Pay attention to drips and stains on the ground where your car was parked. Watch the brake fluid level inside the reservoir on the master cylinder.
Production history
And they were invented back in the 19th century. The first prototypes of modern brakes were a primitive system of only three components. This was the brake drum itself, attached to the wheel, a strong and flexible band located around it, as well as a lever that tensioned the last part. Naturally, the service life of such a system was short-lived, and various stones and dirt got into it.
The design was improved only at the beginning of the 20th century. Then engineer Louis Renault invented a new brake drum with more reliable components. For the first time, it included pads located inside the mechanism. The brake device was well protected from dirt, and therefore its service life increased significantly. Since then, the brake drum has repeatedly changed its design and materials, but its function has remained unchanged. Such a device still reduced the vehicle's speed when necessary. It also served as a hand brake.
Replacement with disk
Many experts, including myself, say that replacing drum brakes with disc brakes is associated with a large number of problems:
- The first problem is adapting the hand brake mechanism to the disc mechanism. The design is too different, so connecting the old manual brakes to the new ones will not work. There are two solutions here - either figure out how to remake the old mechanism so that it works, or install a new one. The first option can only be performed by a mechanic with extensive work experience, and not everyone will undertake it. The second option is simpler and more accessible, but its cost is not small. You simply purchase and install a hydraulic handbrake on new mechanisms.
- The second problem is choosing a mechanism suitable for replacement with the required dimensions and to effectively cope with braking. So that there is no difference in diameter or studs. Why buy brakes that won't fit or will work worse than what you had? At the same time, you should not forget to demand quality certificates for purchased mechanisms. This is the only way to be sure that these are reliable branded parts.
- The third problem arises after replacing mechanisms. The fact is that any design changes in the car that affect control and so on must be included in the technical data sheet and the insurance document for the car. This is the only way you can avoid fines and other troubles from the traffic police and misunderstandings among the mechanics who will have to service your car.
- Fourth and most difficult, you may be denied registration of a vehicle if they consider that after modernization the machine no longer meets safety standards or the requirements of operating regulations. Therefore, first find out whether such a change in the design of your car can be registered, and then start thinking about how to change drum brakes to disc brakes.
If you don’t mind your nerves, money and time, you can get started, no one is stopping you.
These are all friends, subscribe to updates if you haven’t already and share the information with your friends via the link, it won’t hurt for them to subscribe either, see you.
Drum brakes: how they work and how to repair them
Drum brake design
Drum brakes have not changed dramatically since their mass appearance in 1902 thanks to Louis Renault.
True, those brakes had a cable drive, and therefore they were exclusively mechanical. Plus they did not have automatic adjustment, so the driver had to regularly check the gap between the pads and the drum. But the fundamental design, I repeat, has changed minimally. We will describe here the most common, classic design of the drum brake mechanism. There is a brake flap that is rigidly attached to the rear axle housing or wheel axle, and it does not rotate. There is also a drum that is attached to the wheel hub and rotates with it and the wheel.
The brake pads are installed on the brake flap. On one side, the pads rest on the axles, on the other, on the pistons of the working brake cylinder (this is clearly visible in the photographs). When the brake pedal is pressed, the brake fluid pushes the pistons in the working cylinder apart, which in turn pushes the brake pads apart. The pads are pressed against the surface of the drum and the car slows down. Friction linings are glued or riveted to the pads. To prevent the pads from falling out, pressure springs are installed.
A nice feature of this design is that one of the pads has the property of wedging (it is called active). To give an example, imagine a car wheel, spin it well and try to insert an object between the wheel and the arch with your hand: on one side the object will be pushed out, and on the other it will be pulled even more into the space between the wheel and the arch, thereby wedging wheel. The same situation applies to the pads.
The second block (passive) is repelled by the drum, and its efficiency is lower than the first - this, on the contrary, is an unpleasant moment. To compensate for the difference, the friction lining of the passive pad is larger in size than the active pad.
The downside of a jammed pad is that the braking force does not increase in proportion to the force on the pedal. Simply put, you press the brake pedal and get a completely different, much greater deceleration than expected. This is not the case with disc brakes.
To ensure that the pads return to their original position after braking, return springs are installed on them. Often, if the rear brake mechanism is drum, then the same pads are activated when the parking brake (“handbrake”) is applied. One of the pads has an additional lever to which a cable is attached, when moving the cable the pads are moved apart.
On modern cars, the drum brake mechanism is self-adjusting. That is, you don’t need to crawl under the car every few thousand kilometers or after repairs, like on a ZIL 130, to measure the gap between the friction linings and the drum.
In the photo: ZIL-130 '1966–74
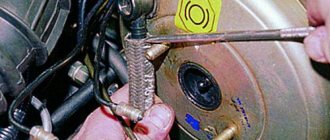
However, even on modern cars the parking brake still needs to be adjusted. Therefore, the spacer strut, thanks to which the pads are moved apart when the handbrake is tightened, tends to lengthen or shorten due to the rotation of the nut (it is also clearly visible in the photo). Another positive aspect of drum brakes is the working surface area of the friction linings - in any case, it is larger compared to disc brakes.
But due to the specific operating conditions (see above), the wear of the linings is uneven, which means that the force will also change with wear. In turn, no one bothers to increase the working area of the linings by increasing not only the diameter of the drum, but also its width, and this is an indisputable plus. This is skillfully used by truck designers, for whom it is more important to brake 20 tons within the limits of decency than the delicate connection between the driver’s foot and the acceleration of the vehicle’s deceleration.
Test drives / Single Nicknamed “barge”: test drive of the GAZ-24 Volga The 24th Volga, familiar to almost everyone, has a rather difficult fate: quite recently it was one of the most famous cars, but now it is either completely “killed” the car is in a state of leaky trough,... 61385 15 44 05/01/2016
Moreover, even if a car has disc brakes installed all around, then with a high degree of probability the handbrake brake mechanism is implemented using a drum circuit. They simply make a groove in the disc and create their own small drum and place it inside the pad.
A few words about outdated drum brake designs. In search of simpler and more effective design options, engineers, in order to solve the problem with a block that does not wedge, came to the conclusion that it is possible to install two working cylinders on two opposite sides of the brake flap (as on the GAZ 24 and many other cars with drum brakes in front and behind). In this case, both pads became jammed, but only when moving forward.
AZLK designers used drum mechanisms with floating shoes. Floating because they do not rest on an axle, each on its own, but on a hinge connecting both blocks. Therefore, when the pistons move them apart, they are stabilized relative to the drum due to efforts. And the wedging effect of the active block is reduced due to the transfer of force through the hinge to the passive block.
Pros and cons of drums
Articles / History Brakes a hundred years ago: how drums turned out to be more effective than discs It will soon be one hundred years since the appearance of hydraulic brakes on cars - a very respectable age for the technology still used today. The first patent for hydraulic technology... 32312 0 13 09/03/2015
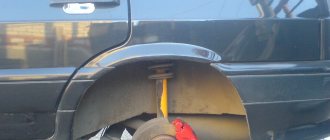
One of the main advantages of drum mechanisms is that they are closed from the environment - neither dirt nor dust gets inside. It’s hard to disagree with this, but with a caveat – if we are talking about dirt outside. All the wear products of the pads that appear inside the drum cannot simply “get out” from there. All the beauty of being closed by a drum is visible in the photographs of the experimental subject.
If in disc brakes the remains of the friction linings are simply blown out of the mechanism, then in drum brakes almost everything remains in place. And further. Anyone who has driven trucks or ancient cars with “drums” in a circle in their life must remember: if you drive through a deep puddle or ford, then you need to press the brakes several times to dry them out, otherwise they simply won’t happen. There is no such circus with discs.
Drums also overheat easily and, unlike disks, cannot be quickly cooled by incoming air. In this case, it is difficult to warp the drum itself (which cannot be said about discs), but the braking efficiency of hot drums decreases very significantly.
In terms of dynamics, drums are also inferior to discs, since the latter are lighter. Plus, the maximum braking force of drums is greatly limited - excessive pressure on the pads can simply “break” the drum. Discs can be compressed much more strongly.
Example of rear drum brake repair
Everything here is, in general, quite predictable. Drums are usually disassembled for two manipulations: replacing the pads or repairing the jammed mechanism itself.
This time we received a car with a non-working rear right brake and no parking brake. The experienced eye of the foreman found no brake fluid leaks. Therefore, the probability of a stuck brake wheel cylinder has increased to 99%. The decision was made immediately - disassembly and more detailed diagnostics.
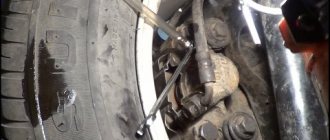
Unscrew the nuts and remove the wheel. Fortunately, the drum did not stick and came off quite easily. The owner of the car felt better when he found out that it was too early to change the pads. But then the bad news came. The parking brake strut is soured, therefore, it is impossible to adjust the location of the pads, and this is the reason for the missing handbrake. Further. The pistons in the working cylinder were jammed, which is why the car did not brake. Verdict - replacement of the working cylinder. The owner faced the difficulties courageously and blessed us to start immediately.
Since it is necessary to replace the working cylinder, we clamp the brake hose to prevent all the brake fluid from leaking out of the circuit. Unscrew the connecting nut and disconnect the brake pipe from the working cylinder. Using narrow-nose pliers, remove the lower spring from the brake pads. Then we disconnected the parking brake cable from the brake shoe lever.
Using the same narrow-nose pliers, they pressed, turned and removed the pressure springs of both pads. The springs are fixed on the finger: each has a small support cover with a slot, and the outer end of the finger is flattened. Accordingly, during installation, the spring is compressed, the end of the pin passes through the slot, and in order to fix the spring, it is turned. But that will come later, now it’s dismantling.
After removing the pressure springs, both pads can be removed from the brake flap and the working cylinder. This is what we do by moving them slightly apart to overcome the force of the upper return spring. Then we unscrewed the fastening bolts and removed the working brake cylinder. We removed the spacer from the pads, cleaned it thoroughly and designed it so that the parking brake could be adjusted. The upper return spring was then removed.
1 / 3
2 / 3
3 / 3
During the process, the grooves on the friction linings drew attention to themselves. Exactly the same were on the working surface of the brake drum, and such wear inevitably reduces braking efficiency. In order not to risk the health and well-being of the car owner, the drums were sent for grinding. It’s too early to change the pads - they will level out.
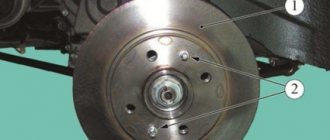
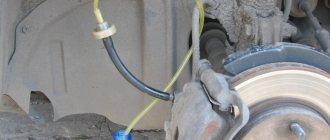
The photographs clearly show the ring gear of the rear wheel speed sensor. Recently, automakers have often installed a conventional ring with magnetized sectors instead of a ring gear. Everything is fine, but sometimes dirt, dust, and wear products get so packed on the ring that its magnetism begins to be lacking, and the ABS system throws up the “I don’t see the sensor” error. This can be treated by thoroughly cleaning the ring and resetting the error. But we digress.
We install a spacer stand on the pads - clean, designed and lubricated. We connect the upper return spring to both pads. First of all, we connect the parking brake cable to the lever on the shoe, then we hang the shoes on the brake flap. Install a new brake slave cylinder. We screw in, but do not tighten the bolts of its fastening and do not forget about the bleeder fitting.
1 / 6
2 / 6
3 / 6
4 / 6
5 / 6
6 / 6
Now we install the pads in the slots on the pistons of the brake cylinder. Slightly center the pads relative to the brake flap and finally tighten the working cylinder mounting bolts.
After which we perform the seemingly simple, but sometimes very troublesome operation of installing the pad pressure springs. Place a finger on the inside. Then, grasping the spring cover with narrow-nose pliers, install the latter on the block, compress and rotate for final fixation. In words, everything seems simple, but in reality it requires skill... To prevent the finger from falling out, you need to hold it, at the same time you need to hold the block and accurately install the spring. Often either the finger falls out, or the spring, or both.
1 / 4
2 / 4
3 / 4
4 / 4
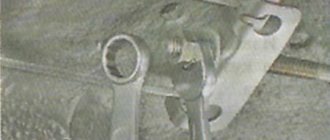
Having dealt with the pressure springs, we check the entire assembly for secure fastening and install the lower spring of the brake pads. At this point, they just brought us perfectly machined brake drums - we put them in place. It remains to be adjusted.
Adjusting the parking brake is an extremely simple operation. With the handbrake not tightened, you need to turn the wheel and, while it is rotating, turn the adjusting nut on the spacer through the service hole until the wheel brakes, then unscrew this nut three to five clicks in the opposite direction. Each manufacturer gives its own instructions and figures, so before making adjustments it would be a good idea to familiarize yourself with the technical data.
After adjustment, do not forget to put a rubber plug for the service hole on the brake flap and bleed the rear right brake mechanism.
The attentive reader may have noticed how different the right and left brake mechanisms were. The right one was in much worse condition. You can blame everything on Chinese metal, but the root cause is that the right side is the side of the roadside, there are always more puddles and potholes, and it is more loaded with corrosion. Therefore, we will end with a banal but timeless piece of advice: monitor the technical condition of your car and carry out maintenance in a timely manner.
Survey
Have you ever repaired drum brakes?
Your voice
Total votes: