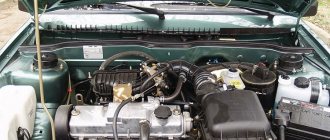
Cars of the Lada-Samara 2 family became a continuation of the well-known “nines” and “eights”, which were produced since the times of the USSR. As for model 2115 specifically, it is a continuation of the “ninety-ninth”, the production of which lasted more than twenty years. The Samara 2 car used many parts from the old Samara. The exhaust system also moved here. However, its design and operating principle are no different from those found on foreign cars. Well, let's take a closer look at the VAZ-2115 muffler and find out how to change it.
Varieties
It is worth noting that this car has two types of mufflers:
- Preliminary.
- Basic.
The first is a resonator. The element consists of a metal body, blind partitions and perforated tubes. There is also thermal insulation inside the resonator. This element connects directly to the exhaust pipe. As for the main thing, this muffler on the VAZ-2115 (its price, by the way, is 900 rubles) performs the function of not only heat removal, but also damping sound vibrations. The design of this element requires the presence of the following parts:
- Front perforated pipe.
- Middle and posterior septum.
- Outlet and inlet pipes.
All this is neatly placed in a metal case. Sometimes a corrugation is placed between the exhaust pipe and the muffler.
How to notice a node malfunction
It is not difficult to determine that it is time to change parts of the exhaust system on a VAZ-2115 with an 8-valve engine.
Even a novice car enthusiast can cope with this, since the main signs are the appearance of a strong smell of exhaust gases in the cabin and an increased noise level. Most often, faults are hidden in the additional or main muffler, as well as in the gaskets between the connections, which can burn out over time. The classification of the most frequently occurring faults is as follows:
- mechanical damage to the muffler;
- burnout of gaskets;
- corrugation burnout;
- loosening of connections at joints;
- cracks in the system pipes.
Problems can be spotted by visual inspection. Experienced specialists recommend removing gas exhaust units for these purposes. This way you can examine them from all sides and notice the slightest damage. After you conduct a visual inspection of the system, you need to buy spare parts and begin repairs. It's easy to do it yourself.
If there are no external problems, you can try replacing the internal resonator. This repair method will only help those who know how to handle welding equipment.
Small burns and holes can be covered with sealant. Just pay attention: it must easily withstand temperatures up to 1000 degrees. Before applying the composition, it is necessary to thoroughly clean and degrease the surfaces.
Corrugation
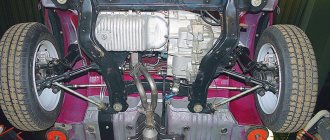
This element is installed on many cars of both domestic and foreign production. VAZ-2115 is no exception. The corrugation performs the function of vibration damping. Since the combustion of the fuel-air mixture causes gases to rush out with enormous force, the exhaust sound would be very loud. The corrugation partially reduces the noise level of the exhaust gases. It is made of stainless steel. She is very flexible. Unlike the muffler and resonator, the corrugation does not rust. However, it is susceptible to mechanical damage. Since it is located under the bottom, it is often hit by asphalt. As a result, it becomes deformed and gases pass through it.
Installation and dismantling
Before installation, we disassemble the old system:
- Using a metal brush, we clean the 2 bolts that secure the clamp between the muffler and the resonator.
- Lubricate the fastening nuts with WD-shkoy, machine oil or rust remover.
- Take a 13mm wrench and tighten the nuts. If this does not work out, cut it with a grinder.
- Next, remove the clamp itself and take out the sealing ring.
- We disconnect the muffler from the resonator, dismantle the VAZ 2114 muffler itself.
- We unscrew the fastenings of the remaining parts and remove them.
- Assembly is carried out in reverse order. If you have not encountered such work before, it is better to take your car to a service center to replace the exhaust system.
The VAZ 2114 muffler can be replaced independently. Just repeat steps 1-5. The resonator is replaced after dismantling the muffler.
The exhaust system of the VAZ 2114 is a complete problem. The presence of serious design flaws makes itself felt very often: either a breakdown will occur, or the pipes will rust.
The exhaust on a VAZ is easier to replace than to repair.
For urban conditions, expensive tuning does not make sense, so it is worth looking for a more reliable analogue, for example, a stainless steel exhaust system kit.
VAZ cars of the 14th and 15th models are still in demand among Russian drivers today. The machines are easy to use, do not require vigilant attention and rarely require repairs. However, they also have a “sore spot” - the mufflers. Therefore, VAZ 2114/2115 owners need to be prepared for the fact that sooner or later they will have to repair or replace the silencer on their car.
Pre-silencer Features
This element represents the middle part of the exhaust system. Performs the function of a “mirror”, reflecting the air flows of gases coming from the combustion chamber. Unlike the main one, the additional VAZ-2115 muffler (resonator) does not have several pipes. Here it is alone, and also perforated. The resonator is a kind of acoustic mirror.
What role does the VAZ 2115 exhaust system play?
The exhaust system of the VAZ 2114 serves to remove fuel combustion products from the engine unit. There are practically no special features in the design of the channels: it is the same as that of the entire VAZ family. Nevertheless, it is worth discussing some details, for example, how to tune the exhaust system of a VAZ or replace old structural elements with new ones.
Signs of a muffler malfunction
How to determine that an element has become unusable? Everything is very simple. If the car begins to “scream” even at low speeds, it means there is a breakdown in the body. Usually the VAZ-2115 muffler burns out from the inside. At the same time, the exhaust sound changes. He becomes loud and irritable. We also note that malfunctions may affect not only this element. If the muffler was replaced (including the VAZ-2115), but the car did not change its sound tone, then the breakdown is in another place. Check the condition of the corrugation or resonator. They also tend to burn out.
This occurs due to high exhaust gas temperatures. Plus, there is no additional protection. The exhaust system is not protected in any way from dirt and water that gets to the bottom. Of course, all this significantly accelerates the corrosion process. In winter, everything is even worse - salt and road reagents accelerate the process of rotting of exhaust system elements tenfold. If after winter the exhaust of your car has become loud, it is worth going up to the overpass and inspecting which element of the exhaust system has failed. And only after that buy a new one. It is not recommended to buy products from imported manufacturers. This is a scam - you will get a Chinese fake. It is better to trust the domestic manufacturer and buy Togliatti elements.
How to repair a “glushak” with your own hands
The muffler on the “fourteenth” and “fifteenth” is considered one of the most vulnerable points of the car. The fact is that due to exposure to high temperatures, the metal quickly burns out, that is, the tightness of the system is broken. Therefore, the part must be changed as soon as there is a suspicion that it is not working.
Reasons for failure
Most often, mufflers “burn out” - that is, due to hot exhaust, the metal inside the housing begins to thin out, which ultimately leads to the appearance of holes. However, this is not the only reason why the silencer may fail:
- using a homemade device - handicraft products do not differ in quality and long service life;
- mechanical shocks from uneven roads - dents and deformations of the pipe also lead to loss of tightness;
- Rust and corrosion sooner or later affects even the highest quality original mufflers.
In general, all of the above factors influence service life to some extent. The car owner can easily identify all of the above faults - just drive the VAZ into the inspection hole and visually examine the muffler. In addition, when deformations, burnouts and corrosion reach their “peak”, the part will begin to make characteristic sounds when moving - gurgling, sharp pops, knocking.
Why is the muffler knocking?
This part on the VAZ 2114/2115 can make knocking noises only in two cases:
- it hits the body;
- When moving, it touches the gas tank housing.
In any case, it is necessary to immediately take measures to eliminate this malfunction. Most often, the problem lies in severe wear of the rubber suspensions. It is enough to change them and the muffler will again return to its normal position under the bottom of the car.
Pendants are inexpensive, so you can buy new products without spending any money.
In some cases, the silencer begins to knock when its elements have been installed incorrectly - for example, after replacing the resonator or exhaust pipe. In this case, you will need to double-check that all fasteners and gaskets are installed correctly.
Citizens! It's simple! I had a knock and I was cured in five minutes! The pipes are connected with a clamp, and inside there is a spherical ring. But the connection is not movable. By changing the angle between the pipes at this connection, we change the center of gravity of the entire exhaust structure. You can also change the slope of the pipe arc, thereby moving it away from the gas tank. Experiment! Repair is a scam!!! They will loosen the clamp, change the degree and charge you 800. Tough!
Marseal
https://autolada.ru/viewtopic.php?t=227961
What to do if the plug is clogged
During vehicle operation, dirt, soot, fuel impurities and other sediments will inevitably accumulate in the exhaust system pipes. Gradually, they will settle on the walls of the muffler and clog its working space.
The driver can notice this only by the behavior of his car:
- At first, it will be difficult to gain speed when overtaking.
- Then, even with uniform movement, the car will have difficulty maintaining the set speed limit.
- Black exhaust from the pipe, loss of engine dynamics.
Cleaning the muffler is a tedious and time-consuming procedure. In addition, if the pipes are clogged, then, most likely, after cleaning, other defects will be revealed - such as rust or burnouts. Therefore, it is more advisable to simply install a new one.
If the catalyst is clogged or the partitions in the muffler are destroyed and interfere with the exhaust, then after replacement it will certainly fly, but if nothing is clogged, then you won’t notice these 2 unfortunate horses at all.
Kirusha27
https://forums.drom.ru/mazda-capella-626/t1151289161.html
Thermal insulation is completely burnt out
The car owner needs to carefully ensure that the resonator coating is always sealed. The barrel is covered with special thermal insulation materials, which sooner or later burn out during the operation of the machine. If you do not change the insulation in time, you will soon have to change the muffler itself.
To do this, the pipes are dismantled from under the car and separated in parts. A special heat-resistant cloth is glued to the surface, which can be purchased at any auto store. Such protection will ensure a longer service life and significantly reduce the noise of the motor.
Muffler replacement
Unlike corrugation, you can install this element yourself. To do this we need a lift, overpass or inspection hole. Next, we find the crimp coupling and unscrew it with a ratchet (you can use open-end wrenches). If the bolt starts to turn, hold the other side with an additional wrench. If the clamp is fairly rusty, you can use lubricant in a can (VD-40). After waiting a couple of minutes, we begin dismantling. Having removed the clamp, we find an o-ring inside.
We do not throw it away, but install it on a new one. Remove the muffler from the rubber cushions. If the elements have cracks, we replace them too. On Lada Samara cars of the first and second generations, the rubber cushions are very thin. They cannot support the weight of the muffler and often break off.
Replacement problems
Most often, problems arise when dismantling the old element. It simply sticks to the resonator. Sometimes bolts break. In this case, you can use a grinder. But you need to act carefully so as not to catch the resonator. If the latter has also become unusable, the problem with dismantling does not go away. Along the chain, the resonator similarly sticks to the receiving pipe. If they also change, you should stock up on the gasket we talked about earlier. It looks like this.
This part compresses the exhaust pipe with the manifold and prevents exhaust gases from leaking out. Thanks to the gasket, they follow strictly along the pipe - to the muffler, and then to the street. There is also a problem when unscrewing the bolts. If they “don’t work”, they are also cut off with a grinder. New ones are installed in their place.
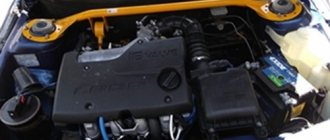
Direct exhaust system
Almost all the elements of the exhaust system were purchased by me in the first year after the start of the car modification project. The very first of them was purchased an exhaust manifold ( spider 4-2-1
) in the online store stinger-shop in April 2013. I was originally looking for a stainless steel manifold in the budget price range but couldn't find anything. Although, probably, I didn’t really bother, that’s why I stopped at the stinger store website. Moreover, this particular brand was especially widespread among exhaust systems at that time; I had never even heard of STT at that time, and sites like tuningsport, clubturbo, meta-s acted only as speculators. At least that's how it was in my mind. At the time of ordering, I did not find a section for manifolds made of stainless steel, so I put in the cart “Exhaust manifold / spider 4-2-1 (SPORT) 16 V “Stinger” for VAZ 2108, VAZ 2109, VAZ 2199, VAZ 2113, VAZ 2114, VAZ 2115” made according to the description from steel 08 ps. It cost 1800 rubles. Before paying for the order, I asked the store manager about the possibility of making the selected manifold from stainless steel. The answer was yes. After which I paid for the order in the amount of 2800 rubles.
After receiving the order, I was interested to check whether the manifold is actually made of stainless steel. Initially, I was like the amateur method – the magnet method. Having found out that the metal from which the collector is made has magnetic properties, I used a more accurate method - chemical. After cleaning a small section of the pipe with sandpaper, I applied a few drops of copper sulfate to it. After a short time, the color of the metal remained virtually unchanged. For the experiment, I repeated this on ordinary carbon steel, where copper precipitation occurred almost immediately, as evidenced by a rich reddish tint at the site of the reaction. Now I was sure that the spider was indeed made of stainless steel. The only thing I remembered later was that I did not check what steel the flange adjacent to the cylinder head was made of. By “later” we mean the complete preparation of the spider for installation, after which I no longer wanted to know anything, so we will assume that the material of the product satisfied my wishes.
Next, I would like to touch on the issue of the quality of workmanship of the purchased product. Here, as always, I was dissatisfied. Although, if judged objectively, the collector is more likely to correspond to the price-quality ratio.
The first step in modifying the manifold was additional welding of the pipes from the inside at the junction with the flange adjacent to the cylinder head. I believe that this should have a beneficial effect on the strength and durability of the product, as well as on the hydrodynamic performance of the collector channels. After welding, the following picture was obtained in each of the four channels.
After that, I had to process the channels and pin holes according to the same coordinates in which the exhaust channels of the cylinder head were processed during its modification. But before this, it was necessary to bring out the contact plane of the flange, since after welding it was significantly deformed.
I had to build a device to install the collector on the grinding machine, which was later used when milling on a milling machine.
The processing was carried out on a surface grinding machine model 3B70V. The only thing that had to be done for smooth installation and further processing of the part on the machine was to remove the handle from the steering wheel of the longitudinal feed of the table.
As a result, the thickness of the flange at the edges was about 8 mm, in the center about 10 mm. Due to this deformation, some of the mounting holes had to be modified subsequently, as their coordinates were shifted.
Further processing of the channels was carried out on a model 67M20VF2 machine, which, after modernization, received a relatively modern NC-202 CNC system.
The working area of the machine did not allow processing all the holes in one setup, so we had to set it up a second time.
After processing the canals, shells opened up in some places, which were later welded back and processed. Unfortunately, there are no photographs of the final appearance of the collector channels. Most likely, I simply forgot to do them due to the rush to install it and the desire to start the engine as soon as possible.
Here, on the machine, I also modified the two-layer metal gasket, drilling holes in it for the pins.
Considering that the manifold was ready for installation, I tried to mount it under the hood. The first thing I noticed was the contact of the secondary manifold pipes with the thermal shield of the brake pipes and the fuel return line.
Looking ahead, I will say that this problem could not be solved, and this thermal screen still had to be abandoned. Secondly, the deviation of the end pipes from the horizontal plane of the body bottom is too large and, in my opinion, their location is low, given that the suspension will use an anti-roll bar from a Lada Granta car, manufactured by TechnoMaster.
Well, the third argument, which initially bothered me, but I turned a blind eye to it, was the imperfection of the channel connections in the internal cavity of the collector. This technology for joining pipes in the manufacture of a collector requires quite precise fitting to achieve the required ( correct)
) channel geometry, but with the serial type of production and taking into account the cost of the product, the quality can change dramatically from one to another. As a result, the manifold was sawed and welded again in place. To connect the primary and secondary pipes, I decided to use stamped tees used by ProCar in the manufacture of exhaust manifolds.
The first two tees had to be slightly modified by cutting off their inlet sockets, which are designed for a pipe with a diameter of 43 mm. But even at the same time, the tees sat with a fairly large gap on the primary collector pipes.
The last tee fit just perfectly, all the pipes fit tightly into its holes. This was very convenient for preliminary installation and tacking of the exhaust system.
As a result of welding the manifold, it turned out to be a little shorter, and it was not possible to place a hole on it for the oxygen sensor. I decided to make it later on the resonator pipe, which had to be lengthened by the missing amount, fortunately I had a small piece of the 51st pipe that I somehow got from a very good friend Densa17.
The underbody thermal shield in the area of the gearbox gate was either missing initially after purchasing the car, or I sent it to scrap when dismantling the standard exhaust system. I can’t say for sure now, but in any case I had to purchase it. In addition, the end pipes of the manifold were too close to the bottom, relative to the serial location of the standard intake pipe.
As always, I turned to the site avtozapchasty.ru for help in purchasing a screen. Order number 21080-1206020-10.
The screen itself had to be modified a little by cutting off its stamped collar on the front side, since it touched the collector. Otherwise there were no problems with its installation.
When choosing a resonator and muffler, I gave my preference to FOX. I purchased everything from the clubturbo online store in the form of welded components ready for installation. The resonator and muffler itself are made of stainless steel, the pipes are made of 08 ps steel. In May 2013, the muffler arrived; its price at that time was 3,450 rubles. I received the resonator only in August of the same year due to its absence at the time of ordering the muffler, I paid 2900 rubles for it.
The connection of the resonator and muffler implied the use of a serial clamp with a ring from the Lada Priora car. With this connection method, the pipes had a certain profile at the ends, which locally reduces the flow area of the pipeline. Without bothering to find out the extent of the influence of this “bottleneck” on the characteristics of the exhaust system, I decided to switch to flange mounting. To do this, I purchased a exhaust pipe gasket from the same Priora, scanned it and made two flanges according to the resulting dimensions. Now the line has a constant flow area along its entire length, not taking into account the insert for the oxygen sensor.
Because the car’s suspension was lowered by -50 mm. I tried to place the muffler as high as possible, thereby trying to avoid its contact with the rear beam when the car was moving. Because of this, the muffler was slightly tilted relative to the horizontal, and its end pipe touched the body. As a temporary solution, I simply shortened the end pipe a little. When installing the exhaust system, I used serial rubber muffler pads, later replacing them with polyurethane ones.
After completing the main welding work with the exhaust system, all that remained was to manufacture and place an insert with a plug for the oxygen sensor on the resonator pipe and paint the bare metal.
I asked a turner colleague to turn out an insert with a stainless steel plug. Then I milled a hole in the pipe for it. The axis of the hole is located at approximately an angle of 15-20 degrees to the horizontal.
Now the exhaust system was completely ready for use. Next in line is the cooling system.