Headlights, indicators, brake light bulbs are not only lighting, but also a way of communication with other drivers. All road users must know what the neighbors in the lane are going to do in the next second, otherwise accidents cannot be avoided. A car is not only a means of transportation, but also a source of increased danger, so always ensure that the lighting elements are in good working order. They can break down, like any other machine equipment parts, they need preventive care and repair if there is already a breakdown.
What happened to the brake light?
Mostly it just burns out. There is nothing difficult about replacing it; it only takes a few minutes. There is no need to go to the salon, no skills or special knowledge are needed. But it is worth changing it as soon as possible. Not so long ago, all residents of our country were required to install a brake light, and while in new cars it was installed at the factory, in old cars the owners had to do it themselves. It is needed to let the driver behind you know that you are braking for a maneuver. This way he has time to stop too and you both avoid a dangerous situation. This is very important, but without it, both you and the driver who is driving behind you are in danger.
If your brake light bulb is burned out, you can most likely replace it yourself. There is also a less common reason - wiring fault. If you are not an electrician, it is better to see a specialist, but first make sure that the problem is not with the light bulb.
Lamp selection
How to determine that it is time to change the wheel bearings on a Chevrolet Niva and how to carry out the replacement yourself?
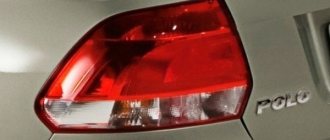
Repair begins with a trip to the store for parts: you need to buy a light bulb. But before you go to the auto parts store for a new one, you need to determine which bulbs are in the brake lights on your Renault Logan. There is a two-filament incandescent lamp installed there, its name is Osram 7528 P21/5W
On its base there are two pins opposite each other, pay attention to this when purchasing - there are models where the pins are not on the same axis. It looks like this
But Renault Logan has a third, additional brake light: in the cabin under the rear window. It contains an incandescent light bulb with one filament, it is called Osram 7506 P21W. It looks almost the same, except that there is only one contact on its base and one spiral in the bulb.
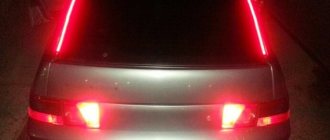
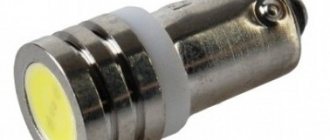
To make the rear lights shine brighter, you can install LED lamps P21W and P21/5W. There are a great many of them on the market, and in this case, oddly enough, the rule “the more expensive the better” almost always works. Don’t buy outright “fawn” for pennies, good LEDs are expensive
Also pay attention to the direction of the lamp's glow. It should be omnidirectional, not oriented somewhere specifically
How to replace correctly
Now that you have already bought new lamps and are ready to work, let's figure out how to change the lamp in the brake lights on a first-generation Logan (sometimes they say first-phase). For simplicity and clarity, read the step-by-step instructions:
- open the trunk;
- We inspect the place where the headlights are mounted. It is covered with casing, but two plastic wings for attaching the headlight protrude through the cutouts. You can bend the trim, then you can remove the terminal block from the headlight before dismantling it;
Tail light and stop light
- press slightly on the flask and turn it 90 degrees counterclockwise. The lamp will come out of the grooves and you can remove it;
- install and turn the new light bulb all the way clockwise.
Dacia and Renault Logan have slightly different headlights, but the process for replacing lamps is similar.
On Logan in a new body
But when removing the headlight on the new second-generation Renault Logan, motorists have problems - they cannot remove the headlight, even though it is held in place by only one wing. Let's look at the differences. Let's start with the fact that Renault Logan 2 does not have a trunk trim in the area of the rear lights. The headlight is held in place by 1 plastic wing, a plastic guide and a “piston”, which is fixed in the car body. The fact is that after unscrewing the wing, the headlight cannot be removed. Experts advise doing the following: we do not unscrew the lamb all the way, and then we press on it with the palm of our hand from the trunk. From the outside, you need to firmly press the corner of the headlight, which is located closer to the rear door, with your palm and pull the headlight back. The palm should be clean and not slip, but rather stick to the headlight. Then the headlight will give in. In particularly neglected cases, they are removed into the gap between the body and the lamp using a wedge.
Replacing the additional brake light lamp
Let's figure out what to do if the additional brake light lamp does not light up. And on the Renaul t Logan it is located in the interior, but how can you change it correctly, since there is no access from above? The fact is that the lamp in it is changed from the trunk. To do this, there is a technological hole through which you need to stick your hand and turn the lamp counterclockwise half a turn.
In a station wagon
Renault Logan MCV or, as it is also called, Logan station wagon in Russia is produced under the name Lada Largus. Now let's figure out how to replace the brake light lamp on a Renault Logan Universal. Double-filament P21/5W lamps are also used here, and the lamps are held on two plastic nuts located vertically at the edges. They need to be unscrewed counterclockwise. Nut holders
Remove the headlight, but do not break the wires. After disconnecting the terminal block, you need to press the latch and remove the panel with lamps. As you can see, the replacement process is similar to those described above. Rear side of Largus headlight, latch at top right
What does this mean?
Accidents. But they are not the main problem. “Kisses” on the highway are a common occurrence; repairs should normally be provided by the insurance company; in a country with a more developed insurance industry, you would simply exchange business cards with your agents and go your separate ways. In Russia everything is a little more complicated. If you brake without turning on the rear brake light, the driver behind you sharply reduces the distance, and when you collide, from the point of view of the traffic police, you will be the culprit. These include fines and sometimes even the risk of losing your license. The operation of the brake light is easy to check - almost every car now has a recorder installed. It is enough to raise the records.
Replacing a brake light bulb is, in most cases, such a simple operation that it is not worth the risk of driving a damaged car.
Removing the lantern
Two screws hold the taillight of the Opel Astra H sedan
Recipe for delicious, crumbly pearl barley porridge without soaking
How to completely remove a program from your computer on Windows 7
Source
Why did the breakdown occur?
Most often you just need to replace the diode. But options are possible.
- The contacts may have oxidized. Humidity, dirt, road dust - all this does not benefit the equipment.
- The wiring is damaged. Attention! If you do not have special education, do not fix it yourself, contact an automobile electrician.
- The mechanism connecting the brake light to the brake system has broken down. You brake, but the signal does not come on.
Use a tester to make sure the voltage is the same across different parts of the wiring. If the problem is already here, and you are not an electrician, just go to a service station. But this is rare, because the diode is the most fragile part and a simple replacement will solve the problem.
Typical faults
We propose to consider the most common malfunctions of the rear lights of Renault Logan 1.
Pay. Despite the fact that the car was supposed to be a budget car, the designers took the reliability of the headlight board extremely seriously. The lamps are powered not by thin tracks or even wires, but literally by busbars, which are impossible to burn even if you insert a crowbar instead of a fuse and short-circuit them.
To burn such tires, you have to try very hard.
The only trouble that can happen is oxidation or burning of the cartridge contacts. We remove the light bulb, inspect the contacts, and clean if necessary. There may be another problem with the cartridge - sagging of the lower contact, which is also a preloading spring. If a correctly installed lamp “dangles,” then this contact needs to be slightly bent outward with an awl or a screwdriver.
In the lamp socket, the marker/brake light of such spring contacts is 2
Connector A fairly common problem is burning of contacts. Typically, burning occurs when there is poor electrical contact between the block and its mating part on the circuit board of the lighting device. If the problem is noticed in time, then the contacts of the block can be put in order - cleaned, tightened, lubricated.
This board connector can still be restored
But if it burns out completely, you will have to replace the pad.
Such a block, of course, cannot be repaired.
Often, along with the block, the connector of the Renault Logan rear light board (part number 6001548137) also burns out. In this case, there is only one way out - buying a new board (there is a photo above), which costs around 1,500 rubles. Fuse.
More precisely, there are several fuses and each one is responsible for its own circuit. They are located in the mounting block, and the block itself can be found in the cabin to the left of the steering column.
Location of the mounting block Renault Logan 1
The fuses with the following numbers are responsible for the headlight located at the rear of the car:
- F03 – brake lights, reverse indicator;
- F04 – direction indicators;
- F18 – side lights, left side;
- F19 – side lights, starboard;
- F20 – rear fog lamp.
Finding them is not difficult - just look at the picture below.
Placement and numbering of fuses in the interior mounting block of Renault Logan 1
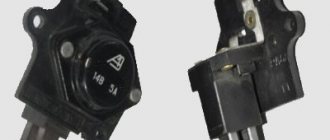
Brake light switch. This problem, of course, only affects the brake indicators, which automatically turn on when you press the brake pedal. Their operation is controlled by a limit switch located under the brake pedal lever.
Brake light limit switch location
This is, in fact, an ordinary button with two contacts, and ringing it will not be a problem - you just need to know how to use a multimeter.
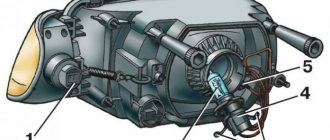
Reverse signal switch. Here the principle is the same as for brake lights, only the limit switch is not located in the passenger compartment, but is screwed into the gearbox. We engage reverse gear, a special rod inside the gearbox presses the limit switch - the reverse light comes on.
Location of the reverse indicator switch in Renault Logan 1
The problem is diagnosed in the same way - we disconnect the power supply from the limit switch, check with a multimeter with the reverse gear turned off and on.
Important! If we are going to change the reverse limit switch, we place a container under the work area. As soon as we unscrew the limit switch, oil will flow from its seat
At the end of the work, be sure to check the oil level in the crankcase and, if necessary, add fresh oil (not the one that was drained during the replacement!).
Wiring. Basically, this is a violation of the insulation and a short circuit of the supply wire to the body. In this case, the fuse immediately burns out. If the circuit is “reliable,” then the new one will burn out immediately. If it is “floating”, it will burn out during the next trip (due to vibration). We carefully inspect the power harness of the faulty light fixture from the flashlight to the mounting block, look for frayed insulation, and fix it.
Where to begin?
There are cosmetics - colorless glass, multi-colored glass, even refractive glass. There is a technique - power and number of threads. Double-filament lamps are the second dimensions, and when you press the brake, the signal goes off because the second filament lights up, while the first one is constantly on. It's up to you to decide what is more important to you and what color it should be. The tools you will need are wrenches of different sizes, a Phillips screwdriver, double-sided tape and a screwdriver. The latter is the most difficult to deal with on the road, but it is an excellent tool for fixing any breakdown, so take a closer look at models with a battery or car charger - it will come in handy. You can only change the brake light bulb with the engine off, otherwise you may get an electric shock.
Possible lighting malfunctions when braking
Continuing to drive when the Renault Logan brake light does not light up when braking, then you will expose yourself and other road users to danger, so periodic monitoring of the serviceability of these devices is necessary. Among the types of problems, the most common problems are:
- When braking, one light does not light up;
- When turned on, both brake lights do not light up;
- The additional brake light does not work.
Since the operation of these devices is directly related to the vehicle’s electrical network, first of all they pay attention to its condition. It is necessary to check the serviceability of fuse F3, which is responsible for the power supply circuit for the brake lamps
The fuse circuit is installed in the interior block on the left side of the dashboard. Its power is designed to pass current up to 10 amperes. An indirect confirmation of its failure is the case when not a single lamp works.
You can check it by installing a known-good fuse or using a measuring device such as a multimeter or tester. If replacing it has not made any changes and the flashlight still does not work, then the search must be continued. The next step should be to check the condition of the machine's electrical wiring for broken wires.
The next element that you should pay attention to should be the stop lamp switch for the Renault Logan car. It is installed on a bracket with pedals
For better convenience when checking, it is best to remove the switch from the pedal bracket. This can be done this way:
- It is necessary to disconnect the battery terminal, since the circuit of this circuit and the sensor are always energized;
- The next step is to remove the connector with wires;
- To remove the sensor from the installation socket, you need to rotate it 90 degrees around its axis and lightly pull it towards you. The device will be in your hands.
You can check the sensor with a tester in resistance measurement mode, or by connecting a known good one. To do this, connect the terminals of the measuring device to the connector of the switch and press and release its protruding rod several times by hand. The device must show serviceability, otherwise it needs to be replaced.
If the sensor has confirmed its serviceability, and the inspector is convinced that it is working, then you need to check the supply of on-board network voltage to it. To do this, replace the battery terminal and use the device to check its presence at the connector with wires. When there is on-board voltage at the sensor connector, you need to proceed to checking the rear lights and their lamps. Replacing it with a new sensor is carried out in the reverse order to its removal.
How to replace?
Easier than it seems.
- Disconnect the wire from the light to turn off the power.
- Unscrew the thumb.
- Unfasten the mounting bolts with a Phillips screwdriver.
- Remove the lamp. Sometimes they are secured with a plastic clip, sometimes they are inserted into a groove, depending on the model.
- Unfasten the latches, take out the back of the lamp, and turn it over.
- Unscrew the brake light bulb, install a new one, repeat the previous steps in reverse order.
Everything works - great. Doesn't work - you didn't check the wiring carefully or installed the light incorrectly. Try again. If it doesn’t help, go to a service station.
Replacement instructions
In general, the replacement process is quite simple, there is nothing complicated about it, but it is still better to look at the service manual and familiarize yourself with the electrical connection diagram.
Tools and materials
When all the necessary products have been purchased, you can begin preparation.
You will need:
- a screwdriver with a Phillips head for unscrewing the bolts that secure the optics;
- a wrench for removing nuts (the author of the video is the ZhZhZhoGGGovo channel).
Algorithm of actions
Before starting work, be sure to turn off the ignition - this will avoid a possible short circuit during repairs.
How to replace brake light bulbs:
- First you need to open the trunk lid of the car.
- Next, taking into account the design features of the car, you need to remove the plastic lining behind which the optics are located. As a rule, this stage does not cause difficulties; to dismantle the cladding, you need to disconnect four clips. This way you will be able to access the wing nut.
- It is possible that access to the bottom nut will be blocked by another cover, in which case you will need to remove it. This cover is located in the same place as the lining.
- After completing these steps, you will need to unscrew both nuts. One of them is located in a convenient place; unscrewing it is not a problem. As for the second nut, difficulties may arise with it, since its location is inconvenient, and therefore it will not be possible to unscrew it by hand. As a rule, a 22mm wrench is used to unscrew it; you only need to rip off the nut, after which you can use your hands. Be careful not to miss the nut, as you will have to disassemble the entire trunk to find it.
- Once the nuts are unscrewed, you can remove the optics itself. Make sure that when dismantling both the upper and lower parts of the headlights are removed synchronously, otherwise the lamp may fall into the spacer. You may need the help of an assistant at this stage.
- When the optics are removed, you will need to unscrew the three screws with a screwdriver. This way you can get directly to the light source. The old product is removed and a new one is installed in its place.
- When the devices are replaced, the optics are assembled, all steps are performed in the reverse order. Now all you have to do is turn on the ignition and check the functionality of the installed light bulb by pressing the gas pedal.
Photo gallery “Do-It-Yourself Replacement”
In some cars, the replacement procedure is simpler. For example, in VAZ 2109 cars, you just need to remove the rear light trim, after which you will get access to the connector with the light source, which can be unscrewed and replaced with a new one. We considered the most difficult option.
Price issue
Lamp prices vary widely. On the market you can find products costing from 30 to 1000 rubles per piece.
What else could go wrong?
Not all cars have an additional brake light, because it is not required by law. This is for greater security, nothing more. If it doesn't work, follow the same principle, but prepare double-sided tape, try not to lose the rubber plugs. Otherwise, it's even easier because the extra light is usually not bolted on.
Buy a high-quality fog light bulb
To buy a good light bulb, just contact the store with a professional consultant. Here they will tell you which manufacturers are the most reliable, which lamp models have sufficient brightness for your car model. The design of the fog lights also determines the type of light element required. Some good, reliable bulbs simply won't fit into your headlight because they're too long. There are also options for types of bulbs - you can buy halogen, LED or xenon bulbs for fog lights. The choice is influenced by the following factors:
if the replacement occurs in one headlight, you should pay attention to the type and brightness of the lamp in the second fog lamp; it is necessary to comply with the power, which is a limitation of the manufacturer of a particular headlight; It is also worth purchasing a lighting element of exactly the shape that is necessary for normal installation; it is necessary to make sure that the thermal activity of the lamp does not destroy the headlight and its surrounding elements; when purchasing a lamp for an original factory headlight, it is best to buy an official lighting element from the manufacturer; overpaying for the purchase of light elements usually pays off handsomely, the lamp will last longer, and the quality of its work will not disappoint you.
Everything suggests that it is better to buy expensive equipment that will work functionally and for a long time. Many believe that an excellent opportunity would be to change the factory settings and install a more functional LED lamp or xenon lighting element. This solution is not suitable for all fog lights. Therefore, before performing this task, it is best to consult with a specialist who can evaluate the design and requirements of your fog lights.