Valve seat - a small ring with a bevel on the inner surface.
It is installed in the holes of the cylinder head intended for installing valves and distilling the air-fuel mixture and exhaust gases through them. The part is pressed into the cylinder head at the factory.
Performs the following functions:
- hole tightness;
- transfers excess heat to the cylinder head;
- provides the necessary air flow when the mechanism is open.
Replacing the valve seat is required when it is not possible to restore its tightness using mechanical processing (numerous treatments in the past, burnout, severe wear). You can do this yourself.
Part repairs are performed when:
- plate burnout;
- after replacing the guide bushings;
- with a moderate degree of natural wear;
- if the tightness of the connection between the ring and the plate is broken.
Correcting worn and damaged saddles at home is done using cutters. In addition, you may need a welding machine or a powerful gas torch, a standard set of wrenches necessary for dismantling and disassembling the cylinder head, lapping paste, and a drill.
How to Replace Valve Guides
Domestic cars can be repaired independently in any convenient garage. Their design provides for the maximum level of maintainability of all components and mechanisms. No exception in this case will be the repair of the cylinder head; one of the operations of this process is the replacement of valve guides.
Mechanism design
During operation of the valve mechanism, the movement of the valves occurs in a limited space. The direction for movement is set using the coaxiality of the hole in which the axis of the rod and the inlet/outlet “walks”. The material for the rod is selected to be as wear-resistant as possible.
The steel is alloyed with large amounts of chromium and nickel. The valve guides mating with the stem are made of less durable material, often copper-containing alloys. This is due to the fact that a repair kit of such bushings will cost less to maintain than a complete replacement of valves with a worn stem. Also, the steel-brass pair works much better with frictional mating.
Replacing bushings
There is practically no gap between the hole and the valve. This and the presence of seals on the rod help prevent oil from entering the combustion chamber. But due to the fact that the valves operate under aggressive conditions and with intense movement, the bushings wear out and they have to be changed periodically. If they were not included in the structure, then the entire head of the blocks would have to be replaced after they were worn out in the holes along which the rod runs.
The need to replace bushings
Wear can be determined by several indirect signs; there are also cases when it is necessary to change bushings:
- Engine oil penetrates into the combustion chamber, due to this its consumption increases and grayish smoke is formed from the exhaust pipe;
- a characteristic tapping sound is heard from the side of the block head;
- when completely replacing a set of valves;
- overhaul of the block head.
Pressing tool
Pressing out bushings
The most popular pressing method is impact. We clean the previously removed block head from dirt. Then we fix it on the workbench. For the operation you will need a special puller, a brass or bronze cylindrical mandrel 80-100 mm long. At one end there should be a groove 30-40 mm long with a diameter 1-2 mm less than the diameter of the inner hole of the sleeve. The mandrel must have a maximum diameter no larger than the outer size of the sleeve.
Before knocking out the bushings, it is necessary to heat the head to approximately 100-120C. This is done to loosen the tension between the bushings and the body. In garage conditions, an electric stove is suitable. Under no circumstances should you use a torch for this operation, so as not to overheat the metal and spoil the “geometry” of the surface of the body part. It must be knocked out from the side of the combustion chamber.
After releasing the mounting hole, you need to measure its diameter. This is necessary in order to correctly select the interference, the difference between the size of the new bushing and the landing diameter. The repair sleeve should be 0.03-0.05 mm larger. This will ensure a tight fit. Measurements should be taken on a cooled head.
Pressing in the repair kit
To avoid damaging the surface of the holes and creating scuffing, before replacing the valve guides, you need to warm up the cylinder head a little again. The repair kit needs to be cooled for a better fit. A household freezer is suitable for this. Without such manipulations, high-quality pressing may not be obtained, and subsequently they will all quickly “loose” in their places. And it will be necessary to disassemble the assembly again.
Mechanism assembly
When everything is in place and the block head has cooled down to ambient temperature, it will be necessary to process the holes with a reamer. This calibration will bring the diameter to the desired size along the entire length. It is advisable to use an adjustable tool, since a non-adjustable tool wears out and the hole size will become slightly smaller than required after a large number of treatments. Due to this, the valves will move with tension, overcoming friction, or they may simply jam.
The normal gap between the valve stem and the hole is 0.03-0.04 mm.
After pressing the bushings, the valve seats can be adjusted. For this operation, cutters or countersinks are used.
ktonaavto.ru
Removing the seat
First, let's look at what not to do, although some automotive garage gurus recommend doing just that.
-valve welding + knocking out
First, the old unnecessary valve is adjusted to the dimensions of the seat, inserted onto the seat and the valve is welded to the seat. While it is still warm, knock out the valve and it comes out along with the seat. Due to the different expansion of metals - steel and aluminum - the tension decreases; when it cools down, it will not be so easy to come out.
Why shouldn't you do this? During welding, the entire head heats up and it will certainly move, it will become crooked and in addition to this, hidden cracks will open where there were internal stresses in the metal (and they exist in any case). Then you will wonder why my head suddenly turned out to be pierced.
The best way is to bore the valve seat on a machine until it becomes the size of foil and jumps out of the seat hole. But... this cannot be implemented in a garage due to the high cost of the equipment, and not every village will have such a machine. Therefore, let’s consider another method, easy and safe, and can be implemented in any garage.
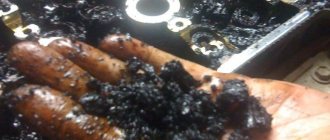
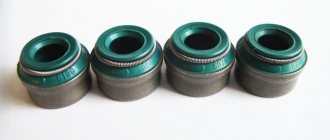
Causes and consequences of valve liner wear
The photo shows valve bushings; if they are worn out, then engine oil is consumed intensively
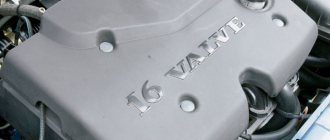
Wear of the inner surface of the valve sleeve leads to increased oil consumption, since the backlash causes the oil seal to wear out faster and oil enters the combustion chamber. This causes increased carbon formation, disruption of operating temperature conditions, increased toxicity of exhaust gases, and if there was a catalyst in the nine, then it would also lead to its failure. This applies to a greater extent to newer engines with 16 valves VAZ 2110, Priora, Grant.
Under ideal conditions, with timely replacement of good oil with good oil and when operating the engine without overheating, the bushing should be changed no earlier than after 180-200 thousand mileage. But if the oil does not meet the standard viscosity, the valve clearances are not controlled, then lateral wear of the bushing may occur due to increased radial load on the valve and deterioration of its mobility along the axis of the rod. Therefore, it is strongly recommended that after each replacement of the valve stem seals, check the clearance in the valve guides. If it is enlarged or there is strong play, the bushings need to be changed.
Machining a new seat
The newly installed seat must be chamfered. It is best to do this on a specialized machine, so it can be processed most accurately. This is achieved thanks to rigid centering of the cutter, which cannot be achieved using hand cutters.
But if there is no such equipment in your area, roller cutters are all you can count on. If there is a metalworking shop nearby, you can try processing the valves on a milling machine, the result will be fine.
On the seat you need to cut three edges - the outer, the inner and on top of them the central, narrowest one, along which the seat will come into contact with the valve.
Didn't find the information you are looking for? on our forum.
The procedure for removing the cylinder head and guide bushings
Checking and adjusting thermal clearances in the Renault Logan valve drive
Before you begin repairs, you must have a complete kit to restore the cylinder head to working order. This component of the engine does not break down instantly, its wear occurs gradually. The service life is affected by:
- timely oil change;
- compliance with the thermal operating conditions of the power unit;
- quality of the fuel used.
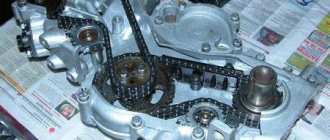
Having removed the cylinder head, you can begin repairing the damaged unit. This operation is considered the most labor-intensive and time-consuming. First of all, it is necessary to disconnect the battery, then the head channels are cleaned by draining the coolant through the drain plug into a specially prepared container. Next, the intake pipe is dismantled. Carefully remove the thermostat and timing belt. We fix the camshafts so that it is convenient to seat the pulleys. The next step is to remove the engine cooling sensor.
This repair also includes removing the valve cover, after unscrewing all the fastening bolts. The cylinder head placed on the table must be thoroughly cleaned of the remnants of the old gasket, oil leaks, dust and washed with kerosene. Next comes its analysis, first of all the rocker arms must be removed. After this, the valves are desiccated using a device. Using a wide flat-head screwdriver or special tool, remove the valve stem seals. After this, the plates, washers, springs (internal, external) are dismantled.
There are times when the valve does not come out of its seat well. In such cases, it should be struck several times with a hammer. Using a nozzle, a worn-out bushing is removed from the head.
Such repairs must be carried out very carefully; inattention can lead to damage to the seat or cylinder head surface. All parts of the unit must be checked for any damage or malfunctions.
The final stage: grinding in the valves
Final processing of the joint between the valve and the seat - valve grinding.
In professional repairs, this operation is practically not used. If the valve seat and chamfer are precisely machined, then lapping is not necessary, but even harmful. It’s a different matter when manually processing parts with cutters and cutting heads. Surfaces after repair may not have an ideal shape and roughness. Lapping is needed not so much for processing as for controlling the quality of the mating. If you wipe the ground surfaces dry and turn the valve in both directions several times, pressing it against the seat, a shiny line will appear on the chamfers of the parts. It will turn out closed, running along the entire circumference - everything is done correctly and the fit is good.
Technology for replacing VAZ 2109 guides
We can assume that the moral and theoretical preparation was successful, so the old bushings are removed using a mandrel or puller. You shouldn’t feel sorry for them, but you also don’t need to scatter them all over the garage. Each bushing is marked and placed with the appropriate valve block, washer and spring kit. Next, the pressing operation proceeds in stages:
- The block head heats up to 100-170 degrees, but in no case should burners or other methods of local heating be used. You can heat it in an electric oven, but an oil bath is ideal. Warming up the head should be as uniform as possible so that it does not warp. It is the oil bath that allows heating evenly and gently. You can use an electric stove at your own risk.
- If possible, new bushings are cooled with either liquid nitrogen or a special Freeze 75 spray.
- The hot head is installed on a flat, stable surface.
- New bushings are driven in using a mandrel with 2-3 blows with a hammer. The pressing must take place at lightning speed so that the bushing does not have time to heat up from the head. The direction of impact is strictly along the axis of the bushing. (It's better to buy a couple of spare bushings just in case).
- After pressing, the head must cool completely. Only after this can you use a reamer to bring the holes to the standard diameter of 8.03 mm.
Removal of old bushings is carried out using a mandrel or puller
The bushings are pressed in and deployed, the head has cooled down, you can start countersinking the valve seats. For this, a special set of countersinks is used. After countersinking, the valves are ground with abrasive paste or a mixture of clean motor oil and fine abrasive, the tightness of the valve fit is checked and the block head can be assembled.
Design and probable malfunctions of the valve mechanism
This element operates in the aggressive environment of internal combustion engines and is always subject to significant dynamic loads, significant speed conditions and heating. To reduce premature wear of the running elements of this part, materials alloyed with nickel and chromium are most often used in its manufacture. The composition includes two main elements:
- head;
- core part.
These automotive components can have heads of various shapes:
- in the form of a tulip;
- flat;
- convex.
At the tip of the rod there are conical, shaped or cylindrical grooves that help fix the springs. The most likely sign of valve failure is a decrease in engine power and instability in operation. This is due to sticking and formation of gap areas. Another reason is the appearance of soot, which accumulates near the valve and does not allow it to close. Excessive emissions of exhaust fumes can also be considered a visible sign. If extraneous noise appears in the internal combustion engine, the rod parts and guides are worn out. Therefore, let’s look at how to replace valve seats with your own hands.
Rear wheel installation process
It will help to correctly install the rear wheel by strictly following the reverse order of dismantling. To do this, we adhere to the following algorithm:
The chain is put on the smallest sprocket size. After this, the wheel is inserted into the bicycle body mount.
It is important to ensure that the axle is finally secured in the grooves of the frame. The next step is to tighten the nuts or eccentrics with the necessary force so that the wheel does not later jump out of the frame. If the bike uses rim brakes, this is a further step. The main thing is to fasten them strictly in the reverse order.
Otherwise, the trip will not be so safe.
Upon completion of the wheel installation, it is necessary to conduct a small test of the bicycle in order to check the functionality of all parts. Do not neglect the maintenance of all parts and mechanisms of the bicycle. After all, this is the only way to extend their service life.
Completion of work
Before installing the valves, modify the internal holes in the bushings. To do this, let the block head cool completely. Try installing the valves - if they do not fit, use a reamer to enlarge the hole. Use the smallest size first. Be sure to test the valve after each pass.
You need to achieve maximum tightness of the valve fit in the bushing. When replacing VAZ-2112 valve guides, be sure to mark the position of the inlet and outlet holes. The inlet bushings are shorter than the outlet bushings, so it is impossible to confuse them during installation.
Source
Replacing valve guides
In a worn guide, the valve will move crookedly, which will lead to rapid wear of the oil seals, then oil will easily get into the engine, especially since the bushing itself is broken, and more oil will pass through it. Simply replacing the caps will not help; the new ones will quickly wear out and everything will start all over again.
Oil can also escape through the gap between the bushing and the head, especially if you install a “proprietary” crooked bushing, it seems that the MSK is fine, they don’t let it through, and the valve moves without distortions, but still everything is covered in oil. And this breakdown is quite difficult to diagnose, because you can’t look into it, but there will still be oil on all sides.
And when the timing belt breaks, the valves usually bend and can damage the guides.
Replacement procedure
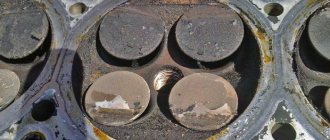
Valves, like seats, are subject to severe temperature loads. Because of this, various defects gradually form on them during operation. These are shells, burnt marks, cracks, and so on. Foreign components can also penetrate into the internal combustion engine and cause damage to the saddle. This option also cannot be excluded.
When the head overheats, a violation of the alignment of the seat, as well as the guide of the valve itself, often occurs. Hence the lack of necessary tightness.
The saddle wears unevenly. The process occurs along the cam axis. As a result, the saddle becomes oval, breaking its original round shape.
Such defects are eliminated using cutters, cutters and countersinks. Then comes the wiping. With special machines at our disposal, seat straightening is done quickly and in one go. Even grinding in after this is not required. But there is definitely no such equipment in an ordinary car owner’s garage. Therefore, we have to resort to alternative methods.
In the case when the wear of the seat is really severe and straightening will not help in any way, then there is only one option left. This is a replacement part. A new seat is installed, which is processed, and then the appropriate chamfer is cut for the valve.
How to change valve guides. Mandrel for pressing valve guides
During the cylinder head repair, I needed to replace the valve guides. I don’t accept impact repair methods, so I decided to make a screw extractor “like Travnikov’s”, simplifying the design and adapting it to my tasks.
There is a nuance here - the factory technology for replacing the guides on my engine involves removing and pressing the bushings in one direction, from top to bottom (towards the combustion chamber). This somewhat simplifies the design of the device, since it allows you to change only the replaceable stops that transmit force to the bushing, and leave the entire sandwich in the KS as is. At the same time, there are no collars or stoppers on the guide bushings themselves that limit the pressing depth, i.e. this moment must be ensured instrumentally during the work process.
Taking these features into account, I made this simple soup set:
The basis of the entire device is an M14 bolt with a nut. The strength class of the foot is 8.8, which in fact is more than enough for the normal operation of the device. The hardware will need to be slightly modified by making a blind M6 threaded hole 10mm deep in its end.
The washer and nut, again, are footrests from the nearest hardware store, a thrust bearing with an internal diameter of 15 mm, which was the first to be found in Autostamp, all other parts, except for the guide bushing, are made of 12Х18Н10Т. A guide sleeve with cones is needed to center the device on the valve seat; therefore, it is made of aluminum to prevent damage to the seat. In addition, making it from soft metal allows you to close your eyes to the inaccuracy of the 45-degree angle; this moment ceases to play any role in the operation of the device.
Non-obvious, but very important points: replaceable screws are necessary for the correct distribution of force on the valve bushing during operation - the small one is used when pressing out, the large one is used when pressing in and at the same time serves as a guide, ensuring the required installation depth of the bushings.
Device assembly procedure:
The effort required when pressing out is very small; maximum effort is achieved when the bushing is pulled out of place, and then everything goes on without visible stress. I took a video of the device working, but I can’t get it out of my old iPhone, so I’ll have to wait :) let’s admire:
Well, photographic evidence of the device’s performance:
The pressing process is no different from the pressing process, except for the use of a different screw. You need to press the end of the screw into the seat of the lower spring plate on the cylinder head until it stops.
Now the report is over, love your engines, friends! Bye!
Often, car repairs are carried out by the owners themselves, using private garages for this purpose. This is especially true for domestic brands of cars, the design of which provides for the repair of main components and mechanisms. Repair work on critical engine components is no exception.
Repairing the cylinder head often involves replacing the valve guides of the gas distribution mechanism, which is responsible for the timely supply of air and air-fuel mixture to the cylinders of an internal combustion engine.
Signs indicating inspection and the need to replace guide bushings:
- an extraneous knock is heard in the engine;
- oil consumption increases;
- there is transverse play of the valve in the bushing.
Often the concept of “ pressing out”
" and " pressing
"parts are associated with the terms "
dismantling
" and "
installation
". This is not entirely correct, since dismantling or installation work relates more to loose-fitting parts, but pressing out or pressing - to parts installed with an interference fit. This is a more labor-intensive process.
For the pressing and pressing process, different types of presses are used: hydraulic, rack-and-pinion, and screw-type. Each press has its own functionality. Bench-type rack and bench-type screws are appropriate for pressing out small parts: bushings, pins, studs, etc. Hydraulic presses are appropriate when working with large parts. Replacing valve bushings. To install new parts, you need to prepare each slot - press out the old elements.
What to use?
Such work involves the use of rough tools that are characterized by almost jeweler precision - countersinks and cutters. Such tools with narrow specifications are used exclusively for engine repairs.
A selection of cutters for valve seats is used for recessing the required diameter sizes. Such actions make it possible to give the plate maximum closing density.
Countersinks are used in the same way when repairing valve seats. But there is one difference - the countersink is used not only on mechanical, but also on power tools.
How to profitably exchange a used car
To guarantee the legality of the used car exchange service and its objective cost, the purchase and sale process should be carried out at a trusted auto center. Here the client will be offered:
- Diagnostics of the old model, on the basis of which its cost will be determined;
- Selection of cars for exchange, completely new or with a clean mileage history: all cars undergo forensic examination, therefore the car dealership will never sell a car with a “dark past”;
- Legal support of the transaction: the client enters into a notarized agreement and, if necessary, can use the credit services of the car dealership’s partner bank;
- Efficiency of the service: the client does not need to look for buyers for his vehicle; he does not need to settle issues with the traffic police or the bank. The listed functions are the task of the auto center.
Thus, with minimal documents, it is possible to buy an improved car within one to three days. The used car exchange service makes it possible to regularly change the owner’s vehicle fleet by purchasing its best models.
Peculiarities
A considerable part of the parts have a special collar on the outside for their necessary vertical fixation in the head. In the case when the bushing is smooth, its installation is carried out with a special mandrel.
On intake valves, the parts in question must not protrude in order to avoid increasing the aerodynamics of the valve resistance. In the exhaust, the bushings must completely hide the valve post so that it is not exposed to high temperatures and heat is better removed from it.
When do you need to change guides?
Blue smoke coming out of the exhaust is a sign of oil combustion.
Signs of oil consumption due to problems with the guides are:
- bluish smoke from the exhaust pipe from escaping combustion products of lubricant that constantly enters the cylinders;
- the car practically does not lose in dynamics, but smokes a fair amount;
- light “fluffy” carbon deposits on the spark plug electrodes;
- liquid oil is observed on the skirts and threaded parts of the spark plugs.
This is oil deposits on the spark plug.
Since oil can also penetrate into the chambers due to the fault of the cylinder-piston group, it is necessary to carry out diagnostics to accurately determine the malfunction. As an example, it is proposed to take the popular VAZ 2106 car:
- Measure the compression in the cylinders. The goal is to ensure that the piston rings are in good technical condition.
- Remove the valve cover, loosen the chain and unscrew the camshaft gear, first aligning the marks.
- Dismantle the camshaft along with the bed and remove the rocker arms. Unlock the valve springs of the cylinder whose spark plug is more heavily covered with carbon deposits.
- Carefully remove the oil seal and try to rock the rod sideways with your hand, while moving it up and down.
To feel the play, the valve must be pulled out by the stem and rocked to the sides
If there is play, you can safely continue disassembly, since to replace the bushings you need to remove the cylinder head. If you have no doubts, check the other valves, the picture should be approximately the same.
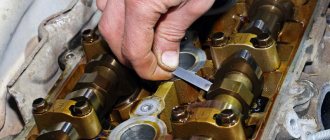
So, let's get down to work! For everything to go smoothly and without any mistakes, you need to follow the following instructions. First, we insert the mandrel one by one into the holes of the old bushings and very carefully, without using much effort, strike the very end of the mandrel with a hammer.
To install new bushings, they need to be kept in the freezer for about two days, so they will be more compressed and then smoothly fit into the seat. Next, we need to heat the cylinder heads on an electric stove to approximately 100 degrees, thereby expanding the seats. The last step remains: we put retaining rings on the bushings, insert them into the holes and, just as carefully as we took them out, begin to drive them in.
Oil seals for VAZ 2106 engine
Valve seals or valve seals primarily prevent excess oil from entering the engine. The part is made of rubber of a special composition, which wears out over time, leading to leakage of lubricant. As a result, oil consumption increases. Therefore, it is worth understanding in more detail what this part is, how and when to replace it with a VAZ 2106.
What are they for?
The design of the power unit has intake and exhaust valves. The valve stem is in constant contact with the camshaft, causing oily mist to form. The return part of the intake valve is located in the area of the constant presence of small drops of fuel or in the area of hot exhaust gases, which is typical for the exhaust valve. Correct operation of the camshaft is impossible without lubrication, but its penetration into the cylinders is an undesirable process. When the valve moves back and forth, oil is removed from its stem by the oil seal skirt.
Signs of wear
During engine operation, the valves are subject to constant friction, as well as the aggressive effects of lubricant and exhaust gases. This leads to the fact that the rubber from which the rubbing part of the oil seal is made hardens, and the working edges of the cap wear out. Despite the high quality of the material, the part has to be replaced over time. In order to extend the life of the caps, it is necessary to use high-quality engine oil.
The average service life of valve seals is about 100 thousand km.
The fact that the seals have become unusable and it’s time to change them is indicated by characteristic signs:
- bluish smoke appears from the muffler;
- engine oil consumption increases;
- spark plugs become covered with soot.
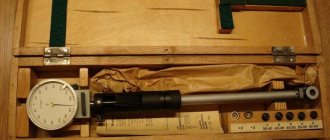
Measuring Valve Guide Wear
Before measuring valve guide wear, you must measure the diameter of the valve stem. Next, use a split ring gauge to measure the diameter of the hole in the center of the valve guide. The opening of the ring gauge is then measured using a micrometer. The diameter of the hole at both ends of the guide bushing is then measured.
The cut in the ring during these measurements should be oriented perpendicular to the axis of maximum wear of the hole. The difference between the largest hole diameter in the guide sleeve and the diameter of the valve stem is then calculated. If the gap is greater than the specified limit, the valve guide must be repaired.
The valve stem-to-valve guide clearance can also be determined by using a dial displacement meter to measure the play of the valve when it is pulled out of the seat. It is also necessary to measure the diameter of the valve stem.
Most American car manufacturers whose engines use built-in valve guides recommend widening the worn holes in the guides using a reamer and replacing the valves with new ones with stems of increased repair diameter. If the valve guide is worn, the valve stem is likely worn as well. In this case, new valves are required. But if the valves are replaced, then it makes no difference whether they have a standard diameter rod or a repair rod of increased diameter. Repair valves are usually available with stem diameters increased by standard sizes - 0.003, 0.005, 0.015 and 0.030 inches. The hole in the guide bushing to be repaired is reamed or honed to the required diameter corresponding to the diameter of the repair valve stem. The clearance between the stem and the repaired guide bushing remains the same as the old valve. When replacing worn valves with repair ones that have stems of increased diameter, the oil clearance and heat transfer characteristics remain the same.
Many companies involved in engine overhauls, in order to simplify head repairs, use repair valves with rods of increased diameter.
When restoring a hole in a valve guide using knurling technology, the knurling head rotates and moves deeper into the hole. During this operation, the diameter of the hole is reduced by displacing metal from one place to another. Knurling technology is ideal for engines with integral valve guides (i.e. non-removable, cast with the cylinder head and therefore not replaceable). Knurling is not recommended for repairing holes with wear greater than 0.006 inch (0.15 mm). During the knurling process, a conical-shaped knurling roller with a small diameter, or a thread-cutting tool with a specially blunted cutting edge, is pressed into the wall of the hole, extruding a groove in it without removing metal, as shown in Fig. 13.39 and 13.40. The metal is squeezed out onto the edges of the groove, similar to how soft soil is squeezed out of the rut by the wheels of a car onto its edges (forming a continuous protrusion along the edges of the rut). The knurling head is driven by a drill with a reduction gearbox. The reamers included with the knurling head ream the knurled hole just enough to ensure that the valve guide-to-valve stem clearance meets the general remanufactured standards. If special precision is required, the holes are honed to the specified size using high-precision equipment. Valve guides remanufactured by knurling typically have half the clearance of new parts. But such a small gap is acceptable, because after knurling in the wall of the hole, along its entire length, there remain many thin annular projections that hold the oil, ensuring normal lubrication.
Preparation for repair
It is necessary to carry out repairs of the head and gas distribution mechanisms as carefully as possible. Several special tools are required; a set of keys is clearly not enough. Replacing the VAZ-2106 valve guides is carried out in exactly the same way as on any other model. The design is different, but only slightly. The master will need the following tool:
- Mandrel for pressing guides out of their seats. It can be made on a lathe or purchased in a store. Factory products have a handle and a working part, which is a metal rod with a diameter slightly smaller than that of the sleeve. At the end the part is thinner - it freely penetrates into the inner hole of the valve sleeve.
- Special reamers with dimensions 8.022..8.040 (for intake valves) and 8.029..8.047 (for exhaust valves). Using these devices, which are elongated drills, you can increase the diameter of the holes in the block head for installing guides to the desired size.
It is advisable to carry out all work with the head removed. Be sure to remove valves, seals, camshaft and other elements.
Wear measurement
- Determination using a micrometer and bore gauge. They can be used to measure the inner diameter of the guides and the outer diameter of the valve lifter. By comparing these two values and calculating the difference, you can find out how much they correspond to the parameters necessary for normal operation. When measurements are taken, it is necessary to thoroughly clean the parts from dirt and carbon deposits.
- Detection of wear using a dial indicator. Using this tool, diameter readings are taken and if the obtained value is greater than the permissible value, a new valve is taken and a measurement is taken. If in this case the value is outside the limits, then these elements must be replaced.
Last stage of installation
Often valves are not included in new products. This is due to a decrease in their internal diameter after pressing. In order to correct the current situation, you need to apply sweeps.
- They are used in increments until the valve fits normally into the guide.
- Accordingly, you need to monitor the dimensions after using each scan.
- It is recommended to buy diamond-coated reamers, since ordinary steel ones very quickly lose their functionality.
Timely replacement saves a considerable amount of time and money.