Does reverse gear rarely engage the first time, and the process itself is accompanied by a crunching sound? Owners of not only Lada Priora, Kalina and Grant models, but also modern Lada Vesta and XRAY cars face similar problems. Let us tell you what is the cause of this disease.
The peculiarity of the reverse gear on LADA cars is that it does not have synchronizers. Therefore, the problem of engaging reverse speed is most often due to the fact that the gear gets caught on a tooth.
What to do if reverse gear does not engage:
- If you feel that the reverse speed has not reached, release the clutch a little, the gear will move and the gearshift lever will be inserted all the way.
- After releasing the clutch, try to engage reverse gear after 2-3 seconds.
- Try depressing the clutch and putting it in neutral, then releasing the clutch, and then again depressing and engaging the reverse.
- Try engaging reverse gear at a different speed. For example, first 4th or 5th gear, and then reverse.
Sometimes changing the transmission oil helps solve the problem of reverse gear.
Articles about tuning Lada Xray
Disabling the automatic activation of the rear wiper on the Lada XRAY Installing additional trunk lighting on the Lada XRAY Installing an additional seal in the engine compartment of the Lada XRAY Bracing the front struts of the car: purpose, installation and reviews
Some LADA owners write that the gearbox began to work normally only after a certain mileage (3000 -5000 km).
If none of the tips helped solve the problem, contact an authorized dealer for help (the problem may be in the gearbox). Have you encountered similar cases? How did you solve the problem?
From the first day of purchasing the Priors, I engaged the gears with great effort, the reverse gear crunched and squealed. Sometimes at a traffic light I couldn’t move and turn on first, every trip turned into an exciting journey. I started to figure it out. The first thing I did was look at the cable from the clutch pedal to the gearbox. The distance between the fork and the leash in the extended position should be 27 mm, I checked it myself, the tip was tightened to the limit and covered with some kind of sealant. I set everything up and fixed everything.
The situation became a little better, but the reverse gear still sang every time it was turned on, for a while I even came to terms with this, some on the Internet write that it is impossible to adjust and it will always turn on like this (since it does not have synchronizers), they advise turning it on through first.
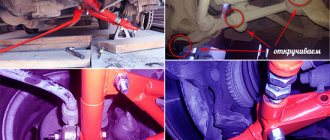
I drove like this for a couple of months until I came across an article about the 5th engine mount and how to install it correctly. In the article I read that it is necessary to place washers during installation, at the height of the gap between the mount and the body, otherwise the box rises and the gears begin to jam. I looked under the car, the 5th support is there, there are no washers. Probably the previous owner of the would-be master screwed on an additional support, without knowing how to screw it on correctly :) I decided to remove the fifth support for a while. The situation changed for the better, but the reverse gear still crunched.
Then I read about adjusting the rocker, precise adjustment helped me completely get rid of the crunching of the rear gear and the difficulty of engaging first gear! DON'T BELIEVE THE MASTERS WHO SAY THAT REVERSE SPEED SHOULD TURN IN WITH A CRUNCH BECAUSE IT DOESN'T HAVE SYNCHRONIZERS!
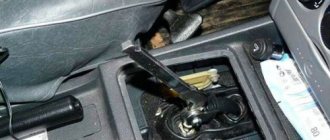
I want to share this method with you, I tried to write everything in the photo, but here I’ll tell you in more detail: 1) We’re going to the pit. Before unscrewing the drive clamp, you need to remember at what distance the end of the drive is to the cardan shaft. Or then adjust so that the gearshift lever is vertical in the neutral position. 2) Turn on the first speed, loosen the clamp of the rocker drive, I sprayed WD40 so that the drive could rotate freely. 3) Without turning off the speed, rotate the drive counterclockwise until it stops. 4) As soon as the gearshift lever rests against the plastic reverse speed stop, we look for the best gear engagement position by turning the rocker drive clockwise a couple of millimeters. Do not forget to tighten the drive clamp each time before the next attempt to engage the gear. PS. I had to unscrew and tighten the clamp 7 times while I turned the drive a couple of millimeters at a time and tried to engage gears.
I was very pleased with the result, first gear is easy to engage, reverse gear is engaged perfectly.
The transmission is the most mysterious unit in a car, especially for people who are not technically savvy. And everything seems simple - you squeeze the clutch, push the handle and the car goes. However, if suddenly it doesn’t go, then you don’t know what to think. Therefore, when something happens to the gearbox - reverse gear does not engage, for example, then at least cry.
And if it happens in a garage or in a parking lot, where there are always a lot of advisers who always know exactly why the gear won’t engage, then after several minutes of heated discussions you begin to regret that the gearbox in the car is not an automatic, but a manual transmission. Although automatic transmission is also not without such problems. But let's start in order.
Wear of the rocker bushing
This malfunction may be indicated by some looseness of the lever. However, if the wear proceeded evenly - it ran its course - you could get used to the free movements of the scenes and not notice the impending troubles. The problem is solved by replacing the bushing - remove the lever cover, then remove the rocker itself, replace the plastic bushing with a new one and put everything in place. The procedure is carried out in the car interior.
Main malfunctions of manual transmission and manual transmission
Breaking a gearbox is a costly affair, the only justification for which is the natural wear and tear of parts.
Other reasons for node failure are caused by owner oversight:
- sporty and aggressive driving;
- low-quality gear oil;
- non-original spare parts used for replacement;
- ignoring maintenance deadlines.
You can significantly delay the repair time of the VAZ Priora gearbox if you follow simple rules for operating and maintaining the transmission.
You also need to know the common problems with the box.
Weaknesses of manual transmission:
- oil leaks;
- noise at neutral speed with the engine running, shifting one or more (as well as difficulty, crunching) gears;
- their sudden shutdown;
- box vibration.
External manifestations of malfunctions can be caused by many reasons: wear of the synchronizer, breakage of gears, defective bearings, clutch problems, failure of the box fastening.
The robotic gearbox has its own damage:
- the warning light on the instrument panel lights up;
- while moving, buzzing and howling appear;
- lubricant leaks;
- engine speed increases, but speed does not increase;
- clutch slips;
- there are jerks and jolts of the car in motion;
- The manual transmission spontaneously stops working and the car stops.
Why are gears difficult to engage?
First, we suggest finding out what is the reason why reverse or first gear is sometimes or systematically difficult to activate.
If, when you press the clutch pedal and try to turn on the speed, a crunching sound is heard from the car’s transmission, this indicates problems in the operation of the unit.
The reasons why the gear is difficult to engage may be different, let’s consider them in detail:
- If it is difficult to switch between first and second gears, the problem may be that the clutch is not fully activated. On a VAZ Priora, the reason often lies in damage or disconnection of the cable on the pedal. This problem can be identified by diagnosing it. If the pedal is sunk into the floor, the cable must be replaced.
- Failure of the drive rod for controlling the gearbox activation mechanism.
- Damage or incorrect operation of the transmission's torque rod.
- Loosening the fixing bolts on the gear selector rod lever or on the hinge. It is necessary to determine the reason why the screws may have become loose.
- Making mistakes when adjusting the gear activation drive.
- Failure or damage to plastic components that are installed on the Lada Priora gearbox control drive.
- Mistakes made when adjusting the scenes. This unit on the VAZ Priora is designed to connect the gearbox to the selector in the car interior. As a result of long-term use, the plastic bushings on the rocker could wear out.
- Failure of synchronizer elements. These mechanisms are made in the form of brass bushings, which are used for more simplified gear shifting. Brass is a soft metal and will wear out over long periods of use. If the first and reverse gears are difficult to engage, and the reason lies in the synchronizing elements, when you try to change gear, an unpleasant crunching or grinding noise will be heard. When there are no problems with activating gears, but there is an uncharacteristic sound when the gearbox is operating, then in the future you will encounter difficulty changing gears.
- Failure of bearing elements due to damage or wear. This type of malfunction is not common, but over time the bearings wear out, so every car owner can encounter it. If a part breaks, one of the transmission pulleys is no longer able to rotate, which leads to problems when activating speeds. Usually we are talking only about the first gear.
- Failure of the box shaft. This unit is not subject to wear or critical loads during its entire service life, but it may break due to a manufacturing defect. Even minor errors made by the manufacturer when assembling the vehicle can lead to shaft failure. Because of this, the car owner will face the problem of not only difficulty engaging first gear, but also a breakdown of the transmission unit as a whole.
- The reason may lie in the car's engine mounts. The power unit hangs on them and is connected to the transmission. During long-term use of the car, the fastening fails or is unscrewed from its seat. This leads to sagging of the car engine or transmission. As a result of subsidence, damage to the backstage may occur.
- Failure of the clutch fork.
- Clutch basket malfunctions. This assembly breaks due to wear or damage to the petals. The “spider” of the basket can also fail. This element is a bearing mechanism that is fixed on several stretch marks. If they tear, they cannot fully stay on the basket, which leads to difficulties in changing gears. Due to damage to the paddles, it will be impossible to release the clutch disc. If the disk itself is worn out, this will lead to the appearance of wear. When the wear of the part is too great, it will be impossible to switch on the speed.
- Damage to the ball joint or spherical spring.
- Often such problems occur as a result of changing the transmission fluid. The main feature of the Priora gearbox is that the gear ratios in the first and second stages of the unit differ as much as possible. When the driver changes gears, it is necessary to wait for the input shaft to slow down during the process. If it takes longer than usual to slow down, it may be due to low viscosity lubricant or slight underfilling.
User Sergey Tsapyuk made a video in which he talked about the problem of poor gear engagement on a Priora.
First gear doesn't engage well - what to do?
Many drivers, when operating used cars, are faced with the fact that the gear does not engage well, in most cases it is the first one. What to do and how to improve gear engagement ?
How to engage first gear without harming the gearbox
Often, novice drivers, shifting the gear lever from second gear to first, notice certain difficulties: first gear does not want to engage. And the driver, using force, literally drives the lever into the position of engaging the cherished gear.
Some drivers who were “lucky enough” to notice such a drawback of a manual transmission even came up with a kind of rule: the first gear is intended only for starting the movement, and then the second, third, fourth, fifth are used.
Of course, this rule is completely wrong, since it is necessary to select a gear based on the ratio of the current speed of movement and the engine crankshaft speed. In fact, you can even park normally only in first gear. Parking in second gear means you'll be firing the clutch or maneuvering unreasonably fast.
Therefore, absolutely any driver needs to acquire an extremely simple skill that allows him to engage first gear on the move.
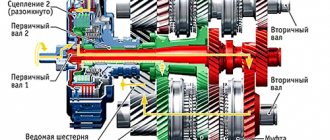
Theory of gearbox operation
Modern passenger cars equipped with a manual gearbox have synchronizers. A synchronizer is an integral part of a mechanical gearbox that acts as a shaft speed equalizer and is also responsible for the shockless engagement of gears.
It is in the process of pushing the gear lever from the second gear position to the first gear position that we come across some obstacle that prevents us from moving the lever to the first gear position. This obstacle is the synchronizer. If the first gear synchronizer is new, then the process of shifting from upshift to downshift occurs without any serious delays. If the car has a high mileage, then the synchronizers begin to stop performing their direct functions.
The driver has to remember the old-fashioned methods of controlling a manual transmission - these are various throttle shifts combined with double clutch release. Re-throttle with double squeeze acts as an equalizer of the angular velocities of the articulated gears. The higher the difference in angular speeds, and the higher the wear of the synchronizer for a given gear, the more you will have to throttle. When the angular speeds are equal, the driver will immediately feel it: the gearshift lever will easily move into the first gear position.
No force is needed.
Methods for engaging first gear while driving
The easiest way to engage first gear while the car is moving is to not push the lever too much and wait for the moment when the first gear synchronizer is activated. Unfortunately, this method is not applicable on some trucks, since their gearbox design does not use a first gear synchronizer.
Also, this method of engaging first gear will not be successful if you are driving a passenger car with a “dead” first gear synchronizer. In this case, you will either have to wait a long time for the first gear to engage, or forcefully “drive” the first gear. Both are not a good way out of the current situation.
The most optimal technique for engaging first gear while driving is the technique of switching on the throttle. Let's consider the driver's action algorithm.
Shifting with double clutch release
After several successful starts, you will remember these sensations and turn on the first one normally. But keep in mind that this is a temporary solution, and the gearbox with its synchronizers needs to be repaired. Where? That's another question.
Prices for repairing Lexus automatic transmissions and other gearboxes can be found on the website rekpp.ru
It is better to choose good box specialists who can guarantee their work, otherwise there is a risk of having to undergo a major overhaul. And this, my dear friend, is big money.
What to do?
Next, we will look at several ways to solve the problem that can be done at home. The process of repairing a transmission is not such a simple task, so if you are not confident in your abilities, then do not try to do it yourself. It is better to contact specialists, because if you make even a small mistake, it can develop into more serious problems in the future.
Tools
Regardless of what kind of breakdown you have, prepare in advance all the necessary tools that you may need to disassemble the gearbox:
- slotted screwdriver;
- a set of heads for unscrewing bolts;
- set of wrenches;
- mounting blade;
- hammer;
- pliers with thin jaws;
- Phillips screwdriver;
- Litol lubricant;
- jack;
- container for draining transmission oil from the gearbox;
- technological plug for the hole in your robotic gearbox.
A set of tools for dismantling and repairing the VAZ Priora gearbox
Step-by-step replacement instructions
Removing the manual transmission
- First of all, before disassembling the gearbox, it is necessary to drain the transmission fluid from the gearbox. To do this, find an oil drain hole under the bottom of the vehicle, place a previously prepared container and unscrew the plug. Wait 40-60 minutes until the oil is completely drained. Now you can begin dismantling the gearbox.
- To begin, find in the cabin under the instrument panel the fastening nut of the clutch cable housing, which is connected to the pedal. It needs to be unscrewed. To do this, you will need an "8" socket or wrench. When the nut is unscrewed, remove the stop from the bracket.
- Then you need to dismantle the locking element and the housing of the wear compensation device for the driven shaft linings from the clutch pedal pin. To do this, take a slotted screwdriver and pry out the element.
- Now remove the plastic bushing from the pedal and then inspect it. If the bushing shows signs of wear or any physical damage, the bushing should be replaced. Before installing it directly, take “Litol” and lubricate the element so that it does not become dry.
- Next, dismantle the rubber seal of the clutch pedal cable sheath - it is located in the engine compartment.
- Then you need to remove the end element from the cable fork, after pulling it forward in the direction of travel of the vehicle.
VAZ Priora gearbox disassembled
- Remove the nut securing the clutch cable end to the bracket, which is located directly on the gearbox. To do this, use a wrench set to “17”.
- Remove the cable end from the bracket hole. Then you need to remove the cable from the car.
- Now remove the plastic retaining plug and remove the wiring block from the speed sensor.
- Using a 10mm wrench, you need to unscrew the three mounting bolts on the front crankcase cover and remove it.
- Now you should support the engine of your vehicle with a reliable support or secure it using a device for lifting loads.
- Next, remove the nut securing the rear suspension support of the power device directly to the bracket. To do this you will need a key or socket on “15”.
- Now you need to remove the rear airbag upper limiting device.
- Unscrew the bolts securing the airbag to the vehicle body.
- Remove the cushion and its lower stop.
New manual transmission bearings for VAZ Priora - Remove several nuts (their number depends on the year of manufacture of the car) that secure the rear support of the power mechanism to the transmission housing. To do this, use a socket or key set to “13”.
- Now take the “8” key and use it to remove the upper mounting bolt, and then remove the rear support bracket.
- Remove the plastic plug and remove the wiring harness from the reversing headlight switching device.
- Remove the bolt securing the gear shift mechanism hinge to the rod, where they are directly selected. To do this you will need a key for “10”.
- Next, remove several torque rod mounting bolts.
- After this, unscrew the screws securing the front wheel hubcaps and the hubcaps themselves, prying them off with a slotted screwdriver. The caps have rubber O-rings - they must never be lost.
- Using a 30mm wrench, loosen the wheel bolts and hub nuts. They can be very tight, so you may need to use force to loosen them. During this work, the machine must be on the ground, and not, for example, on an overpass.
- Now you need to secure the vehicle in place. To do this, put the car on the handbrake and place bricks or other wheel chocks under the rear wheels.
- Raise the front of the car using a jack and remove the front wheels, then completely unscrew the hub nuts and remove the thrust washers installed under them. Please note: after removing the nuts, they will definitely need to be replaced with new ones.
Spring for VAZ Priora manual transmission - Remove the rotating mechanisms from the suspension arms, having previously removed several mounting bolts using a “17” wrench.
- Remove the left and right drives, having previously pressed them out.
- Next, you need to support your transmission with a reliable support.
- Remove the bolts that secure your box to the engine - for this you will need a “19” wrench.
- Now you need to move the gearbox back as far as possible. Remove the support in advance by holding the box.
- This completes the process of dismantling the gearbox. Installation is carried out in reverse order.
- Don't forget to fill the transmission fluid.
Replacing manual transmission lever axle bushings
If the bushings are faulty, then follow all steps in the order described to replace them.
- First, dismantle the car floor tunnel lining.
- Using a “13” wrench, unscrew the fastening nut of the gearbox lever axle.
- Remove the lever axle stop mounting screw.
- Now you need to move the lever itself to the side and remove its axis along with the stop.
- You will see two plastic and one spacer bushings.
- If the fault lies precisely in them, then install new bushings. Remember: the plastic parts themselves are split, so don't assume they're cracked.
- Now install all the components in the reverse order, lubricating them with Lithol in advance.