Material characteristics
This model is a cylinder shape that is mounted under shock absorbers and suspension springs. Different materials of manufacture, density and dimensions of spacers for increasing ground clearance are determined by the purpose of installation on the front or rear of the car body. As a rule, the choice of one spacer or another does not depend on the make of the car: most parts are universal.
The material used to make parts can be divided into metal (steel or aluminum) and non-metal (polyurethane, plastic). Metal spacers are mounted under the spring, and non-metal spacers are mounted above the spring.
To have a clear idea of the subject, you can watch the installation of a spacer to increase ground clearance with your own hands in the video.
We install spacers to increase the ground clearance of Kalina (rear)
In the West, most modifications to the chassis involve lowering the ground clearance, increasing the rims and reducing the tire height. In general, everything is to increase suspension stiffness and reduce ground clearance (clearance). With us, everything is exactly the opposite! Everyone is trying to increase the ground clearance in order to install bigger, thicker, and softer wheels!
There is nothing surprising here if you look at it, but it’s better to take a ride along “our” roads once. Factory wheels and ground clearance are sorely insufficient for normal movement on public roads; there is always a risk of hitting the pallet, breaking the bumper, etc. As a result, spacers for increasing ground clearance have become almost the most popular product for the majority of Russian motorists.
The price of spacers to increase the ground clearance is ridiculous compared to how much it costs to repair the above-mentioned body parts. The solution to this issue was the so-called spacers, which allow you to increase ground clearance. Spacers to increase ground clearance are installed at the front above the springs and at the rear, either under or above the strut.
In this article I will tell you how to raise the rear of a VAZ 2117 using spacers. The work is not difficult, and anyone who has an idea of what do-it-yourself car repair is can do.
To work we need to prepare:
- Two jacks;
- Set of keys (standard);
- Liquid WD-40 just in case;
- And, of course, the spacers themselves to increase the ground clearance of the VAZ.
What is it for?
There are two reasons for raising the vehicle's ground clearance:
- off-road driving;
- sagging of springs over time.
To restore the spring to its original position, special spacers are used. The ideal option would be to replace old springs with new ones at a service station; however, car owners widely practice installing spacers to increase ground clearance with their own hands. If previously, increasing ground clearance was achieved by introducing tennis balls into the springs, now car dealerships sell special spacers of various thicknesses.
Pros and cons of the clearance operation
Is there really a need to tune the suspension, and will such a change damage the car? Before installing aluminum spacers under the springs, let’s pay attention to the positive aspects of the changes:
- protection of the rear suspension, underbody and crankcase from breakdowns;
- protection of the rear wheels from impacts on the fender liner;
- increasing the vehicle's off-road capability.
The disadvantages of installing a spacer under the springs with your own hands include:
- failure of the lower shock absorber mounting;
- additional load on the bottom bracket;
- car instability on an icy surface;
- impairment of vehicle controllability due to a shift in the center of gravity;
- rapid wear of steering parts;
- imbalance of wheel alignment.
After tuning, the car owner needs to pay more attention to the suspension in general and shock absorbers in particular.
Shock absorber modification
When transporting large loads (and often VAZ 2110 owners do not listen too much to recommendations regarding load capacity), the car seriously “sits down” and its ground clearance is significantly reduced.
If you have to constantly carry heavy things, it makes sense to install springs with class “A”. Naturally, they will make the shock absorbers stiff, and you will only be comfortable in a heavily loaded car, and without a load it will shake like on a cart.
There are also s, which are installed between the spring coils and do not allow the shock absorber to compress too much.
Interturn spacers in the shock absorber spring
In principle, such a car will no longer sag significantly under load, as well as nod off, but the shock absorber stroke will decrease and it will fail faster.
What to choose?
What are spacers made of to increase ground clearance? The choice of material depends on the design of your machine. In the front compartment of the car, spacers made of metals are mounted: steel or aluminum alloys. It is recommended to place rubber or plastic products under the rear springs.
Which spacers are best for increasing ground clearance? Firstly, you cannot install any spacers over 30 mm thick. Secondly, polyurethane products can cause damage to the body by steel bushings due to rapid wear.
Aluminum products are the most reliable, although they cause corrosion at points of contact with the body. In practice, plastic spacers have shown themselves to work well to increase ground clearance, without revealing any serious shortcomings. Rubber material is the cheapest, but is prone to tearing, deformation and rapid wear.
About the body and suspension lift
How to correctly install spacers on the rear pillars of a VAZ 2110
If you are the happy owner of a VAZ 2110, then you were able to fully appreciate the undemanding and easy operation of your dozen. But one day, if you have had the car for a long time or got it from someone, you will notice that it has begun to sag a lot. This can be noticeable even with a completely empty cabin and tank. The consequence of this subsidence will most likely be impacts from the tires into the fender liners. And, as a consequence, their mutual destruction.
You can solve this problem of your VAZ 2110 by using spacers for the rear springs by contacting the nearest car service center, but it will be much cheaper and more interesting for any real car enthusiast to solve the problem on their own. Moreover, the process of installing spacers will not take much time.
The procedure for installing spacers on the rear pillars of a VAZ 2110
All you need for this operation are the spacers themselves for the rear springs for the VAZ 2110, a small set of tools and a little accuracy.
Let's look at the whole operation, breaking it down into 16 stages:
- First of all, using available tools, you need to hang up the rear part of your VAZ 2110 and remove the rear wheels;
- Next, taking a 19mm wrench, you need to unscrew the bolt that secures the shock absorber from below. To prevent the bolt from turning, securely fix the nut with another suitable wrench.
- Remove the bolt.
- We take one of the spacers. Which one is not important, since they are symmetrical and equally suitable for any side of the VAZ 2110.
- We orient the spacer with the larger side facing longitudinally in relation to the length of the car.
- The spacer has three holes that connect it to the end of the shock absorber. You need to select one of the holes depending on what lifting height of the VAZ 2110 you need.
- Remember which hole you chose, you will need to select a similar hole on the other spacer.
- We mark the longitudinal axis of the shock absorber and mentally draw an imaginary line through the centers of the holes with which the spacer is attached to the bottom of the shock absorber and the beam. This line must be vertical.
- Observing all of the above, you need to put a spacer on the eyes available in the beam.
- Between these same eyes we place a spacer sleeve.
- We fasten everything with the appropriate bolt.
- Tighten the nut. To do this, you should use a torque wrench. It will allow you to maintain the optimal, in this case, force - about 80 Nm.
- Next, the bolt is also inserted into the shock absorber bushing. Tightens his nut. The recommended force is the same as in the first case - about 80 Nm.
- Next, we proceed to install the pressure regulator. To do this, you need to press on the car trunk with a force of about 45 kgf.
- After this, loosen the pressure regulator bolt connecting it to the regulator drive lever.
- Using a suitable screwdriver, move the lever bracket until the gap between the lever and its spring is about 2.05 mm. Use a wire of suitable thickness to check the distance.
Installation Rules
To properly make spacers for springs with your own hands, you need to take into account some nuances:
- Setting the ground clearance above 30 mm leads to wheel alignment problems.
- It is not recommended to install metal products that have not been pre-treated against corrosion.
- It is recommended to raise the front of the body by no more than 20 mm.
- The rear compartment of the body is raised by no more than 30 mm.
- If the shock absorber is not located next to the spring, spacers should be mounted under the springs and shock absorbers to balance the structure.
Front installation procedure
How to install spacers to increase ground clearance in the front part of the body? To do this, follow the recommendations:
- We lift the car with a jack, remove the tire, disconnect the braking system and the stabilizer link.
- We install other bolts of the required size on the rack (the old ones do not fit in length).
- We fix the spacer to the bolt and assemble the entire structure to its original state.
For greater clarity, you can see the diagram for installing a spacer to increase ground clearance with your own hands in the drawings.
Rear installation procedure:
- We disconnect the thresholds under the loading compartment lid and the rear door area.
- Move back the rear seats.
- We remove the panels and leave one body.
- We remove the wheel.
- We install the bolts according to the example of the front part of the body.
- We assemble the structure in reverse order.
If the word “jack” causes you vague anxiety, and the idea of the location of the bolts seems unclear, watch the procedure for installing a spacer under the springs in the video.
When creating a car, design engineers calculate every millimeter, establishing a certain balance between the parts and assemblies of the vehicle. Any change made to the design of a car in order to improve technical characteristics introduces a certain imbalance into the overall structure.
It is not always possible to increase the cross-country ability of a car designed to drive on asphalt. No matter how hard you try to change or improve the condition of the suspension using various manipulations, you will not be able to improve the design to the condition of an SUV. Either buy an SUV, or resign yourself to driving on city highways.
How much will the ground clearance increase after replacing the wheels and tires?
difference in ground clearance on different wheels Depending on the configuration of cars of the tenth family, wheel rims are installed with a 13th or 14th radius. If you replace the standard wheels of a car with wheels of a larger radius, then no matter how you look at it, the vehicle's ground clearance will increase. As well as replacing tires with higher ones (for example, 175/55 R13 to 175/65 R13).
It is important to know what size of wheels and tires is the maximum permissible for a particular car (data for wheels/tires according to VAZ 2110). I wouldn’t be surprised if, after installing high tires, the wheels start to touch the fender liners.
What is it about
Before you figure out what spacers are to increase ground clearance, you need to figure out what ground clearance is. clearance, in other words ground clearance , is the distance between the lowest point of the car body and the road.
Actually, why does a motorist need to increase the ground clearance? As already mentioned, various situations can lead to the fact that the ground clearance is reduced (damage to springs and fasteners, for example), or the factory one was not high enough. A car is, first and foremost, a means of transportation. A vehicle that sits tightly to the ground will not be able to drive without damaging the underbody. This can have a serious impact and make the car unsuitable for driving, which is why the question arises of increasing the distance to the road. Also, increasing the ground clearance is of interest to people who like to drive off-road.
So, increasing ground clearance is often done using special spacers. This is especially common in the case of subsidence of “native” springs. These spacers are spring mechanisms or additional fasteners. They cope with the task of increasing the clearance very well. Moreover, the procedure for attaching such magnifiers is the most accessible, since they themselves are not expensive - one spacer can be purchased for a price of 1000 rubles .
Air cylinders also cope just as well as spacers . It turns out even cheaper, and a “healthy” car with working springs does not suffer.
However, to decide whether such a modification is necessary, risk factors must also be taken into account. Of course, this idea has plenty of advantages, but it is not without its disadvantages - one way or another, any change in the “native” design always lies on the conscience of the motorist, and no one gives guarantees for its effectiveness. Before deciding to modify to increase ground clearance, weigh the pros and cons.
Pros of this idea
A modification that has only disadvantages usually disappears quickly. The installation of spacers continues to this day. Therefore, there are significant advantages to this.
The advantages of spacers include:
- Increased cross-country ability . It will become easier to drive the car off-road; various bumps and unevenness will be overcome without difficulty. The likelihood that a car driving over hillocks will “sit on its belly” is reduced. In such unpleasant situations, the help of outsiders is usually required.
- Reducing the likelihood of damage . When actively driving off-road or even sharply braking on a flat road with low ground clearance, the percentage of damage is always high; you can accidentally scratch the bottom, damage components: fuel lines, wiring, small parts, etc. There may not be anything “vitally important” located in the lower part of the car, but serious damage can cost the life of your iron friend.
- Preventing "accidental touches" . The car’s bumper or lower body will no longer touch various bushes, curbs and other objects that can be found on uneven terrain.
- Improving the appearance of the car . One way or another, with high ground clearance, even a Soviet passenger car will look more impressive.
- The ability to maintain normativity . There is a certain standard for ground clearance for each brand of car. When it decreases excessively, the vehicle becomes uncontrollable or difficult to control, which is rarely liked by the owners. When installing spacers, it is possible to maintain the standard.
How to raise the rear suspension on a VAZ
- For what
- Let's improve the VAZ 2110
- Other models
- By replacing struts and shock absorbers
- Video
Everyone is familiar with the problem of poor quality road surfaces in our country. In such conditions, many drivers decide to raise the rear suspension of their car, and since the majority of the population in Russia drives VAZ cars, this article will look at how to raise the rear suspension on the VAZ 2110, 2107 and 2115.
For what
The rear of the car can sag a lot.
Reasons to raise the rear suspension:
- Of course, increased cross-country ability. When hitting bumps, the car's wheels hit the wheel arch liners; many people raise the suspension to correct this problem.
- Increased load capacity. If you load something heavy into the car, the springs cannot withstand it and the rear end drops significantly. To avoid this, you need to raise the rear suspension.
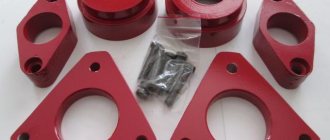
Spacers
To raise the rear suspension of any of the three cars in question, spacers are needed. On the VAZ 2110 and VAZ 2115 they look the same, but on the VAZ 2107 they are slightly different.
It is important to consider that when installing spacers the following changes:
- direction of headlight beams;
- rear brake pressure regulator position;
- castor (the longitudinal inclination angle of the front wheels' turning axis).
Let's improve the VAZ 2110
To raise the rear suspension on a VAZ 2110 you need to:
- Put the car on the handbrake.
- Using a jack, raise the rear of the car so that the wheels are in the air and rotate freely.
- Remove the wheel.
- Unscrew the shock absorber mounting bolt. To do this you will need a key “19”.
- Get the bolt. Perform a similar operation with the opposite shock absorber.
- Take the spacer and determine on which side the distance from the base to the first hole is greater. The side where it is larger should be directed inward. The same spacer can be installed on both the right and left shock absorbers, since these devices are mirror symmetrical.
- Install the spacer so that a line is drawn from the center of its lower hole to the upper hole, which falls into the vertical of the rack. You can install the spacer so that it is not adjustable in height by screwing the shock absorber into a single hole.
- By unfolding the spacer, you can adjust the suspension height by screwing the strut into the upper or lower hole, but the device will then need to be placed on the opposite rear shock absorber.
- When installing a spacer on an eye, it is important to install a bolt spacer so that the mechanism does not break during operation. You don't need to tighten the bolt too much, just make sure it fits snugly and doesn't wobble.
- Install the strut mounting bolt into the holes in the spacer and shock absorber. The height can be adjusted by selecting the top or bottom holes.
- Also install a spacer on the opposite shock absorber.
- Adjust the rear brake pressure regulator by unscrewing its mounting bolt. Next, you need to move the bracket with something until the distance between the lever and the spring becomes 2 millimeters.
- Check the functionality of the brake system. When braking hard at low speed, the rear axle should lock a little later than the front. If the rear wheels brake much later, then you need to reduce the distance from the lever to the mounting spring, and if it is too early, increase it.
Photo instructions
Unscrew the lower mounting bolt
We take out the bolt
We turn the side with a large distance towards the longitudinal axis of the machine
The installation line must coincide with the longitudinal axis of the shock absorber
Regardless of hole selection
Insert spacer and bolt
Insert the bolt into the holes
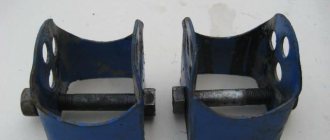
Other models
Spacers for classics
The process of installing spacers on the VAZ 2115 and VAZ 2107 is identical to the VAZ 2110, so there is no point in describing it again. It is only worth noting that the spacers for the rear-wheel drive model look a little different and have only two holes - for the shock absorber and the eye.
By replacing struts and shock absorbers
The method of installing spacers is the most effective and least expensive. The downside of installing this element is that the suspension becomes stiffer. To raise the rear suspension, you can replace the struts and shock absorbers. In this case, the service life of the entire suspension will be extended.
When raising the rear of the car using springs and shock absorbers, it is worth knowing that the height of the suspension does not depend on the strut, but the handling of the car does. To raise the rear suspension of the VAZ, it is worth buying longer springs, but you need to know the limit, since they may not fit into the struts. To prevent the car from sagging due to overload, it is worth installing stiffer springs; they are not always higher than the factory ones. You should not buy the toughest of them, as driving in such a car will turn into a test.
Replacing the springs will help.
You should choose hard shock absorbers, since on the road the car will not tilt from side to side due to the slightest unevenness.
Some people install air suspension on domestic cars, then the ground clearance increases significantly, but the special convenience is that it can be adjusted.
Air suspension of the VAZ 2114
When raising the rear suspension of the VAZ, you should know when to stop, since after all, this is not an SUV and the components of this car are not designed for such a load.
Video
How to install spacers on a classic, see the following video:
Disadvantages of spacers
But, of course, there is a fly in the ointment in this barrel of honey. The question “to put it or not?” would not have arisen if spacers had only advantages.
The following factors may serve as arguments for rejecting this idea:
- , which was provided by the manufacturer, shifts Because of this, some extraneous processes occur during operation, which one day may result in serious problems with the car.
- Stability and maneuverability deteriorate significantly, and control problems appear: problems with turns. This is partly due to the shift in the center of gravity.
- High percentage of incorrect alignment or camber . This leads to inevitably rapid wear of the tires on the wheels and the tires themselves, and sometimes even ensures the death of the car without wheels - it depends only on the “zeal” of the installers. More about wear – the tires will begin to wear unevenly, which often causes the thought “I’ll replace them if they’re completely damaged.” But wear continues precisely at the point of first manifestation.
- Installing spacers is a direct waiver of the warranty on shock absorbers and an agreement to be ready to replace them at any time.
- Reviews from car owners who have undergone this procedure say that after installing the enlargers, the components of the car's chassis wear out significantly .
- There is always the possibility of going overboard . With self-modification, there is a high percentage of cases when the ground clearance is increased too much, the car becomes even more unstable and uncontrollable.
The problem of insufficient clearance
A lot of owners of passenger cars during operation are faced with one problem - the low ground clearance of the car, which is why, when overcoming bumps, the car clings to the bottom until it hangs on its belly. This is especially true in winter.
Moreover, the problem with insufficient ground clearance can arise both with new cars, which are structurally designed with low ground clearance (such cars are popularly called “puzoterki”), and with models with ground clearance that is, in general, quite acceptable, but due to shriveled springs suspension, there was a decrease in it.
And anyway, what driver doesn’t want to bring his car at least a little closer to crossovers and SUVs in cross-country ability.
And the easiest way is to increase the ground clearance.
Ways to increase clearance
There are several methods for increasing ground clearance, but when choosing the optimal one, you should take into account what problem is being solved - increasing the ground clearance to improve cross-country ability or eliminating the consequences of flat springs.
One of the easiest ways to increase ground clearance is to install larger diameter wheels on your car. This solution can really help add a couple of centimeters between the bottom and the road.
But there are many negative aspects here - installing such wheels will be expensive, the clearance will increase, but the distance between the wheel and the arch will decrease, and the load on the suspension and transmission will increase. In general, this method is not the most optimal.
You can increase the stiffness of worn-out springs, thereby reducing body vibrations when driving over uneven surfaces, not only by replacing them (which is also not always cheap), but also by installing elastic elements between the coils of the springs.
Their main task is to resist compression. Previously, ordinary tennis balls were used for these purposes (and now for some, such tuning is quite relevant).
Now you can simply buy special rubber spacers that are installed between the turns. This modification of the suspension only increases the stiffness of the springs and has virtually no effect on ground clearance.
You can also increase ground clearance by completely reworking the chassis and installing an air suspension instead of the usual one. But this is a very expensive option.
Installing spacers is the easiest way to increase both ground clearance and spring stiffness.
There is no need to modify anything in the car suspension, they are inexpensive, or you can make and install them yourself.
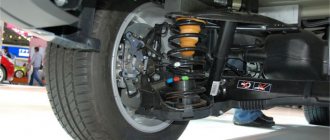
The essence of this method comes down to adding special substrates under the shock absorber struts between the body and the support (increases ground clearance), or between the support and the spring (increases rigidity).
It's simple: the spacer will prevent the shock absorber strut from becoming all the way (resting against the body), as a result the load-bearing part will rise relative to the wheel, thereby increasing the ground clearance.
As for spacers to increase rigidity, after assembling the strut the spring will be in a more compressed state.
Spacers for springs
Spacers are made of high-strength rubber, do not deform and are able to support the weight of the car. They are installed between the spring and the body. If the spring sag, then no spacer will save it, because in such a spring the interturn distance is reduced. Riding on such springs is already becoming dangerous, because the stroke before the coils close is reduced.
It’s a different story when such a spacer is placed on a normal spring and a working body. In this case, it will increase the ground clearance, but at the same time the rebound stroke will decrease and the compression stroke of the shock absorber will increase, which in general is also not very pleasant.
The third case is when the spring is normal, but the ground clearance has decreased due to body aging. In this case, the spacer will not harm the car.
It is worth noting that VAZ did not approve the spacers.
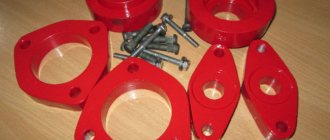
What are spacers made of?
Manufacturers of auto parts and accessories have already noticed that spacers are in demand, so they have already started producing them.
Moreover, different materials are used for their manufacture:
Polyurethane and rubber are elastic materials themselves, so they can compress during use, which allows vibrations to be dampened to a greater extent.
At the same time, polyurethane is very resistant to negative environmental influences, so it can last for a long time.
But the design of such spacers often uses metal bushings in the bolt holes, and this is their disadvantage.
When compressed, these bushings come into contact with the body, and corrosion may appear at the point of contact.
Although rubber is subject to “aging,” such spacers do not contain any metal elements, so they do not have any negative effects on the body.
On a Suzuki Escudo it looks like this:
Aluminum spacers are highly durable, but since they are metal, corrosion may occur at the point of contact with the body.
Plastic is better in this regard. It is also durable, but will not rust. Therefore, rubber and plastic spacers are optimal for installation on cars.
Moreover, it is noted that it is advisable to use spacers made of durable materials on the front suspension, and elastic ones on the rear suspension.
In addition, you cannot increase the ground clearance indefinitely using spacers.
Their thickness should not exceed 3-5 cm; the use of thicker substrates will lead to a significant deterioration in the car's handling.
Installation algorithm
Installing spacers to increase ground clearance (in the case where they will be placed between the strut support and the body) is not difficult, and it can be done independently.
The following is the general sequence of work for their installation. It is suitable for almost any car, but it is worth considering that each model has its own specific nuances.
To install spacers at the front you need to:
- Jack up the wheel and remove it from the car;
- We disconnect the levers and steering tips from the rack;
- Unscrew the nuts securing the strut to the body;
- We lower the rack down and turn it so as to provide access to the upper support;
- We remove the “original” bolts from the support (knock them out), put elongated ones in their place (to prevent the bolts from turning when tightening the nuts, it is better to weld them to the support);
- We put a spacer on the bolts;
- We install the stand in place and secure it with nuts;
- Let's put everything back together.
Then the operation is repeated on the other side. After installing the spacers, the wheel alignment angles must be adjusted.
The underlays are installed on the rear suspension in approximately the same way. That is, we disconnect the rack from the body, change the bolts, install a spacer, and put everything back together.
The only thing is that after assembly work, adjustment of the angles will not be required.
But this describes the installation of spacers on passenger cars, where MacPherson struts are mainly used at the front.
But there are also machines that have a different spring design, which is why the supports are often installed under the springs. This is all shown more clearly below.
Lada Kalina Station wagon "Kalinka" › Logbook › Installing spacers (houses) under the rear pillars
Good day everyone. It's no secret that if you use the Lada Kalina (and any front-wheel drive VAZ) not only to transport yourself, but also to the dacha, bring building materials, etc. The elasticity of the rear springs leaves much to be desired. How it was for me. I planted two guys 120 kg + me 65 kg + 50 l. in the tank and + 30-40 kg of potatoes and that’s it. I drove 280 km on asphalt and the result was that the rear fender liners were worn out on uneven roads (you know what the roads in Russia are like). I put the patches on. I decided to install spacers (houses. How I did it. 1). I took off the wheel. I cleaned everything that I will unscrew from dirt; 2). Unscrewed the lower bolt and nut securing the strut to the beam;
3). I took a pipe, inserted it into a round hole in the beam, pressed it, installed a spacer and screwed it on with a bolt (it comes included); 4). I secured the stand to the spacer with the original bolt and nut;
5). Installed the wheel. 6). On the other hand, we perform all operations in the same way; 6). I finally tightened the bolt and nut that secures the strut to the spacer (it is necessary to tighten it when the suspension is loaded). 7). Adjusted the brake force distributor (“sorcerer”). Place the car on a flat surface and rock the rear of the car several times to begin the adjustment.
After adjusting the regulator, test the brakes in action. Accelerate the car to 40-50 km/h and brake. If the regulator is adjusted correctly, the front wheels will lock first and the rear wheels should lock immediately, but not vice versa.
Adjustment is needed to set the start of braking of the rear wheels relative to the front wheels at different vehicle loads.
Note on installing spacers. The spacers must be installed correctly, otherwise the rack will break and the lower ear of the rack will come off under load. The spacer must be installed so that the lowest (which is attached to the beam) hole has two (in which the greater distance from the lower end faces the inside of the car, and the shorter distance faces the wheel).
The bolts and the construction must be located on the same line.
source
Homemade spacers
Any spacers are structurally simple, so they are not difficult to make. Moreover, this process is quite creative.
Some make them by simply cutting them out of an old tire, others use ebonite, steel, polyurethane and other materials.
Any tools are good for making. At home, a drill, jigsaw, files, etc. may be useful for this.
Those who have the opportunity to use a lathe simply turn them from blanks.
In general, any suitable material can be used for manufacturing, and it can also be processed with different tools and equipment. The only important condition is compliance with the dimensions.
For cutting, you can try to find drawings, and if they are not there, then focus on the dimensions of the components of the suspension (for example, a spacer for a spring is made based on the diameter of the spring itself and its seat).
In general, if you want to make spacers at home, it is quite possible.