02.02.2022 14,647 VAZ Granta
Author: Ivan Baranov
Installing an EUR on a Granta Standard is a common reason for the owners of these cars to contact a car service center. However, with proper skill, you can easily do everything yourself. Read the article about how to install such a system if you have a Lada Granta and whether it’s worth doing it at all.
[Hide]
We install the EUR on Granta Standard. Part III
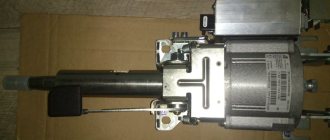
The EUR is installed, now all that remains is to connect it.
To be honest, for me this part turned out to be the most time-consuming due to the fact that it took a long time to find suitable terminals, some were never successful...
Even before inspecting the ECU connectors, we managed to find out from the Internet that AMP connectors with square contacts are more common, so an instrument cluster connector from Kalina was purchased as a donor of contacts for the instrument panel and ECU:
We take out the contact you like with the wire and install it in place of the 20th contact of our tidy connector
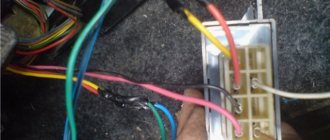
For easy access to the ECU, you need to fold back the upholstery and remove the glove compartment, in the figure below the location of the ECU is marked in red, the OBDII diagnostic connector is marked in yellow (already removed from the seat, it is located behind the plastic lining in the place where the blue arrow points)
If you purchased the necessary contacts for the ECU connector X2 in advance, then simply insert them into the connector and assemble them in the reverse order.
I was unlucky - at the time of installation I could not get them, since I needed round MOLEX contacts, and time was running out, so “be careful, collective farm!”
Since the square shell acts as a tightening body and limiter, it is necessary to replace it with something, and this something should be cylindrical in shape - I settled on PVC insulation of the contact wire, cut two thin rings and put them on the contact, something like this :
We do the same with the second contact.
We assemble the connector and connect it to the ECU. We check the presence of contact just in case - measure the resistance between the new wires and ground, I got 4.98 and 5.83 kOhm, although I don’t remember which one is which)
On the EUR side, we run 3 wires from connector X2 in the corrugation: 2 to the ECU and 1 to the diagnostic connector.
We connect the corrugated wires to the new contacts of the ECU and OBDII connectors, assemble everything, insulate it and lay it down. To check, you need to check the resistance between contacts 2.3 and ground on the EUR connector; it should not differ much from the previously measured 4.98 and 5.83 kOhm.
The second low-current corrugation goes from connector X2 of the EUR towards the fuse block with two wires: a wire for connecting to pin 20 of the device and a wire for connecting + 12V ignition from pin 56 of the fuse block.
The fuse block is fixed with one self-tapping screw - although in a very “fortunate” place
After that, access to the spider's lair opens from electrical tape wires, it's good that the wire to which you need to solder is located quite successfully.
Let's put this horror back together. We solder the device contact, insulate everything and lay it down.
It remains to connect the ground of the signal part of the EUR. According to the diagram, it goes to the S22 twist, which in turn is attached to the body, I couldn’t find this point, so I had to make my own - an M6 bolt was screwed into the side guide of the center console, which will be a “pin” for connecting the signal mass of the EUR.
At this stage, we have installed the EUR and connected all the signal conductors; the next part will talk about connecting the “power”.
Source
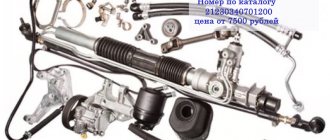
Steering mechanism malfunctions and their elimination
The steering mechanism of the Lada Granta is quite reliable and rarely causes problems for the owner. However, this does not mean that problems do not occur at all. There are problems. And you need to know how to eliminate them.
| Cause of problems | Elimination |
| Large steering wheel play | |
| The fastening nuts on the ball rods have become loose. | The cotter pin may be missing. Tighten the fastening and install a cotter pin if necessary. |
| The clearance in the ball joint rods is too large. | Replacement of steering tips for Lada Granta. |
| The silent blocks of the hinges are worn out. | Replace the rods. |
| There is too much clearance between the rack and nut. | Worn elements must be replaced, and after replacement the mechanism must be adjusted. |
| There is a knocking sound when turning the steering wheel | |
| The tie rod nuts are loose. | Tighten the fastening nuts. |
| There is a large gap between the rack and the nut. | Replace worn elements; after replacement, the mechanism should be adjusted. |
| The steering mount is loose. | Tighten the fastening nuts holding the mechanism. |
| Steering wheel turns too hard | |
| The support bearing of the shock absorber strut is faulty. | Replace the support bearing. |
| The support sleeve is worn, the rack stop is worn. | Worn elements need to be replaced. |
| Tire pressure is too low. | Inflate tires to optimal pressure. |
| Ball joint parts are worn or damaged. | Replace elements. |
| The shock absorber struts or their elements have expired. | Repairing the shock absorber strut or replacing it. |
| The shaft bearings are worn out. | The shaft bearings need to be replaced. |
| The electric power steering is faulty. | Replacement of the EUR together with the shaft. |
Like the braking system, engine operation and other important components and assemblies, the steering system must be periodically inspected for malfunctions. If there are no signs, protective boots and other smaller structural parts must be inspected. The steering rack of the Lada Granta is a key control mechanism. It is thanks to this that the car is controlled by turning the wheel.
Not only the comfort of control, but also the safety of the driver and his passengers depends on the serviceability of the steering mechanism. Unit problems must be diagnosed and corrected in a timely manner.
Basic steering rack faults
The main sign of a breakdown is a knocking sound when turning. At first it is almost invisible and appears when hitting potholes. If you ignore the first symptoms, the noise will not go away and will constantly get worse. Then the knock will be transmitted to the steering wheel. If you ignore this symptom, the rack will simply jam, and this risks getting into an accident due to loss of control. The rack knocks due to wear of the hinges, teeth or rubber-metal bushings (damper).
The following symptoms can also be attributed to steering rack malfunctions.
- The steering wheel turns hard (accompanied by a slight whistle).
- The tight rotation stops as the speed increases.
- With straight steering, there is no gain.
- When turning, the steering wheel does not turn the front wheels properly (the car begins to roll left/right while driving).
- Vibration, beating, grinding; the steering wheel begins to rattle.
- The steering wheel does not return to its original position.
- The steering wheel rotates spontaneously.
There are many reasons for steering rack malfunctions. But these are the most common. If at least one of them occurs, the Lada Granta should go for repairs as soon as possible.
DIY steering rack replacement
For novice motorists, this may seem like an overly complicated procedure. But in reality everything is simpler. The algorithm of actions is as follows.
- Disconnect the battery, loosen the bolts of the front wheels, hang the front on jacks and remove the wheels.
- Inside the car, you need to unscrew the bolt that connects the steering gear terminal to the intermediate shaft. In this case, the steering wheel must be in a straight position (the wheels are strictly straight).
- Disconnect the rods from the swing arms.
- Unscrew the steering mechanism mounting nuts through the gaps in the wheel arches.
- Dismantle the clamp and remove the steering mechanism assembly.
- Next, all anthers and their fastenings are removed.
Now you can install a new steering rack (if you did not use a repair kit). The assembly is assembled in the reverse order. The position of the rack should be adjusted so that the marks on the crankcase coincide with the marks on the protective boot. The last operation when replacing a unit is to adjust the front wheel alignment.
If the rack has been repaired, all parts are generously lubricated with special lubricant (lack of lubrication shortens the service life of the steering rack).
In most cases, the cause of rack failure is motorists ignoring to inspect the car for faults. A thorough diagnosis of all components and assemblies is carried out at least once a year.
Frequently asked questions about EUR
Hi all. I decided to write a publication in the logbook, in which I will try to answer frequently asked questions, namely: 1. What kind of ESD are there and what cars are installed on them. 2. Why the EUR fails. 3. Which EUR is most reliable. 4. What you need to pay attention to when purchasing an EUR. 5. How to choose from whom to buy EUR on Avito.
This publication will concern EURs installed on VAZ cars. So, let's go:
EUR
— electric power steering, designed to reduce the control force applied to the steering wheel.
1. What kind of ESD are there?
1.1 EURs manufactured by Aviagregat, Makhachkala, were installed on the Kalina car. These EURs have been installed on Kalina cars since 2006. EUR data has never been installed on Prioras. The design of the EUR is geared. Kalina was also equipped with EUR manufactured by Avtoelektronika, Kaluga.
1.2 The grant car was equipped with EUR manufactured by Mando Korea. These ESD data were installed on Grant cars from 2012 to 2014. Fragile body. In the event of an accident, the EUR housing breaks. The design of the EUR is geared. EURs manufactured by Avtoelektronika, Kaluga were also installed on Granta and are still installed to this day.
1.3 EURs manufactured only by Avtoelektronika, Kaluga, have been installed on Priora cars since 2007. From 2007 to 2008 version 646 was installed In 2009 version 660 was installed From 2010 to 2011 version 670 was installed (the most reliable version) In 2011 version 702 was installed In 2012 version 10301 was installed And so on
2 Why does the EUR fail?
2.1 Unstable power supply to the unit. Most of the clients who come for EUR repairs have faulty car generators. The problem is standard and familiar to everyone; over time, the generator wears out and begins to produce a low voltage level under load. Remember, if the generator is faulty, the first thing that fails is the EUR. If your light bulbs or fuses are constantly on, then you need to first check the generator, and not change the burnt out element and scold the manufacturer. It is necessary to eliminate the cause, not the effect. Your diode bridge or relay regulator may be faulty. There may be a problem in the wiring (Bad or damaged ground wire of the battery - Housing, Housing - EUR). The 50A fuse, located in the fuse box next to the battery, may have burned out. You can check the wiring with a multimeter. Turn on the low beams and the heater at full power. We measure the voltage at the output of the generator, the voltage should be no lower than 13.8 volts, otherwise it’s time to check your generator when it’s cold and when it’s hot, not lower than 13.4 V. We check the voltage drop on the wires and 2 fuses (60A) as follows: One probe We place the multimeter on the output of the generator, the second one on the + terminal of the battery. Look at the voltage drop. The voltage drop should not be more than 200 mV (0.200 V). It’s the same with the mass, only we take measurements between the generator housing and the car body. The voltage drop should not be more than 50 mV. (0.05 V). All figures are taken from personal experience and are not supported by tabular values. If the voltage drop is greater than that indicated above, look for the cause or add dubbing. 2.2 Power consumers are connected incorrectly. Are you a loud music lover? Then this section is for you. To connect powerful consumers, you need to correctly calculate the load current and the current that your generator can provide. If the current consumption exceeds the current supplied by the generator, then you will always have “light music” in your car. As a result, the battery and, as a result, the EUR will suffer. Installation of wires should be done on terminals and with brake shrinkage, and not with electrical tape and twists. When installing non-standard electrical equipment, it is necessary to study the theory and only then move on to practice. Unfortunately, most often the opposite happens. This applies not only to music, but to any powerful consumer, for example, heated windshield. 2.3 Incorrect operation of the ESD. Often during operation, people using the ESD do not even know that it is impossible to hold the ESD in extreme positions! Having twisted the EUR to its extreme position, the driver continues to press the steering wheel further, tries with all his might to spin the wheels, but they have already reached the extreme position of the steering rack, but the EUR does not know about this. The EUR does not have the concept of “extreme position”. If the driver continues to press on the steering wheel, it means the wheels need to be turned more. At this moment, the current on the power transistors of the EUR increases significantly. Which in turn leads to overheating of the transistors and failure of the control unit. 2.4 Steering problems. The rack began to knock and the owner of the car, without thinking about the consequences, took and tightened the rack. The noise seems to have become quieter, or maybe disappeared altogether, but the load on the power steering has increased. As a result of overheating of the transistors in the EUR control unit, a failure occurs and the owner of the car begins to swear, then the rack, then the EUR... “not a car, but junk.” With a working steering system, the steering shaft force should be no more than 20 N*m. The power supply current consumption is within 15 A.
Friends, sometimes the failure of your EUR is you yourself, but a person by nature is ready to blame himself on anything, but not on himself.
3. Which EUR is most reliable.
In my opinion, the most reliable EUR Priora is version 670. It’s a pity that it was produced only from 10 to 11. By the way, 11 years old already come across with 0204 transistors, which is not very good. Why 670? 1. Non-contact torque sensor from Valeo. Increases reliability many times over 646 and 660. (Photo of Valeo sensor) 2. Very reliable transistor bridge from IXYS. Increases reliability many times over 702 or 10301 and newer versions. (Photo of transistors) 3. All-milled aluminum case, which is a very good heatsink for power transistors. Compared to the blocks of the new sample, they cannot be compared. (Photo of buildings)
Which EURs, in my opinion, are the weakest: 646 and 660. (photo of control units) The year of their release was 2007-2009. Their torque sensor is of contact type. And over the years of operation, they have exhausted their entire resource. The tracks on the sliding contacts are frayed. As a result, the signal from the torque sensor is either there or not. Such work of the DM leads to the fact that the steering wheel begins to twitch on its own. I do not recommend buying EUR versions 646 and 660. I would not recommend installing 646 or 660 EUR on cars like Gazelle, Niva or UAZ, these EURs are very “delicate”, they will suit the maximum front-wheel drive VAZ and classics.
My advice to you: If you are going to buy an EUR, then under no circumstances do not take the 660 and especially the 646 EUR. These models have already exhausted their entire service life and are complete rubbish, it’s like buying yourself a washing machine that’s 13 years old. It wouldn’t even occur to you, would it?
Source
Premiere of the Lada Granta Liftback
N
Russian factories often delight us with premieres,
so let's go to Udmurtia to see the Lada Granta Liftback, which is assembled at the IzhAvto plant. The Lada Granta Liftback is offered with three power units: the first is a 1.6-liter eight-valve four-cylinder petrol engine with an output of 87 hp.
, aggregated with a five-speed manual transmission, the second is a “Prior” 16-valve 1.6-liter engine with a capacity of 98 hp, which is offered only with a Jatco four-speed automatic transmission, and the third is the same 1.6-liter engine from Priora, but modernized, which produces 106 hp.
— it can only be combined with a five-speed manual transmission. All engines are supplied with a lightweight connecting rod and piston group with a graphitized piston skirt, which eliminates rubbing during cold starts.
All liftbacks produced in Izhevsk are equipped with a Kaluga electric power steering, which differs significantly from the Korean Mando electric power steering - it is more compact and more efficient, because the rotor on the Kaluga electric power steering is mounted directly on the steering shaft.
One of the car's signature advantages is its high ground clearance - an honest 180 mm, which decreases to 165 mm under load. All cars are currently offered in five colors with outlandish names: red "Magma", "White Cloud", dark blue "Odyssey", silver with light sandy shades of Riesling and Black Truffle. Truffle will surely become the favorite color of Moscow Spartak.
Equipment "Standard-21911-40-710
The basic version of the liftback with an 8-valve engine, comes with a manual gearbox with a VAZ-2181 cable drive, a driver's airbag, unpainted side mirrors and door handles, an instrument cluster without an on-board computer, ISOFIX child seat mounts, headlights with DRLs, an immobilizer, one-piece a rear seat back without head restraints, a headliner without handrails, a non-power steering with a gear speed of 4.02, a tilt-adjustable steering column, a central locking system, a single key for the ignition and doors, audio equipment and stamped rims. Such a car costs 314,000 rubles.
Equipment “Norma”0)
The car with the same engine is distinguished by the presence of a modernized VAZ-2180 cable gearbox with a reinforced secondary shaft package, a separate rear seat backrest with headrests, silver edging on the door handrails and all air ducts on the front panel, ABS+BAS, instrument cluster with on-board computer functions, steering gear with ESD and a “short” rack 3.10, ceiling handrails, an air filter entering the cabin, glass with an overtinted athermal effect, power windows for the front doors, trunk opening buttons in the cabin. For such a Lada you will have to pay 346,100 rubles. In addition to all of the above, the “Norma” version with a 106-horsepower engine (21917-41-710) has an Itelma multimedia system with 4 speakers, Bluetooth, a USB input and a slot for SD cards - this Granta Liftback will cost 367,600 rubles.
"Lux" package 0)
The next stage already has a 106-horsepower engine.
This car sports an upgraded suspension, a passenger airbag, front seat belt pretensioners, LED turn signals, fog lights, an ignition key with a remote control (doors and trunk), an alarm system, an extended sound insulation package, an eyeglass holder on the ceiling, and height-adjustable front seat belts. , heated front seats, power windows in the rear doors, climate control system SAUKU with a function to maintain a set temperature and 15-inch alloy wheels. The price of the car in this version is already 419,500 rubles.
The most “luxury” version stands apart
0) with a 98-horsepower engine and a 4-speed automatic transmission. To all of the above, ESC stability control system, rear parking sensors, rain and light sensors are added. This Lada already costs 477,500 rubles, although it is not possible to find a car on the market with this level of equipment for the same money.
Source https://auto.mail.ru/article/47552-lada_granta_liftback_normalnaya_mashina/
Source: https://pantv.livejournal.com/282804.html
Installing EUR on Granta fl
Good afternoon! Over the weekend I installed an electric booster on my Grant fl. I spent 2 full days on this (yes, I’m not a professional mechanic and not even an amateur, without a garage or tools, just purchasing as needed). In general, everything on the drive is described quite informatively about the installation (Aclii has 4 parts drive2-ru.turbopages.org/…d-8080-BAL-4088&trbsrc=wb), so there is no point in telling the whole process, I can only describe some impressions about the fact that it is scary to insert into the ECU sockets (wiring for reading the tachometer and speedometer) without normal pins (the wiring will/will not be scuffed, it will/will not close against adjacent contacts