Self-discharge and leakage currents
When a rechargeable lithium battery is used as a storage component for indoor energy harvesting, the battery leakage current cannot be ignored, especially in ultra-low power applications. It is generally believed that the leakage current in a lithium battery is in the small µA range.
An experimental method for measuring it is proposed by applying a µA charge to a stabilized battery with post-charging to observe the change in voltage at the terminals. When the applied charging current is greater than the leakage current, a positive sign (increase in terminal voltage) may be observed. Otherwise – negative. By gradually changing the charging current, using a search algorithm in successive approximation, the leakage current will finally converge with the applied charging current.
Convergence occurs after changing sign in two successive search procedures, demonstrating that charging currents approach the leakage current in both directions. The approximation accuracy can be improved by adjusting the number of sign changes in the successive approximation search algorithm. The proposed method allows the full capacity of a rechargeable lithium battery to be used with ultra-low power consumption.
Design and types of batteries
The rapid development of technology has also affected the field of car batteries. Gone are the days when only serviceable antimony batteries were available. Today, if a battery needs to be replaced, drivers have plenty to choose from:
- Lead-acid power supplies. The classic type of battery, consisting of a housing in which lead electrodes are installed and electrochemical fluid is filled. The electrolyte reacts with the electrodes when current is supplied to the terminals from an external power source and when a load is connected. The average service life of this type of battery is about 5 years.
- AGM batteries are an improved version of lead-acid batteries. The main difference is the presence of fiberglass wrapping of the electrodes, which prevents them from falling off. They are manufactured using maintenance-free technology and are installed mainly in electric vehicles.
- Gel batteries use a jelly-like electrolyte instead of a liquid electrolyte, which has an order of magnitude less fluidity. This allows you to operate the battery in an inclined position, up to vertical, without the risk of electrolytic fluid leaking.
- Traction batteries differ from the listed analogues in their greater power (currents up to 1000 A and voltage up to 96 V), which allows them to be used as a long-term power source for vehicles.
Safety precautions when removing the battery from a car
The first thing an inexperienced car enthusiast needs to do is find the battery under the hood.
This is a fairly large box with two metal connectors, one of which is most likely covered by a plastic cover. Be sure to turn off the engine before starting work. Check for battery leakage. To protect yourself from sulfuric acid, always wear safety glasses and rubber gloves. If you notice signs of severe leakage and corrosion, it would be wise to contact a professional. Important!
It's connected to the body of the car, and if you take the positive lead out first and accidentally touch any metal part, you'll short out the battery (not to mention a shower of sparks).
Proceed to disconnect the cables. This must be done with caution, otherwise you may be in for an unpleasant “surprise”. There are two cables: positive and negative. Always remove the negative one first.
With the negative cable disconnected, go to the positive cable. As a rule, it is usually red, and negative is black. However, it is better to check the battery label to be on the safe side. Now you can remove the battery from its place. Keep in mind that the battery is quite heavy. If you are installing a new one, then you should take the old one to an authorized recycling center. However, if you're just planning on recharging, you can take the opportunity to clean the terminals with a wire brush. Do the same with the cables.
Now it's time to put the new battery or the old, recharged one back into place.
A good finishing touch would be to apply a special lubricant to the terminals to prevent further corrosion. Now you need to start the engine to make sure everything is in order.
Attention! You will have to connect everything in reverse order: after placing the battery in place and securing it, connect the positive cable first, and then the negative.
What are the consequences of incorrect terminal removal sequence?
As noted earlier, violating the order of removing the terminals from the battery can lead to a short circuit. In this case, not only the operation of all electronics of the car may be disrupted, but the vehicle may also catch fire. In addition, the person disconnecting the terminals can be seriously injured in this case.
Therefore, in order to avoid tragedy, you must not only know how to properly remove the terminals from the battery, but also always strictly adhere to the established procedure.
Avoiding short circuits
However, it is believed that you should always disconnect the positive terminal of the battery first to prevent electricity from leaking from the battery. Let's consider a case from life. This is the story of what happened to a professional dentist who sometimes likes to fix his sports car himself. He decided to remove the battery from the car using a socket wrench to loosen its clamps. The key came into contact with the man's wedding ring, and the ring, in turn, touched the battery clamp. A massive short welded the ring to the clamp and wrench, which in turn was welded to the positive terminal.
Car batteries store enormous amounts of energy and are optimized to deliver it in a very short period of time. A shorted battery can easily produce several hundred amps—more than an arc welder. Within a second, the wedding ring became almost red-hot, and only the quick reaction of his other hand to break the connection by pressing the wrench prevented the ring from starting to melt right on his finger. The jewelry was cut from the finger in the emergency room and it took more than a month before the hapless motorist was sure he wouldn't lose his finger.
Result:
- When working with tools, remove all jewelry.
- Always disconnect the battery ground clamp before loosening the positive one. If you remove the negative and inadvertently complete a ground fault, no current will flow because the terminal is already grounded. Subsequently shorting the positive terminal to ground will not cause current to flow, since the current has no path back to the negative terminal.
- Connect the ground last.
If the terminals are oxidized
Oxidation at the terminal terminals occurs:
- due to a leaky battery case;
- due to a faulty generator giving overcharge.
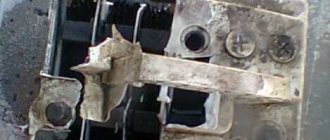
The oxide forms in the form of a whitish coating, similar to salt, which indicates that it is urgent to take some measures to eliminate this defect. If plaque has accumulated on the battery terminals, it will not be easy to remove the wires from them, and before unscrewing the nuts and bolts, you must first remove the formed oxide.
The easiest way to clean the battery from plaque is with a baking soda solution; it must be applied to the oxidized surface and wait for a while. After the build-up has dissolved, its remnants will need to be thoroughly removed using a clean rag, and only then can you begin to remove the wires.
We recommend: Replacing rings and valve stem seals: instructions with photos and videos
Another important point is that oxidized deposits accumulate on the inner surface of the battery cable terminals. It must be cleaned, otherwise contact is lost, the engine starts with problems, and the wires get hot.
You can clean oxidized areas using:
- sandpaper;
- WD-40;
- ordinary water and rags.
By the way, with a cloth moistened with water, the plaque can be cleaned effectively; you just need to spare the liquid and repeat the action several times. On the contrary, it is better not to use a metal brush - deep scratches form on soft metal, in which dirt accumulates, causing contact to deteriorate.
Procedure for removing the battery from the car
No matter how well you treat your vehicle, car batteries still wear out every few years and require replacement. This is just one of the regular maintenance items that car owners deal with. Luckily, installing a new battery is a simple job that we recommend doing it yourself.
How to disconnect a car battery and install a new one:
- Determine the location of your car's battery; you can use the car's manual to do this. In modern cars, all important parts are located under the hood. But sometimes the batteries can be in the trunk, under the hardwood floors, or even hidden out of sight under the wheel well.
- Identify the positive and negative terminals and the corresponding cables attached to each. The positive post may have a red plastic cover and the cable connected to it is also red. There should also be a “+” symbol next to a positive post.
- Use a wrench to loosen the nut or bolt that secures the negative terminal and cable to the similar terminal of the battery.
- Once you have loosened the bolt, first use a terminal puller to remove the cable and terminal from the negative terminal of the battery. Do the same with the positive terminal.
- Remove the clamp or holding system holding the battery in place and move parts and fasteners out of the way to avoid spills or misplacement.
- Carefully lift the battery (be prepared for it to be heavy). If the stands are located on top of the battery rather than on the side, you can use a carrying strap.
Attention! Be careful not to allow metal objects to come into contact with both poles of the battery at the same time, and do not allow the key to touch the positive terminal and the housing or fender at the same time.
Sequence of actions when connecting the battery
When installing the battery, you need to pay attention to the positive and negative contacts so as not to install the battery the other way around, plus to minus. Those car enthusiasts who do not see the difference in which terminal to put on the battery first can cause damage to their car.
Which terminal should be put on the battery first?
The positive terminal is put on first.
Install the battery in the following order:
- install and secure the battery in its proper place in the car;
- put the positive terminal on the corresponding contact, the order of connecting the battery terminals is in reverse order;
- tighten the fastening nut using a number 10 wrench or a wing nut;
- then put on the negative terminal and tighten the nut.
Instructions for further actions
After installing the battery, you need to check the operation of the on-board electronics. When the battery is removed, all parameters are automatically reset. The problem arises that if the battery is correctly removed and reinstalled, the vehicle will not function.
To configure these systems, many years of experience of motorists suggests the following steps:
- when starting the engine, bring it to normal temperature;
- turn off the engine;
- disconnect the negative contact, after 5 minutes return it to its place;
- do the same with the positive terminal;
- start the engine for 15 minutes, during which time the computer will restore all data;
- after turning it off, all information will be saved;
- to check, start the engine again in the tested mode;
- turn off the ignition, after a few minutes the system will record all parameters.
In order for the car to always be on the move, you need to know the reasons for battery discharge, how to remove the terminals from the battery, which terminal should be removed first from the battery, and in what sequence to connect the battery terminals. Carrying out battery diagnostics will help avoid car breakdowns. With proper maintenance, the battery will last for more than one year.
Putting the battery back into the car
Step-by-step instruction:
- Inspect the terminals attached to the ends of the battery cables to make sure they are clean and free of corrosion. If not, clean them up using a terminal cleaning tool. There is a special tool on sale that fits onto a stand, with another brush that is inserted into the clamp. In its absence, a sturdy wire brush can do the job. The cleaner the clamps, the better the connection.
- Try on the battery so that the red positive terminal matches the positive terminal and cable location.
- Reinsert the battery. Secure it with the clip or retaining system you removed earlier.
- Remove the plastic covers that cover the battery terminals and install anti-corrosion washers on them.
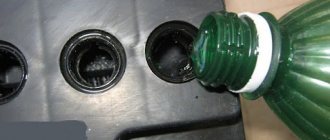
- Apply a thin layer of grease to the terminals before connecting the positive terminal for the first time. A special anti-corrosion lubricant can be purchased to prevent the formation of fluffy greenish-white corrosion that can actually prevent the battery from charging. As a last resort, use regular Vaseline. Using a wrench, tighten the connector until it stops. Then repeat the same steps for the negative post and terminal.
- Try rocking the battery slightly. If it moves, tighten the clamp or retaining system. You have finished installing your car battery.
Battery care
Proper care and operation will extend the life of the battery.
To maintain the battery, you need to wipe its case with a dry, clean cloth to remove moisture and remove dirt and dust from the ventilation holes. If the battery is serviceable, then regularly measure the electrolyte level and its density. Monitor the condition of the contacts, clean the terminals and treat them with a special anti-corrosion compound. The installation sequence is very important when installing a battery. The main thing is to remember that you must connect the plus first, and then the minus. If everything is done correctly and the on-board computer is configured, then you can count on trouble-free operation of the car. We also recommend that you familiarize yourself with the design of the transformer.
Is it possible to disconnect one battery terminal when storing a car for a long time?
This is possible, but first you need to disconnect the battery and take care of safety equipment, otherwise the key will be instantly welded to the battery. It is advisable that such operations be performed by a specialist at a service station, otherwise you will have to change the battery, which is time-consuming and expensive.
The fact is that when the minus is removed, residual currents will circulate inside the system, which will not allow normal operation of the unit. If you remove the positive, a short circuit may occur, which will not have the best effect on the further operation of the battery. The best solution would be to remove both terminals at once or disconnect the battery from the power source directly. The other options are too risky to sacrifice such an expensive part of the car.
Recycling an old car battery
Failed units are not installed in the car. They must be disposed of because toxic and harmful materials were used for their preparation.
Full or partial disposal is carried out by special organizations. They operate according to a proven scheme:
- Draining and neutralization of spent electrolyte.
- Crushing the body on special machines.
- Removing debris and metal residues from the lead-acid mixture.
- Lead separation and purification.
- Re-preparation of purified lead products.
Remove the terminal to clear the error
When removing the terminal, another error may occur, which will create even more problems. There are safer ways to reset without further hassle. You can remove one terminal (plus) to cause a short circuit. If the battery is new, most likely nothing will happen. But this method is still not recommended, since in the event of a breakdown there will be nothing to reset.
If it is possible to discharge the battery to zero, it is better to do so, and then sort it out at a service center.
What tools are needed
To remove and install terminals on the battery terminals, you need a 10x12 open-end wrench. Additionally, you may need a flat-head screwdriver and a wrench to remove the battery mounting bracket in the compartment. Manufacturers often use wing nuts, but regular nuts are also available.
Instead of a simple open-end wrench, it is more convenient to use a thin head or a tubular wrench. It is advisable to have an adapter with a cardan and a wrench with a ratchet under the head. You can buy a wrench with a ratchet and a swivel head. This tool is useful not only for installing terminals, but also for accessing nuts in narrow places.
In addition to tools, you will need some materials: conductive grease, rags, cushioning material.
Restoring vehicle on-board settings
The algorithm of actions depends on the make of the car and the model of on-board equipment. Let's look at the example of several vehicles. Resetting the computer Mazda Familia, Mazda 626, Mazda 323, Mazda Protege:
- Stop the engine. Remove the negative terminal from the battery.
- Get into the car and press the brake pedal.
- Hold for at least 20 seconds.
- Replace the battery terminal.
- After resetting the computer, you need to perform training, especially if the car has an automatic transmission.
When repairing and removing yourself, you need to follow safety precautions and remember the algorithm for correctly disconnecting the terminal. Main rules:
- use protective equipment;
- thoroughly study the instructions and specifications for the car;
- Disconnect the positive (+) terminal first;
- Do not use terminal removal to reset settings on the equipment.
If you have no experience in this matter, it is better to enlist the help of specialists, since purchasing and installing a battery is a difficult task.
Which terminal to remove from the battery first: sequence of actions
Despite the difference of opinions, information on the correct removal of terminals is in the public domain and in every car manual. The sequence of actions is simple, and if it is not followed, you can burn all the electrical equipment by accidentally leaving the key in the ignition inside the car with the doors locked, etc.
Step 1. First of all, you need to de-energize the on-board network devices:
- music Center;
- headlights;
- dimensions;
- running lights;
- lighting fixtures in the cabin and trunk.
Step 2. After checking, turn off the ignition, remove the key and be sure to take it with you. If the key ends up inside the car when it is locked, the situation will become much more complicated. This happens because the car's security system recognizes removing the terminals as a tamper.
Step 3. We begin to directly remove the terminal. When asked which terminal to remove first, experts advise starting with the negative terminal for maximum charge preservation.
Here we follow the algorithm very carefully:
- Loosen the negative terminal.
- Remove it, move it to the side, locking it in the removed position.
- After this, you can remove the second terminal. There is no need to completely unscrew the fasteners, just loosen them and carefully remove them.
Note! If the terminal is oxidized, it can be cleaned with a brush and WD-40. Under no circumstances try to forcefully remove the terminal - this may damage the contacts. It’s better to wait until she “gets dirty” herself.
Battery: practical advice
A battery is a complex device. Externally, the battery looks like a complete monolithic equipment, reliably protected from various negative factors, but in fact it is a fragile device containing many parts. Shocks, shocks and falls can damage the battery, so it requires careful handling.
Dismantling the battery must be carried out taking into account all safety rules:
- Any work on the battery is permitted only with the engine turned off. Otherwise, the vehicle's electronics may be damaged. When the engine is running, the generator is started, producing electricity. Removing the battery in this case will lead to a sharp increase in voltage in the on-board network, which can cause breakdowns of electrical appliances and even a fire.
- Standard batteries generate several hundred amperes. Under no circumstances should you check the remaining charge by touching the terminals with metal objects. The charge is enough to damage the instrument and harm your health.
- Monitor your alarm settings. Before dismantling the battery, it is recommended that you read the alarm manual. Many systems immediately block the doors when the car is de-energized.
- In some car brands, the airbag system is active for another 3–5 minutes, so it is recommended to remove the battery after this time.
- It is recommended to carry out work outdoors or in a well-ventilated area, which will help reduce the negative impact of fumes and the danger from toxic substances.
- To charge the battery, it is not necessary to remove it from the car. Portable chargers have been developed for this purpose. The portable charger is capable of starting a car with “crocodiles” when the battery is completely dead.
- Electrolyte should be drained from cans only in specially prepared places, since it contains more than 30% sulfuric acid.
- In winter, a discharged battery should never be left in the cold. It can simply freeze, which in half the cases leads to sedimentation of the active mass.
If you are a novice car enthusiast who is not yet very versed in the mechanisms and on-board system of the car, then it is better to entrust the removal and maintenance of the battery to professionals. Most modern brands have complex electrical systems, and the risk of damaging electrical appliances if the battery is removed incorrectly is very high.