The cabin filter is one of the components of the car cleaning system. The main function is to purify the air that comes from the street from dust, gases, and soot. The level of comfort of the driver and passengers during the trip will depend on the timely replacement of the cabin filter. Let us consider in detail the features of this process for a Mazda 3 car.
Carrying out the work yourself will save time and money required to contact a car service. Using the video and text manual, where the filter consumables are removed and replaced with new ones, almost every car enthusiast will be able to cope with this task.
When to replace: signs of wear
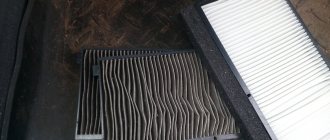
Filter elements are consumables that require regular replacement. If you begin to notice that during the trip the air in the cabin becomes more humid, the windows regularly fog up and unpleasant air appears, then the cleaning system is not functioning fully.
Important. Experts advise purchasing new consumables for the filter every 10,000 kilometers. The Mazda 3 cabin filter, both new models (manufactured in 2011) and those released three years earlier, will have to be replaced more often than once every six months if motorists drive frequently :
- in villages;
- on highways in disrepair;
- in areas with poor environmental conditions.
How to choose a cabin filter for Mazda 3
Before you begin replacing this consumable, you first need to purchase it.
It is recommended to install original consumables on Mazda 3.
But there are many companies that produce these elements for this car, some of which are branded, for example, Mann, Knecht, Bosch, Japan Parts. In general, there are enough manufacturers, so the choice of manufacturer is a matter of taste.
It is important to take into account that on first-generation cars, these consumables are slightly different in size than those installed on Mazda 3 of the second and third generations, so this fact also needs to be taken into account when purchasing.
Replacement sequence for the first generation Mazda 3
So, the filter has been purchased, all that remains is to replace it. First, let's figure out how to change the filter on the first generation Mazda 3.
How to replace
The replacement process can be roughly divided into five stages. You must first disconnect the battery terminals. Then remove the decorative panels and glove compartment of the Mazda 3. Next, dismantle the fuse box, open the compartment with the filter elements, remove them and install new ones.
More details about how to change the cabin filter are described in the section of the article with a detailed manual.
TOP 6 reasons why the clutch “burns” |
The concept of “clutch” is familiar to almost every driver: there are those who like the feeling of control over the car, there are those who are financially unable to drive cars with an automatic transmission. The first category can also include a separate caste of people who love, appreciate and overcome harsh off-road conditions exclusively through classic solutions: with three pedals under their feet and more than one gearshift lever at hand
But for both of them, the health of the clutch assembly is as important as life - without it, it’s not that you won’t go far... you just won’t go
The modern automobile industry offers two main clutch designs: hydraulic and a simpler mechanical cable clutch. The difference between the two schemes is minimal: in the first case, the driver is “helped” to depress the clutch by the hydraulic clutch master cylinder, in the second there is none and the force from the pedal is essentially “directly” transmitted mechanically further - to a dense assembly of forks, levers, drive and driven disks . The design differences between a simple cable and a hydraulic cylinder also have differences in the handling of the pedal: the first essentially uses the entire range of motion of the drive pressure shaft, and the second has only two operating modes: the clutch works (closed) and does not work (open).
Modern cars, of course, also have a completely electric clutch circuit without a direct physical connection between the pedal and the final clutch disc - but apart from the slightly differently “designed” power transmission unit, the circuit does not change further.
So, we present the TOP 6 bad tips on how to “kill” the clutch as quickly as possible.
The clutch assembly itself is quite simple and reliable. If you follow fairly simple rules, which everyone is told about or shown in driving school.
Life is a race, push it to the fullest!
Starting as quickly as possible is the first way to “kill” the clutch as quickly as possible. The correct way would be a simple (and boring) smooth start with a smooth release of the clutch. It is also better not to touch the gas pedal at the start unless necessary - increased engine speed at the moment the clutch closes will not have the most positive effect on the latter.
Keep the pedal half-pressed
The reason why the clutch suffers at this point is the so-called “heavy foot”: the driver does not remove his foot from the pedal, pressing it lightly (i.e., in fact using the pedal in the format of a footrest). And even a small angle of deflection activates the drive and relieves the pressure of the disk on the flywheel. The result is slippage, reduction in the life of the unit, overheating.
Skid more often!
This point is relevant for winter with snow or off-road rides. If you find yourself in a snow/mud/sand (and other) trap, first confidently try to get out with the help of the car - but if a characteristic smell and heat has risen from under the bottom, it’s time to look for alternative ways to continue moving.
Release the clutch downhill, save fuel!
The last statement was once not such bad advice - when the grass was greener, the trees were very small, and the engines had carburetors. In modern cars, there can be only three reasons to touch the third pedal: changing gears, starting and stopping. And we are no longer talking about saving.
And we'll drive with the handbrake!
If the handbrake is no longer great, then in principle you can even drive on it. Needless to say, even in this state, the load on all components and assemblies increases many times over? The same applies to situations when the handbrake lever is not fully lowered.
... and take the house with you...
A motorhome, a heavy trailer or just another car is a large load, which is not included in the calculations by the manufacturers themselves. We are talking not only about straight-line movement, but also about the process of more “heavy” starting
What if it’s also uphill? Of course, help on the road is a very important matter, but it is also important to remember the golden rule: everything is good in moderation
What's the verdict? For “difficult” drivers, the clutch can fail within a ridiculous few thousand kilometers, but experienced drivers can confidently travel an impressive 200 thousand with the same mechanism. Choose who to look up to.
crossovery.info
Choosing a new cabin filter
Before purchasing, be sure to consider a few factors:
- the desired degree of air purification;
- quality of consumables;
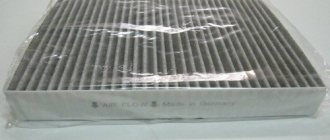
- compatibility with the technical equipment of the car (original consumables marked BP4K-61-J6X-9A are best suited, but installation of analogues is also allowed).
Important. Carbon filter elements will help cope with foreign odors (city air pollution, highway dust). An increased level of protection will be provided by antibacterial coating of filters. Choosing products in branded showrooms, as well as from official dealers, will eliminate the risk of purchasing a counterfeit.
note
An unpleasant smell in the cabin while driving or parking may be a signal to replace the filter element and the need for additional treatment of the evaporator of the air conditioning system.
The evaporator, necessary to reduce air humidity levels, is constantly exposed to moisture. Treatment with antibacterial agents will prevent the appearance of painful microflora, thereby protecting people and pets traveling in the car.
Automotive giants today produce cars equipped with ECU systems. These electronic control units using sensors...
When choosing a car, the future owner quite reasonably analyzes all the information relating to the vehicle of interest. Today thanks to...
Mazda MPV is a Japanese-made car designed for 7 seats. In some Asian countries, the model...
source
Step-by-step instructions for replacing the filter
- Battery disconnection.
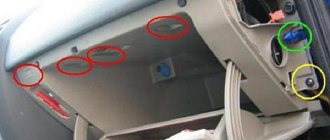
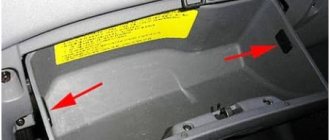
- Removing the decorative board near the glove compartment. As mentioned above, the cabin filter is located behind the glove compartment. In order to remove it, you need to unscrew the screws located under the decorative panel. Remove it using a thin screwdriver, after sliding it to the left.
- Removing the glove compartment.
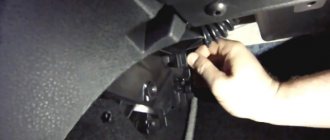
- Unscrewing the screw under the glove compartment that holds the plug.
- Removing decorative panels. To do this, you will need a thin screwdriver or knife to pry off the cap of the plug (it holds the panels in place).
- Move down the next panel (located under the glove compartment) by pressing the clips.
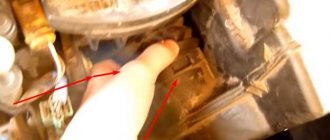
- Removing fuse blocks. We unscrew the two screws (but do not remove them, but leave them in the block) and the plugs. We move the block itself to the side.
- Unscrewing the screws that secure the cabin filter housing.
- Disconnecting the electrical control plug (located in the filter housing).
- Opening the cabin filter housing compartment.
- Removing elements of the cleaning system that have become unusable.
- Cleaning the compartment cavity.
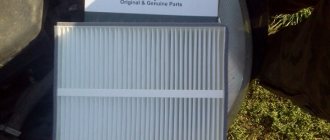
- Placement of new consumables in the compartment. Their service life and wear resistance can be increased by wrapping them with foam rubber.
- Perform the previous steps in reverse order.
Using the instructions for performing the work, you can replace the consumables of the Mazda 3 air purification system with your own hands, without contacting a car service.
Video of installing a cabin filter on a Mazda 3
We bring to your attention video material that clearly demonstrates each stage of the work.
Note:
When installing, make sure that the filters are positioned correctly among each other: the arrows on the element bodies should be opposite each other and directed backwards. The protrusion of the lower part of the filter should fit into the groove of the upper part.
It is very important to insert new elements into the housing correctly and evenly. There are guides on the far wall of the filter housing. When inserting the first element, you need to get into the guides on the far wall and into the guides on the near wall. Then lift the filter up. After this, install the lower element.
Location of grooves in the filter box
23. Reassemble the structure in reverse order.
Symptoms of clutch malfunctions
As we have already noted, many drivers, when problems arise with the clutch, understand that the car has begun to behave strangely, but often get used to it without taking any active action. As a result, a minor breakdown develops into a serious one, leading to a situation where the car becomes immobilized.
If you know the main signs of a clutch malfunction, you can avoid such risks by carrying out timely repairs yourself or contacting the nearest service station or service center.
So, we will describe the main signs of possible clutch malfunctions and the specific unit responsible for the “wrong” behavior.