Connecting running lights through dimensions
I have long wanted to install DRLs, pursuing different goals. And now it has come true.
The connection itself:
1. We take the DRL in our hands and see 2 wires: red - PLUS, black - MINUS
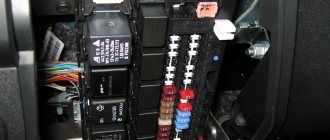
2. Open the hood and look for PLUS, which turns on when the ignition is turned on (I took it from some relay (photo below))
.3 We parallel the red (+) wires of the DRL and connect to the PLUS that we found
4. We parallel the black (-) wires of the DRLs and connect (connect) them to the red wire of the dimensions!
We get: When you turn on the ignition, the DRLs light up (not including the headlights). When the headlights or low beam are turned on, the DRLs automatically go out. Everything is in accordance with GOST.
We have: RPM 550-600, instead of 750-850 with the low beam on => reducing the load on the generator => no savings at all. Much better visibility on the road, especially on the highway and in the rain. And we protect our neighbor’s lamps from frequent burnout!
Recently, the demand for daytime running lights (DRLs) has been quite high; this situation in the market is due to the fact that most motorists are reluctant to make contact with traffic police inspectors, who, in turn, can easily stop a vehicle that does not have additional lighting devices.
Methods for connecting daytime running lights DRL
Turning on daylight/fog lights can save the situation, but in this case, the service life of the lighting devices, due to constant use, will be much lower, and lamps will have to be replaced more often. Also, do not forget that when using daylight/fog lights, although not significantly, fuel consumption still increases.
Having very little free time, as well as the desire to make driving a favorite car more comfortable, every car enthusiast can install DRLs with his own hands. This task is quite feasible at home; to do this, it is enough to have skills in working with a soldering iron, and you can learn about other installation nuances from this article.
Here is a small list of tools you will need for the job:
- soldering iron,
- crimping device (can be replaced with pliers),
- knife,
- lighter,
- wire cutters
- Also for installation you will need a two-core wire in PVA insulation 2x1.5; it can be replaced with 2x0.75 if the lighting fixture is LED and not halogen. The wire is necessary to make a parallel connection of the lights. It is also necessary
- car relay 12v.,
- reed switch,
- 2-3 meters of single wire ∅1.5 -2.5,
- plastic clamps,
- heat shrink.
So, we’ve decided on the list of tools and materials, let’s move on to connection options:
1 way. You can connect the lighting directly to the engine, so the DRLs will turn on when the car starts and turn off when it turns off.
This method is the easiest to implement; to connect, you need to attach the minus to the car body, and the plus to the plus of the ignition switch or to terminal D of the high-voltage module; the presence of a fuse is highly recommended.
Method 2 . This method is similar to the previous one, with the only difference that when the low beam is turned on, the lamps go out. The plus should be connected in the same way as described in the first method, the minus is connected to the positive wire of the low beam lamp.
The bottom line is that DRLs consume less energy and have a higher resistance than an incandescent lamp, so when connected in this way, the filament will not heat up much, and the resistance of the filament will not affect the operation of the DRLs.
When you turn on the low beam, a plus will appear on the negative side of the DRLs and they will turn off; of course, when you turn on the high beam, they will start working again. This method is acceptable for connecting to large lamps, if they are not LED. In many cars, by default, side lamps are wired in parallel, so you can connect the common negative wire of both DRL lamps to any lamp.
3 way. Thanks to this option, the DRL turns on automatically only when the engine is switched on and running. In order to make such a connection, you should connect the minus to the machine frame, and the plus to the 30th contact of the relay. Contact 87 is connected to a more powerful plus; alternatively, you can connect to the positive terminal; contact 85 of the relay is thrown through the running lamps to the ground of the car, and 86 to one of the reed switch terminals.
The second terminal of the reed switch should be connected to any nearby positive, a generator or battery will do just fine, it doesn’t matter. Then we start the engine and, by moving the reed switch, look for the point at which the relay operates and the DRL starts. The further sequence of actions is very simple: you need to pack the reed switch in heat shrink and secure it with a clamp to the generator.
4 way. This method is suitable if there is no reed switch. The sequence of connecting the contacts is the same as in the third method, only contact 86 should be connected to the oil pressure lamp, which is located on the dashboard.
These four methods are very easy to implement and will help you make the connection yourself without any difficulty.
More recently, Russia introduced requirements for the use of fog lights, either low beam or daytime running lights, during daylight hours. Many service stations offer assistance in installing additional optics on your car. However, connecting daytime running lights with your own hands is not very difficult, and below we will tell you how to do it.
We will talk about how to choose daytime running lights, describe how to install them and provide a diagram for connecting the DRLs.
At the end of the article, watch the video instructions for connecting DRLs via an oil pressure sensor.
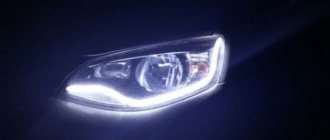
Daytime running lights (DRL or DRL) are additional lighting devices that are installed in the front of the car. They can be combined with standard optics or used separately. When turning on the low or high beams, as well as the side lights, it is advisable to turn off the DRLs.
Which parts to choose
Granta, whose lamps are easy to find in any auto parts store, is equipped with modern optics that illuminate the road surface in accordance with all GOST requirements.
When choosing lamps, it is important to observe the following parameters:
Installation of parts that do not meet the requirements often leads to melting of the base, transparent cover or headlight housing.
Lamps used on Grant:
- low/high beam – H4 55/60W 12V;
- direction indicator block – PY21W 12V/21W;
- running light/marker – P21 5/21W 12V.
A special feature of the H4 format is a combined bulb for near and far illumination. Each type of light has its own thread. If one of them burns out, the second continues to work.
The factory in Grant comes with lighting elements from Philips or Osram, depending on the batch.
The following options are suitable as a replacement:
Japanese Koito and Korean MTF are expensive, so owners rarely choose them to replace the original ones.
Philips X-treme Vision
According to test results from independent experts, these consumables have one of the best indicators of brightness and illumination in the dark.
The manufacturer indicates the following features:
- light temperature corresponds to 3500K;
- increase in the lighting area of Grants up to 45 meters in comparison with standard lamps;
- service life up to 450 hours.
The packaging with two parts included is produced in Poland. During installation, car enthusiasts note a significant improvement in low beam and sufficient brightness in rainy weather. The disadvantages include a short service life. On average, such parts work in Grant from 1 to 2 years.
Philips LongLife EcoVision
Lamps are supplied from factories in Poland and Germany. A distinctive feature is an increased service life of up to 1500 hours, which equates to 4-5 years of operation or 100,000 km.
Characteristics for low and high beam:
- quartz flask with increased strength indicators;
- thread resistant to shock and vibration;
- powerful luminous flux due to increased gas pressure in the bulb.
The lamps do not differ in lighting quality from the original ones, but they work much longer and are also not afraid of shocks.
Bosch Pure Light
You can purchase such lamps for Granta in a package of one piece. This is convenient for owners who have one lamp burnt out and do not want to pay for both.
- the manufacturer promises an increase in light spot of up to 90%;
- The item comes with a silver plated cartridge and a blue bulb to provide white light.
The lamps show themselves in Grants optics on the positive side and last about 2-3 years. Drivers often choose Bosch for its reasonable price and good workmanship. Country of origin: Germany, Poland.
Osram Original Line
The cost of the part is comparable to the prices of lamps from Bosch. The manufacturer promises car owners the following features:
- improving the length of the light beam, increasing visibility on the roadside;
- pressure in the flask provides a power increase of up to 130%.
Lamps are supplied individually. The production plant is located in Germany. The part has a good service life of 500 hours and is inexpensive. These lamps are factory installed on many makes of cars.
How to choose daytime running lights
Until recently, drivers turned on low beam headlights to attract attention to the car. The use of daytime running lights eliminates some of the disadvantages that appear when using standard optics in the daytime.
- DRLs increase the service life of headlight bulbs. Frequently turning the low beam on and off negatively affects the life of the bulbs. This is especially true for lighting devices with improved luminous efficiency, such as +30%, +50%, etc.
- When using DRLs, the inclusion of side lights and license plate illumination is excluded. This allows you to reduce energy consumption and not impair the readability of brake lights.
- The presence of automatic activation of DRLs allows you to combat the car owner’s forgetfulness. Without turning on the standard optics during the day, a motorist risks getting a fine. And if you leave the headlights on low beam with the engine off, the battery will quickly drain.
Before you start connecting daytime running lights, you should consider a number of factors that influence the choice of DRL model.
Firstly, a lot depends on the installation location and car design:
- Additional optics can be rectangular or round. Here the design of the bumper and the appearance of the “front” of the car will play a decisive role.
- The size of the lights is determined by the niche that is in the bumper or air intake of the car.
- The brightness of each block depends on the number of LEDs. It should be between 150-330 lumens.
The second important factor when choosing daytime running lights will be compliance with regulatory requirements. During installation, several basic characteristics must be met:
- The height from the ground level to the lanterns should be in the range from 250 to 1500 mm.
- The distance from the extreme side point of the car to the headlight should not exceed 400 mm.
- The minimum distance between two DRL lamps is 600 mm. For vehicles up to 1300 mm wide, this parameter is reduced to a distance of 400 mm.
- It is also necessary to observe certain geometric parameters when installing DRL lights. The horizontal deviation should be 20 degrees in and out, and the vertical angle should be 10 degrees down and up.
Installation methods and connection diagram for daytime running lights
Installation of daytime running lights can be done in different ways, it all depends on the skills of the car owner.
When purchasing daytime running lights, please note that the kit must include two lights, connecting wires, installation materials and installation and operating instructions. In this case, the car owner will not have to rack his brains and look for DRL connection diagrams.
- For people who are afraid or do not want to engage in car maintenance or repair, it is preferable to contact a specialized car service center. An experienced auto electrician will quickly and efficiently handle the DRL connection.
- Those who are able to perform simple car tuning operations can be advised to buy a ready-made set of running lights. For example, Philips and Hella DRLs performed well.
- Fans of soldering irons and electrical circuits can completely make LED lights with their own hands and connect them.
The running lights can be connected using different electrical circuits (the simplest circuit is through a relay and oil pressure sensor). The main thing is that the DRLs turn on after starting the engine and go out when the low and high beam headlights are turned on. It is convenient to use a DRL controller for connection (a wiring diagram will also be provided for it).
About lamps with increased visual comfort
For the Lada Granta, such a running light lamp is a conventional lighting device, made using standard halogen technology, but having a more pleasant white light spectrum. Their main drawback is reduced visibility in rainy weather. This is explained by the tendency of white light to produce more glare from wet surfaces and raindrops compared to a yellow tint.
To be more specific at this point, among the most common halogen products that are readily purchased by many owners are the following:
- OSRAM and General Electric;
- "Mayak" and "Philips";
- "Narva", "IPF" and "Hella".
This is not the entire recommended list of devices. If you ask about the priorities of the car manufacturer, they like OSRAM H4. These devices have two versions:
The first version has full compliance with legislative regulations in terms of ensuring safe conditions of use, including: current strength, cut-off line, illumination, beam delivery geometry and power.
The second option has an advantageous difference from the first in terms of increased resource, but is inferior in the power of the light beam. However, purchasing devices is one thing; you need to know how to change the running light bulb with your own hands.
How to make daytime running lights with your own hands
To make your own DRLs, you usually use cheap fog lights, LED strip, aluminum plates, silicone sealant and a soldering iron. The assembly sequence will be approximately as follows:
- First, the old fog lamp is disassembled and the internal filling is removed.
- Next, an aluminum plate is cut to the size of the flashlight body.
- A piece (or 2 pieces) of LED strip is cut to the size of the plate.
- An adhesive-sealant is applied to the degreased aluminum surface, and the LEDs are attached.
- All that remains is to use a soldering iron to connect the pieces of luminous tape and the electrical wire in series.
- The headlight is already assembled with a new filling.
To connect such DRLs, select one of the circuits suitable for a given car (it is better to connect via a DRL controller or via a relay and oil pressure sensor, as in the video below).
Installing daytime running lights on a car with your own hands becomes not only an interesting pastime. The result of the work will be a reason for pride for the car owner, because he managed to create a new image for his iron horse on his own.
Replacing DRL lamps on Lada Granta
On the Lada Granta, the liftback and sedan dimensions are combined with daytime running lights in one lamp. That’s what the lamp is called: a two-filament side light/daytime running light (it’s the same on the new and old family - W21/5W). When the ignition is turned on, the DRLs (21 W thread) are automatically turned on, and when the headlights are turned on, the DRLs go out and the side lights (5 W thread) turn on. Next, we will tell you about the features of replacing the DRL bulb of a Lada Granta..
To gain access to the left headlight unit, you need to move the engine air filter housing to the side. To do this, we release all the housing fasteners, the wiring harness and the sensor. Then we move the filter housing up, as shown in the photo:
To gain access to the right headlight unit, remove the engine cover. To do this, you will need to unscrew the oil filler cap, and then unclip the cap by pulling it up. Don't forget to screw the lid back on to prevent foreign objects from getting into the neck!
The connector for the headlight bulbs in the Lada Granta is located in place No. 7. To replace the DRL lamp, you need to remove the socket by turning it counterclockwise and then pull out the lamp. Install the new lamp in the reverse order, insert the cartridge into the groove on the headlight unit and turn clockwise.
The entire process of replacing DRL lamps is shown in the video:
Why do DRL bulbs often burn out on Lada Granta? The reason is an error during replacement. Do not touch the bulbs of halogen lamps with your fingers. Work in clean cotton gloves without rubber coating. Greasy fingerprints left on the lamp bulb will shorten its service life several times. To remove contaminants, wipe the flask with a clean cloth moistened with alcohol.
As a reminder, check your headlights periodically and adjust your headlights if necessary.
Source
How to change lamps
To replace a burnt-out part in a headlight yourself, you don’t need complex tools. Before starting work, you should thoroughly wipe the headlights, disconnect the battery and prepare new spare parts.
When installing a new lamp, be careful not to touch the glass bulb. The contaminated part overheats and burns out before its service life. For protection, it is best to use cloth gloves.
Replacing the Granta part in the main lighting module
To change a spare part, you need to choose calm, dry weather or use a garage.
Replacing a low beam lamp on a Grant:
- Open the hood.
- Remove the battery terminal.
- Disconnect the power supply.
- Carefully remove the cap from the body by pulling the three special ebbs.
- Bend back the two springs securing the skirt.
- Remove the burnt part.
- Install a new one without touching the flask with your hands or parts of the Grant.
- Connect the connector and install the plug in place.
When replacing, drivers are often in a hurry and forget to fasten the latches in the cartridge. In this case, the lamp will hang on uneven surfaces and quickly burn out.
Dismantling of the part is also carried out from the engine compartment. Replacing Lada Granta DRL lamps step by step:
- Disconnect the battery terminal.
- Find the connector located opposite the DRL unit.
- Rotate the chip counterclockwise 90°.
- Pull towards you and remove the lamp.
- Install the new part into the contact area and screw the chip into place.
Regular light bulbs are resistant to finger touches, so the use of gloves is not necessary. Daytime running lights turn on automatically when you turn the ignition key and dim when you turn on the Granta's main light.
Drivers often install LED DRLs on Granta. In this case, the brightness increases and the car is easier to notice on the road in sunny weather. When installing a diode, it is important to observe polarity and select the appropriate part size.
How to connect the DRL so that it turns on at startup
More recently, Russia introduced requirements for the use of fog lights, either low beam or daytime running lights, during daylight hours. Many service stations offer assistance in installing additional optics on your car. However, connecting daytime running lights with your own hands is not very difficult, and below we will tell you how to do it.
We will talk about how to choose daytime running lights, describe how to install them and provide a diagram for connecting the DRLs.
At the end of the article, watch the video instructions for connecting DRLs via an oil pressure sensor.
Daytime running lights (DRL or DRL) are additional lighting devices that are installed in the front of the car. They can be combined with standard optics or used separately. When turning on the low or high beams, as well as the side lights, it is advisable to turn off the DRLs.
Disadvantages of replacement
Using LEDs will save energy
As an example, we can take a car that has a function installed that is responsible for monitoring the health of the DRLs in the car. Also under control are such details as the injector and brake lights, of which the sensor will constantly remind the owner of the Lada Grant. Using an LED allows you to consume less energy than a conventional lamp. The control relay, responsible for monitoring the normal functioning of the lamps, noticing that the current is supplied in a reduced amount, informs the driver that the lamp has deteriorated.
This occurs by signaling a problem with a constantly lit lamp on the instrument panel or a constant beeping sound from the on-board system. However, this signal will only be heard if you replace the standard Lada Granta instrument panel with a European version.
Also keep in mind that if you replace a yellow LED with a white one, it will emit a white color that can reflect many additional shades (from blue to violet). This, in turn, can cause very significant claims from the authorities. Therefore, it will be challenging to prove that your LED is compliant with the law.
How to choose daytime running lights
Until recently, drivers turned on low beam headlights to attract attention to the car. The use of daytime running lights eliminates some of the disadvantages that appear when using standard optics in the daytime.
- DRLs increase the service life of headlight bulbs. Frequently turning the low beam on and off negatively affects the life of the bulbs. This is especially true for lighting devices with improved luminous efficiency, such as +30%, +50%, etc.
- When using DRLs, the inclusion of side lights and license plate illumination is excluded. This allows you to reduce energy consumption and not impair the readability of brake lights.
- The presence of automatic activation of DRLs allows you to combat the car owner’s forgetfulness. Without turning on the standard optics during the day, a motorist risks getting a fine. And if you leave the headlights on low beam with the engine off, the battery will quickly drain.
Before you start connecting daytime running lights, you should consider a number of factors that influence the choice of DRL model.
Firstly, a lot depends on the installation location and car design:
- Additional optics can be rectangular or round. Here the design of the bumper and the appearance of the “front” of the car will play a decisive role.
- The size of the lights is determined by the niche that is in the bumper or air intake of the car.
- The brightness of each block depends on the number of LEDs. It should be between 150-330 lumens.
The second important factor when choosing daytime running lights will be compliance with regulatory requirements. During installation, several basic characteristics must be met:
- The height from the ground level to the lanterns should be in the range from 250 to 1500 mm.
- The distance from the extreme side point of the car to the headlight should not exceed 400 mm.
- The minimum distance between two DRL lamps is 600 mm. For vehicles up to 1300 mm wide, this parameter is reduced to a distance of 400 mm.
- It is also necessary to observe certain geometric parameters when installing DRL lights. The horizontal deviation should be 20 degrees in and out, and the vertical angle should be 10 degrees down and up.
Installation methods and connection diagram for daytime running lights
Installation of daytime running lights can be done in different ways, it all depends on the skills of the car owner.
When purchasing daytime running lights, please note that the kit must include two lights, connecting wires, installation materials and installation and operating instructions. In this case, the car owner will not have to rack his brains and look for DRL connection diagrams.
- For people who are afraid or do not want to engage in car maintenance or repair, it is preferable to contact a specialized car service center. An experienced auto electrician will quickly and efficiently handle the DRL connection.
- Those who are able to perform simple car tuning operations can be advised to buy a ready-made set of running lights. For example, Philips and Hella DRLs performed well.
- Fans of soldering irons and electrical circuits can completely make LED lights with their own hands and connect them.
The running lights can be connected using different electrical circuits (the simplest circuit is through a relay and oil pressure sensor). The main thing is that the DRLs turn on after starting the engine and go out when the low and high beam headlights are turned on. It is convenient to use a DRL controller for connection (a wiring diagram will also be provided for it).
High visual comfort lamps
Although the standard lamps with a dull yellow color in the running light system may still remain fully operational, almost all Lada Granta owners strive to immediately replace them with halogen ones with a catchy snow-white light. The reason for this is an increase in visual comfort. It is also noted that this can highlight the exterior profile of the car.
Halogen light bulbs from the following manufacturers are most popular among car enthusiasts:
- Philips.
- Lighthouse.
- OSRAM.
- IPF.
- General Electric and some others.
Like other modifications, halogen lamps for DRLs have the same corresponding number of shortcomings. This is primarily due to increased heating and, as a result, the shelf life decreases with increasing power. For this reason, when choosing similar sources for the Lada Limonka, you should take into account that they can be produced in 2 versions:
Option 1 meets all legal requirements, but at the same time has average durability. The 2nd is the most economical and, although it does not shine as brightly, it lasts longer.
Pay attention! The grease mark left on the surface of the test tube when replacing it can significantly reduce the service life of a halogen lamp. Therefore, when reinstalling, it is imperative to wear cotton gloves, and after installation, wipe the surface of its glass with clean alcohol wipes (if contamination has been applied).
How to make daytime running lights with your own hands
To make your own DRLs, you usually use cheap fog lights, LED strip, aluminum plates, silicone sealant and a soldering iron. The assembly sequence will be approximately as follows:
- First, the old fog lamp is disassembled and the internal filling is removed.
- Next, an aluminum plate is cut to the size of the flashlight body.
- A piece (or 2 pieces) of LED strip is cut to the size of the plate.
- An adhesive-sealant is applied to the degreased aluminum surface, and the LEDs are attached.
- All that remains is to use a soldering iron to connect the pieces of luminous tape and the electrical wire in series.
- The headlight is already assembled with a new filling.
To connect such DRLs, select one of the circuits suitable for a given car (it is better to connect via a DRL controller or via a relay and oil pressure sensor, as in the video below).
Installing daytime running lights on a car with your own hands becomes not only an interesting pastime. The result of the work will be a reason for pride for the car owner, because he managed to create a new image for his iron horse on his own.
Types and causes of failure
These devices have several types:
- low beam headlights. Turned on during vehicle operation. In Russia it is allowed to use them as a light source for daytime driving;
- high beam headlights. Operate at reduced voltage. This helps to reduce the intensity of light, which in some cases does not help increase the visibility of pedestrians and cyclists on the road;
- fog lights. Their implementation in the Russian Federation is permitted (clause 19.4 of the traffic rules);
- front turn signals;
- individual light sources in front of the vehicle with specific light intensity patterns.
Headlight Lada Granta with LED lamps
The main manufacturers of high-quality DRLs are brands such as:
These and other models of light sources may differ in shape (rectangular, round, oval), the number of diode bulbs inside, power, and brightness.
Now manufacturers have even begun to produce silicone diode bulbs suitable for the Lada Granta. They can be placed on one or several tapes.
Among the main reasons why DRLs do not glow are:
- lack of polarity check before installing light sources;
- the turn signal channel does not light up;
- fuse is blown;
- lack of heating or burnout of the filament.
In order to improve daytime running light sources and make them as useful and elegant as possible for the car enthusiast, all stages of the work must be done very carefully. Instead of conventional lamps, which do not glow very brightly, you can install LED lighting without a base assembly. You can purchase these components in virtually any store that has spare parts for cars. With all this, when making a choice, you need to focus on models with greater lighting brightness.
Operation of LED lamps
Video: connecting DRLs via oil pressure sensor
Traffic rules provide for the mandatory lighting of running lights during the day while the vehicle is moving. This is explained by the fact that a car with its headlights on is certainly much more visible on the road. And this reduces the risk of an emergency.
Many drivers consider connecting daytime running lights to their cars too expensive - as an alternative, the rules allow the use of low beams or fog lights. However, these options are not entirely successful. Constantly turning on the headlights will lead to the fact that after a short time the lamps will need to be replaced - there is no escape from wear and tear. Each product has its own resource: whatever the usage pattern, after the resource is exhausted, replacement is necessary.
DIY daytime running lights for cars
So, what do we have if we use options with fog lights and low beam headlights? Here's what:
- premature wear of lamps;
- battery discharge and generator power consumption;
- increased gasoline consumption;
- the danger of forgetting to turn on the lights before driving and earning a fine.
Therefore, it is best to take care of installing standard running lights and connect them correctly. And it’s best if the connection diagram works on the principle of automatically turning on the lights after starting the car engine.
If you do not want to spend money on the services of specialists to develop and implement a scheme for switching on DRLs, you can find here options that you can do yourself.
conclusions
Regular DRL bulbs are very good.
They shine great, the diodes shine better, but no one has used DRLs before. This is all marketing needed in order to equip the card with additional elements for which you will need to pay. Replacing a DRL lamp is ordinary; an ordinary lamp costs about 100 rubles, while diode lights will cost you several times more!
I would think about substitution only if I had problems with conventional equipment!
For me, the most important advantage of an LED lamp is that if one diode burns out, the other diodes will continue to work. In other words, you can keep moving!
Naturally, installing LED lamps is a step forward for your car. But you need to think about the other drivers. If you install it, you need to immediately adjust the direction of the light so as not to blind oncoming people.
I made myself a backlight from LED lamps in the cabin. Now the crotch between the seats and the pedals are illuminated. I was very pleased, because at night, the interior is lit no worse than during the day, as needed. It gives an error on the device panel, but everything has been fine for more than one year.
I thought for a long time about installing LED lamps, but when I finally decided to do it, I was pleased. The panel did not give me any errors, and they shine even better.
I installed the running lights following your instructions, connecting them to the headlights button. The “dimension malfunction” light is on. The shine is unsurpassed! The car began to attract more attention.
You need to add additional resistance, the machine thinks that the lamps have burned out. Although surprisingly, I didn’t have one!
hi, I tried to install LED lamps on the DRLs, the fuses popped up, sorry about that
Marvelous. Diode lamps consume less and do not have to be. Bad advice - but try the other lamps.
the polarity does not match, look where + and where -
This is literally due to polarity, I had this happen, the fuses were blown, until the store checked the lamps, the jamb was in them
Chinese lamps, take them back to the store. Closing only from them
What additions don’t even need to be created and everything doesn’t show any errors, it’s just that they’ve read all sorts of nonsense and are discussing and messing with people’s heads
Look for lamps with non-standard polarity and everything will be fine
I ALSO BUYED FOR 750 AND I DON’T REGRET, I ALSO WAS AFRAID OF WHAT WOULD HAPPEN AND IT TURNS OUT EVERYTHING SIMPLE
Of course they ate to take it for 200-250 rubles. There will be no use there
Source: carfrance.ru
Necessary materials
Before connecting daytime running lights to your car, you will need to stock up on all the necessary tools and materials. To do the job yourself, you will need:
- pliers;
- wire cutters;
- soldering iron;
- insulated two-core wire;
- LED DRLs;
- relay for cars 12V;
- reed switch;
- single-core wire;
- plastic clamps.
Once everything you need is in stock, you can begin connecting the DRLs to your car with your own hands.
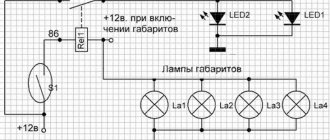
Scheme 1
The first option involves automatically turning on the DRL after the ignition starts and turning it off after stopping the engine. The minus is connected to the car body, and the plus is connected to the plus of the ignition switch. All this is quite easy to do with your own hands, even without special knowledge in the field of electrical engineering. The main thing is to carefully monitor what is connected where.
Diagram of automatic activation of daytime running lights
Installation Requirements
The key disadvantage of running lights is that current regulations do not consider them as standard lighting. In this regard, you may encounter various problems when interacting with authorities. Special lighting must fully comply with the standards established by current legislation. In this regard, when replacing running lights with your own hands, you need to make sure that the new lamps for the Lada Granta comply with these standards.
Scheme 2
The second option is, in fact, a variation of the first. The same operations are performed here with one small difference - after turning on the low beam headlights, the running lights turn off. Here the plus is connected, as in the previous section, and the minus is connected to the plus of the low beam lights.
This is explained by the fact that the incandescent lamp, which is used for low beam, has a lower resistance and a higher current flows through it. The moment the low beam turns on, a plus appears on the negative side of the DRLs and they go out.
This option is also quite easy to implement with your own hands - it is important not to confuse and connect all the contacts correctly.
If you have incandescent lamps installed as dimensions, you can use this principle for dimensions.
Features of choice
The necessary increase in brightness or service life of light bulbs can only be achieved by replacing existing lights. Car enthusiasts often replace the halogen lighting sources installed in Lada with LED ones. As a rule, even a person without experience in replacing lamps can cope with this task.
However, you should know a few nuances. Simply placing a new diode in the right place is not enough - the process has its own characteristics.
Scheme 3
Here, the running lights turn on after the engine starts. The relay, battery and generator are involved. We connect the negative of the DRL to the car body, and the plus to the relay contact marked 30. We connect the relay contact marked 87 to the positive of the battery. We connect the relay contact marked 85 to vehicle ground through the DRL. And with mark 86 we connect to the reed switch, the second contact of which is connected to the plus of the generator. After starting the engine, move the reed switch around the generator so that the relay is activated and the running lights turn on. After this, we pack the reed switch in thermopolymer and attach it to the generator. It is very important that the reed switch is attached exactly in the place of the generator where the relay operates.
Connection diagram for running lights from the generator
Common causes of fuse failures
- Natural factor - due to long-term operation of the technical device;
- Mechanical damage, accident, impact, collision;
- Short circuit in the circuit;
- Damage to insulation, oxidation of terminals, loosening of contacts;
- Water entering the mounting block, condensation formation, deformation due to high operating temperature.
Scheme 4
This option is a variation of the previous scheme when a reed switch is not available. Then the contact marked 86 is attached to the oil pressure lamp in the dashboard. In this case, the lights will also turn on after the engine starts. This option is done with your own hands somewhat easier than the previous one.
How to properly connect daytime running lights
Main conclusions
As standard, the Lada Granta car is equipped with low-power incandescent light bulbs in the running light system, which are not distinguished by good brightness and durability. Their replacement is likely with subsequent other light sources:
The first ones belong to the group of high visual comfort, have good brightness and speed of installation. But during installation, they can simply be damaged by putting a grease mark on the surface of the test tube, not to mention that the stronger they are, the less they serve. LEDs do not have such disadvantages, consume less energy, save battery resources and are very durable. Their main drawback is the formation of blue reflections and the originality of the base, which complicates the replacement function. In addition, LED bulbs can trigger sensors on the dashboard.
Source: svetilnik.info
What is DHO
ATTENTION! A completely simple way to reduce fuel consumption has been found! Don't believe me? An auto mechanic with 15 years of experience also didn’t believe it until he tried it. And now he saves 35,000 rubles a year on gasoline! Read more"
Modern traffic regulations provide for the mandatory use of daytime lights. The solution was implemented for safety reasons, because a car with its lights on will be much more visible to other road users even during the day. As a result, the risk of accidents is reduced.
Today, traffic police officers can legally stop a vehicle that does not use daytime running lights. And the owner of the car will bear the same responsibility for this as if he did not have low-beam headlights or PTF.
Daytime lights are a mandatory element in the list of standard equipment of new car models. But this does not mean that all is lost for owners of used cars.
Despite the fact that for some Russian drivers, connecting the DRL is too expensive, it can be done without “raping” the family wallet.
Using low beam or PTF as an alternative, unfortunately, does not bring anything useful. The constant operation of optics leads to the fact that the headlights wear out faster, and as a result, such savings lead to even greater costs.
But you can really help save on service costs by connecting the DRL according to a scheme that is easy to implement with your own hands.
Only an independent connection diagram, preferably in accordance with the following mandatory rules:
- daytime LEDs go out a priori when the head optics (low beam, high beam or PTF) are activated;
- it must be possible to turn off the DRL using a separate button, without the use of extraneous tools;
- The running light must turn on randomly as soon as the engine is started.
Thus, the issue with the law is resolved. Inspectors will have nothing to complain about.
FakeHeader
Comments 13
In short, I'll take it under warranty, let them rack their brains.
That's right, then write down what the trouble was. Good luck
I went today under warranty and attended the inspection. In short, the problem was in the lamps themselves (When you start shaking them, they light up), it turns out they shook the lamps for me at TO-3 and said that there was a bad contact.
yes, they are fooling our brother ((
Are all the previous ones intact?
Is there an abnormal alarm?
Are all the previous ones intact?
If the front burnt out, then both would stop burning. (I tried)
As I understand it, you didn’t ask the reason at the maintenance? And they didn’t say it themselves either?
At first I didn’t ask, but the next day when the light stopped burning I asked. He told me that the contact was bad in the connector itself. (Although I tried the same thing myself, it didn’t help me.)
Damn, masters)) So take it back to them - let them establish contact)) It’s good if it’s a trifle, but if there’s something wrong with the wiring, then it’s fraught with trouble in the future. I read somewhere about problems with DRLs when the signal was connected incorrectly, the lamps burned out there too... Right now I can’t find the source. I read it on the Lada Granta Club, it seems. But you yourself don’t associate any of your recent manipulations? Maybe he changed something?
Scheme options
So, you can connect in several ways.
- The DRL turns on as soon as the ignition key is turned. The lights do not go out until the car engine stops. It is considered the simplest method, which does not involve the use of an on-board network. It is enough just to connect the negative from the lights to any place in the car body, and connect the positive from the lock to the output of the high-voltage module, always through a fuse.
- The same scheme, only the DRLs go out immediately as soon as the low beam is turned on. To implement this connection option, you need to adhere to the diagram described above, with the only difference being that the negative is connected to one of the positive wires of the low beam lamp. As soon as the low beam on the car is turned on, a positive impulse will appear on the minus DRL and the lights will go out. The DRLs will light up again as soon as the high beams are activated or the headlights are turned off.
- Connection diagram, which involves automatic connection of the DRL as soon as the car engine starts. It is considered the most reliable option for self-integrating LED daytime running lights. To implement this scheme, the minus of the DRL is connected to the car body, and the plus is connected to the relay contact.
Simple circuit with 4-pin relay
There is a simplicity in circuit number 1, implemented through a 4-pin relay. However, this option does not always satisfy the requirements of GOST, since the DRLs will shine separately from the head optics. The lights are not turned off by a push-button mechanism, everything happens automatically.
The photo above shows exactly this circuit, connected via a 4-pin relay. It implies the following procedure:
- when the engine starts, an impulse is sent from the generator to the relay, and the LEDs light up;
- As soon as the headlights are turned on, the DRLs turn off.
This connection method is also possible without using a generator. Then, instead, the voltage source will be the battery, the positive of which should be connected to the 30th contact in the photo.
It is also possible to connect the plus from the parking brake. In this case, as soon as the handbrake is activated, the daytime lights will go out - that's the button.
Circuit with 5-pin relay
It involves the use of 4 contacts. Ideal connection option for Priora cars. The difference from the above diagram is not only in the number of relay contacts. This circuit does not provide for the use of output 87. An alternative to ground is output 86.
The circuit with a 5-pin relay provides for the use of DRL control. The push-button mechanism is built between the generator and the 30th relay contact.
The operation of the DRL is as follows:
- the internal combustion engine is started, thereby the impulse from the generator goes to the 30th contact of the relay, and from there to the plus of the DRL;
- the lights come on, the minus is connected to any part of the car body;
- when the dimensions are used, the coil is activated, the 30th contact is integrated with the 87th, the pulse no longer arrives - the DRL is turned off.
With reed switch
In a circuit using a reed switch, three important automotive systems are simultaneously activated: the generator, battery and relay.
The photo above shows a detailed connection diagram for the option using a generator. The plus is integrated, as can be seen from the diagram with point 30. The relay contact, marked with point 87, is integrated with the battery positive. Another relay contact, marked with number 85, is connected to the vehicle ground through the DRL.
Attention. This scheme implies the mandatory use of a reed switch - a device capable of changing the state of a connected electrical circuit when exposed to a magnetic field.
The contact marked on the diagram with point 86 is connected to the reed switch. From the reed switch there is a connection to the plus of the generator.
Thus, the scheme implies the following. As soon as the internal combustion engine starts, the driver activates the reed switch with a button, the relay is activated, and the DRL turns on. The reed switch must be packed in thermopolymer and securely fixed to the generator.
Advice. It is important that the reed switch is fixed exactly in the place of the generator where the relay would operate.
Without reed switch
A variation of circuit number 3, only without using a reed switch. In this case, the contact marked 86 is integrated with the oil pressure lamp in the instrument panel. Thus, the option of turning on the DRL after the engine is started is supported.
It is noteworthy that this scheme is much easier to implement with your own hands than the option with a reed switch.
Video: how to connect DRL from a generator
As you can see, connecting the DRL to the vehicle’s on-board network is carried out using several circuits. The plus is taken from the output of the generator, less often from the battery.
Forget about fines from cameras! An absolutely legal new product - Traffic Police Camera Jammer, hides your license plates from the cameras that are installed in all cities. More details at the link.
- Absolutely legal (Article 12.2);
- Hides from photo and video recording;
- Suitable for all cars;
- Works through the cigarette lighter connector;
- Does not cause interference to radios and cell phones.
Source