Fasteners
For fastening, it is best to use yellow self-tapping screws with a length at least 2 times the wall thickness.
The heads of black ones often break off; they are thinner and not as strong. An advanced solution is furniture bolts, but if this is your first sub, then it will be easier with self-tapping screws. Yellow screws, black screws, furniture bolts.
Cage nuts for attaching the subwoofer to the cabinet are cool! The sub can also be secured with self-tapping screws, but with bolts in the mountings, the speaker is attracted as tightly as possible, and if necessary, it can be removed and installed as many times as necessary without damage. And the polished hex bolts look really cool.
Bolt with cage nut
Video about installing cage nuts (a more convenient option):
Glue
If you are sawing the walls with a jigsaw or a hand-held circular saw, then the glue will additionally act as a sealant between the uneven edges; any liquid wood nails will do for this. If you unraveled the material on the machine and the edges of the body walls are perfect, then apply the glue in a very thin layer, but still do not forget to coat the joints from the inside.
Terminal block
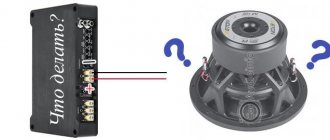
You can route the wires directly, but it is better to make a box for the subwoofer with a terminal block.
Terminal block for housing
Use threaded options - they are more reliable, or choose ones with fairly powerful springs. When installing the terminal block (terminal) for connecting the subwoofer, do not forget to tape the connection point with the housing around the perimeter. For round seats, it is convenient to cut a hole using a nozzle.
Round hole tool
Wires
You will need a piece of wire to connect the subwoofer coil to the output terminal block. Take any copper wire no thinner than 4 mm. in most cases this will be sufficient.
Tools
You will need:
- Circular saw - for cutting material, it can be either manual or stationary, it all depends on your capabilities. It is better not to cut with a jigsaw, the edges will be too uneven, even if you attach a guide bar, since the file can still wander.
Manual circular
- A jigsaw is for cutting out holes for the speaker and for the terminal block, it can also be a router, with its help the holes will be smooth and neat. To cut out the wall for a round terminal block, you can use a saw attachment. Select the right jigsaw blade for the job at hand.
- Screwdriver - for tightening screws and drilling holes.
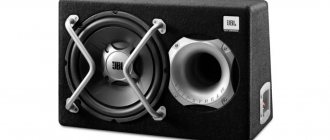
Closed box
This type of design is the simplest. A closed box for a subwoofer is easy to calculate and assemble. Its design is a box of several walls, most often 6.
Advantages of ZY:
- Simple calculation;
- Easy assembly;
- Small displacement of the finished box, and therefore compact;
- Good impulsive characteristics;
- Fast and clear bass. Plays club tracks well.
A closed box has only one drawback, but sometimes it is decisive. This type of design has a very low level of efficiency compared to other boxes. A closed box is not suitable for those who want high sound pressure.
However, it is suitable for fans of rock, club music, jazz and the like. If a person wants bass, but needs space in the trunk, then a closed box is an ideal option. A closed box will not play well if the wrong volume is selected. What volume of box is needed for this type of design was long ago decided by experienced people in car audio through calculations and experiments. The choice of volume will depend on the size of the subwoofer speaker.
The most common speaker sizes are: 6, 8, 10, 12, 15, 18 inches. But you can also find speakers of other sizes; as a rule, they are used very rarely in installations. Subwoofers with a diameter of 6 inches are produced by several companies and are also rarely found in installations. Mostly people choose speakers with a diameter of 8-18 inches. Some people indicate the diameter of the subwoofer speaker in centimeters, which is not entirely correct. In professional car audio, it is customary to express dimensions in inches.
Recommended volume for a closed box subwoofer:
- an 8-inch subwoofer (20 cm) requires 8-12 liters of net volume,
- for 10-inch (25 cm) 13-23 liters of net volume,
- for 12-inch (30 cm) 24-37 liters of net volume,
- for 15-inch (38 cm) 38-57 liters net volume
- and for 18 inches (46 cm) you will need 58-80 liters.
The volume is given approximately, since for each speaker you need to select a certain volume based on its characteristics. The setting of a closed box will depend on its volume. The larger the volume of the box, the lower the tuning frequency of the box will be, the bass will be softer. The smaller the volume of the box, the higher the frequency of the box, and the bass will be clearer and faster. You should not increase or decrease the volume too much, as this is fraught with consequences. When calculating the box, adhere to the volume that was indicated above. If there is too much volume, the bass will turn out vague and indistinct. If the volume is not enough, then the bass will be very fast and “pound” the ears in the worst sense of the word.
A lot depends on how the box is configured, but an equally important point is “Setting up the radio.”
Operating principle
Motorists may be familiar with a resonator, another example of which is the CV box For example, it is used as a functional element of a muffler. In this case, the hollow structure has its own characteristics and another purpose.
From a technical point of view, a resonator is an oscillatory system that accumulates vibrations due to frequency resonance. Typically, the design involves “working” with a limited set of frequency characteristics. Depending on the design, resonators of cumulative and instantaneous action differ.
Homemade wooden box
The storage resonator accumulates external energy by reducing the frequency of internal oscillations. In a mathematical context, any resonator design whose oscillation frequency is greater than the oscillation frequency of the external influence is cumulative. This happens whether the diameter is 10 or 12 inches, but you need to choose a different volume.
Bass reflex
This type of design is quite more difficult to calculate and build. Its design is significantly different from a closed box. However, it has advantages, namely:
- High level of efficiency. A bass reflex will produce low frequencies much louder than a closed box;
- Simple calculation of the body;
- Reconfiguration if necessary. This is especially important for beginners;
- Good speaker cooling.
The bass reflex also has disadvantages, the number of which is greater than that of the ZYa. So, the cons:
- FI is louder than ZY, but the bass here is not so clear and fast;
- The dimensions of the FI box are much larger compared to the ZY;
- Large displacement. Because of this, the finished box will take up more space in the trunk.
Based on the advantages and disadvantages, you can understand where FI boxes are used. Most often they are used in installations where loud and pronounced bass is needed. The bass reflex is suitable for listeners of any rap, electronic and club music. It is also suitable for those who do not need free space in the trunk, since the box will occupy almost all the space.
The FI box will help you get more bass than from a small-diameter speaker. However, this will require much more space.
What volume of box is required for a bass reflex?
- for a subwoofer with a diameter of 8 inches (20 cm) you will need 20-33 liters of net volume;
- for a 10-inch speaker (25 cm) – 34-46 liters,
- for 12-inch (30 cm) – 47-78 liters,
- for 15-inch (38 cm) – 79-120 liters
- and for an 18-inch subwoofer (46 cm) you need 120-170 liters.
Purpose, design and principle of operation of the CV box
The design of the HF box is aimed at modulating the sound flow. The effect of sound transmission and reflection is used. Thanks to the special housing design, sound harmonization is achieved. This is especially noticeable at low frequencies and when installing a subwoofer. With the appropriate dimensions, the HF box will make the bass sound quite loud, bright, but unusually deep.
Subwoofer box
What types of subwoofer boxes are there?
There are several types of subwoofer boxes. you get at the output directly depends on the design of the box Below are the most popular types of subwoofers:
A closed box is the easiest to manufacture and design; its name speaks for itself. The woofer is housed in a sealed wooden housing, which improves its acoustic performance. Making a subwoofer in a car with such a housing is quite simple, but it has the lowest efficiency.
A 4th order bandpass is a type of subwoofer whose body is divided into chambers. The volumes of these chambers are different; in one of them there is a speaker, and in the second there is a bass reflex (air duct). One of the features of this type of subwoofer is the design's ability to limit the frequencies that the cone reproduces.
The 6th order bandpass differs from the 4th order by the presence of another bass reflex and another camera. There are two types of 6th order bandpasses - the first has one bass reflex, and the second has two (one of them is common to both cameras). This type of box is the most difficult to design, but produces maximum efficiency.
A bass reflex is a subwoofer with a special tube in the housing. It vents air and provides additional sound from the rear of the speaker. In terms of complexity in manufacturing and sound quality, this type is a cross between a closed box and a bandpass.
If you want to get the highest quality sound, you can opt for bandpasses. But this type of design has many details that must be carefully designed and calculated. All this can be done using a special program WinlSD, which will not only determine the optimal size and volume of the subwoofer, but also create a 3D model of it, and also calculate the dimensions of all parts.
Unfortunately, this program requires at least minimal knowledge in this area and the average car enthusiast is unlikely to be able to do everything right the first time. Moreover, in order for the program to work correctly, it needs some speaker parameters, which are also not known to everyone. If you do not plan to take part in car audio competitions, we advise you to discard the bandpasses.
Are you interested in auto tuning? Detailed instructions for installing parking sensors with your own hands especially for you!
Programs for calculating the subwoofer enclosure
Speaker Box Lite
One of the most modern and convenient programs for calculating subwoofers. Speaker Box Lite will help you quickly and conveniently calculate the enclosure for the subwoofer, as well as draw its sketch and cut the material. It builds frequency response graphs, takes into account the transfer function of the cabin, is based on the Thiel-Small parameters, and additionally displays the system impedance, phase response, group delays, etc.
JBL speaker shop
A program for calculating the design of speakers and subwoofers in particular. The program is old and does not work with the latest operating systems, but nothing better has been invented so far, so you have to use small tricks to get it working. The program builds frequency response graphs, takes into account the transfer function of the cabin, takes into account the Thiel-Small parameters - that is, everything that is needed to correctly calculate the box for the subwoofer.
BassBox 6 Pro
The program for calculating subwoofers works on the basis of JBL speakershop, in the 5th version they even had the same interface - in the 6th it was changed. But the program works well and some may find it more convenient to work with it.
Bassport
A narrowly focused program designed to calculate bass reflex ports for a certain volume; it cannot fully calculate the enclosure . All attention is directed to the design of ports, taking into account air flows, shapes, distances to walls and partitions.
UniBox (Unified Box Model)
A very simple program that runs on Microsoft Windows Excel 2000 . Can simulate sound pressure level, speaker impedance curve, frequency response, etc.
What materials do we need to assemble the subwoofer?
The material for making the subwoofer box must be durable, dense and well insulating sound. Multilayer plywood or chipboard is perfect for this . The main advantages of these materials are their affordable price and ease of processing. They are quite durable and provide good sound insulation. We will make a subwoofer from 30 mm thick multilayer plywood.
To make a subwoofer box we will need:
- Wood screws (approximately 50-55 mm, 100 pieces)
- Soundproofing material (Shumka)
- Drill and screwdriver (or screwdriver)
- Jigsaw
- Liquid Nails
- Sealant
- PVA glue
- Carpet, approximately 3 meters
- Klemnik
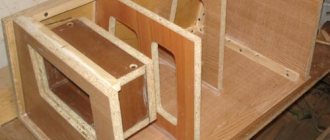
Assembling a subwoofer box with your own hands
You can start assembling. We use a 12-inch Lanzar VW-124 speaker.
Its diameter is 30 cm, and the first thing you need to do is cut a hole for the speaker. The minimum distance from the center of the diffuser to the subwoofer wall is 20 cm. We measured 23 cm (20 cm + 3 cm plywood width) from the edge of the panel and cut a hole with a jigsaw. Next, we cut a hole for the bass reflex slot; in our example, it has a size of 35*5 cm.
Instead of a slot, you can use a classic air duct - a tube. Now we assemble the bass reflex slot and attach it to the front panel of the subwoofer. We go along the joints with liquid nails and tighten them with self-tapping screws.
Next, we assemble the side walls of the box, having previously lubricated them with liquid nails, and tighten them tightly with self-tapping screws.
On the back cover of the box you need to cut a small hole for the terminal block. We connect all parts of the body. We make sure that we cut and fastened all the parts correctly.
We insert the speaker. Let's look and admire.
Let's move on to the interior decoration of the box. The first thing you need to do is seal all the joints and cracks with epoxy glue or sealant. Next, using PVA glue, we glue soundproofing material onto the entire inner surface of the box.
Now we cover the entire outer plane of the box with carpet, including the bass reflex slot. You can attach it with epoxy glue or using a furniture stapler.
Next, insert and screw the speaker tightly. The subwoofer is almost ready, all that remains is to stretch the wires from the speaker to the terminal block and connect the amplifier.
We bought an additional amplifier, but you can also make it yourself. This is quite difficult, as it requires knowledge and practice in the field of radio engineering. You can also use ready-made kits and circuits for radio amateurs, like Master-KIT, and assemble the amplifier yourself. The only requirement for the amplifier is that its maximum power must be less than the maximum power of the speaker .
See also a video report on making a homemade subwoofer for 2 speakers
Recommended amplifier settings
We understand that a large number of people visiting our portal are non-professionals, and they worry that if configured and used incorrectly, they can render the entire system unusable. To relieve you of your fears, we have made a table with recommended settings for this calculation. Find out what the power rating (RMS) of your amplifier is and set the settings according to the recommendations. I would like to note that the settings indicated in the table are not a panacea, and are only advisory in nature.
| Setting name | RMS 150-250w | RMS 250-350w | RMS 350-450w |
| 1. GAIN (lvl) | 60-80% | 55-75% | 45-70% |
| 2. Subsonic | 27 Hz | 28 Hz | 29 Hz |
| 3. Bass Boost | 0-50% | 0-25% | 0-15% |
| 4.LPF | 50-100hz | 50-100hz | 50-100hz |
*PHASE – smooth phase adjustment. There is such an effect as a temporary lag of the subwoofer bass from the rest of the music. However, by adjusting the phase this phenomenon can be reduced.
Before installing the amplifier, read the instructions, in it you will find what cross-section of the power wire is necessary for stable operation of your amplifier, use only copper wires, monitor the reliability of the contacts, as well as the voltage of the on-board network. Here we have described in detail how to connect the amplifier.
Making a stealth subwoofer with your own hands
Tired of carrying a huge box in your trunk? Then the stealth subwoofer is just made for you. This unique type of case is more practical than the classic box. It doesn't sit in a square box in the middle of the trunk and takes up less space. Often, stealth is installed in the inner part of the wing, sometimes in a niche instead of a spare wheel. The minimum volume of the box that requires a 10-12 inch speaker for normal operation is 18 liters.
To make a passive stealth subwoofer we will need:
- subwoofer;
- protective grille and socket for connection to the amplifier;
- wire for connecting the speaker to the outlet;
- multilayer plywood or chipboard (thickness 20 mm);
- a small piece of fiberboard;
- epoxy adhesive;
- brush;
- fiberglass;
- mounting tape;
- polyethylene film;
- wood screws;
- drill, jigsaw.
Find out what documents are needed to replace your license when changing your last name, and whether you need to take your license again.
Have you recently bought a new car? Read tips on breaking in a new car from experienced motorists.
Here /avtotovary/pokupka-avto/byudzhetnye-krossovery.html you can learn how to properly use and care for an automatic transmission.
After choosing the place where the stealth will be installed, we empty the trunk and begin manufacturing the body. You can remove the trunk trim where the subwoofer will be installed to place it even closer to the fender. First of all, lay a plastic film on the floor of the trunk. It performs two functions at once: it protects the trunk lining from epoxy glue and allows us to make a mount to which we will screw the bottom of the subwoofer. Next, we cover the inside of the wing with mounting tape in two layers.
We cut the fiberglass into small pieces, approximately 20x20 cm. We place pieces of fiberglass onto masking tape and glue them with epoxy glue. It is better to overlap the fiberglass fabric so that there are no obvious joints and seams.
We sculpt layers of fiberglass on top of each other, simultaneously lubricating them with epoxy glue, until the thickness of the sheet reaches 10 mm (about 4-5 layers).
The material will harden in approximately 12 hours. To speed up the process, you can use a lamp. Now we cut out the bottom of the subwoofer and glue it to our body. The joint is treated with sealant or glued with epoxy resin.
In this particular case, the shape needs to be adjusted to the trunk hinges so that our homemade subwoofer does not interfere with its closing. After we cut off all the excess, we cut out the side walls and the top cover from chipboard. We make the rounded part from plywood, we did it “by eye”.
Subwoofer box
How you design your subwoofer is how it will sound. Of course, there are ready-made options - cabinet-mounted woofers, but you shouldn’t demand real performance and vibrations from them. This is the “middle”, designed for the average consumer, and is far from an audiophile and creative format.
The most popular types of acoustic design for low-frequency speakers are closed boxes and bass reflexes. A lot has been written about them, the advantages and disadvantages are described in detail, there are reviews, examples and much more.
The subwoofer box requires precise calculation; there is even a special program for calculating the volume of the subwoofer box. If you are faced with this issue for the first time, it is better to turn to professionals. Otherwise, the result will be disastrous: money down the drain and the lack of sound we are striving for.
What box volume is needed for a closed box?
- Subwoofer 8 inches - box 8-12 liters in its pure form
- Subwoofer 10 inches – box 13-23 liters
- Subwoofer 12 inches – box 24-37 liters
- Subwoofer 15 inches – box 38-57 liters
It is impossible to indicate the exact volume, since each woofer has its own characteristics and installation requirements; setting is also important here. If the volume of the box is larger than necessary, then the low frequencies will be blurry and not clear. If it is less, the bass will become “fast” and harsh, this is too much for human hearing.
What volume of box is needed for a bass reflex?
- Subwoofer 8 inches – 20-33 liters in pure form
- Subwoofer 10 inches – 34-46 liters
- Subwoofer 12 inches – 47-78 liters
- Subwoofer 15 inches – 79-120 liters
Unlike a closed box, a bass reflex enclosure can operate even at lower values, although here it is important not to overdo it. If the volume is too increased or decreased, you will not get sound; in the worst case, the result will be a loss of power and failure of the woofer.
Subwoofer with inverted speakers
Typically installed on demo cars for SPL competitions, where maximum sound pressure is particularly valued. Plus - savings in housing volume, the ability to install several subwoofers on one box. The speaker diffuser “pumps” volume in both directions. This is how SPL drivers achieve that very “wind” when everything around the cabin vibrates, including upholstery, long hair, and people. Such boxes are made by real professionals, relying on experience and knowledge in the subject of car audio.
Material requirements
Multilayer plywood, wood or chipboard are used as materials for the subwoofer box. You will also need sound insulation, sealant, screws, glue and tools. In the technical documents, each woofer comes with instructions indicating the required cabinet volumes for good sound. Drawings are developed in accordance with the box volumes recommended by manufacturers.
If you want to buy a box for a subwoofer, you can consult directly in the store; MVA specialists know a lot about this and will advise the required volume and type for the existing low-frequency speaker.
What's the result?
As you can see, the decision to make a housing for a subwoofer in a car with your own hands will require certain skills and tools. However, if you do everything correctly and use good quality materials, you can get a fairly powerful sub with good sound.
Finally, we note that after connecting the subwoofer, you also need to configure it. Only after proper adjustment and tuning of the subwoofer will the sound “reveal” to its fullest, which will allow you to fully customize the car’s acoustic system in the future.
Installing a subwoofer in a car: how to choose a subwoofer, installation diagram for a subwoofer in a car. Connecting a subwoofer through an amplifier or without an amplifier, recommendations.
How to set up a subwoofer in a car. Amplifier settings: frequency, phase, Gain, subsonic, etc. What to look for when setting up a subwoofer, recommendations.
How to connect a radio in a car yourself: sizes of radios, adapter frames. Features of connecting the radio if the connector does not fit. Recommendations.
Selecting PTF for VAZ 2114 and 2115: how to choose VAZ fog lights (housing, type of lamp, standard or universal, etc.). Installation of fog lights VAZ 2114, 2115.
How to connect PTF in a car yourself: do-it-yourself fog light connection diagram. Subtleties and nuances, what to pay attention to when connecting.
How to install a child car seat or infant carrier in a car: choosing a child seat, mounting features, installation location of the seat. Tips and tricks.
An HF box or quarter-wave resonator is a hollow box made of any furniture material. The design is used for a subwoofer and allows for deeper sound with a harmonious spectrum. Such branded devices are quite expensive, but the box can be assembled independently from scrap materials. This is exactly what we will discuss in our review.