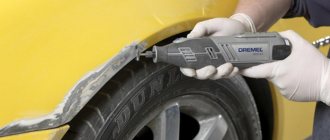
Materials for preparing and painting a car
To paint a car well, you should use high-quality materials - this is an axiom. This applies not only to the paint itself, but also to everything that may be required to prepare the car for painting - abrasives, putties, primers, etc. and so on. Below I will describe the necessary minimum materials for high-quality preparation of the body for further application of paintwork. Please do not pay attention to brands, I photographed what came to hand.
1. ABRASIVE MATERIALS (paper, sandpaper for a plane) To process putty using a plane, belt-type sandpaper with an abrasive size of P80 - P240 is used. Starting with the coarsest P80 (there are even coarser ones, but I don’t recommend using them, since the marks left with very coarse sandpaper are difficult to erase and they can later appear after painting) and ending with P220-240 for applying primer. Remember the rule - the step between grains is no more than 100 units! Belt abrasive paper is easily attached to a special plane with clamps. Gradually switching to finer grains, we achieve the desired result.
Velcro sanding paper is also available for sale, cut to size. If you purchase a plane with Velcro, you can use this option. But, such a simplification will significantly affect the cost of both the plane and the abrasive paper itself.
Cost: from 20-30 rub. per meter
2. ABRASIVE MATERIALS (for an orbital sander) We use as many devices as possible to make our work easier - special Velcro discs for an orbital sander. They are divided according to: - the diameter of the sole of your orbital sander; — number (size) of abrasive grain; — the number of holes for blowing dust from the surface being treated (not of fundamental importance).
The range of abrasive grains is very wide from P60 (the coarsest) to P2000 (for grinding varnish for polishing).
Cost: from 15-30 rub. a piece.
3. PUTTY (putty) UNIVERSAL
Two-component putty (of course it would be more correct: putty, but I’m used to it!). Available in containers of various weights. Usually diluted 1:20. The most consumable material in auto repair. The consumption of universal putty is the highest, as a percentage of other materials when preparing a car for painting. Before use, mix with the hardener very carefully so that there are no pink streaks (usually the hardener is a bright contrasting color). It is most convenient to do the kneading with a large spatula while stirring with a small one. I wrote about how to properly putty repair areas here. The “life” of the working mixture is 10-15 minutes; the warmer the air, the faster it begins to polymerize. Apply with a spatula in thin layers. It is sanded after complete curing (after about 30-40 minutes), with abrasives from P80 to P240. There are many manufacturers, over time you will choose what you like, regarding: price - quality.
4. GLASS FIBER PUTTY
It has the lowest degree of shrinkage and is successfully used when repairing plastic parts and filling large gaps that cannot be eliminated with body work. It should be applied in several layers with intermediate drying. It is sanded after complete curing (approximately 30-40 minutes), with abrasives from P80 to P120. Layers of universal putty are placed on top. Some people use glass fiber putty to seal corrosion holes. But I don’t recommend this method of use. After some time, 2 - 3 days after painting, bubbles in the paint will definitely appear in this place. Moisture easily penetrates through this putty. How to seal small holes from rye, read the article - “Removing through corrosion of the car body.”
5. FINAL PUTTY Also, a two-component putty, usually white. Has a finer grain structure. Used for final finishing work on putty. The finishing putty should be applied in thin layers; it can be wiped off with an abrasive much easier than a universal putty. For processing, use an abrasive no coarser than P180.
6. ONE-COMPONENT FINISHING NITRO PUTTY (Nitrosoft)
A one-component nitro putty, usually gray-yellow-green in color. It is used to eliminate minor defects after puttying, as well as to eliminate drips on the paintwork and other defects. It is usually applied with a soft spatula (made of white rubber or transparent silicone, so as not to leave traces of black rubber). It should be applied in a very thin layer. Drying: 10-15 min. Afraid of solvent. It is processed with abrasive P220 - 240 -320 -400, immediately before priming.
7. TWO-COMPONENT ACRYLIC PRIMER
It is used, as is clear, for priming the surface for painting. Usually available in white and black. Choose a color based on your paint color. Light tone - use white primer, if dark, guess three times. It is possible to mix primers (from the same manufacturer) to achieve the best substrate for paint. Some pearlescent pigments require a specific primer and base color, so be careful! The men and women who work mixing paints are usually in the know. Don’t be shy, shake them like Pinocchio, they will tell you everything about the required primer and substrate.
8. ACID (PHOSPHATE) SOIL
A two-component primer, usually yellow-greenish-gray. It is used for application to bare metal, as well as to protect “rubbed marks” after finishing with abrasive immediately before painting. Not processed with abrasives! It should be diluted in a glass container, otherwise it will lose its properties! Dries very quickly, 5-10 minutes. Removes water molecules from the surface of iron, forming a thin film. Apply in 1-2 layers. No more pouring! Regular acrylic primer is applied on top. It can also be used immediately before painting. Acid soil is used to cover areas rubbed with abrasive when grinding the soil layer. Bald spots with exposed metal or worn down to putty. Next, without processing, pigment or acrylic paint is applied. WARNING! Do not apply putty over applied acidic primer!
9. POLISHING PASTES
They are divided into several types:
abrasive rough; abrasive; fine abrasive; non-abrasive (for shine); protective pastes (various wax, Teflon, etc.) The use of polishing pastes is described in detail in the articles: “How to properly polish a car” and “Grinding and polishing a car body after painting.”
10. DEGREASING WIPES Special lint-free (after use they do not leave lint behind) wipes. They are used to degrease the surface to be primed or painted. I don’t think there’s any need to explain how to use them.
It is a degreasing agent, applied using a spray (such as spraying flowers) or napkins onto the surface, immediately before applying primer or painting. First, wipe the surface prepared for painting with a cloth generously moistened with anti-silicone, then wipe this surface with a dry cloth to remove excess anti-silicone liquid. After waiting for the anti-silicone to dry completely, apply primer or paint. A must-use product. Allows you to effectively combat paint defects such as “fish eyes”. After application, it is not recommended to touch the surface, only with a sticky cloth to collect dust immediately before applying primer-paint.
Process Features
Before deciding which sandpaper to use to clean the putty on a car, you should understand that sanding is a rather labor-intensive task; during the work, it is important to do everything so that only a thin layer of putty remains, so leveling will have to be done several times in a row. As a result of cleaning, almost 90% of the putty will be eliminated.
It is important to do everything very carefully and seriously. You may not enjoy sanding, but without the proper diligence, quality body work will not be achieved. Before you begin sanding, prepare all the necessary materials and room.
Video review of how to properly sand putty on a car:
Degreasing
Degreasing is an important stage of preparation and is carried out with a special anti-silicone liquid. A lint-free napkin is impregnated with it. According to technology, you need to use two napkins at the same time. One is impregnated with anti-silicone, the other is simply dry. The first thing to do is degrease, and wipe dry immediately after it. The idea is that soaked rags “lift” various microscopic particles, dissolve silicone and dirt, and dry rags wash them away.
Solvents should not be used as a degreaser. They have an aggressive effect on paintwork and soil.
Preparatory work
If you are interested in what kind of sandpaper to sand putty on a car, then, first, think about where you will perform all the necessary work. It is important to note here that such activities should be carried out in a well-ventilated area, as many small dust particles will get into the air.
Even if you think there is no dust, this is not true. Dirt will be especially noticeable at night when the lights are on.
To get rid of the bulk of dust, it is recommended to periodically vacuum during work. It is also worth considering personal protective equipment. First of all, we are talking about a respirator and gloves.
conclusions
So, we looked at how to properly prepare a car element for local painting and how to apply primer correctly. The sample part has been successfully primed, sanded and ready for painting.
12. The part is primed and ready for painting
SOLID 500 passed the test: it did not break through at the repair site, was sanded well, and dried in half an hour. Suitable for use.
Source
How to sand a car before painting
So, the preparatory work has been completed, now you should begin choosing materials for grinding. As a rule, silicon carbide or aluminum oxide plays the role of an abrasive for body work.
The question of which sandpaper to rub putty on a car consists, first of all, of choosing materials with a certain concentration of particles . The more there are, the faster the grinding procedure will occur. On the other hand, this same parameter also affects the uniformity of scratches that occur during work.
Pay attention to the number that refers to a specific material. As it decreases, the size of the abrasive increases.
Secrets of the craft: priming the car correctly
We offer step-by-step instructions from our specialist - a simple and understandable video.
We’ll reveal all the secrets and show you in practice how to properly prime a car before painting. At the same time, we will test the new Europroject Trading primer SOLID 500.
As an example, let’s take a wonderful repaired car part, puttied with materials from the SOLID digital line.
1. Repaired auto part for priming
Let's get to work.
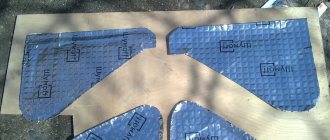
Sanding materials with mesh backing
At the same time, using abrasive paper is not the only option for how to properly sand putty on a car. In addition, there are also special mesh devices. They are made from high-strength polyamide or nylon material, which is joined with cross fibers. Abrasive elements (aluminum oxide) are attached to them.
Such materials are excellent for any type of sanding. They are characterized by increased stability, and even if water is used, the devices will not fly off during operation.
Although there is less abrasive material on the meshes, it is used with maximum efficiency. Dust does not stick to the surface of the material. Thanks to this, it can be easily removed with a vacuum cleaner.
Among the advantages of the sanding mesh are:
- high productivity;
- increase in work efficiency up to 40%;
- no contamination of the material;
- simplicity of work, since the surface being processed is sanded as evenly as possible.
Most popular sizes
When answering how to clean putty on a machine, you should also worry about choosing an abrasive with suitable parameters. Among the most common options it is worth highlighting:
- P36-P60. Suitable for preparatory work. With the help of these grinding wheels, you can quickly remove a large ball of putty, including putty with fiberglass. They can also be used to remove areas of corrosion and seams that occur after welding. But here you need to act very carefully so as not to remove excess;
- P80-P100. Medium abrasive is used to smooth out rough scratches and level the surface. Grinding wheels of this type are often used to prepare the surface for applying putty;
- P100-P120. Suitable for removing scratches from coarser abrasives;
- P120-P180. Designed to prepare the surface for priming;
- P180-P220. Suitable for cleaning the finishing putty before painting a car;
- P220-P320. A very delicate abrasive. It can be used by hand, without a sander. The goal is to achieve an almost perfectly flat surface;
- P400-P800. Final preparation of the surface before painting;
- Suitable for wet sanding of paintwork before painting;
- P1200-P1500. The material is used for sanding paint to remove defects before polishing;
- R2000. Suitable for finishing work before polishing.
Surface matting
Matting should begin by sanding large flat surfaces with coarse sandpaper and a sander or plane. Treated and embossed surfaces are carefully processed by hand. In the process of high-quality matting, the old coating is removed and an even, polished thin layer remains.
The final stages of matting are:
- grinding;
- visual inspection of work quality using developing powder;
- rinsing with clean water;
- wiping with a sponge or felt;
- drying;
- degreasing.
It is better to check the quality of work with side lighting. Detected defects are marked with a marker and processed again. The quality of matting determines the reliability of adhesion of the paintwork to the surface of the car. At the same time, the matting of ordinary surfaces and transport soil are significantly different, so they should be considered separately.
Matting a normal surface
Matting is carried out at all stages of car painting. To apply primer, putty and paint, the surface is treated with abrasives of varying grits to improve the reaction between layers.
Before priming, the surface is sanded with sandpaper with a grain size of approximately P320. Before painting, treatment is carried out with less aggressive abrasives, within the range of P800-P1200, or using a special paste. For local repairs, the edges of the area are polished with a thin abrasive sponge P2000. For high-quality polishing, several abrasives of different grain sizes are used alternately in the same place, first for sanding and then for polishing. Matting is carried out dry, for example for polyester putty, or with wetting with a moderate amount of water to remove dust.
Reference! Technological details of processing can be found in the instructions for the selected abrasive from the manufacturer.
Matting of transport soil
To deliver new parts for sale, they are often protected from damage with a special protective layer. The transport primer is applied by electrodeposition and is characterized by high hardness. Before using such a part, the protective layer must be removed and standard automotive paintwork applied. When painting new parts, matting will be required if, in addition to the primer, there is a shipping coating. A solvent that reacts with any coating other than the base primer will help determine its presence.
It is almost impossible to carefully remove the transport primer by hand, so you will need to use a grinding machine. Removing transport soil requires, due to its hardness, a specific approach. You will need a special grinding wheel made from mineral components. It has a standard P320 gradation, but can handle increased grinding loads. Also included are matting gel and paste.
Features of manual grinding
This solution is suitable in the absence of special equipment. In addition, hand sanding is necessary when working in hard-to-reach areas. In the course of such activities, a number of features should be adhered to:
- using a long block you can smooth out defects that cannot be felt even after touching with your hand;
- using a block, make passes crosswise, up and down and back and forth five times in each direction. You should not sand one place, otherwise this will lead to the appearance of indentations;
- Use only clean sanding paper. Its operation is suitable until you feel that the material is being cut;
- It is important to gradually switch from coarser abrasives to fine ones (40-60 at a time, for example, from 120 to 180). As a result, you will save your time and effort;
- Apply masking tape to the adjacent panel to protect it from unintentional damage;
- no need to wait for the putty to completely harden. Within 5-10 minutes after its application, you can begin sanding work. If you use medium abrasives, you need to wait for the surface to completely harden;
- Keep in mind that in modern cars the body can be very thin, due to which the metal will bend during work. Take this fact into account to avoid removing too large a ball of putty;
- For rounded surfaces, elastic bars can be used.
see also
- Do-it-yourself wheel alignment in the field
- Normal engine compression
If you receive a prescription for tinting, what should you do in 2019?
Professional car tinting- Do drivers need a medical certificate in 2022?
- Dimensions of Mazda 6
- UAZ hunter clutch
- Oversized permissible dimensions
- Wheel bearing photo
- Car brand logos
- How powerful is the battery?
How to sand putty on a car using a sander
The use of special equipment will be especially relevant in the initial stages, when you need to remove large balls of putty. Finishing work is done by hand. At the same time, when working with equipment, you should adhere to the following rules:
- Avoid high speeds, this will make it easier to control the process. In addition, high speeds can lead to overheating of the device;
- Do not press hard on the equipment, otherwise the grinding efficiency will decrease;
- using a soft substrate you can reduce the level of pressure on the surface, which will allow you to process the body more efficiently;
- when working with a grinder, the risks will not be as large as with manual grinding;
- Under no circumstances should the machine be stopped in one place; it should be constantly moved. Movements should be smooth, without sudden jerks. New passages should overlap the previous ones by 50% of the length;
- You should not sand with one edge of the sole, especially when using a coarse abrasive. It is important that the angle is as small as possible.
What sandpaper should I use to remove old paint?
Old paint
can be removed with waterproof
sandpaper
400-600 with water. Next, the part is primed, unless there are strong defects that the primer will not remove. If there are any, then putty first, then sand and prime.
Interesting materials:
What to give to the Matchmaker for her 50th birthday? What to give your mother-in-law for her 60th birthday? What to give your mother-in-law for her 55th birthday? What to give your father-in-law for his 50th birthday? What to give a woman manager for her anniversary? What to give a man you know for his birthday? What is meant by threat? What will a stool test show for dysbacteriosis? What will a CT scan of the head and neck show? What will a CT scan with contrast show?
A few additional tips
Finally, I would like to say a few more tips that will help you when sanding before painting:
- The primer is sanded dry because it is porous and will absorb water. Paint and hard-to-reach places are sanded with water, but then the surface should be dried very thoroughly (alternatively, infrared equipment should be used);
- When processing paintwork, it is better to turn on medium speed. A soft backing will also come in handy to help make sanding more even;
- For hard-to-reach places and edges, you can use a special Scotch-Brite abrasive. Along with it, you should resort to matting paste. These elements do not remove defects, but only increase the dullness of the surface;
- before starting work, it is important to clean the body from dust and dirt;
- Don't forget to prepare a sanding block. Its role can be played by a block of rubber, as well as a foam squeegee. If you hold the sandpaper in your hands, the marks will be uneven;
- When using water, do not resort to soap. Otherwise, it may be absorbed into the soil, causing the subsequent layer of paint to be uneven.
Prime without mistakes: technology inside
The most common mistake at the car priming stage is the desire to prime more in the repair area. This method is called "priming out" - and it is the wrong approach.
We will explain and demonstrate how to properly prime a car “inside” when painting locally.
First, spray the areas of bare metal from a spray can and let it dry for 10-15 minutes. Next, apply 3 layers of primer-filler.
Correct order of execution, inward priming technology:
4. Apply the first layer of primer
The primed area of the car is completely dry. Before we start sanding, remove the masking and evaluate the result. The transition boundary turned out to be very smooth, without a hard cutoff. Everything is correct. Exactly the way it should be.
6. Ground transition boundary
What is the result?
So, the grinding process is the most important task during painting work. If everything is done correctly, the paintwork will adhere well and retain its attractive appearance.
We hope our set of rules will help you choose the appropriate abrasive, as well as carry out high-quality sanding of the putty before applying paint to your vehicle.
Video advice on what sandpaper to use to sand putty on a car:
1200 rub. for the photo report
We pay for photo reports on car repairs. Earnings from 10,000 rubles/month.
Write:
Polishing a car body is quite a hot topic, because every car owner wants to see his reliable iron friend beautiful and shining in the sun with pearlescent tints and a perfect mirror paint coating. Such success can only be achieved by high-quality polishing, subject to a good layer of varnish or acrylic paint. An important factor in the mirror surface of a car is polishing after painting.
No painting in a chamber can guarantee the complete absence of dust particles on the surface being painted, and fresh paint or varnish can lose up to 60% of its shine when drying - there are a number of technological reasons for this: the quality of the materials used during painting and surface preparation, the solvents used, humidity, drying temperature.
Polishing after painting is most necessary for a successful high-gloss finish. Depending on a number of reasons, freshly painted parts may not immediately have a perfectly glossy surface - in addition to specks of dust, there may be different sizes of shagreen, and overspray of varnish on the last layer of varnish, when painting around the entire car.
It is not necessary to take your car to a specialized service for polishing, although they will do everything much faster and possibly with better quality. For body polishing, the price ranges on average from 70 to 150 dollars, and the materials needed for polishing cost at most 50. So, if you want to save a few hundred dollars, read on.
If you need to add putty
If, during sanding, deep unevenness is discovered that is not compensated by the thickness of the soil, then you are out of luck - you will have to putty and level the surface again. Then you prime again, apply development, and continue finishing. For a beginner, this process can be painfully long, but believe me, your efforts will not be in vain.
It will be much more disappointing if you give up on everything and start painting the car without bringing the surface to the desired quality. You will regret it at the very moment when, after applying the paint, all your flaws will appear in full view. Therefore, you need to gather your strength and complete the work.
In this case, it is not advisable to apply putty (especially thick layers) directly onto the filler primer. According to technology, the soil from these places must be cleaned off and only then putty.
Although many manufacturers of putties allow their application on 2K acrylic primers, they set one mandatory condition - complete curing of the primer. However, we must keep in mind that complete polymerization is not as fast a process as it seems. It does not end at all after the conditional 6 hours of air drying specified in the instructions for the primer. And when applying putty to a soil that is not completely cured, problems with adhesion and contouring will not take long to arise.
Try to remove all defects at the puttying stage, that is, before applying the filler. Level the surface until there is not a single defect left on it - only then can you apply primer-filler and then paint with a clear conscience.
Our surface has been cleaned and is almost ready for painting. In the next article we will talk about the final preparations that should precede the application of enamel.
Tools and materials for DIY polishing
So, first of all, what do we need for self-polishing:
- A set of sandpaper for washing - gradations 1500, 2000 and 2500.
- Polish - here it is better to pay attention to the quality and range, otherwise your car will remain matte, like after washing. It is best to use 2 or 3 names - the most basic one is the first one. It is best to use 3M polish with article number 09374 - it has the largest abrasive in its line, and it polishes washed out surfaces and small scratches as quickly as possible.
The second number of polish, with a smaller gradation of abrasive, will remove the remaining micro-scratches from the first polish, giving the surface a more mirror-like surface. The second number may be required on dark colors, especially black - all the flaws of poor-quality polishing are visible on it.
On dark colors, a hologram effect may occur - after polishing, large abrasives leave microscratches, which, under the sun's rays, begin to outline the entire car with tints and spots. Therefore, it is better to stock up on anti-hologram polish in advance. Ideally, a 3M anti-hologram or WURTH brand polish can cope with this task of removing stains from a machine - it’s expensive, but it cleans well, and the consumption is minimal.
- Polishing machine with a maximum speed of 3000.
- A microfiber cloth for wiping the body after polishing - removes polish residues and its components without scratching the body.