In almost all modern cars, in addition to the sensor showing the engine temperature, there is another device that shows the temperature outside the car. The ambient temperature sensor in the car is part of the climate control system, as well as the on-board computer. Incoming information can be seen on the dashboard.
The main purpose of DTNV
Today, the VDO panel has become widespread, which allows you to display the ambient temperature directly on the dashboard display. At first glance, it may seem that information about the state of affairs outside the car is not so significant for the driver. But, in fact, the outside air temperature sensor is a useful mechanism. This information is especially relevant during periods of unstable weather.
You can leave the garage in the morning, when the temperature is above zero, and in the evening it will be frosty. Thanks to DTNV, the driver will always be aware of possible problems with the road.
Among other things, in more expensive trim levels the outside air temperature sensor allows the car owner to start the engine to warm up automatically. This function significantly saves time and promotes “easy” engine starting.
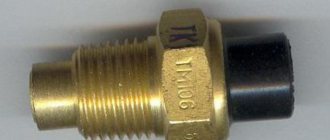
According to the principle of operation, this mechanism is a conventional thermistor, since its resistance depends on temperature. The VAZ-2114 air temperature sensor is connected in its operation to the control unit. Any deviations in the functioning of the device will result in the manifestation of various symptoms of serious damage.
Operating principle of the sensor
All temperature measurement sensors have the same operating principle. The effect of changing the resistance value of a semiconductor element depending on temperature is taken as a basis: as the temperature increases, the resistance values decrease. For a clear example, you can take meter readings from a domestic VAZ:
All values are specifically given with errors, for greater accuracy of the measuring device and the reliability of its readings.
Why does DTNV break down?
The main difficulty for novice drivers is the search for a device. The manufacturer has hidden the mechanism in such a way that sometimes experienced drivers are not immediately able to detect the DTNV. The controller itself is reliable, but breakdowns often occur.
see also
The most common reasons for its breakdown:
- from being hit by crushed stone while driving;
- critical temperature level (often breaks down during severe frosts);
- damage to wires;
- oxidation of contacts.
The driver may not notice for a long time that the ambient temperature sensor of the VAZ-2114 has failed. The system will not generate any signals if there is a small difference between the actual air temperature and the air temperature displayed by the sensor. However, with large deviations, when in the summer the display shows sub-zero temperatures, serious troubles will arise.
The resistance in the circuit will increase, and the control unit will perceive this information as an urgent need to increase the amount of fuel supplied to the cylinders. Ultimately, your gas mileage will increase.
What types of thermostats are there: what are they for, the principle of operation and the design of the device
A thermostat is a device that allows you to maintain the temperature within specified parameters.
Below you will learn how a thermostat works, how it works and the basic principle of its operation.
Without noticing this, we often come across a thermostat in life: it makes sure that the refrigerator maintains the desired temperature, does not overheat or freeze, thanks to it the kettle is heated to the desired temperature, and the car quickly warms up and does not break down due to the high engine temperature . You will learn why a thermostat is needed in different devices and what needs to be done to identify faults.
What is a thermostat and what is it for?
What is a thermostat and what is it for? Thermostat - what is it? A thermostat is a device that is needed to maintain the temperature at a given level.
It is used in different areas of life, in everyday life: to maintain the temperature in the stove, refrigerator, heated field, air conditioner. And in industry to regulate space heating, in cars the purpose of a thermostat is to avoid engine overheating.
How to extend the life of the controller
The cost of this device is relatively small. If the sensor fails, it is better to replace it with a new one. Experienced mechanics advise doing this. You can try to extend its service life, but there is no guarantee that the DTNV will not fail at the most inopportune moment.
In any case, before replacing the controller, it is best to ensure the following:
- If the contacts are oxidized, they should be cleaned.
- Oxidized contacts on the chip should be wiped with alcohol and dried.
- Check wiring.
If the actions taken do not lead to the desired result, it is best to replace the DTNV. To carry out all the work, you do not need to have the skills of a mechanic; it is enough to arm yourself with a handy item.
When replacing an old sensor with a new one, there should not be any particular difficulties. DTNV must be installed in the same place. If the car was not equipped with such a device, then first of all it is worth deciding on a suitable location for the mechanism.
It is strictly not recommended to install the controller in the rear of the car. Since hot air is directed precisely to this part of the body while the car is moving. Experienced auto mechanics install the sensor mainly in the front of the car. Where is the air temperature sensor located on the VAZ-2114? The manufacturer has already provided space between the front bumper and the radiator.
Installation of external air t* sensor (ADTV)
Installing an outside air temperature sensor. The automotive world is improving and developing rapidly every year, bringing unique innovations to the characteristics of the car, providing comfort and convenience to its owner.
So the AvtoVAZ company equipped its latest models of VAZ-2110 cars with additional on-board computers - DTVV. But the next model of the VAZ-2115 car was equipped with a VDO dashboard, which already came with 2 windows, which made it possible to display the temperature regime directly on the instrument panel itself.
Today, the following options for installing DTVV on the VAZ-2110 car model are known and quite successfully used:
- • First of all, you need to figure out which air temperature sensor is the most optimal in this case. Among the popular devices is DTVV, catalog number 2115-3828210-03 (price range 200-250 rubles).
- • To make sure that it is working properly, you can use a simple technique (test): by heating or cooling the sensor itself, its resistance values will also change in accordance with the instructions supplied with it.
So, the primary question that arises when installing the sensor is:
Where should the DTVV be located?
In accordance with the instructions, the DTVV must be isolated from dampness and direct exposure to sunlight must be minimized. Also, the accuracy of the sensor readings is negatively affected by heat from the engine compartment. As an exception, it is allowed that the flow of oncoming air directly impacts the sensor itself.
Having compared all the conditions, a suitable location for the sensor is the front of the car (behind the front bumper in the center), as well as near the towing eye (in the bumper or slightly above the bumper on the left in the direction of travel).
You should know that if you install the DTVV in the rear of the car, the temperature readings will differ significantly from the actual temperature. Because the warm air coming from the engine is directed towards the rear of the engine.
The sensor is equipped with 2 contacts: one goes to ground, and the second signals temperature changes. It is advisable to make such information contact into the car interior through the corresponding hole near the fuse box.
Having carried out the above steps, you can proceed to connecting the DTVV to the VAZ-2110 trip computer.
Having selected the desired model of on-board computer, it is recommended to carefully study all the documentation related to its connection.
The manufacturer equips VAZ-2110 cars with an on-board computer of the MK-2112 brand or AMK-211001 brand.
Based on the instructions in the instructions, the second contact of the DTVV should be connected to contact C4 on the MK block. As for the wire extending from contact C4, it must be removed and reliably insulated.
If there is no DTVV or if the circuit is broken, the following symbol “- -” will appear on the on-board computer display.
When connecting the sensor to on-board computers such as State, Multitronics and Gamma, it is recommended to adhere to the attached diagram included in the kit. To eliminate errors in temperature readings, a temperature calibration function was provided, but, unfortunately, not all models of on-board computers have it.
Second option: connecting DTVV to a VDO panel with 2 displays.
Mostly luxury VAZ-2115 models have a VDO instrument panel with 2 displays. The connection process is as follows: the wire coming from the sensor must be connected to the red block X2, which is located on the instrument panel in socket No. 1.
If this socket already contains another wire, then these wires must be combined. If the display of the VDO panel shows -40, then you need to pay attention to the integrity of the circuit between the sensor and the panel (if there are any breaks).
Another interesting nuance: when connecting the DTVV, it is simultaneously possible to create an original backlight for the VDO panel, as well as change the color of the screens.
← Previous post
Next entry →
Leave a comment Cancel reply
How to connect an air temperature sensor yourself
The mechanism itself has two contacts, one of which must be connected to the vehicle ground, and the second to the ECU. But, before starting all work, you need to make sure that the on-board computer supports collaboration with a specific type of sensor. Information can be found in the documentation.
As for the installation itself, there are no difficulties here. You just need to follow the instructions for connecting the DTNV. After connecting the sensor, make sure that the instrument panel display shows the correct temperature.
If the incorrect outside air temperature is still displayed, you should “restart” the on-board computer. You just need to remove the positive terminal for 5-10 minutes, and then reconnect it. After the operation has been completed, the DTNV should begin to display the actual ambient temperature.
How to determine if your device is faulty
You can determine that the meter is broken by the obvious discrepancy between the data on the display and the outside temperature. The most accurate readings will always be in the morning, when the car has not yet warmed up.
The verification procedure is simple:
- First, you need to check the thermometer reading outside the window with the meter reading in a cold car. They should be approximately the same.
- The next step is to start, warm up the car and make a short trip of a couple of kilometers.
- If the readings change during the trip, then most likely moisture has entered the sensor due to improper placement of the device.
- In this case, after stopping it will need to be removed from the mount in the car, removed from the casing and wiped with a dry cloth.
- A clean device can be inserted into its original place and connected.
If after the procedure, the readings are still far from reliable, then it will be easier to buy a new one. The main thing when choosing is to select a device based on the make and model of the car.
General information
As noted above, various sensors are installed on cars for a reason. They are necessary for the efficient operation of the system as a whole. As for the outside air temperature controller, it is mostly informational in nature and shows the temperature outside. But this does not apply to all systems. Sometimes the coolant temperature sensor is connected to the engine electronic systems. This is necessary to start the engine in the cold season and is a very convenient addition to the “autostart” function.
Unfortunately, not all cars have a temperature sensor built in at the factory. Many VAZ models do not provide this. But it doesn’t matter, let’s look at how to install it and what is remarkable about this process.
Conclusion
Many modern car enthusiasts naively believe that an external temperature sensor in a car is a completely useless option that is of little use. However, if you delve into the details, it becomes obvious that manufacturers simply would not equip vehicles with unnecessary features. Outside temperature sensors are aimed primarily at motorists who have to travel long distances in their cars and who do not have the opportunity to monitor weather conditions on the road using a smartphone or other gadget. Moreover, in some modern cars this device allows you to automatically select the optimal mode for the climate system, which in turn is aimed at the comfort of the driver and passengers.
Author: Oleg Mokrov
Where is the ambient temperature sensor located?
On different brands of cars, the controller has a different location. This is due in most cases to the design differences of the machines. For example, on a BMW you can install a temperature sensor directly behind the bumper, but not on a VAZ.
However, understanding where the ambient temperature sensor is located is quite simple. You need to find its number in the electrical diagram, and that's all. In most cases, it is installed near the radiator, usually in front or behind it. But it happens that it is mounted on the side. The main requirement is the absence of temperature effects from the engine. The motor gets hot and affects the controller. He, in turn, will give incorrect testimony.
Types of DTOZH
We figured out where the controller is located and what functions it performs, now let’s talk about the varieties. Regardless of location, regulators are divided into magnetic and bimetallic. You can understand what type of installed element is based on how the device reacts to starting the motor. Magnetic devices react almost immediately and display the temperature profile immediately after the engine starts. As for the bimetallic one, it will be able to show accurate readings after a certain pause.
What is the operating principle of the devices:
- The bimetallic regulator is equipped with a control unit that changes the current strength based on the temperature of the consumable. Ultimately, this leads to heating of the coil on the steel strip, while the latter can change length depending on the temperature regime.
- In magnetic controllers, the operating principle is also not complicated. The design of such a device consists of an arrow mounted on it, and on the side parts there are coils that are connected to the car's electrical circuit. The resistance level of the coils will change in accordance with the passing current layer, which, in turn, is determined in accordance with the temperature conditions in which the motor operates.
DTOZH controller with dial
"Lada Granta": sensor installation
This car is equipped with a controller only in the maximum configuration. In other cases, there is preparation, that is, there are all the necessary connectors and wires for connection. This is done so that the driver has the opportunity to carry out the installation himself.
However, before installation, it is advisable to check whether the dashboard will display controller readings. To do this, press the daily mileage button and turn on the ignition. This is how we run self-diagnosis, as a result all indicators are displayed. During diagnostics, press the daily mileage button again, which should bring up version 090 or higher on the display. This will indicate the possibility of installing a sensor
Causes and symptoms of DTOZh malfunction
If the controller fails, the cooling fan will not be able to start. Ultimately, this can lead to overheating of the power unit. At the same time, the driver who is currently driving may not even be able to find out about the presence of a problem, which will result in expensive repairs of the internal combustion engine.
The problem can be solved only by periodically checking the temperature sensor, which can be done at home using a tester - a multimeter - as well as a digital thermometer. The dismantled regulator must be lowered into a container of water heated to 100 degrees, after which the resistance must be measured, this parameter should be 177 Ohms. When the liquid cools to 50 degrees, this figure will already be 973 Ohms or higher, and when cooled to 20 degrees it will increase to 3520 Ohms. If the indications are different, this indicates the need to replace the DTOZH.
Direct installation
As noted above, the VAZ ambient temperature sensor is not difficult to install. Especially if all connectors are provided by the manufacturer. The next step is purchasing a sensor. There is nothing complicated, we go to the car store and buy the thing we need. The most optimal location for the sensor is near the radiator. The mass can be thrown over the welded pin. The wires need to be pulled into the interior. How this will be done is up to you. The most convenient and shortest way is through the clutch plug. Of course, you can’t do without disassembling the instrument panel. We dismantle it and look for the 25th contact. It is precisely intended for the ambient temperature controller. Readings on the on-board computer usually appear automatically. If this does not happen, reset the battery terminal for 10-15 minutes. After this everything should work. The VAZ ambient temperature sensor costs a penny. Its installation does not take much time.
Firmware for instrument cluster on Kalina2Granta
Since the USBDM programmer had already tested it at home (CAN recovery) and found out that it can also flash instrument clusters (gearboxes), I decided to flash it myself.
My gearbox costs 219240 and came with firmware 007 and did not display engine temperature readings. I decided to upgrade to version 009. But as always, the first thing is lumpy, an error popped up during the firmware and the result was a brick. Again, study the internet and figure out what’s wrong. I found my mistake, reflashed it with a new one - everything worked.
But the mileage readings became “000” and the IMMO was lost. There were no problems with retraining the keys (IMMO), the Internet is full of information, and I’ve already done it myself. But it was not easy to restore the mileage; the car is under warranty and also needs mileage. MrRararai for help
, he helped restore my mileage, for which I thank him very much.
Now I have firmware 012 on my gearbox.
Now I have also learned to change the mileage.
I surfed the Internet and this is what I found about instrument clusters:
how to view the CP firmware
- press the mileage switch button, then turn on the ignition without releasing the button (without starting the engine), the test will begin, press the button again - we see the software version (top line) and equipment (bottom line).
There are two firmware options:
1) with mileage and IMMO reset (it will be necessary to retrain the keys)
2) with preservation of mileage and IMMO.
— The gearbox seal is broken (warranty).
— When flashing the firmware, there must be a training key nearby, if something goes wrong and the IMMO is jammed, the car will not start, you need to train the keys (IMMO)
015
- on the old board, there is not a single temperature.
029 — 040
- updated board. there is no temperature.
All panels from the standard have a different display installed; to flash the firmware, you need to change it to a display from the standard. And add a bunch more elements. The old and new versions are different, each has its own improvements.
053, 060, 076, 087
- there is no temperature.
090, 091
– it is possible to connect an ambient temperature sensor (TOS), but there is no coolant temperature (TOZH)
092-095
– there is TOZ and TOS
053, 060, 076
– Old boards, to flash them you need to modify the board with a soldering iron or sew adapted 092 firmware
087-095
– New boards. Sewn without any modifications.
046
– has everything (same as 009 from Kalina)
009
– has everything (same as 046)
012
– everything is there, the latest version. It differs from 009 in the presence of a gear shift prompt.
Hardware PCs of configuration 40 (Lux) from configuration 20 (Normal) differ in the presence of an LED for indicating PPTF and the color of the glasses
— 219220(40)-007 and higher, there will be software: 009 or 012 — BC of the “Lux” configuration + engine temperature + removed the glitch with the outside air temperature + corrected the clock
On the 012 firmware of the gearbox and the firmware “i427ge05”, “i427GKA1” of the ECU, only on the luxury PC (219240), only on the manual (127 engine) - a hint about gear shifting appeared.
— 219020-060, 076 will be software: adapted 092, TOS and TOZH will be added
— 219020-087 and higher, there will be software: 092 or 046 (unlike 092, it will additionally show the engine operating time, fuel consumed and average speed. All parameters are resettable) or 009 from Kalina (in addition to 046, the squeak of the turn signals).
— 219040-032 and higher, there will be software: 046 — BC of the “Lux” configuration + engine temperature + removed the glitch with the outside air temperature + corrected the clock
Some data on firmware versions was taken from Goffka
How to install an ambient temperature sensor on a Priora
The standard configuration includes this controller. But there are times when for one reason or another it is absent. For example, you bought a used car, but there is no sensor or there is one, but it doesn’t work.
However, this is not a big problem. True, for installation or replacement you will need to remove the bumper, since it is not always possible to get under it. It is located directly behind the front bumper and mounted on the front of the body. If there is an air conditioner, then there will be two such sensors. First of all, you need to check the functionality of the old one. The best option is to take a household thermometer and compare the readings. Deviations may be caused by excessive voltage on the contacts.
If the sensor is missing, then install it in the appropriate socket. There should be a wiring harness, so all that remains is to connect and enjoy the result. If the old sensor is acting up, then take it out, turn on the ignition and check the voltage on the connecting block (wire harness). It should be in the 3.5 V range. If there is no voltage, then the problem is somewhere in the circuit. We call and eliminate.
About installing the controller on Kalina
Let's figure out how to install an ambient temperature sensor on this car. "Kalina", unfortunately, often does not even have the necessary wires, so you will have to pull them into the cabin yourself.
To install, you need to remove the bumper and install the sensor, preferably in front of the radiator. There are only two wires - ground and signal. We hook the mass to the nearest bolt, for example from a horn. We tape the signal wire to the harness with tape, although it is more preferable to use plastic clamps. The most convenient way to bring it into the cabin is through a plug installed near the battery. We remove the tidy and connect the sensor. Usually it shows the temperature right away, you don’t even have to remove the terminals. Now you know where the ambient temperature sensor is located on VAZ cars.
The engine control unit
An electronic engine control unit (ECU) is a kind of computer that processes many different processes necessary for the proper operation of the entire car and its engine. The ECU receives signals from all sensors in the vehicle system and processes their readings, thereby changing the quantity and quality of fuel, etc.
Signs of malfunction:
As a rule, the engine control unit does not completely fail, but only its small parts. Inside the ECU there is an electrical board with many radio components that are responsible for the operation of each of the sensors. If a part responsible for the operation of a particular sensor fails, there is a high probability that this sensor will stop working.
If the ECU completely fails, for example due to getting wet or mechanical damage, then the car simply will not start.
Where is
The engine control unit is located in the engine compartment behind the battery. When washing the engine at a car wash, be careful, this part is very “afraid” of water.