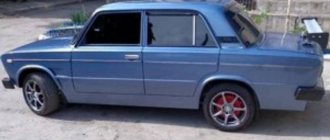
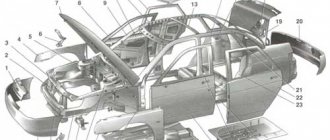
Car body
The body of the VAZ 2107 car is a rear-wheel drive four-door sedan. The assembly diagram of its frame is standard and has the following elements:
- Front parts;
- Front fenders with reinforcements;
- Roofs with glass frames;
- Reinforced floor and rear panel;
- Side parts;
- Hind wings.
Each element is cast from mild steel. Each part has not only its own number, casting pattern, but also its own thickness. For example, for the roof it is 0.9 mm, and for the rear wheel arches - 1.0 mm.
Most parts are connected using non-contact welding, but parts that bear a large load are additionally strengthened by arc welding.
Among the mounted parts it is worth highlighting:
- hood;
- doors;
- trunk lid;
- bumpers.
Paper car: step-by-step instructions on how to make beautiful origami in the form of a car (90 photos)
The main advantage of any paper crafts is the availability of the material and its environmental friendliness. In addition, there are many variations of paper products that you can make yourself.
It is also worth noting that even children of kindergarten age can do this type of needlework. You just need to interest them in such creativity. Beautiful paper cars are best suited for this.
Dimensions and specifications
Regardless of the configuration, the VAZ 2107 has the following dimensions:
– length – 4126,
– width – 1620,
- height - 1435.
- curb weight (how much is the weight of the car with equipment and materials) - 1030 kg,
- total weight (how much does a loaded car weigh with passengers and cargo) - 1430 kg
A motorist needs to know not only the standard parameters of his car, but also the control dimensions.
Control dimensions (points) are usually necessary when restoring a car after an accident. If you buy a used car, knowing these control dimensions, you can easily find out whether the car has been in an accident. This geometry will help in restoring the body, as well as other important parts.
The main control dimensions are described in detail in the diagram below:
The linear dimensions are clearly defined by the following diagram:
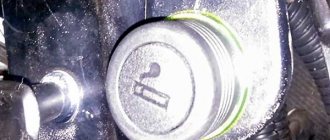
Hood of VAZ 2107
VAZ 2107 owners often modify the hood of the car. First of all, the lid stop, which was made at the factory in an extremely inconvenient way, changes. First you need to remove it from the latch and only then close it. On the VAZ 2106, the same stop is designed much simpler and more functional.
Installing an air intake on the hood
An air intake or snorkel is often installed on the hood of the VAZ 2107, which improves the appearance of the car and helps cool the engine. It is mounted so that air flows directly onto the air filter. Sometimes additional pipes are installed to the main air intake to increase cooling efficiency.
The snorkel is usually made by hand. In this case, it is better to use durable plastic or metal as a material. The air intake is mounted as follows.
- A U-shaped hole is cut in the hood with a grinder.
- The cut out part of the hood is bent to form the snorkel profile.
- Triangular metal pieces are welded along the edges to cover the ends of the part.
- The hood is puttied and painted to match the body color.
When cutting the hood, it is important not to touch the stiffeners provided by the design. Otherwise, the strength of the body will noticeably decrease.
The air intake on the hood of the VAZ 2107 changes the appearance of the car and improves engine cooling
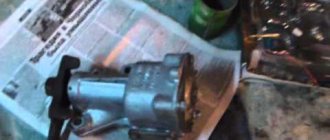
Hood lock
Sometimes car owners modify the hood lock of the VAZ 2107. If it does not work well or fails, the mechanism is dismantled. It is recommended to first outline the lock with a marker - this will avoid adjusting a new or restored lock. The mechanism is removed in the following order.
- The hood opens.
- The lock cable clamps come out of their seats.
- The bent end of the cable is straightened with pliers. The fixing sleeve is removed.
- Use a 10mm wrench to unscrew the lock nuts.
- The lock is removed from the pins.
- A well-oiled new lock is installed.
When replacing the cable, it is first disconnected from the lever handle. This is done from the salon. Then the cable is pulled out of its sheath. Nowadays, cables are often sold complete with a sheath. In this case, when replacing the old cable, it is pulled out along with the casing.
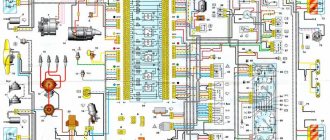
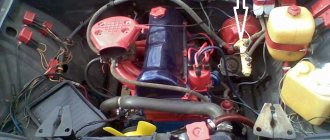
Identification data
The VAZ 2107 car, like any other car, has specific passport data, the liver of which is indicated in the table located under the hood on the air box.
The plate contains information about the vehicle model, engine number and body number, weight data and spare parts number. Above it is the vehicle identification number - VIN.
— The first 3 letters are responsible for the manufacturer’s code;
— 6 subsequent digits are the decoding of the car model;
— A letter or number of the Latin alphabet indicates the year of manufacture of the VAZ 2107 model;
— The last 7 digits are the required body number.
You will find the exact same number in the trunk.
Paper cars print scans for modeling
And so on this page there are scans, paper cars, pictures with retro cars from the times of the USSR for homemade printing, assembly and collection. Models of cars, trucks and buses. To assemble a 3D paper model of a car you will need: a sheet of thick paper for printing a scan of the car model on a printer, scissors, glue.
Volga Gaz 21 made of paper
Pictures of Soviet paper cars, print scans for 3D modeling
VAZ 2005
Gas 460
Zaporozhets
VAZ 21099
Volga Gaz 21 made of paper
Slavuta
ZAZ 969
UAZ Eraz Vaz 2106 Volga gaz 2410 Vaz 2114 Vaz 2108 Oka VAZ 1111 VAZ 2108 VAZ 2131 Niva Volga gaz 31029 Gas 69 UAZ VAZ 2121 Niva VAZ 2105 Raf Raf Gazelle Luaz 969 Oka VAZ 2114 Zaporozhets Zaporozhets 969 VAZ 2104 Zaporozhets 969
How to glue a 3D model of a paper car?
To complete the work, you need to prepare a printer, a sheet of paper, scissors, cardboard material, as well as glue, colored pencils, paints or felt-tip pens.
The instructions are very simple; you can assemble a paper machine without any special skills or knowledge. First, you need to print out a model of the machine you like on paper, then glue the sheet onto cardboard to make the structure durable. The image is cut out along the contour; this is another advantage of this technique of creating a paper machine.
Carefully cut out the car along the outline. Bend it at the folds, apply glue to the fastening paper strips.
Let the glue dry and delight your little one with the assembled model! So if anyone is interested in retro Russian cars, then make them for yourself and find out more about them, and if you haven’t found the model you need and want, then write in x to this page, I will definitely add more.
Source: https://AutoShtuchka.ru/modelirovanie/mashinki-iz-bumagi/mashinki-iz-bumagi-dlya-skachevaniya/
Famous pickup truck
For those who were looking for a spacious, convenient option, a pickup truck in any color was produced based on the VAZ 2107. It is called the VIS-2345 pickup, but it is also no longer produced. But despite this, it is still popular.
This subcompact pickup truck is easy to drive, giving you plenty of flexibility to haul as much stuff as you need. Even a refrigerator will fit into the wide isothermal booth.
The two-seater pickup truck has a fuel-injected engine. It reaches speeds of up to 110 km/h. Due to its convenience and original design, this body type is very common in America and Europe - so it’s a shame that production of this model was stopped.
How to make a paper car
Origami is a unique art of folding unusual figures from sheets of plain paper. In this article we will talk about how to make a paper car, so stock up on a set of colored paper and feel free to involve your children in the work and create a whole fleet of paper cars with them!
Lesson #1
First we will make a sports car. You will need a rectangular piece of paper. Its aspect ratio should be 1:7.
1: First fold the top right corner, then straighten and fold the left corner - this way you will mark the folds.
2: Now fold the top of the sheet, tucking the triangles inward at the same time (see picture).
3: Now you need to bend each of the “sticking out” triangles again, towards the middle.
4: Fold the sides of the sheet, and then fold the bottom of the sheet, as shown in the picture (follow the same principle as you folded the top of the sheet at the very beginning of the work).
5: Now fold the figure in half and tuck the protruding triangles into the “pockets”. Ready!
Master class No. 2
Let's make a car using origami technique.
1: Take a square piece of paper and fold it in half from right to left. Unfold and fold again, but this time from top to bottom. This way you will outline the folds and the middle of the sheet.
2: Fold the bottom quarter of the sheet up and bend the corners as shown in the picture.
3: Fold the top half of the sheet down, thereby covering the bent triangles.
4: Now bend the sheet as shown in Figure 5. In this case, the distance from the edge of the sheet to the dotted line does not matter much.
5: To make the windshield, fold the top right corner, connecting the two points marked in red in the picture.
6: Turn the figure over. Ready!
Step by step lesson #3
- Another simple tutorial on how to make a paper car.
- 1: Fold a piece of paper in half, then fold the fold out again.
2: Now fold the top and bottom quarters of the sheet, bend the corners. Bend the top of each of the resulting triangles inward, and fold the part itself in half.
Source: https://www.promyhouse.ru/rukodelie/izdeliya-iz-bumagi/kak-sdelat-mashinku-iz-bumagi.html
Roof
It is part of the metal body - the basis of the body. The task of the roof is not only to protect the interior from above, closing it, but also to absorb impact energy in an emergency. On the VAZ 2107, the roof is reinforced with cross members that act as stiffeners.
The roof of the “seven” is directly related to the overall geometry of the body. After an impact or accident, it is imperative to check whether the roof has “slipped.” To do this, the dimensions of the door diagonals are measured as follows: from the bottom of the rear corner to the top corner of the front. In addition, for things to be more convincing, the diagonal of the roof itself is measured.
The cost of the roof, as a separate element of the body, starts from 3 thousand rubles. Dimensions, mm: 1290x100x1550. Weight – 15.6 kg.
How to draw a Lada with a pencil step by step
Now you laugh, but the appearance of this car is actually a work of art. Now it seems to us that only Lamborghini or Bugatti Veyron can have the coolest appearance. It was different before.
At the beginning of the 20th century, it was believed that the most advanced form of art was cubism, or rather the desire to see regular geometric shapes in objects. It was fashionable in France, and then reached the Soviet Union. Well, it’s true that the French still believed that a car should be comfortable, reliable and durable, but this is the technical side of the issue. The soul of a Russian person requires external beauty. This is how this work of art came about:
How to draw a Lada with a pencil step by step
Step one. I draw the rectangular shapes of a car cabin.
Step two. I'll add wheels.
Step three. Now I'll work on the headlights and appearance.
Step four. I'll add shadows on the wheels.
Step five. Here's the drawing I made of the Zhiguli: If you drove a Zhiguli, give it a like. And draw other cars:
- Domestic cult car - nine;
- American legend - Ford Mustang;
- Lada Priora;
- Lamborghini;
- VAZ 2115;
- Bus;
- Fire truck;
- Boomer is black;
- Truck;
Facing panel (apron) and front bumper
The facing panel or front apron on the “seven” plays more of a decorative role. But besides giving a stylish appearance, an apron also provides many benefits. In particular, thanks to it, during rain, water does not fly directly onto the windshield, but is cut off by this element.
The apron is located directly under the bumper and is a flexible shield that also serves to prevent damage to the front of the car from splashes from under the wheels.
This structural element of the body has special holes for the front bumper brackets and the radiator grille (the latter is attached to it). The apron, due to its “extreme” location (bottom and front), becomes vulnerable to impacts and corrosion. Connected to the body by spot welding.
The design of the "seven" apron must be thought out carefully and correspond to the shape and geometry of the entire car body, otherwise it will simply vomit at high speed. In addition, non-compliance with geometry and design will lead to increased fuel consumption at high speed.
The price for a front apron for a VAZ 2107 individually starts from 600 rubles. The part may be of different workmanship, have a different color and different design features.
Front aprons, sold as a separate element of body decor, come with special mounts to the bumper. As for the original Semerovo ones, they are welded, as mentioned above, to the car body.
The rear apron is also required and must have special fastening plates that ensure its immovable condition and prevent it from coming off on the road.
Front bumper
The bumper is not only designed to retain the energy of a frontal impact first, but also plays a significant role in the exterior design of the Seven. In other words, this is a beam located in front and protects the body from damage in minor collisions.
Thanks to modern synthetic-based materials, bumpers have become much lighter and more beautiful than they were before. Thus, elegant bumpers with bent edges also serve as spoilers, increasing the downforce of the car.
The front and rear bumpers on the VAZ 2107 are made of plastic or thin metal and have chrome trim. They are mounted using special brackets.
The front bumper is equipped with a platform for attaching a license plate and for this reason is 5 cm wider than the rear one.
Today, the owner of the “Seven” is offered three options for bumpers for the VAZ 2107: plastic, plastic with chrome lining, and with brackets for fastening. The price starts from 600 rubles.
Front bumper tuning
Modernizing the front bumper of the “Seven”, first of all, means improving the appearance. To be honest, the factory bumpers of the VAZ 2107 family look, to put it mildly, fake. They do not carry any visual, or even more importantly, high-quality functionality.
The implementation of the idea of tuning the bumper on a VAZ 2107 (the rear one is also possible) consists in strengthening it with a metal profile of an L-shaped section. In addition, to give a more aesthetic appearance, the part moves slightly from the body.
You need to work with the bumpers removed. Here's what to do:
- Place the pre-prepared reinforcing corner to the bumper and mark the mounting holes, and then drill them in the profile;
- The lower part of the profile bends forward. This creates a fastener for the lower bumper bolt;
- First, the amplifier is attached to the body, then the bumper is attached to it.
As a result, we get a massive bumper that is not afraid of light and medium impacts and looks much more impressive in appearance than the factory one.
How to draw a VAZ 2115 with a pencil step by step
Vehicles are needed to move our bodies quickly and effortlessly in a given direction. However, this is difficult to find in the Russian automotive industry. Here you have to repair the car more than drive it. Perhaps the reason for this was that he should drive on the road and not through potholes. Suddenly it turned out that in some places there were roads, but cars still refused to be decent transport. Why this happens is not clear. But we will still try to find out how to draw a VAZ 2115.
VAZ is an abbreviation for Great Hadron Constipation, a company producing tin cans and boards on wheels. Outwardly, the product looks like a machine, but when used, it self-destructs or refuses to cooperate due to the incompatibility of the developers' hands with the tools. To save money, it would be logical to narrow the cycle of using the car to Factory - Scrap Metal, then all expenses will be recouped.
Nevertheless, the self-transporter is popular with the average Russian person, because it is cheap and cheerful, and in combination with the roads, you won’t immediately understand which is worse: the VAZ or the Beha. There are thoughts that they are being bought by terrorists from the Middle East and used as a means of intimidating America and European countries. Religious fanatics are happy to use it, since getting behind the wheel of a VAZ is a direct path to heaven. On the other hand, such a weapon could only be invented by the Devil himself, get a shock from the nightmare he made, and out of fear send it to Earth, out of harm’s way.
- You definitely live in Russia or a country of the former Soviet Union;
- You go to work on foot;
- A car is your most expensive purchase after a razor;
- You openly support domestic producers and that is why it is so good to live in Russia;
- In the summer you get a blast from the windshield, and the temperature inside allows you to openly smoke fish;
- Sell it, add another 99% of the required amount and buy a car that is able to move in space-time;
And if you don’t even have enough money to buy this device, then you’ll definitely have enough for a pencil!
How to draw a VAZ 2115 with a pencil step by step
Step one. First, use lines to outline the shape of the car as viewed from the side. Let us clearly highlight the edges and the floor on which the VAZ will be located.
Step two. Let’s clearly define the location of the car, and only then draw the body with wheels.
Step three. We will beautifully outline everything with a line several times to make the tone darker, create doors with windows and headlights.
Step four. We tint the windows, paint the tires, finishing with the shadows, remove unnecessary lines with an eraser.
We have drawing lessons and other vehicles, for example:
- Draw a black Boomer;
- Rural tractor;
- Audi sports car;
- Cool motorcycle;
- Bike;
- Tank;
- Ferry;
General view
ATTENTION! A completely simple way to reduce fuel consumption has been found! Don't believe me? An auto mechanic with 15 years of experience also didn’t believe it until he tried it. And now he saves 35,000 rubles a year on gasoline! Read more"
The exterior of the “Seven” generally copies other VAZ models, called “classics”. On the other hand, some parts and components of the frame are not the same. They simply will not fit the general exterior due to the fact that they differ in basic parameters.
Let's start with the front. This area of the car includes these components: the hood, the apron with the front bumper (they are considered more decorative elements) and the fenders.
As for the middle part of the car, this includes the roof of the VAZ 2107, sills, and doors.
Finally, the rear of the car includes the fenders, boot lid and rear apron.
All main body elements are made of stamped steel, additional ones are made of plastic. If minor damage occurs, they can be easily straightened and, if necessary, replaced with new ones without much difficulty.
Note. With the exception of the “tail”, all elements of the “Seven” body are connected by welding.
Comparatively, the “seven” looks more modern than other “classic” models. It is for this reason that the car remained on the production line, although the designers did not make any significant changes.
The car interior is equipped with 4 seats. The front seats are made in the form of an independent adjustable design. As for the rear ones, they have no adjustment. The interior lining is plastic, the roof is covered with leatherette.
The interior of the “Seven” is structurally excellently protected from frontal and rear impacts, but a side collision with another car can lead to catastrophic consequences.
DIY paper machine (diagrams, templates)
Every boy loves to play with cars; he will not soon assemble a metal structure on his own, but teaching a child to make paper models is very easy. Parents will need a little time, paper, glue and scissors. You can create such machines using the origami technique or 3D design; for each method there are the necessary materials, instructions and recommendations.
How to make a car from waste material?
The older the boy gets, the more interested he will be in complex models, including those made from paper. Parents can only suggest which creativity is more exciting, provide the necessary materials and a good mood to complete the task.
For boys, among all the models, it is cars that enjoy great prestige, and buying different designs every day will cost parents a pretty penny. After a while, the child will lose all interest in these beautiful cars, so it is more interesting and useful to make the design yourself.