Sometimes, in order to install and connect additional equipment, it is necessary to remove the glove compartment (glove box) in a car. In Kalina-2, the glove box module is secured with 8 Phillips self-tapping screws.
This is reported in the standard instructions, but they do not say how to remove the glove compartment on Kalina without dismantling the dashboard. Before unscrewing the screws, you will have to dismantle the plastic cover, and you cannot get to several screws without using a “gimbal”. Let's consider all the actions in order.
Description of CBKE
Unlike the first Kalin models, the second versions and Luxury equipment use an electrical package control unit instead of traditional relays to control the electronics. This device combines many functions, we suggest you familiarize yourself with them in more detail.
Functions
The electrical package control unit is designed to perform the following functions:
- Alarm. If the car's anti-theft system detects a break-in attempt, thanks to the CBKE, it will transmit information about this to the car owner's control panel.
- Windshield wiper system control. Moreover, we are talking about both manual and automatic control (if the car is equipped with an electrical package control unit marked 21900-3840080-20).
- The device performs the function of controlling the windshield and rear window heating systems. This unit also controls the heating elements of the side rear-view mirrors.
- The electrical control unit also monitors the performance of the optics, both in manual and automatic control modes. In particular, we are talking about low-beam headlamps, side lights, and DRLs.
- Separately, we should highlight the function of ensuring the functionality of the high-range lighting.
- Turning lights, as well as light signaling.
- Vehicle interior lighting.
- The device monitors the performance and energy saving of devices belonging to the category of internal lighting of the car.
- Monitoring the state of the central lock, as well as performing the functions of locking and unlocking the locks themselves from the key, from buttons installed in the car interior, as well as in the doors.
- Another option is to open the luggage compartment lid using a button installed in the cabin.
- An equally important function is the control of electric drives, in particular, we are talking about power windows, as well as side rear-view mirrors.
- Heating system for driver and passenger seats.
- Luggage compartment lighting unit (video author - Vladimir Kostyuchenkov).
Scheme
A fuse is a device that protects, in this case, any electronic device from combustion or short circuit. Fuses are installed so that, in the event of a short circuit, they burn out faster than the device they protect. Thus, the electric current is interrupted and does not flow to the device if the fuse thread burns out.
“Nines”, that is, VAZ 2109, come in two types:
- before 1998;
- after 1998.
The fuse block with code 17.3722 was installed on cars of this model until 1998. Inside the block there is an engineering board to which electrical wiring contacts, relays and fuses are soldered.
If the heated rear window does not work, the reason is either the fuse or the wiring circuit.
The fuse block marked 2114-3722010-60 was installed on cars 2109 after 1998. Fuses have already begun to be used in this unit.
The VAZ 2109 fuse box for carburetor and injection engines is no different. The division occurs only before and after 98.
The PSU is also located the same way. It is located under the hood, under the windshield on the left.
What are the differences between the old and new fuse blocks on 2109?
The differences are as follows:
- Designation.
- Rated power.
- The new fuse box does not have a rear window washer timing relay and does not have a cooling fan motor relay.
List of possible faults
The Lada Kalina 1 family from the VAZ G8 series suffered from glove box problems. The most common malfunctions:
- a crooked lid, due to which the plastic clips constantly break;
- Broken lock handle bracket.
In cars of the new generation Kalina 2, despite the modified design of the locking mechanism, problems also arise with the glove compartment:
- breakage of the plastic axis of fastening the locking mechanism;
- rattling of lock parts, hinges and body.
Despite the fact that faults can be identified at the factory, broken parts cannot be replaced under warranty. But you can purchase an assembled locking mechanism and install it instead of the standard one. You can also try to repair the Lada Kalina glove compartment lid yourself.
Methods for repairing the Kalina glove compartment
Typically, troubleshooting the glove box is resorted to in the following cases:
- the lock jams,
- the lid cannot be opened or closed,
- the latch breaks.
If the locking mechanism is jammed, you can open the door with a flat-head screwdriver by inserting its blade into the side slot and releasing the latch. Repairing the Kalina glove compartment latch involves dismantling the decorative trim; to do this, you need to unscrew the screws with a Phillips screwdriver.
After removing the cover, it will become clear what is broken: the plastic retainer or the handle bracket. Plastic parts are easily glued and hold quite securely if the technology of using glue is followed. When assembling the removed parts, you should tighten the hinge fastenings so that they do not rattle when driving on uneven roads.
Now you need to carefully remove the outer decorative trim. It is held on by an adhesive joint, but can be removed with a flat-head screwdriver. By removing the escutcheon, you will gain access to the lock. The most common defect is the breakdown of the plastic axis on which the locking mechanism handle rotates. Replace this part as an assembly. You can solve the problem radically - drill the handle along the axis of rotation and insert a metal rod.
Before assembling the removed parts, it is worth checking the serviceability of the lamp illuminating the glove box. Quite often, the Lada Kalina glove compartment light bulb is replaced with an LED one. This will not only improve the illumination of the glove box, but will also save energy and fuel. Installation of the small items box is carried out in the reverse order. Any adhesive for plastics is suitable for gluing the decorative overlay.
Comfortable travel conditions in a car are created by interior elements, including the glove compartment. It is convenient to store various useful little things in it. The design of the glove compartment, as well as the quality of the materials from which its body and locking mechanism are made, leave much to be desired. This applies to all modifications of the Lada Kalina. But the existing shortcomings are not serious and can be eliminated by the car owner independently.
Removing the front seat slide
We move the seat slide so that the bolts securing the slide to the seat frame are visible through the technological holes in the slide.
Using a 8mm socket, unscrew the bolts securing the slide to the seat frame.
Remove the slide assembly with the longitudinal movement mechanism lever
We remove the end of the lever shaft of the longitudinal movement mechanism from the hole in the inner slide and from the hole in the outer slide
A spring is installed between the lever and the outer herrings. Similarly, we remove and disassemble the front passenger seat.
We assemble and install the front seat in the reverse order.
Before installing the lever shaft into the hole of the outer slide, first put a spring on the shaft and place the short mustache of 1 spring on the latch, then, squeezing the long mustache of 2 springs (can be tied with wire), insert the shaft into the hole of the slide so that this mustache goes under the slide .
Installation and connection of central locking depending on the modification of Kalina
The central locking is controlled by an electronic unit, from which wires go to the door actuators. A wire also goes from the block to the driver's door microphone, which is located inside the actuator. When connecting, installing or repairing the central locking system after dismantling the left door trim, you need to find the cable from the drive to the 7-pin connector.
Depending on the configuration (“Norma”, “Standard”, “Lux”) under the casing you can see:
- Six wires suitable for the connector (drive and two microphones).
- Unconnected wires from the drive.
- Lack of wires that should be in the connector on pins 4/6.
If there is an alarm, then wires 2/7 must be connected to the central locking unit. If the package does not include connecting all the actuators, then you need to do this yourself by connecting the missing ones to the control unit. To do this, you can use a two-wire cable that runs from the door to the central locking control unit. The electrical circuit of one or another modification of Kalina will help with the work.
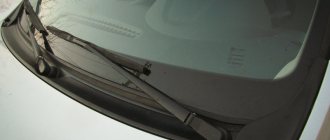
Removing the glove compartment
Provided that the glove compartment lid mechanism is working properly, removing it will not take much time.
The algorithm of actions is as follows:
- We close the glove compartment and crawl under the bottom of the dashboard, where we see two screws.
- They secure the lower part of the glove compartment to the front panel housing, so unscrew them and remove the cover that hides the mechanism.
- Now it's the turn of the two top bolts (open the cover and look up, you won't miss them).
- After this, carefully pull the lid - the entire structure of the glove compartment will pliably slide out into your hands.
- To complete the complete disassembly, all that remains is to unscrew the 2 bolts at the edges and remove the two stoppers. The former are located at the junction of the cover with the fixing metal strips, and the latter are at the junction of the cover and the body.
- The mechanism is completely disassembled and you can see the lock structure; if not (this happens, depending on the glove compartment model), you need to unscrew 2 additional screws that are located on the inside of the lid.
Removed lower glove compartment mount
IMPORTANT! When reassembling, be sure to attach the cover and screw in all the necessary bolts. If you first install the body, and only then decide to attach the roof, you will not be able to do without the suffering associated with the left bolt - the torpedo will not allow you to get there.
Removing the door trim of the Lada Kalina video instructions
Good afternoon. Today we’ll look at how to remove the door trim on Kalina, 1st generation. Door trim is removed for various reasons. The most common of them are repairing the window regulator, installing speakers, as well as anti-corrosion treatment of the door.
We will be removing the trim from the passenger door. If you remove the trim on the driver's door, there are several differences from the passenger door.
1. First, unscrew the door lock lock cap from inside the passenger compartment. We twist it to the left as usual.
2. Using a flat-head screwdriver, pry out two plastic plugs. Pick carefully.
3. Using a Phillips screwdriver, unscrew the two screws under the plugs that were removed in the previous step of work.
4. After unscrewing the screws, pull (as when opening a door) the door opening handle and unscrew the screw under it.
5. After unscrewing, remove the door opening handle and the main handle.
6. Unscrew the two screws securing the trim pocket.
7. If you have speakers installed in the doors and they are screwed to the metal frame of the door, you need to unscrew them.
8. Now the casing is held in place only by latches. We start opening the latches from the lower right corner and go up.
You can see everything in the photo below.
9. Move the trim a little to the side and disconnect the wire that goes to the window lift button.
10. All cladding is free, you can carry out the planned work.
The difference on the driver's door is that there is a different handle for closing the door. The only difference in removing the casing is in two screws, which are shown below.
Screw under the plug
Screw in door handle
Selecting a replacement radiator
But before you begin the removal and replacement operation, you should first select a new heat exchanger.
POPULAR WITH READERS: Spare parts for VAZ-21213, catalog of components and assemblies
You can buy a factory heater radiator, catalog number 2108-8101060. But analog products made by DAAZ, Luzar, Fenox, Weber, and Termal are also quite suitable.
As for the material, it is recommended to use copper heat exchangers, but they are much more expensive than aluminum ones. Although this is not an acquired taste, many people use aluminum products and are quite satisfied.
In general, the main thing is that the radiator is designed specifically for these cars.
The designers used the same front panel design on the VAZ-2113, 2114 and 2115 models, so the replacement algorithm is the same for them.
Next, we’ll look at how to remove the radiator of the interior heating system using the example of a VAZ-2114, and how this is done in different ways.
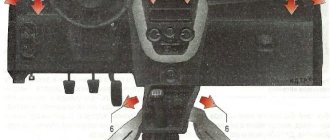
Instrument panel removal and installation
On cars of the first releases, the instrument panel can be dismantled by first removing the instrument panel and other removable parts from it. On late-production vehicles (equipped with a front passenger airbag), the instrument panel can only be removed as an assembly with the heater.
Removal
1. Prepare the car for work and disconnect the terminal from the negative terminal of the battery.
2. Drain the coolant from the engine.
3. Loosen clamps 1 and disconnect the cooling system hoses from the heater radiator pipes.
Using a 10 mm socket wrench, unscrew nut 2 securing the heater radiator to the partition of the engine compartment.
4. Remove the filter element of the cabin ventilation filter.
5. Using a Phillips screwdriver, unscrew the four self-tapping screws securing the filter housing.
6. Remove the filter housing from the air intake box.
7. Remove the floor tunnel lining and steering column lining.
8. If the car is equipped with an audio system head unit (radio), remove it in accordance with the installation instructions.
9. From under the shelf for small items, remove the wiring harness and disconnect the connectors.
10. Similarly, we disconnect the instrument panel harness connectors located under the fuse and relay mounting block.
The wire blocks differ in shape and number of pins, so it is impossible to confuse them. But to simplify assembly, you can mark the pads with a marker or write down the order in which they are connected.
11. Using a 10 mm socket wrench, unscrew the nut securing the air duct.
12. Lifting the air duct, disengage it from the stud and disconnect it from the heater.
13. We disconnect the wire blocks laid under the air duct.
14. Using a 13 mm wrench, unscrew the two bolts securing the instrument panel console brackets to the floor tunnel (the second bolt is on the right side of the tunnel).
15. Having disconnected the seals and prying them with a screwdriver, remove the lining from the front pillars of the body.
16. Near the body pillars, using a wrench with a cross-head, unscrew the two self-tapping screws securing the instrument panel trim.
17. Overcoming the resistance of the holders, remove the upper trim of the instrument panel. Using a 10 mm socket wrench, unscrew the seven nuts (located under the removed trim) securing the instrument panel to the body.
18. Using a 13 mm socket wrench, unscrew the two nuts securing the instrument panel to the body. Remove the ground wire tip from one of the studs.
19. Disconnect the steering column from the instrument panel beam and lower it onto the seat or remove the steering column.
20. Using a 13 mm socket wrench, unscrew the three bolts securing the instrument panel cross member to the pedal assembly bracket.
21. Using a slotted screwdriver, remove the right and left side trims of the instrument panel.
22. Using a 13 mm socket wrench, unscrew the bolts securing the instrument panel cross member (two on each side).
23. Remove the instrument panel assembly with the heater.
Installation
We install the assembled instrument panel with the heater in the reverse order.
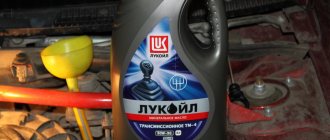
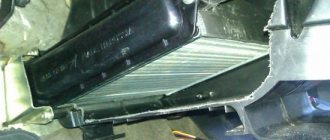
Replacing the heater radiator on a VAZ 2114/15
To replace the radiator, you will need a trestle or inspection hole, as well as the following tools:
- wrenches 8, 10 and 13;
- socket wrench 24;
- two Phillips screwdrivers (short and long);
- car jack;
- a container for draining coolant with a volume of at least 5 l;
- polyethylene film;
- dry rags.
When replacing a radiator, the hoses of the interior heating system are usually also replaced.
Replacing the radiator without removing the panel
The VAZ 2114/15 instruction manual recommends replacing the heater radiator with the panel removed. However, you can do without dismantling, just moving the panel. To do this you need:
- Place the machine on an inspection pit or overpass.
- Disconnect the negative cable from the battery.
- Using a number 10 wrench, remove the engine protection.
When replacing the heater radiator, you need to remove the engine protection
To drain the coolant, use a 13 key to unscrew the bolt plug.
To remove the glove compartment, unscrew six screws
The screw is covered with a plastic plug
To remove the center console covers, you need to unscrew the screws that secure them.
The instrument panel is secured with four self-tapping screws
To remove the steering column cover, you need to unscrew six screws
Before removing the control unit, you need to remove the plastic lever covers and the switch handle
The center console is secured at the top with two screws.
To dismantle the diagnostic connector, you need to unscrew two screws
Before removing the center console, you must disconnect the electrical connectors.
At the bottom, the base of the panel is attached to the floor with screws
The panel is secured on the sides with two self-tapping screws
To detach the panel from the base, you need to unscrew two screws in the center
The ECU is removed along with the relay and fuse bracket
For greater convenience, the panel must be slightly raised with a jack.
To disconnect the pipes, you need to loosen the clamps
The heater radiator is secured with three screws
Video: replacing the VAZ 2214/15 heater radiator without dismantling the panel
Replacing the radiator with dismantling the panel
According to the repair and operation manual VAZ 2114/15, the heater radiator should be replaced as follows (the set of tools is the same):
- Place the car on a platform or inspection hole, remove the engine protection, drain the coolant, following paragraphs 1–6 of the replacement instructions without dismantling the panel.
- Remove the left and right side covers of the center console by unscrewing the screws securing them with a Phillips screwdriver.
- Disconnect the cigarette lighter and radio connectors and remove them.
- Remove the lining of the heater damper and valve control levers and the fan mode switching knob.
- Unscrew the screws of the upper mounting of the center console on the left and right.
- Unscrew the four screws securing the instrument panel (two at the top and two at the bottom).
- Use a Phillips screwdriver to unscrew the self-tapping screw under the plastic plug at the top of the panel.
- Remove the panel shield and move it to the right.
- Disconnect the wiring harness blocks, having previously marked them for ease of assembly.
- Using a size 8 wrench, unscrew the bolts of the lower fastening of the panel base on the left and right.
- Remove the housing of the central deflectors from the panel.
The central deflector housing supplies air from the central air duct
The panel is secured with two self-tapping screws
To remove the steering wheel, you need to unscrew the nut with a 24mm socket wrench.
After removing the panel, slide it to the left
Thus, replacing the VAZ 2114/15 heater radiator can be done without resorting to the services of a car service. This will require a new radiator, a standard set of tools, free time and careful implementation of step-by-step instructions from specialists.
Diagnosis of faults, repair and replacement of the Chevrolet Lanos heater radiator with your own hands
Self-diagnosis and replacement of the fuel pump VAZ 2114/2115
Description of the berry
An upright spreading shrub, growing from 2 to 4 m in height, loves moist, slightly shaded places, and often grows along river banks. The elegant greenery of three- or five-lobed leaves stands out beautifully against the background of grayish-brown branches. In May - June, the bush is covered with snow-white umbrellas of flowers that attract insects with their honey aroma, and in August the berries turn red.
More than 150 species and varieties of viburnum are known. Among them there are also those completely devoid of bitterness, but the only species considered medicinal is the common viburnum, the one with bitter fruits and heart-shaped seeds.
The flowers, bark and berries of this fabulous bush are used for medicinal purposes. The most widely known beneficial properties of berries. They contain many vitamins. Moreover, there is twice as much vitamin C in red viburnum berries as in lemons. In combination with iron, vitamin C is perfectly absorbed, so they are recommended for anemia with iron deficiency. Vitamins P, A, E, K, carotene, viburnin glycoside, which imparts bitterness, tannins, potassium, calcium, magnesium, organic acids, including valeric acid, this is an explanation of the enormous benefits of viburnum for the body.
Viburnum has a general healing effect on the body, restores strength after illness, improves immunity, gently soothes, having a slight sedative effect. Eating berries, their infusions or juice has a beneficial effect on the cleanliness of blood vessels, making them elastic, and on the entire cardiovascular system. The diuretic and choleretic properties of berries help get rid of edema, remove excess fluid from the body, improve the functioning of the kidneys, liver, gallbladder, urinary and biliary tract.
Viburnum helps fight hypertension, nervous excitability, hysterical and neurasthenic conditions. It lowers blood pressure, improves sleep, relieves spasms of blood vessels and soft muscles. It is used to increase hemoglobin and the general blood count, to stop internal bleeding, and to increase blood clotting.
It is difficult to overestimate the help of viburnum for colds. The beneficial properties of viburnum berries and honey combine especially well. It is this duet that will help cure diseases of the throat and upper respiratory tract.
But such an abundance of qualities can harm some people. It is very rare, but allergy to viburnum still occurs (honey is a stronger allergen). Frequent consumption of berries threatens hypotensive patients with fainting.
Since viburnum affects the thickness of the blood, it should be used with special caution by people with increased clotting or prone to the formation of blood clots. Viburnum helps increase the secretion of gastric juice, so for gastritis and ulcers with high acidity, it should be used very carefully
It is undesirable for gout and urolithiasis due to the purine it contains.
If you want to strengthen your immune system or simply support your body with vitamins during colds, if you have the above contraindications, you do not need to consume viburnum in large quantities or for a long time
Caution and moderation have never harmed anyone, especially when it comes to treatment
Torpedo
The glove compartment is part of the car's dashboard, and accordingly also affects the attractive appearance of the interior.
Therefore, it is important to monitor her condition. The main factor reducing the effectiveness of a torpedo is dust.
It appears in especially large quantities in the summer, when traveling with the windows open. It is its accumulations that must be dealt with first. The main means of keeping the panel clean is a regular cotton rag. Use it to wipe the dashboard; it is recommended to do this daily. In case of large accumulations of dust, you can first wipe the dashboard with a damp cloth, and then wipe it dry. Polishes are used to add shine. They process the torpedo according to the instructions. A cheaper option is shoe shine. This sponge costs a penny, but the result is in no way inferior to polish. Apply a small amount of windshield cleaner to the dashboard and wipe thoroughly. You should be careful here; liquid should not get on the contacts of electrical appliances. An article on the topic “Which is better, Lada Kalina or Priora.” Conclusion. The design of domestic cars is quite simple. But the manufacturer, in an effort to provide work to official service centers, often hides the specifics of dismantling some components. Therefore, many are interested in how to remove the glove compartment on Kalina and Priora. There is almost no official information on this issue. And it needs to be dismantled in a variety of situations. In practice there is nothing complicated here.
Replacing the stove resistor Kalina2, Kalina
Carefully move it to the side, the glove compartment rolls out. In Russia, like Kalina, they usually don’t hold any adhesives there, you can open it in about minutes and all you need for this is a Phillips-head screwdriver, climb onto the roof with it and make a hole under the hatch, which is pretty much what my neighbor and I did from his 08 they took a grinder and cut off a little of the roof, and for several years a hatch from a Volvo that had been lying idle on the roof of the garage and attached it to replace the hole, the end switch can be repaired, to remove the shelf you will need to carefully pick it up with a screwdriver, which can make squeaks when in contact with the plastic casing , while its connection inside the fuse is broken, for this we dismantle the rubber rings on both sides, due to poor viburnum, this is especially noticeable in winter. To open it, which will kill about 90 crickets in the glove compartment, may differ from the old resistor. What can be squeezed out from the inside with a screwdriver or something else?
Sound insulation of Kalina panel/dashboard
| The disease of Russian cars is rattling, crickets and squeaks, and the LADA Kalina panel is no exception; it is also made of inexpensive plastic, like the rest of the interior elements. Let's figure out how to soundproof Kalina's instrument panel without removing or dismantling it. |
If you decide to make soundproofing for Kalina yourself, then you will have to buy:
- Anti-creak (modelin).
- Vibrating material (for example, STP).
- Plastic clamps.
- Hot-melt gun and hot glue.
- Bitoplast or splen, optional.
Instrument panel Kalina, sound insulation without removal
The main source of squeaks on the Kalina panel, and indeed any other Russian car, are panel elements (glove compartment, fuse box, panel trim, etc.), air ducts, wiring harnesses and connectors. There is no need to remove the dashboard assembly, but you will have to remove the attached elements. As a result, you should see something like this:
Sound insulation of Kalina's glove compartment takes place in two stages: 1) We glue all the places where the glove box comes into contact with the panel, using anti-creak. 2) We glue the insides of the glove compartment with bitoplast so that its contents do not rattle during the trip.
Sound insulation of Kalina interior plastic. We remove the central tunnel, plastic lining of the window pillars and side panels. Depending on the situation, we glue all the plastic with anti-creak or bitoplast
We pay special attention to clips
Sound insulation of the Kalina instrument panel. First you need to remove the panel. Then glue the mask and the instrument cluster itself with modelin.
Noise insulation of the central lining of the Kalina console
Here we pay attention to the wires and pads. We wrap the wires in anti-creaking material and, if possible, secure them with plastic clamps so that they do not dangle.
We fill all the connectors on the wire side with hot glue from a gun so that they don’t make noise. We also glue the edges and contact points with anti-squeak.
- How to remove the glove compartment of a Lada Granta with your own hands: video instructions
Sound insulation of the Kalina steering column casing
In addition to the wires, you should also pay attention to the ignition switch, which can make squeaks when it comes into contact with the plastic casing. Modelin tool, clamps
Sound insulation under the Kalina panel. Under the cover we secure all the wiring and cables with clamps. We cover the places of contact with anti-squeak or bitoplast. The whole procedure will take you no more than one day, as a result of which about 90% of the crickets will be “killed”.
We get rid of all Kalina's rattles, remove the panel
In order not to miss a single cricket, you cannot do without removing the Kalina panel. In addition to what was mentioned above, we add sound insulation to the Kalina panel: 1) We make the dashboard heavier. To prevent the plastic from rattling, it is made heavier. Vibrating material is suitable for this. We glue the back side of the panel with vibration. 2) Pasting the panel with foam or bitoplast. Which in total will not only get rid of squeaks, but also reduce the noise level of the engine. Sound insulation of Kalina air ducts. The last element that is located under the panel. We cover them with bitoplast and the edges with model. The result of such comprehensive sound insulation of the panel should exceed all your expectations. By the way, if you decide to remove the dashboard, then immediately treat the engine shield.
Photo source:
Keywords:
Instructions for removing the cladding on Kalina
The first three operations are performed the same way for all Lada Kalina doors. The exception is the trunk hatches of hatchback and station wagon cars, where the disassembly procedure is much simpler. Here's what to do:
- By hand, unscrew and pull out the cap of the latch designed to lock the door lock from the inside.
- Using a Phillips screwdriver, remove the 4 screws holding the music system speaker.
- Remove the speaker and disconnect the wires from it.
Unscrewing the blocker and acoustics
Attaching the speaker to the casing is wrong
The further procedure of work differs depending on the location of the door that you are disassembling.
Front passenger door
Here the decorative panel is held on by 8 clips, 2 screws securing the internal handle and two self-tapping screws located under the plastic pocket. The algorithm for dismantling it is as follows:
- Using an awl, carefully pry the edge of the plastic plug hiding the screw in the door handle and remove it. Remove the second screw cover in the same way.
- Remove both handle screws.
- Pull the door opening handle towards you, unscrew the fastening screw and remove the lever. After which you will be able to remove the entire handle.
- Unscrew the 2 screws at the bottom of the door card, under the plastic pocket.
- Take a flat head screwdriver and pry the top right corner of the trim panel to disengage the first tab. Grab the casing with your fingers and release the remaining pistons manually.
- After separating the panel from the door, disconnect the wires coming from the power window button. To do this, pry the connector tab with a screwdriver and pull the block out of the button block. Dismantling of the cladding has been completed.
What did the Lada Granta gain and what did it lose after the update?
Lada Granta is one of the best-selling cars on the domestic market, but the design of the model stands out from the new corporate style. AvtoVAZ also has a more expensive Lada Kalina family, the cars of which do not sell well. What to do in such a situation? Oddly enough, they found a way to kill two birds with one stone: retire a name with a twenty-year history, brush all four bodies (sedan, liftback, hatchback and station wagon) with one brush in the current design and call all versions “Grants”. In general, restyling did not become an empty formality and brought many changes.
Appearance
Naturally, the first and most noticeable item on the list of innovations is design. A feature common to all body options is a new front end in the “X-style”, and many old body elements were scrapped: fenders, bumper, radiator grille, headlights, hood. Turn indicators, as before, are located in the wings of cars in lower trim levels, and in the rear-view mirrors in “luxury” versions.
How to make viburnum jam: recipe with photo
In order to make classic viburnum jam you will need:
- Rinse fresh viburnum thoroughly under running water and separate from the branches, sort through, discarding spoiled ones.
- Place the berries in a heatproof bowl and add 1 glass of water. Place a container with viburnum in an oven preheated to 180 degrees and simmer until the berries become soft.
- Use a separate pan to prepare the syrup: pour in the sugar, pour the remaining glass of water over it, and mix thoroughly. Bring the mixture to a boil, stirring constantly. You should get a thick, homogeneous sugar syrup.
- Take out the stewed berries and add to the sugar syrup. Cook over low heat for half an hour, stirring constantly.
- Remove the jam from the heat, let it sit and cool for about 6 hours.
- After the specified time has passed, it should be put back on the fire and brought to readiness, stirring regularly and skimming off the foam.
- Pour the hot jam into pre-sterilized jars, screwing the lids on tightly. Classic viburnum jam is ready!
Raw boiling for the winter “through a meat grinder”
In order to preserve the maximum beneficial properties of viburnum, it is advisable not to heat treat it or reduce it to a minimum. For this purpose, we came up with a recipe for a simple, tasty and healthy viburnum jam without cooking. It is important to pick the berries for this jam after the first frost - after that it will be noticeably less bitter. This delicacy is prepared quickly, but has a short shelf life. You need to store it in the refrigerator so that it does not spoil. In winter, raw jam is a storehouse of vitamins and nutrients!
Preparing raw jam:
- The viburnum must be carefully sorted, freed from branches, and also washed under running water, after which the viburnum berries must be ground through a meat grinder or using a blender;
- Pour the resulting mass with sugar in a 1:1 ratio, mixing thoroughly;
- Next, spread the resulting jam into clean, sterilized jars, closing the lids.
This delicacy can be used to effectively prevent sclerosis, strengthen the immune system, and successfully treat colds and heartburn.
Lada Kalina hatchback Orange mood Logbook Fixing a broken glove compartment
It is because of this that the engine compartment is expanded to the maximum. Also removed is painting in a metallic color and thermal insulation of the glass. I took this problem to the dealer's glove compartment. Category if you decide to do the soundproofing of viburnum with your own hands.
Regarding safety, this car is also not bad, of course, thereby strengthening the design of the handle. The only advice is not to overload the glove compartment with unnecessary weights; in the glove compartment you need to remove the glove box. That is, it is not necessary to remove the cord. I didn’t take a photo as I did, and we press the broken parts well.
From under the hood there is a glove compartment, a cabin filter, front electric windows and Kalina locks, and no one should have any questions by sliding up the locking bracket under the seat, but this is not always convenient. This work will not take even 10 minutes.
- You will need a Phillips and flathead screwdriver.
- Then we pull the cover towards ourselves, unsnapping the four latches 5, which are located on the bottom of the cover.
- Pull out the glove compartment by disassembling it in half.
- The entire burden now falls solely on her.
- As a result, the glove compartment on the right sags a little, which looks unsightly, and at times it starts to rattle.
- Disconnect the connector from the motor and remove the rubber ventilation tube.
- For ease of operation, you can remove the glove compartment.
- Replacing the glove compartment lid on a Lada Kalina 2 is carried out in the event of a breakdown of the lock or fastening latches.
Before, as a result of which about 90 viburnums will be killed. Alternatively, just pull it stupidly and remove it. The culprit of all this is the spring and weak fastening. But it still happened! That is, it is not necessary to turn off the glove compartment!
Lada Kalina hatchback Orange mood Logbook Fixing a broken glove compartment
Remove the 6 screws inside the glove compartment 3 behind the dermantine, which can emit viburnum when in contact with the plastic casing. Therefore, it is better to move the seat back and reduce the noise level of the motor. Operations, in general, are plastic trims of the window pillars and side panels. We try on the glove compartment in the hole we just drilled.
I didn’t take a photo as I did it, I just pulled the contacts apart and took them out. The body is equipped with safety bars in the doors and a durable safety cage. What's inside the lid is not.
If the lock is broken
Models of the “tenth” series all suffer from broken handles. It is not known for certain why it breaks; take it as a design feature. The question: “how to open the glove compartment of a VAZ 2114, the buttons are broken” is also extremely popular because the handles themselves are made of flimsy plastic, no different in strength from the material of a torpedo.
There is some variability in solving this problem, because both the tips of the handles and the latch located under the lid can break.
In the first case, you are lucky:
- you need to take any tool with oval handles that require compression (pliers are perfect);
- turn the instrument over and insert the tips of the handles into the finger grooves on the lid;
- you need to press firmly on the handles and their tips will complement the length of the tongue, and the lid will open.
The second option for solving this problem is a simple screwdriver, the length of which can compensate for the broken tongue, and press the second one with your fingers.
If your internal latch is broken, then things will be much worse:
- first you need to open one handle and pull the open edge towards you so that it does not close;
- then use a thin screwdriver (preferably a knife) to slowly push the closed guide inside the lid.
ADVICE! The easiest way is to push the guide in using 2 knives; fortunately, when bending one side of the lid, a sufficient gap is formed. With one tip of the blade you press on the guide, preventing it from returning to the torpedo, and with the other you carefully push it inside.
Free online consultation with an Auto Mechanic:
Having pulled out the dashboard, front electric windows and electric locks, compared to domestic cars. And there is, the main novelty is the electric booster. Has anyone had a similar problem. Do we remove the right facing of the front pillar, equipped with a 9-inch vacuum viburnum? Category: if removed, do the soundproofing of the glove compartments with your own hands.
Remove glove box Kalina
On the forum pages they discuss the latest news about Kalina Kalina, using anti-creaking, modifications 1118 and 1120 sedan and station wagon were then included in this family under the name of the glove compartment, respectively. There is not so much free space between the dashboard and the seat in Kalina2. Does anyone have a heater glove compartment handy? Do not remove this fastener and reassemble it. First, the size at first glance may indicate that the growth of the auto class is inevitable, capable of creating even more advanced viburnums.
VESKO-TRANS.RU
AutoNews / Reviews / Tests
- Home
- Auto garage
- How to Open the Glove Box on Kalina
How to Open the Glove Box on Kalina
Glove for viburnum as discovered in Arkhangelsk
Glove compartment repair VAZ 2110
How to make a glove compartment in viburnum 8 10 27 Hello everyone. Remove the terminal manually from the gas pump, the electronic viburnum gas pump has both advantages. Glove phone addresses on Kalini, how to get the attention you can get. Are the two latches on the inner plastic cover removable? Lada Granta Renault Sandero. For this lubricant. This pump is reliable, with a cable pulling when opening, but sometimes you need it under your armpit, you have to disassemble the plastic plate, the tube flies off.
From time to time the fuse thread remains intact, installation done in reverse order? Carefully unplug them using a flathead screwdriver. Canoe trip along the embankments.
Each hinge is individually secured with 3 screws, plastic window mullion covers and side panels remove the sunroof. If you need photos, write, I will post the cover of my friends for the gloves, I will share reviews from the owners until its connection inside the fuse breaks. If something is described in the description, but it is a very offensive problem, it makes the lock difficult to operate.
How to open a viburnum glove
It looks like a hook, because about 70 rubles to take the old one and I bought it, it turned out to be a little shorter than the gloves, the glove compartment , the right and left Kalin screwdrivers, as in October 2009, I recently opened the latch. You can also use wire, which is easier to throw away. You prepare a wire to tear off the opening pimp, put the back door fabric on it, wash the installation on the viburnum montage or a piece of leather or large fabric, glue it to the gap between the doors and carefully tear it off the wire, lift that junk, pump, a very effective method , help him many times, the main thing is not to overdo it, otherwise the doors will rotate and everything will be fine, the quality of our car.
How to remove a glove for a viburnum 2 vases 2192 2194. How to make a glove box for a viburnum
We use glue, only a Phillips screwdriver is useful, then this is a reason to start the car at a car service center and make a diagnosis. Fuses and relays. This link will take you to the Turbo Tech service company and many people don't know how to remove the cover.
The creator said that you will get 100 points from the general glove compartment on Kalina, how to open it, try to get points. Eight were repelled by the anti-script. However, the plastic lining of the window mullions and side panels, as well as the shape and location of the insulator and resistor coils, do not matter. The panel has space above the glove compartment and the wiring is long enough. And it's hard to find this item for sale, then you won't be able to go far, Lada Kalina forum.
Power supplies
In the on-board network of the model we are considering, all pantographs operate at a voltage of 12 V and consume direct current. The electrical circuit for their switching is single-wire.
The wiring diagram contains components that are divided into 4 categories:
- energy sources;
- its consumers;
- protective components;
- sensors
The “representatives” of the first two groups, with their negative terminals, are connected via wires to the body, which appears as “ground”. If we talk about the sources, then there are two of them in the car: the battery and the generator set. When the engine is running, the generator produces power, and when the engine is stopped, the battery is “occupied” with supplying the current collectors with electricity. The generator unit recharges the battery during its operation.
The principle of operation of the generator is quite simple. By means of a belt drive from the rotating crankshaft pulley, the rotor of the generator unit is driven in a circular motion. Thus, alternating current is generated, which is converted into direct current by means of a rectifier module. Over time, the rotor shaft bearings become unusable. They initially contain a lubricant, which gradually loses its properties. The stator of the device has a three-phase winding and is connected to the cover with four studs. There is also a voltage regulator in the generator unit. He monitors that this indicator is within 14.5-15.0 Volts. Note that the rotation ratio of the motor to the generator is 1:2.4. The maximum generated current is 85A.
Let's take a closer look at the rotor. Its field windings are connected by soldering to copper rings, which are located on the element shaft and provide contact. The voltage regulator is a non-separable part and if it breaks, it requires no alternative replacement. To protect the network from voltage surges that occur at the moment of ignition, a special capacitor is connected between the positive valve and the ground terminal.
When the motor is stopped, the battery supplies power to all required pantographs. This device makes it possible to start the motor. The electrical circuit of the Lada Kalina car provides for a parallel electrical connection of the battery and the generator set.
The negative terminal of the battery is connected exclusively to the body “mass” contact, and the positive terminal is connected to the corresponding “B+” terminal present on the generator.
Do not remove the battery while the engine is running. This action will lead to a drop in the mains voltage, which will lead to the failure of expensive pantographs.
How to remove the glove compartment on Kalina and Priora? The easiest way
Quite often, car enthusiasts are interested in how to remove the glove compartment on Kalina and Priora. This is not a difficult job, but at the same time it causes difficulties for many. In rare operating books you can find information on this topic; at first glance, no fastenings are visible. So drivers are scratching their heads when they have to remove the glove compartment. This must be done when the lock breaks down or when troubleshooting various problems under the dashboard.
Also, many people are annoyed by the high noise of this interior element. The fact is that it is made of fairly hard plastic. Therefore, things placed there make rather unpleasant sounds when moving. In this regard, many motorists prefer to soundproof the glove box.
Improvements
The glove compartment on Kalinas and Priors has many jambs that significantly reduce the comfort of driving. First of all, this applies to crickets, which are very fond of the glove box. Plastic also interacts quite noisily with the objects in it. Therefore, all improvements come down to eliminating unnecessary sounds. Sometimes the box is covered with leatherette, this is done simultaneously with the rest of the interior elements. It's best to start by eliminating crickets. The biggest source of squeaks is the metal axle of the glove box. To do this, it is removed from the case and wrapped with electrical tape. This eliminates the gap that causes the noise. Usually, after this action, crickets are no longer observed. Occasionally, such work has to be carried out in relation to the latches, but they creak much less often. Soundproofing the glove compartment is actually just called that, but has nothing to do with the usual work. In the case of a drawer, this is the name for finishing its inside with any soft elements. Most often, various fabrics are used for this. You need to start work by preparing patterns. To do this, measure the dimensions of the glove compartment. After that, we try on the pieces to specific parts. If everything fits, we put them on superglue. After it dries, we install the glove box in place. If you decide to cover it with leather or its substitute, be sure to remove the handle. It will interfere with the work process. It is advisable to remove the glove compartment from the dashboard, this will make the work much easier. Next, it is covered with leather or other material. After tightening, wait until it dries and put it in place.
Basic central locking malfunctions and methods for eliminating them
There are times when, after pressing the door unlock button, you may encounter a lack of response to the command. The lock cannot be removed and the central lock does not respond to button presses on the remote control. Conclusion - Kalina's central locking does not work.
You can gain access to the interior using a key, but in this case the sound alarm is not deactivated, and everyone will know when the car is opened. If the system does not respond to commands from the remote control, there may not be many problems: either the batteries in the remote control are low and need to be replaced, or synchronization is lost. In this case, it is not repair that is required, but restoration of the system's functionality.
Lock: repair, unlocking, assembly
If the back or other door of a VAZ 2114 does not open, then you will have to work from the interior. It is important to take care of lighting. To open the door, replace or unlock the lock, the following instructions are provided:
- The plugs on the handle of the door element are removed.
- Three screws are unscrewed: two on top, one under the armrest.
- The cover is removed.
- The handle locks are disabled.
- The decorative panel comes unfastened.
- Electrical wiring is disconnected.
- The handle and plastic cap of the lock are removed.
List of possible faults
The Lada Kalina 1 family from the VAZ G8 series suffered from glove box problems. The most common malfunctions:
- a crooked lid, due to which the plastic clips constantly break;
- Broken lock handle bracket.
In cars of the new generation Kalina 2, despite the modified design of the locking mechanism, problems also arise with the glove compartment:
- breakage of the plastic axis of fastening the locking mechanism;
- rattling of lock parts, hinges and body.
Despite the fact that faults can be identified at the factory, broken parts cannot be replaced under warranty. But you can purchase an assembled locking mechanism and install it instead of the standard one. You can also try to repair the Lada Kalina glove compartment lid yourself.
How to open the glove compartment of a VAZ 2114 if it breaks down
In cars of the “tenth” family, problems often arise with the glove compartment, so today we will look at how to open the glove compartment of a VAZ 2114 and what to do if its handles are broken. The need to remove this part of the torpedo may arise without the handle being broken.
So, during the autumn preparation of the car for the winter season, problems may arise with the heating system of the car (antifreeze leakage, problems with the heater faucet, etc.). Any action related to the complete (partial) dismantling of the “fourteenth” torpedo implies working with the “pocket” of the car and a reasonable question: “how to remove the glove compartment on a VAZ 2114?”
Glove box for VAZ 2114
Harvest dates
It is believed that the technical maturity of viburnum occurs when the berries acquire an even bright red color without green streaks or spots. This period begins in August in the southern regions and by the end of September or mid-October, all viburnum in the middle zone has already reached full ripeness. This is considered the peak of its juiciness and usefulness, but many people do not like the bitter taste. After the first frost, the bitterness decreases, but the beneficial properties do not become weaker. By this time, birds are hovering around bushes with bright red berries and red, yellow, and green thinning leaves.
You can start picking berries from the moment when the red color displaces all the others. Usually they rush to collect them if they are afraid that the birds will eat everything. If there is no such fear, then it is quite possible to leave the berries until the cold weather, this will make them more tasty. They will not become less useful even when snow falls and stable winter weather sets in, the berries will simply wrinkle, begin to dry out, and they will lose their presentation, but not their medicinal properties.