The VAZ-2106 fuel level sensor (abbreviated DUT) is used to control the amount of gasoline remaining in the car’s tank. All models of the “classic” family of Volzhsky Automobile Plant sedans (2101-07) with traditional carburetor engines were equipped with the same gas tanks with a capacity of 39 liters, so the same type of sensors were installed in them.
In the catalog of spare parts for the VAZ Six, this part is listed under the code 2107-3827010.01. The article name of the sensor is BM-892. The part should be distinguished from its analogue under the designation BM-891, intended for Zhiguli station wagons (2102, 2104). They have a different lever radius: 183 mm instead of 290 mm on sedans. The sensor is designed to work together with a level indicator of the UB-193 type, installed on the driver’s instrument panel.
Checking and repairing the fuel level sensor VAZ 2106
Before getting rid of the old device and replacing it with a new one, you should make sure that it is really out of order. This can be done in several ways:
- If the receiver distorts the readings, you can simply adjust it. First, connect it and manually change the position of the lever. At the same time, keep an eye on the gasoline gauge. In working condition, it will move according to the float. If it is located below, the arrow will point to “0”, and from above – to “1”. If the arrow shows incorrect parameters in one position or another, try bending the adjustment tab on either side. This will cause the float to drop even lower or higher. Such repair of the fuel level sensor will allow you to adjust the readings most accurately.
Adjusting and repairing the fuel level sensor
Adjusting the fuel sensor on the dashboard
Reasons for replacement
You will definitely have to replace the sensor if the car starts to produce the following:
- The fuel level indicator needle “dances” or has fallen dead to the zero position;
- The indicator is constantly on, indicating a critical fuel level, although you have just filled the tank full.
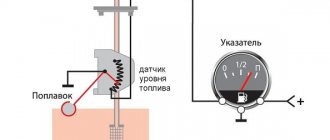
FLS diagram
FLS on high and low panels
The differences in the sensors on the injectors and carburetors are minimal. Also, the fuel level sensors on VAZ 2109 cars equipped with a low and high panel are slightly different.
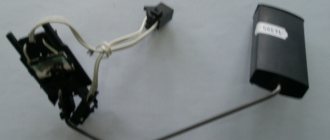
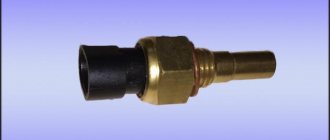
Fuel level sensor VAZ 2106
By the way, depending on the different shapes of the fuel tank, there are different fuel sensors for front-wheel drive and all-wheel drive models. Sign of difference: a sensor with a rectangular float - a front-wheel drive model, with a spherical float - an all-wheel drive model.
Connection diagram
The pointer arrow is or often falls towards the O mark
The sensor is damaged (breaks in the flexible bus, resistor windings, leakage of the float - it sinks and simulates an empty tank) or fuel level indicator
With the ignition on, disconnect the wire from plug I of the sensor (the wire going to the fuel level indicator is connected to plug T of the sensor) and connect the tip of the wire to ground. If the needle deviates, the sensor is faulty. Replace the sensor. If the arrow does not deviate, check the fuel level indicator. To do this, remove the instrument panel and, with the ignition on, connect plug 8 of the indicator to ground. If the device is working properly, the needle should deflect to the end of the scale. Replace the damaged pointer. Repair the float. It can be replaced with hollow objects of suitable size made from petrol-resistant material
The indicator arrows are constantly at the 4/4 mark. Damaged fuel level indicator
Check the serviceability of the indicator by disconnecting the pink wire from the indicator that goes to the sensor plug t. In this case, when the ignition is turned on, the arrow of the reference instrument should be against the 0 mark. If the arrow does not deviate, the pointer is damaged and should be replaced
The fuel reserve indicator lamp does not light up
The lamp has burned out, the sensor contacts have oxidized and do not close. Broken wire between the sensor and the pointer (the wire going to the fuel reserve warning lamp is connected to plug XV of the pointer sensor)
Remove the instrument panel and replace the burnt out lamp. Using a portable lamp, check the reliability of the contact and the integrity of the wire between the sensor and the fuel level indicator. Check instrument switch
Repair
1) First, remove the gas tank itself from the car, otherwise you will not be able to remove the sensor since it will rest against the rear fender of the car when it is removed. (For information on how to remove the gas tank, see the article: “Replacing the gas tank on a VAZ”)
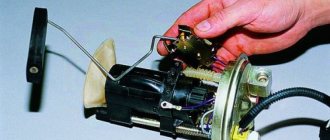
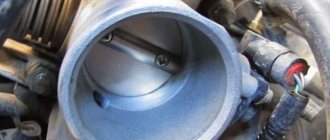
2) Next, unscrew the six nuts (in the photo several nuts are already unscrewed, and one nut is not visible) that secure the fuel sensor flange and then pull out the sensor and thereby remove it from the car.
3) Then pay attention to the place where the sensor flange was secured with nuts, but after you removed the sensor, the sensor flange gasket remained sitting on studs on the gas tank, which also needs to be removed. Note! If this gasket is heavily compressed, cracks or something else is visible on it, then replace the gasket with a new one!
Note! If this gasket is heavily compressed, cracks or something else is visible on it, then replace the gasket with a new one!
Installation: 1) The new sensor and the gas tank itself are installed in the reverse order of removal, that is, first the sensor is installed in the gas tank and then the gas tank itself is installed in its place.
Installing a new sensor in the tank opening
Note! Tighten all six nuts that secure the sensor flange carefully and crosswise, otherwise, with sudden and rough movements, the flange gasket may be damaged and, as a result, later gasoline in the tank will leak through the gasket!
Advice: Before buying a new sensor for your car, pay special attention to the markings that are located on this sensor; therefore, buy a new sensor with exactly the same markings as the old one!
Connection diagram
Pointer arrow or often falls on O
The sensor is damaged (breaks in the flexible bus, resistor winding, leaking float. It sinks and simulates an empty tank) or fuel level
With the ignition on, disconnect the wire from the sensor connector I (connect the wire from the pressure gauge connector to the plug) and connect the end of the wire to ground. If the needle deviates, the sensor is faulty. Replace the sensor. If the needle does not deviate, check the fuel pressure gauge. To do this, remove the instrument panel and, turning on the ignition, connect plug 8 to ground. If the device is in good condition, the needle must be deflected to the end of the scale. Fix the broken index. Restore the float. Replace it with appropriately sized hollow objects made from petrol-resistant material
The indicator arrows are constantly at the 4/4 mark. Fuel level indicator is damaged
Check the correctness of the pointer by disconnecting the pink wire from the pointer to the sensor plug. In this case, when the ignition is turned on, the arrow should be opposite the 0 mark. If the arrow does not deviate, the pointer is damaged and should be replaced
Electronic fuel level indicator
The fuel gauge sensor is one of the main control elements of a car. With its help, the motorist receives information, which is displayed on the front instrument panel, about the presence of fuel in the tank. This mechanism is based on a resistor with a moving contact (extreme resistance values are 50-300 Ohms), which changes its state during the oscillation of the float:
- If the amount of gasoline changes, the float moves and changes the resistance of the resistor;
- As soon as the fuel volume reaches the smallest figure, the contact closes, and it notifies the driver about this. Typically the signal is output to a digital fuel level sensor. The light comes on when there are 5-6 liters left in the container. fuel.
Fuel level sensor resistor
If you notice that the device displays incorrect information or does not react at all to changing the amount of gasoline, you need to dismantle it, check its condition, and if faults are found in the system, replace it with a new one.
In Soviet-made VAZ vehicles, the control device is located directly in the tank. In order to save space, it is installed together with the fuel pump. Therefore, if you need to change the FLS (fuel level sensor), you will also have to remove the fuel intake. First of all, to gain access to the device, you need to remove the rear seat and remove the special hatch.
Fuel level sensor assembly with fuel pump
The fuel gauge shows a full tank, what should I do?
If the fuel level indicator in the instrument cluster constantly shows a full tank (or almost full), although there is actually not much gasoline in it, then there are problems with its sensor or itself.
Here are some simple ways to independently diagnose the causes of this malfunction using the example of a dial gauge for the fuel level in the instrument cluster and a sensor (FLS) working in tandem with it in the gas tank of a VAZ 2109 (2109, 21099).
The fuel gauge shows a full tank, what should I do?
— Check the serviceability of the fuel level sensor (FLS)
Raise the back seat of the car. Remove the access flap to the fuel intake in the gas tank. Turn on the ignition.
We disconnect the wire from the fuel level sensor (pink to terminal “T”) and observe the behavior of the indicator arrow in the instrument cluster. If the arrow falls to the beginning of the scale, the FLS is faulty.
Causes. The float may be stuck in the upper position. Or is this pink wire shorting to ground somewhere. Or the dial indicator of the fuel level in the instrument cluster itself is faulty.
In such a situation, first, you need to remove the fuel intake and find out the reason for the jamming of the sensor float or the sticking of the moving contact on the rheostat inside it. If everything is in order, we ring the pink wire and check the serviceability of the sensor itself.
Position of the fuel level sensor (FLS) parts with a full fuel tank (the float is raised up - floated up)
— Check the serviceability of the fuel level indicator in the instrument cluster
To check, it is necessary to apply voltage to it, bypassing its electrical circuit. To do this, disconnect the instrument cluster. We remove the white block of wires from it (on the combination of the “low” panel), connect terminal “5” in the socket under the block with ground, and connect positive to terminal “12” with the battery. In a combination of a VAZ 2108, 2109, 21099 car with a “high” panel, this will be, pin of the red block “7” is “ground”, pin “2” is plus.
Conclusions of the “ground” and “plus” of the fuel level indicator in the instrument cluster of VAZ 2108, 2109, 21099 (“low” panel)
If the fuel level gauge is working properly, the needle will be at zero; if not, it will be at the end of the scale (show a full tank). If it is determined that the pointer is faulty, then we can safely replace it with a new one or a known good one. There is no point in repairing and rewinding its windings, or changing the magnets present in its design.
Notes and additions
— On VAZ 2108, 2109, 21099 cars and their modifications, fuel level sensor 24.3827 and its variations are used. Its characteristics are as follows: voltage -12 V, rheostat impedance - 350 Ohm, float lever length - 115 mm, lever angle when the tank is empty - 27.5 degrees.
Source
Main malfunctions in the sensor operation
If the sensor does not display the fuel level correctly, you can judge that a certain breakdown has occurred and needs to be repaired. Modern sensors that record the fuel level, like all vehicle parts, fail from time to time. In this case, it is necessary to repair the fuel level sensor.
Malfunction in indicators
The main sign of a sensor failure is the display of false data displayed on the pointer. Based on its “behavior,” certain conclusions can be drawn regarding the resulting breakdown. Here are the most basic types of breakdowns and their causes:
The indicator is at zero, regardless of the fuel level. The problem is that the float stop is broken. The pointer moves, but still drops to the zero mark. In this case, you need to pay attention to the general condition of the device winding, as well as the reliability of the contact between the sensor and the current collector. Fluctuations in fuel quantity indicators. This malfunction indicates sufficient wear on the contacts. When starting the engine, the fuel gauge does not rise above the zero mark. Such a malfunction is directly related to the electronics of the vehicle
Here it is important to check the wires for possible breaks and the degree of reliability of the connection. It is important to ensure the overall integrity of the fuse. Low fuel light does not light up
This problem is often associated with device failure. The fuel level sensor is lying. In such a situation, it will be necessary to check the float for the level of tightness.
According to modern traffic regulations, operating a car with a faulty indicator is strictly prohibited. Problems that arise with sensors must be eliminated as promptly as possible.
Mechanical and functional malfunction
Along with problems that are expressed in incorrect indicators, sensor failure can manifest itself in the following malfunctions:
- loss of tightness of the built-in float;
- strong bending of the wire holder;
- violation of the general tightness of the housing and the resulting decrease in the level of resistance;
- mechanical break of the variable resistor;
- loss of tightness at the point where the device is attached to the fuel tank.
After the float loses proper tightness, the control device, with a full tank, will indicate an incomplete fuel level. If there is a sufficiently strong loss of tightness, the indicator will immediately show the minimum fuel level. In this case, the actual quantity will not matter. To fix this problem, you will need to remove the sensor and replace the float. If it is not possible to purchase a float, you will need to completely replace the entire device.
Quite often, the sensor fails due to long-term movement over rough or uneven terrain. Repeated impacts on the tank will cause serious damage to the wire holder of the built-in float.
With such bends, the behavior of the indicator will directly depend on where the holder was bent. If the bend is directed upward, the parameters will always be increased, if downward, the parameters will be underestimated. If the breakdown involves such a bend, you just need to straighten the wire holder and give it its original shape.
Often the seal of the sensor housing is broken. This happens after an accident has occurred, as well as after long-term use of low quality fuel. If gasoline gets into the device, it will malfunction and, as a result, cause incorrect sensor readings. These malfunctions can only be eliminated by completely replacing the device.
If the variable resistor breaks, this will cause the sensor to always show a full or completely empty tank. Similar signs can be observed in the process of a break in the signal wire running from the sensor to the display unit. Before removing the sensor, you will need to connect a variable resistor with a resistance level of 100 - 200 Ohms to the car body and to the signal contact. As you rotate the knob, you need to make sure that the sensor readings change. In this case, the malfunction can only be eliminated by completely replacing the device.
This is interesting: What to do when a pedestrian is at fault
The main sign of a complete loss of tightness at the installation site of the device is the appearance of the smell of gasoline in the cabin.
Possible faults
Despite the apparent simplicity of the circuit, there may be several reasons why the level indicator in the VAZ-2106 does not work.
Open circuit in ground circuit
On older cars, it happens that the connection between the black wire and the ground of the car is broken. In this case, the device on the panel when the ignition is turned on will begin to show a full tank, regardless of the actual presence of gasoline.
Check: connect the negative output of the FLS to a reliable body ground, watch the instrument needle. If the readings change, you need to restore the broken circuit.
There is no negative contact on the rheostat block
Remove the FLS from the tank and clean the contact surfaces.
Failure of rheostat tracks
Using an ohmmeter, measure the resistance between the terminals with the pink and black wires. The normal range of sensor resistance characteristics with a full tank is about 4 ohms, and with a completely empty tank it is 110 ohms. Intermediate readings must fit within the specified interval. If not, you should remove the sensor from the machine and repeat the measurements, moving the lever with the float manually. If the parameters do not correspond to the specifications, the part should be replaced.
The most common breakdown of this unit on used Zhiguli cars is: the instrument needle on the panel twitches and falls to zero, although the control lamp has not yet come on.
Moreover, problems usually begin at the level of 1/2 or 1/3 of the tank; with a larger supply of gasoline, the device works normally. The reason is simple. Owners rarely fill the car with a full tank; they usually fill in 15–20 liters of gasoline. Therefore, in the area of more than half, the movable tongue of the sensor is rarely located, and in the lower range, due to constant friction, it rubs the track. Due to wear, the quality of contact decreases, and in some places it disappears completely. A worn-out device must be replaced.
Although the cars of the classic AvtoVAZ family have long been discontinued, it is still not difficult to purchase spare parts for them. A fuel level sensor for a VAZ-2106 costs about 300–400 rubles.
Repair of fuel level sensor VAZ 2110
Sequencing:
- It is necessary to disable the button that is responsible for sending the minus command to the battery. If it is missing, you need to reset the terminal from the battery.
- Open the door, unfasten the rear seat and remove it. Remove it from the interior and put it aside.
- Move aside the sound insulation to provide convenient access to the inspection hatch in the body.
- Using a Phillips screwdriver, unscrew the screws that secure the hatch. Remove its cover.
Preparing to dismantle the fuel pump
Disconnecting the pump electrical connector
Disconnecting the pump from the fuel line
Removing the pump from the tank
Checking the fuel level sensor
Installing the fuel pump into the tank
Replacing the fuel sensor
Remove the plastic gas tank trim.
1) Disconnect the two wires from the sensor terminals, having previously marked their location.
Replacing the fuel sensor VAZ 2101-2107
2) Use a Phillips screwdriver to loosen the screw securing the fuel hose clamp and remove the hose from the fuel intake fitting.
3) Using a key set to “7”, unscrew the six nuts and 4) carefully remove the sensor from the gas tank.
Install the new sensor in reverse order.
5) We install a “ground” wire under one of the sensor nuts.
Common problems
The fuel volume control system in the gas tank is susceptible to the following malfunctions:
- the pointer indicator lies at zero regardless of the amount of fuel remaining in the tank;
- the device does not display the fuel level correctly - it is lying up or down;
- the needle “jumps” or changes readings in a short period of time;
- The yellow minimum fuel indicator indicator does not light up.
There are several reasons why the needle drops to zero:
- Sticking or jamming of the lever.
- The float lost its seal and sank to the bottom.
- An electrical circuit is broken due to oxidized contacts or a wiring problem.
- Failure of the indicator itself or the lever sensor - potentiometer.
Typically, incorrect readings and “jumps” of the needle are a consequence of contamination of the rheostat and slider. On a car with high mileage, these parts can wear out - the thin layer on the plates wears away, causing contact to disappear between them and the runner.
One of the reasons for the minimum level indicator not working is a burnt-out light bulb on the instrument panel. Less common are problems with the end contact located inside the tank, or a break in the electrical wiring. In the newest systems, the lamp even lights up at the command of the controller when the resistance of the lever potentiometer reaches a certain value.
How to repair a fuel level sensor?
Repairing the fuel level sensor is an important process. Even if the operation of this unit does not directly affect driving safety, its incorrect data can cause accidents on the road.
Based on the information provided by the meter, you can plan trips or refuel your car. Therefore, it is not recommended to delay, but to repair or replace sensors on time. In order to prevent troubles on the road, you need to know what the system of this device is, how to check and adjust it. An example is the VAZ 2110 model.
How to repair a fuel level sensor
Design and principle of operation
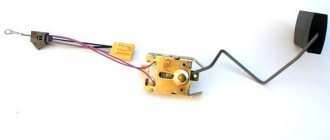
Structurally, the sensor is combined with a fuel intake tube on a common flange, which is attached to the installation hole of the gas tank through a sealing gasket on six studs. On all Zhiguli “classic” cars, the tank is placed in a vertical position near the rear right wing. Access is from inside the trunk by bending back the protective plastic trim.
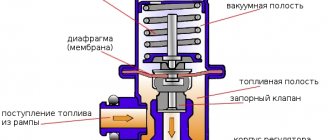
The FLS device is simple. It is made on the basis of a rheostat, the moving contact of which is activated by a lever at the end of which there is a float. The open-type plastic housing is located directly on the fuel intake tube.
In addition to the variable resistance, in the same housing there is an elastic contact, also connected to the swing arm. It closes if the remaining gasoline in the tank becomes less than 4–6.5 liters and turns on the reserve indicator light on the device.
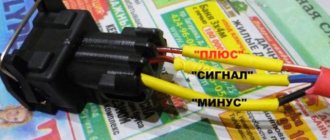
The sensor connection diagram is visible in the figure:
There are three contacts, one of which (black) is screwed to the ground of the machine. The other two are connected to the terminal connectors: the pink wire is used to transmit a signal to the pointer part of the device from the rheostat, and the second wire (in most circuits, gray and red) is responsible for the warning lamp signaling circuit.
How does the device work?
To understand the problem yourself, you need to understand how the fuel level is measured and information is transmitted to the device indicator. The circuit implemented in most vehicles includes the following main elements:
- a float made of lightweight polymer is immersed in the gas tank and is often combined with the pump block;
- gasoline sensor – lever-type potentiometer (otherwise known as rheostat);
- pointer arrow with scale;
- connecting wires.
In many modern cars, an electronic control unit is connected to the system.
The classic rheostat is an open coil of high resistance wire. A lever equipped with a contact and attached to the float rises or falls with the level of fuel in the tank, and the contact moves along the turns of the winding. The classic scheme works simply:
- The rheostat and the pointer device are connected in series in the circuit, both are powered from the vehicle's on-board network.
- When moving the float with the lever, the resistance of the potentiometer changes.
- A change in resistance causes an increase or decrease in the current in the circuit, to which the indicator arrow reacts. The scale is graduated according to the resistance values corresponding to the filling of the gas tank.
The updated version of the system works with the participation of a controller. The fuel level arrow receives a processed digital signal from the electronic unit that supplies power to the potentiometer. The principle of operation does not change, but the circuit allows you to obtain more accurate readings.
Fuel level sensor - device (FLS)
In this article, our attention will be focused on cars where the FLS is used to indicate the fuel level, convert this level into volume and transmit the resulting value digitally or analogue
This device consists of a metal rod mounted into the fuel tank through a standard hole or a specially made hole of suitable diameter. The sensor is connected to the vehicle's monitoring system, where the required data is transmitted.
They are often high-precision universal devices, which allows them to be used not only in transport, but also in other equipment, and even in stationary facilities - factories, warehouses. This unit is closely interconnected with the fuel level indicator located on the instrument panel.
Today, there are a number of FLS variations - universal, ultrasonic, float, digital, electronic, but their common goal is the same - to correctly determine the fuel tank consumption, so that every driver has the opportunity to control their fuel costs. In addition, the device makes it possible to monitor the amount of drainage (the most useful option for taxi services, business managers and other organizations in which employees are able to drain government fuel) and fuel refills (in what volume, when and where they were carried out).
To be able to monitor the fuel level in more detail, it is necessary to install an appropriate device on the car with minimal error and increased sensitivity, which will provide the most accurate readings.
connecting the fuel level sensor
There are two methods for connecting the FLS to the vehicle’s on-board network, the design of which includes a ground switch:
- Connecting the FLS to the on-board network after the main switch. The sensor, in this case, will be de-energized immediately after the vehicle's mass is turned off. In this case, it will be impossible to find out the drain time when parked - the sensor will be turned off. This connection method is recommended for cheap sensors where there is no galvanic isolation.
- Connecting the sensor to the battery directly. This connection method is ideal from a practical and functional point of view. In addition, connecting the FLS directly to the battery is safe, since the sensor current consumption is only 10-48 mA. It is recommended to connect Pro Sensor sensors directly to the battery, since they are distinguished by the presence of a built-in galvanic isolation of up to 3000 V. In addition, the polymer body of this sensor is an insulator, as a result of which all electrical circuits are reliably protected from electrical breakdown. To connect other sensors directly to the battery, you will have to install additional galvanic isolation.
Diagnostics and repair methods
To check and identify a malfunction, perform a number of preparatory work:
- Find a service hatch in the car that gives access to the electric fuel pump and float mechanism unit. Usually located under the rear sofa, where the fuel tank is installed.
- Unscrew the pressure flange and pull the assembly out through the hole. Clean all contacts and the rheostat plate, reinstall the unit.
- Prepare a “control” with a light bulb and a multimeter.
The first step is to accurately determine the “culprit” - check the sensor and pointer separately. The performance of the device is diagnosed as follows:
- Turn on the ignition and connect one terminal of the multimeter or test light to the ground of the car.
- Connect the second contact to the positive terminal of the wire going into the technological opening. The meter should show the voltage of the on-board network.
- Remove the positive terminal and short it to ground. If the instrument on the panel is working properly, the arrow will show a full tank. This means the fuel level sensor is not working.
- If there are 2 wires coming to the gas tank, connect them alternately to the vehicle ground. From one the control lamp should light up, from the second the pointer should move to maximum. If the listed symptoms are observed, change the sensor.
In the case when there is a voltage of 12 volts on the wires, but after a short to ground the pointer indicator does not respond, you will have to disassemble the dashboard and remove the device. Similar actions are taken when the minimum gasoline remaining indicator is not working.
It is somewhat more difficult to independently check the updated system installed in cars of recent years; simply shorting the terminals will not do anything. Using a multimeter, make sure that there is supply voltage on the wires, and then you need to connect another, working sensor to them. If the arrow on the instrument panel reacts when the float moves, the element should be replaced.
Thorough cleaning of the slider and rheostat turns helps in cases where the fuel level sensor simply lies. The moving contact can be carefully bent so that it passes along the unworn part of the turns. Clean the current-carrying strips of the potentiometer with a soft cloth soaked in alcohol to avoid damaging the surface of the element.
Some gasoline sensor malfunctions can be eliminated in a garage:
- a “sunken” float with a crack is replaced as an assembly with a lever or separately (depending on the make of the car);
- the torn conductors are connected using a conventional soldering iron;
- the damaged rheostat plate is replaced with a new one, provided that the spare part for your car is on sale.
At the moment, repairing the fuel level sensor is becoming irrelevant. Considering the cost of a new element, it is easier and more reliable to replace a non-working part.
If the indicator and the gas remaining meter are working properly, but the arrow of the device is lying, try making adjustments. Carefully bend the float rod in the desired direction and check the readings again. To achieve maximum accuracy, the operation will probably have to be repeated several times.
Functionality check
Do not rush to throw out the old sensor and replace it with a new regulator. First you can try to check if it really doesn't work.
To check, you will have to extract the “suspect” in any case.
- Inside the car, remove the lower part of the rear seat, remove the soundproofing material, if any. This will give you access to the inspection hatch in the floor of the car.
- Using a Phillips screwdriver, unscrew the four mounting screws that hold the hatch in place. Take it off. Under the hatch you will find a sealing gasket made of rubber. In any case, even if the old sensor works again for the benefit of your car, this gasket should be replaced.
- Disconnect the power supply block with wires from the sensor, and then unscrew the fastening nuts around the perimeter that hold the desired fuel level sensor on the tank body. Usually there are 6 of these nuts, and to dismantle them you will need an 8 socket socket or a regular wrench.
- Under one of the nuts there is a ground wire attached to a stud. Remove the wiring and put it aside for now. He shouldn't interfere.
- Carefully remove the sensor and do not forget to remove the rubber sealing gasket, which is located directly under the regulator. If there are signs of damage or defects on it, be sure to replace this component.
- When the sensor is removed, visually check its current condition. If there are mechanical damages, there is no point in further trying to repair it or restore its functionality. Change it right away.
- If there is no visual damage, check the condition of the float. It can be depressurized, that is, there is fuel inside it, cracks and various defects through which fuel has leaked are visible on the surface of the element. If all of this is present at the float, replace the entire sensor.
- Be sure to blow out the fuel filter with compressed air. A useful event that definitely will not harm your fuel system. Especially if the quality of gasoline with which you fill your VAZ 2109 leaves much to be desired.
- Check the condition of the resistor. To do this, you will need a multimeter in ohmmeter mode. Connect a measuring device to the sensor terminals and take readings. In the lowest position (empty tank), the resistance should be about 315-345 Ohms. If the tank is half full, the resistance will be 108-128 ohms. And when the tank is empty, the ohmmeter should show no more than 7 ohms. If the parameters differ from those specified, or there is no resistance at all, this indicates a malfunction of the controller. It must be replaced.
Checking status
Reassembly
It is necessary to follow the reverse principle of dismantling. But there are some nuances here.
- Install the gas tank gasket onto the studs.
- Replace the new or repaired old sensor.
- Place the ground wire from the fuel level regulator onto one of the studs, after which you can tighten all six removed sensor mounting nuts.
- Place the fuel outlet and supply hoses onto both tubes. You can then tighten the screws of the fuel hose clamps all the way.
- Connect the power supply wire to the fuel level regulator and return the hatch cover to its place. Just don't forget about the gaskets. All of them are replaced in most cases with new ones. Even if the condition of the old ones is satisfactory.
Why might it not work?
Fuel level controllers in the tank often break down, causing car owners to face problems. The parameters on the control panel are displayed incorrectly or are missing altogether. All device malfunctions can be divided into mechanical and electrical.
When it comes to power line faults, everything is simple – the problems are a consequence of:
- oxidation of contact elements;
- failure of safety devices;
- power line damage.
The AvtoTechLife channel, using the example of a Chevrolet Niva car, offers to learn about the nuances of diagnosing the electrical component of the FLS.
Mechanical problems can be more serious:
- Failure due to wear of the working sectors of the potentiometer. Wear of the elements occurs due to the contact of the potentiometer with the slider, since the latter regularly moves through the sectors. If the wear is insignificant and there is only a worn strip on the sector, then to eliminate the problem you can bend the slider. This will cause it to come into contact with the unworn part of the sector. However, if the wear band is wide, this will not give results and the controller will need to be replaced.
- Bend of the device lever. A malfunction usually occurs as a result of removing the controller and then installing it, during which errors were made. As a result, the controller works, but when displaying readings, incorrect values will be displayed. The deviation can be serious.
- Damage to the float due to leakage. A malfunction will result in fuel getting inside the controller, so the device will always be located on the surface. When the volume of fuel in the tank increases, the sensor will be immersed in the liquid. The values displayed on the dashboard will be incorrect.
Problems of this kind will lead to complete failure or incorrect functioning of the controller. The arrow on the control panel may twitch during operation or indicate an empty fuel tank.
If problems with the fuel level sensor are related to a mechanical component, then it is advisable to completely replace the device.
Signs of trouble
You can determine a malfunction in the operation of the controller through diagnostics; to do this, you need to know the signs of the problem:
- The indicator needle on the dashboard fluctuates constantly.
- The controller needle is located in the zero position when the tank is full. This indicates that the device's travel stop is in the wrong position.
- When the ignition is activated, the indicator needle on the dashboard does not move. This symptom usually indicates a burnt-out safety device or a problem with the electrical circuit.
- The pointer needle jerks and always falls to the zero position. The reason may be a poor-quality connection between the contact element of the potentiometer and the current collector. If the sensor is repaired independently, then the integrity of the potentiometer winding is diagnosed.
- The indicator light has stopped working, indicating that the fuel level is low. The likely cause is a malfunction of the potentiometer.
- Incorrect indications about the fullness of the fuel tank.