The coolant in the cooling system of the Lada Priora must be replaced every 75 thousand kilometers. Also, antifreeze needs to be changed every 5 years, regardless of mileage. The reason is that the additives in the coolant “work”, as a result of which the properties of the antifreeze change.
The procedure for replacing the coolant is not complicated, so you can replace antifreeze or antifreeze on a Priora with your own hands. To do this you need:
- drain the coolant;
- flush the cooling system (if necessary);
- fill in new antifreeze in full;
- remove air pockets;
- Check the cooling system for leaks.
In this case, it is important to take into account certain nuances: how to drain antifreeze from a Priora, where the coolant drain plug is located on this car, etc. Read more in our article.
Recommendations
- Immediately after replacing the coolant, the engine must be warmed up, while simultaneously checking the heating of the lower radiator hose. It should be cold at first, but then quickly warm up. Its heating will indicate that the antifreeze is circulating normally in a large circle.
- Then the engine should continue to warm up until the cooling system fan turns on.
After turning off the fan, turn off the engine and allow the engine to cool. After cooling, unscrew the cap of the expansion tank again and check the fluid level again. If necessary, the normal level in the tank should be set again. - Please note that on models with a cable transmission, the starter will also need to be removed. To do this, you need to remove the negative terminal on the battery. Next, the latch of the wire block is pressed, after which the block is disconnected from the traction relay connector. Then you need to remove the protective cap from the nut securing the wire tip, which is connected to the “plus” wire of the battery.
We also recommend reading the article on how to flush the engine cooling system before replacing the coolant. From this article you will learn about the features of cooling system maintenance, as well as how to flush the engine cooling system correctly.
Using a spanner “13”, unscrew the nut and remove the wire tip from the contact bolt of the traction relay. Now, using a key set to “13”, unscrew the starter mounting bolts (3 pieces), and the starter is removed from the car. If there is a box with traction control, removal of the starter is not required.
Removing the intake pipe
We remove the inlet pipeline to replace the sealing gaskets. in connecting the pipeline and the cylinder head, for removing the fuel rail, as well as when repairing the cylinder head. Disconnect the wire terminal from the negative terminal of the battery. Remove the plastic engine cover. Use a Phillips screwdriver to loosen the clamp securing the crankcase ventilation hose...
...and remove the hose from the cylinder head cover pipe.
Using a Phillips screwdriver, unscrew the self-tapping screw securing the guide tube of the oil level indicator to the intake pipe...
...and lift up the tube with the oil level indicator.
Using pliers, loosen the tightening of the band clamp securing the vacuum brake booster hose... ...and remove the hose from the intake manifold. Disconnect the end of the throttle drive cable from the drive sector (see “Replacing the throttle drive cable”). Having unscrewed the nuts securing the throttle assembly and without disconnecting the coolant hoses from it, remove the throttle assembly from the inlet pipeline (see “Removing the throttle assembly”). We disconnect the wire blocks from the ignition coils of the 1st, 2nd and 3rd cylinders (see “Checking the condition and replacing the spark plugs”)...
...and move the wiring harness to the side.
Using a 10mm socket, unscrew the two nuts of the upper fastening of the intake manifold to the cylinder head cover. Using a 13mm socket, unscrew the two bolts and three nuts of the lower fastening of the intake manifold.
Places for attaching the intake manifold to the cylinder head
(for clarity, the intake pipeline and the fuel rail with injectors have been removed): 1 - studs; 2 - holes for bolts
Unfasten or cut the two clamps securing the engine management system wiring harness to the upper timing belt cover. Disconnect the engine control system wiring harness block from the phase sensor (see “Removing the phase sensor”). We remove the ignition coils of the first, second and third cylinders (see “Checking the condition and replacing spark plugs”). We close the holes for the ignition coils in the cylinder head cover with a rag.
We move the intake pipe forward (along the direction of the car) and lift it up, bringing it out from under the wiring harness of the engine control system.
There are sealing rubber gaskets installed in the grooves of the intake manifold flange. If additional work is required after removing the intake manifold, it is necessary to cover the holes in the cylinder head with a rag to prevent objects from getting into the engine. Before installing the intake pipeline, check the condition of its sealing gaskets. If the gasket has lost elasticity or is damaged, it must be replaced with a new one. Install the intake pipe in reverse order. We tighten the bolts and nuts securing the intake manifold to the cylinder head to the prescribed torque (see “Appendices”).
What to choose: antifreeze or antifreeze
Both antifreeze and antifreeze are coolants. At the same time, antifreeze is the international name denoting coolants for cooling systems of internal combustion engines.
Antifreeze is also an analogue of antifreeze; it was developed back in Soviet times. It is noteworthy that the name TOSOL is not patented. As a result, today antifreeze manufacturers are actively producing products called TOSOL. Such a liquid today has nothing in common with the old Soviet development and is still the same antifreeze. It turns out that this is antifreeze, only domestically produced.
At the same time, TOSOL is traditionally used in domestic cars; it is poured at the factory during the manufacture of new cars. However, if you need to switch from it to antifreeze, no problems arise.
The main thing is to avoid mixing different types of coolants, and also to use products in the cooling system whose properties meet the tolerances of the car manufacturer itself.
Stages of work
To prevent air pockets from forming in the cooling system after filling the cooling system with liquid, use a Phillips screwdriver to loosen the clamp on the throttle assembly heating hose (the highest point of the vehicle's cooling system). After loosening, disconnect the hose from the fitting. Now you need to pour antifreeze into the expansion tank. This should be done carefully, since spilled liquid will evaporate for a long time while the engine is running, causing a large volume of steam. It should be poured until antifreeze runs from the removed hose.
Next, attach the hose to the fitting, tighten the clamp and fill the antifreeze to the required level in the expansion tank. If after replacement the cooling system does not work correctly (the engine overheats quickly), then there are air pockets in the system. You can eliminate them in the following ways:
- Remove the hose from the throttle body heating fitting, then blow into the neck of the expansion tank. As soon as liquid runs out of the hose, immediately return everything to its original position;
- Since antifreeze is poisonous, excess pressure can be created without direct interaction with the expansion tank. To do this, you just need to start the engine for a couple of minutes. Then we remove the hose and wait for the liquid to appear. You should be careful as the liquid will be hot and come out under pressure, so you should protect yourself from possible burns.
How to change antifreeze to antifreeze on a Priora? Replacing antifreeze and replacing antifreeze with antifreeze are not much different. The only detail is that the cooling system should be flushed more thoroughly to remove antifreeze, since it remains on the walls of the hose and reservoir. Also, antifreeze is changed more often than antifreeze, after 40 thousand kilometers.
Priora with 16 valves
Replacing antifreeze on a Priora with 16 valves is not much different from replacing a Priora with 8 valves. The main difference is that in a Lada with 16 valves, antifreeze replacement is necessary only after 75 thousand kilometers. Also, unlike an 8-valve car with air conditioning, a 16-valve car has a drain plug on the radiator.
Lada Priora with 8 valves
When replacing antifreeze on a Priora 8-valve with air conditioning, you may notice the absence of a drain plug on the radiator. Accordingly, the coolant is drained by disconnecting the lower pipe coming from the radiator. After draining the liquid, return the hose to its original position and continue the procedure described above.
Engine problems due to poor quality coolant
When it became clear how important antifreeze is for a car engine, let’s move on to the quality of coolants that are sold on store shelves. The main problem in choosing is not that the manufacturer himself indicates which antifreeze is best for a particular engine, but what quality of antifreeze we can buy. If the manufacturer states that you need to fill the Priora with Felix 40, and the VAZ 2114 with Cool Stream Standard, then you need to either adhere to the factory recommendations, or study the brands of antifreeze in detail in order to select replacements from another company that are exactly the same in composition. Otherwise problems are inevitable. And they can be expressed as follows:
- Engine overheating. Normal engine operating temperature is 80-90 degrees. If it rises by 3-5 degrees, the engine overheats, increased fuel consumption and a drop in power appear, and at 110 degrees aluminum alloys lose their properties.
- Corrosion. The most common defect caused by low-quality antifreeze. Antifreeze, not designed for use with any metal included in the system, inevitably causes corrosion and coking of channels, which, in turn, leads to overheating, deformation of oil scraper rings, and premature aging of the oil. Therefore, at the first signs of rust in the expansion tank, you need to immediately change the antifreeze.
- Cavitation. A very serious defect that can be caused by poor-quality antifreeze. The cavitation process is reminiscent of the collapse of bubbles of boiling water in a kettle, only in the limited space of the engine’s water jacket this leads to the washing out of metal particles from the cylinder block parts, up to the complete disappearance of the partitions and failure of the vane pumps.
How to fill
- Loosen the clamp and disconnect the pipe from the fitting.
Disconnect the pipe
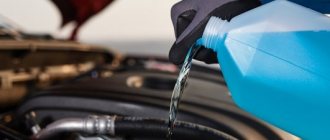
- We unscrew the cap of the coolant container and fill in antifreeze or antifreeze until it begins to flow from the hose, which is disconnected from the throttle assembly.
Pour the required volume into the coolant reservoir
- When coolant starts flowing, install the pipe in its place and secure it with a clamp.
- Add antifreeze to normal level.
Minimum and maximum coolant volume
Installation instructions for an additional electric pump
Communities Lada Priora Lada Priora Club Blog Micro FAQ 2. Checking the functionality of the expansion tank cap Installing an additional water pump on any car (including the Lada Priora has 16 valves) is basically no different. It is necessary to place the electric pump in the section of the pipe, which is the input or output to the car’s stove and provide its power supply.
Step-by-step instructions for installing this additional component are as follows:
- Provide access to the heater pipes under the hood of the car by removing components that interfere with operation.
- Compress one of the rubber pipes that comes out of the heater (stove), which is done to prevent coolant from leaking out, or drain antifreeze (antifreeze) from the entire system.
- Cut part of this pipe to the length of the corresponding pump being installed.
- The length of the fittings is not taken into account due to the fact that they fit into the pipes.
- It is necessary to select the diameter of the fittings on the electric pump in advance to obtain a high-quality connection.
- Secure the rubber pipes to the pump fittings using metal clamps.
- Attach the additional electric pump to a pre-selected location under the hood of the car (indicated above) using special fasteners.
- Connect the power supply to the pump by selecting the options listed above, or install a separate switch.
- Start the engine and check the tightness of the connections, as well as the functionality of the electric pump.
- Install all parts that were removed before installing the pump.
Replacing antifreeze on a Priora
To replace the coolant on a Priora, you need to drive the car into a pit or lift it on a lift, remove the crankcase protection and perform other preparatory procedures. All replacement work must be carried out only after the engine has cooled down!
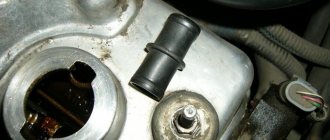
- First you need to relieve excess pressure in the cooling system. To do this, unscrew the cap of the expansion tank.
- Then you need to find the place where the coolant drain plug is located (at the bottom of the right radiator tank).
- Next, place a container of about 8 liters under the plug, screw the cap on the expansion tank (this will prevent too intense draining).
- Then you can unscrew the radiator drain plug by hand, after which the liquid will begin to drain into the container.
Please note that the radiator drain plug has an additional O-ring. If it is damaged, it needs to be replaced. - Having unscrewed the plug, you should return to the place where the Priora expansion tank is located and unscrew the cap of the expansion tank.
- To drain the liquid from the engine cooling jacket, place a container under the drain hole where the antifreeze drain plug is located (on the front side of the cylinder block, closer to the clutch housing).
We also recommend reading the article on how to remove an air lock from the cooling system. From this article you will learn about the reasons for air getting into the cooling system, as well as how to remove an air lock from the cooling system of a car engine. - Having gained access to the plug (by removing the starter or without removing it), using a key set to “13”, you can unscrew the drain plug of the cylinder block, after which the coolant will drain from the engine.
- After draining, all that remains is to tighten the drain plugs (on the radiator and cylinder block). Fresh antifreeze is then poured into the cooling system through the expansion tank.
- The process of replacing antifreeze is completed by starting the engine, after which, with the engine running, you need to compress all the hoses of the cooling system several times (helps distribute the liquid and squeeze out air).
- After compressing the hoses, you should check the fluid level in the tank, bring it to normal when the fluid is between o and “max” and tighten the cap of the expansion tank.
VAZ 2110: replacing the exhaust manifold on your own
Exhaust manifold VAZ 2110
When the car engine is running, smoke and the smell of gas may appear under the hood of the car. The reason may be that the exhaust manifold has burnt out. On a VAZ 2110, replacing the exhaust manifold is associated with metal burning. In this case, it is not recommended to delay replacing it. Since further operation of the machine may cause big problems. Replacing the exhaust manifold of a VAZ 2110 can easily be done with your own hands. Burnt holes are almost impossible to visually examine. When the engine is running, the hood should be open. Exhaust gases will escape, not into the exhaust pipe, but will whistle through these burnt holes. Gases can escape under the bottom of the machine, since the material burns out mainly in those places where the pipe is bent.
Self-replacement
Replacing the exhaust manifold of a VAZ 2110
- the car needs to be driven into the garage;
- hang a lamp with a safety light under the hood;
- before starting repairs, antifreeze must be drained from the tank;
- disconnect the battery terminals;
- take it out;
- put on a rack;
- disconnect the vacuum booster hose from the receiver;
- also disconnect the hoses of the electric pneumatic valve cover and the ramp pressure regulator;
- disconnect the chips of the throttle sensor, idle air control;
- disconnect the throttle valve cable;
- loosen the clamp on the air supply hose to the air flow sensor housing;
- disconnect it;
- loosen the clamps for attaching the hoses to the throttle pipe and ventilation of crankcase gases on the cylinder head cover;
Replacing the cathode collector for a VAZ 2110
- remove the hoses in pairs;
- loosen the crankcase ventilation hose clamp;
- remove it from the throttle assembly;
- In the same way, carry out further work with the coolant inlet and outlet hoses.
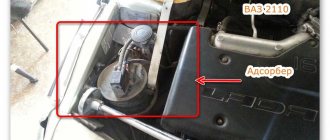
- loosen the clamp;
- disconnect the adsorber purge hose;
- remove the throttle assembly;
- remove the sealing gasket.
The receiver must be removed together with the throttle assembly. In addition, it is necessary to disconnect all inlet and outlet hoses and idle speed sensor chips from the assembly. Carefully check to make sure that all fastenings are completely loosened.
Unscrew the 2 nuts for attaching the fuel supply and outlet pipe bracket to the receiver. The same - 1 nut for fastening the receiver to the bracket, 5 pieces for fastening to the intake manifold. Remove the receiver, remove the gasket.
How many liters of coolant are in the Lada Priora cooling system
Before replacing, it is necessary to determine how much antifreeze to fill. According to the passport, the empty system on the Priora contains about 7.84 liters of liquid. However, when replacing, some of the liquid cannot be drained, as a result of which about 6-6.5 liters are often sufficient for replacement.
Taking into account the fact that antifreeze or antifreeze is often sold in the form of a concentrate, the general rule is:
- mixing the concentrate in a ratio of 50:50 (50% antifreeze and 50% water);
- mixing in a ratio of 60:40 (60% antifreeze and 40% water);
These proportions make it possible to obtain the freezing point of the coolant at around -30 or -35 degrees Celsius, which is quite enough for most regions.
It turns out that for replacement you need to purchase 4 liters of concentrate and 4 liters of distilled water. Ready-made antifreeze for Priora will be obtained with a small reserve. This reserve must be drained into an airtight container and stored, since the liquid will be useful for refilling in the future.