Soviet-made cars are easy to operate and maintain. You can repair a VAZ 2105 yourself in the garage. We are not talking about a major overhaul, but about adjusting and repairing some problems.
Classic "Zhiguli" five, white.
VAZ 2105 is a Soviet small class model. The five first appeared in 1980. The last car, model 2105, rolled off the assembly line in September 2012.
The VAZ 2105 was created on the basis of the Italian Fiat 124 produced in 1966.
The second name of the VAZ 2105 is “Zhiguli” five. After the collapse of the USSR, the model was renamed Lada 2105.
VAZ 2105 was presented in a large number of modifications. Manufacturers produced versions of the model for security services and for participation in rallies.
Engine
Manufacturers offered two engine options:
- 1.5-liter power unit with a power of 72 hp. With.;
- 1.3-liter power unit producing 64 hp. With.
Export VAZ 2105 cars were equipped with a 1.3-liter engine. For the domestic market, manufacturers produced a model only with a 1.5-liter power unit.
The engine inherited the cylinder block from the VAZ-2101. Manufacturers abandoned the use of a chain and equipped the engine with a camshaft belt drive. The modification reduced the noise of the power unit. But it did not completely eliminate the problem.
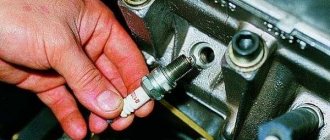
Setting the carburetor choke
How much trouble does incorrect carburetor choke adjustment bring to drivers, especially in winter. In some cars, you pull the choke all the way, but the engine does not hold speed, you have to hold the gas pedal until it warms up. For others, on the contrary, you pull the choke all the way, and the engine screams like crazy, although during warm-up such high engine speeds are unnecessary.
Photo. Carburetor suction system.
The whole point is that the lever for forced opening of the carburetor throttle valve is incorrectly adjusted when the choke is pulled.
All this is easy to fix; in the photo above the arrow shows the thrust for forced opening of the throttle valve at the moment the choke is pulled out. If the engine does not hold speed, then it is possible that the rod is on the lower hole of the throttle lever; the photo shows two holes for the throttle rod. Move the rod into the upper hole of the lever.
If the engine is spinning very quickly on the choke, then use pliers to slightly bend the rod shown by the arrow; it bends easily without removing it from the carburetor; if the engine speed is low, straighten this rod. In this way, you can easily adjust the desired engine speed when starting on choke.
Setting the choke engine speed in a VAZ 2108 carburetor is even simpler; the photo above shows boot 3; by tightening it, the choke engine speed will increase, and unscrewing it will decrease.
I hope that after reading this article, you can easily adjust the carburetor on your car yourself.
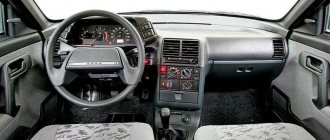
Tuning
Lada 2105 in tuning.
Do you recognize? Fans of the domestic automobile industry tune the VAZ 2105. They fix factory faults and change the appearance using body kits, painting the car, and installing lighting.
Technical tuning can be done without a service station. The pistons and clutch are being replaced, and the gear ratio in the box is being selected. You can also increase the stiffness of the suspension by replacing the damping springs and levers.
After changes in the technical parameters of the VAZ-2105, it is necessary to modify the car’s braking system - update the brake pads and rear calipers.
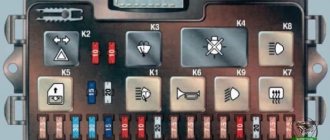
VAZ electrical diagram
Turn indicators in the direction of turn mode, Indicator and reserve signal indicator Control, fuel lamp for turning on the parking brake, electric fan Thermal switch, Electro-pneumatic valve control system, Control lamp for closing the carburetor air damper, Cooling liquid temperature indicator, Relay for electric fan winding, excitation generator winding, Relay-breaker and indicator turn indicator, voltmeter, tachometer, battery charge warning lamp, brake system emergency warning lamp. * Installed on parts of manufactured vehicles. Hazard switch with control relay, turn signal interrupter lamp and emergency indicators, turn signal in hazard mode, control signal, turn signal lamp in Audible mode. alarm signals, signal relay, electric motor relay and radiator cooling fan contacts. Electric vehicle circuits VAZ-2104, signaling device and relay winding for turning on the heated rear window relay, lights, reversing lamps, protected by fuses in the fuse brackets for mounting blocks of the old model: Heater electric motor. The order of the conventional numbering plugs in the blocks is: a-headlight unit, carburetor control valve unit; b — mounting block and three-lever rear; c - lamp switch, numbering of terminals in order from top to bottom, terminals downwards; relay-breaker for emergency indicators and turn signal, relay-breaker for windshield wiper, headlight and rear window cleaners. headlights-Block; 2-side direction indicators; 3 - battery relay; 4 — starter battery; 5 — carburetor electro-pneumatic valve; 6 — carburetor microswitch; 7 - generator 37.3701; 8 — gearmotors of electric motor cleaners*; 9 — headlights of the engine cooling system fan*; 10 — activation of the fan motor sensor*; 11 — sound signals; 12 — ignition distributor; 13 — spark plugs; 14 — starter; 15 — coolant indicator temperature sensor; 16 — engine compartment lamp; 17 — oil pressure lamp control sensor; 18 — sensor coil; 19 — brake fluid level ignition; 20 — gear motor for windshield wiper; 21 — control unit for electric pneumatic valve; electric motor; 22 — carburetor, headlight washer pump*; 23 — electric motor of the windshield washer pump; 24 — stop relay switch; 25 — windshield wiper signal breaker; 26 — lighting regulator of devices; 27 — relay-interrupter for emergency indicators and turn signal; 28 — rear light switch plug; 29 — travel socket for a portable lamp*; 30 - lamp; 31 — cigarette lighter for glove compartment lighting; 32 — a jumper is installed instead of the short-circuit relay block; 33 — switches on the pillars on the front door lamps; 34 — lamp switches on the rear door pillars; 35 — lampshades; 36 — switch for parking brake warning lamp; 37 — carburetor air damper warning lamp switch; 38 — rear window cleaner and washer switch*; 39 — alarm switch; 40 - three-lever switch; 41 — ignition switch; 42 — ignition relay; 43 — outdoor lighting switch; 44 — rear fog light switch; 45 — fog light fuse circuit; 46 — oil pressure warning lamp; 47 — instrument cluster; 48 — fuel reserve warning lamp; 49 — fuel level indicator; 50 - rear lighting lamp of the side: 51 - battery charge control lamp; 52 — control cooling temperature indicator; 53 — liquid lamp of the carburetor air damper; 54 — parking brake warning lamp*; 55 — control block; control; 56 — rear fog light lamp; 57 — control lamp for rear window heating; 58 — brake fluid level control lamp; 59, voltmeter 60 - speedometer 61 - control lamp for external lighting; 62 — indicator lamp; 63 — high beam warning lamp 64 — heater fan switch; 65 — rear heating switch with backlight glass*; 66, standard lighting sensor; 73 — sign of the level indicator and fuel reserve, fan, heater electric motor 67 — additional resistor of the electric motor; 68 - heater, rear window washer pump: 69 - rear lights: 70 - rear window wiper gearmotor*; 71 - for connection block to the rear heating element; diagram; 72.
Models 2105 and 21053: technical specifications
This valve needs to be washed; it is strictly forbidden to do this with plain water. Solvent is the most convenient, high-quality and common means for flushing the valve. Then be sure to dry it with compressed air. If the engine does not perform as well as usual during operation, or your car responds slowly or does not respond at all to pedal inputs, then the strainer is most likely the cause of the problem.
Engine of a car of this model
The float chamber also needs cleaning
It is very important not to wipe its bottom with a lint rag, since the lint remaining on the bottom will clog the mechanism jets. To effectively clean the float chamber, you need to use a blower made of rubber, and you need to dry it in the same way as a mesh filter - with compressed air
Car pump device
In case of many defects, the pump is replaced on a VAZ sixth model, a video about which can always be watched on the Internet. The “six” prefers to change the entire water pump, because Many car enthusiasts do not repair this component of the car cooling system due to its low price when purchased at a spare parts store. The price of a “six” water pump in various retail outlets is quite reasonable, varying from 600 to 700 rubles.
The liquid base (antifreeze) acts as a cooler for the power plant, which heats up during operation. But the cooler is moved using the so-called. “pump” (water pump), which with its impeller blades forces liquid to flow into the supplied pipes. When the “six” water pump is not working, the temperature of the engine begins to steadily increase, which can lead to its overheating, deformation of individual elements and subsequent breakdown. Therefore, it is necessary to replace the pump or repair it. What the water pump consists of can be seen when replacing the oil seal of the VAZ 2106 pump: it is a pump of a centrifugal operating principle, to which the rotational torque is transmitted from the crankshaft pulley of the vehicle’s engine unit. The part is located on the right side of the “engine” and is mounted with a paronite gasket. The product is cast from light aluminum alloys, the shaft of which is equipped with a double-row non-separable bearing without a cage. At one end of the shaft there is a blade impeller, at the other end there is a pulley hub.
An O-ring with the help of an oil seal forces the impeller to be in a state of readiness for operation. Under the action of the rotating impeller, the required pressure is created, with the help of which antifreeze is pumped into the cooling system and supplied to cool the power plant and other components of the vehicle.
All components of the water pump can be seen when replacing the pump seal, which is carried out during plumbing repairs. To find out whether the coolant is circulating in the heating system and whether the “six” pump is functioning, we perform the following simple steps: start and heat the engine to an operating temperature of 90 degrees Celsius and squeeze the upper pipe directed to the radiator with both hands. If the water pump is functioning, you will feel the circulation of antifreeze in the system.
Electrical diagram of VAZ 2104
Scheme of VAZ-2104, for cars of early years of production. It is distinguished from the standard circuit by the G-222 generator, 10-pin hazard warning switch, 5-pin relay for direction indicators and hazard warning lights, top dead center sensor of the 1st cylinder, diagnostic block, rear window heating indicator lamp directly in the switch , the absence of a carburetor choke warning lamp, a two-position exterior lighting switch and a three-position steering column light switch.
1 — block headlights; 2 — side direction indicators; 3 - battery; 4 — battery charge warning lamp relay; 5 — carburetor electro-pneumatic valve; 6 — top dead center sensor of the 1st cylinder; 7 — carburetor microswitch; 8 — generator G-222; 9 — gearmotors for headlight cleaners*; 10 — electric motor of the engine cooling system fan*; 11 — fan motor activation sensor*; 12 — sound signals; 13 — ignition distributor; 14 — spark plugs; 15 - starter; 16 — coolant temperature indicator sensor; 17 — engine compartment lamp; 18 — oil pressure warning lamp sensor; 19 — ignition coil; 20 — brake fluid level sensor; 21 — windshield wiper gearmotor; 22 — carburetor electro-pneumatic valve control unit; 23 — electric motor of the headlight washer pump*; 24 — electric motor of the windshield washer pump; 25 — diagnostic block; 26 — brake light switch; 27 — windshield wiper relay; 28 — relay-interrupter for alarm and direction indicators; 29 — reverse light switch; 30 — plug socket for a portable lamp; 31 — cigarette lighter; 32 — glove box lighting lamp; 33 — mounting block (a jumper is installed instead of a short-circuit relay); 34 — lamp switches on the front door pillars; 35 — lamp switches on the rear door pillars; 36 — lampshades of VAZ 2104; 37 — parking brake warning lamp switch; 38 — rear window cleaner and washer switch*; 39 — alarm switch; 40 — three-lever switch; 41 — ignition switch; 42 — instrument lighting switch; 43 — external lighting switch; 44 — rear fog light switch; 45 — oil pressure warning lamp; 46 — instrument cluster; 47 — fuel reserve warning lamp; 48 — fuel level indicator; 49 — courtesy lamp for the rear part of the cabin; 50 — battery charge indicator lamp; 51 — coolant temperature indicator; 52 — relay-interrupter for the parking brake warning lamp; 53 — control lamp block; 54 — brake fluid level warning lamp; 55 — rear fog light indicator lamp; 56 — parking brake warning lamp; 57 - voltmeter; 58 — speedometer; 59 — control lamp for external lighting; 60 — turn signal indicator lamp; 61 — control lamp for high beam headlights; 62 — heater fan switch; 63 — rear window heating switch with control lamp*; 64 — heater fan electric motor; 65 — additional resistor of the heater electric motor; 66 — electric motor of the rear window washer pump; 67 — rear lights; 68 — rear window wiper gearmotor*; 69 — pads for connecting to the rear window heating element; 70 — license plate lights; 71 — sensor for level indicator and fuel reserve.
Electrical diagram - full view:
DIY chassis repair
Regarding the repair of the chassis, there is one operation that is mandatory for every car enthusiast. This is a replacement for a flat tire. It is not for nothing that the set of tools supplied with the cars includes a jack and a wheel wrench. Many people get punctured wheels. Be prepared for repairs.
Modern tubeless tires can travel several tens of kilometers with small punctures. If you have an electric pump in your car, you can drive to the nearest tire repair shop. But you shouldn’t count on this and drive a VAZ 2104 without a spare wheel. Punctures can be large and the tire will need to be replaced immediately. A spare tire, a tire, a jack and the corresponding repair skills are mandatory accessories for driving a VAZ 2104.
Read also: Mirror tinting for cars
Every car trip begins with an external inspection. You just see a flat tire and put on a spare. When driving, a sure sign of a broken tire is that the car is driving, the car is being pulled away from the direction of travel. If such a slip occurs, you must immediately pull over to the side of the road and stop the car in a safe place. Install a warning triangle.
To change a wheel, the car must be securely locked in place. Put the switched off engine into gear, pull the parking brake lever all the way, and place a brake shoe or an improvised object, such as a stone or brick, under the fixed wheel. Install the jack in the socket closest to the wheel to be repaired.
The order of further actions is as follows.
- Remove the decorative cap.
- Raise the car slightly, but not until the damaged wheel lifts off the road surface.
- Using a wheel wrench, unscrew the four nuts securing the wheel to the hub.
- Raise the car with a jack until the wheel lifts off the road surface.
- Remove the damaged wheel and install a spare one in its place.
- Place the nuts in their original places and tighten by hand until they contact the surface of the wheel rim. Lower the car until the wheel touches the road surface.
- Use a wheel wrench to tighten the nuts completely.
- Lower the car. Install the decorative cap. Remove the jack and the damaged wheel.
- Upon completion of the repair of the VAZ 2104, remove the warning triangle.