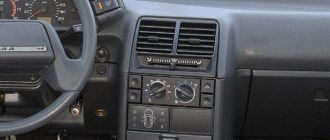
To promptly call service, you need to know the signs of a faulty input shaft bearing. In principle, you can do this work yourself. To do this, you don't even have to disassemble the gearbox. Moreover, this problem is not uncommon. Drivers generally often encounter failures of various bearings. After all, they stand on almost any tree and take on significant loads.
Basically, almost all of these structural elements fail with similar symptoms. Therefore, if you encounter such a malfunction once, the next time you will accurately indicate the reason. And taking into account indirect signs, determine exactly the location where the breakdown occurred.
Position. Signs of a bad input shaft bearing have a lot to do with its location. This bearing is located on the input shaft immediately after the oil seal. In some boxes it can act as a seal. Then, together with the release bearing, it takes on the entire load from the engine. Getting there is quite easy. You just need to remove the box. Currently, roller bearings are mainly used. Their overall dimensions vary on different car models.
Symptoms of a problem
Like all bearings, they howl when they fail. This usually happens when the clutch is released from a stationary position. Sometimes you can hear a whistling noise while driving. In rare cases, a knocking sound is heard. This usually occurs when the bearing is partially destroyed.
Sometimes the clutch may not engage or disengage. It could also be related to the bearing on the input shaft. Therefore, when checking the remaining motives, pay attention and inspect this part. This problem occurs when the bearing seizes. In particularly difficult cases, it may be necessary to replace the input shaft itself.
Most often, a whistle is heard in the absence of lubrication. In this case, the problem is solved by simply lubricating the disassembled bearing. Howling is observed when there are cracks and chips, as well as when one or two rollers are destroyed. Impacts are observed when the part is completely destroyed. If the bearing is not replaced in time, it may become “welded” to the shaft. In this case, it will have to be changed along with the tree.
When and how often should you check your gearbox?
The manufacturer does not set a strict time frame for repairing the device. The only recommendation is a scheduled oil change.
The company recommends changing the fluid after 2,000 kilometers for the first time and after 60,000 kilometers for the second time. Further maintenance is limited to maintenance every 20,000-30,000.
Replacement
To get rid of it, it is recommended to completely disassemble the box, but in reality this work can be done without breaking up the gearbox. In any case, it needs to be removed. Before removing the box, disconnect the battery, remove all chips from the box and unscrew the speedometer transmission. On some models it may be necessary to remove the exhaust panties. Only after the checkpoint is removed.
Having removed the box, we disassemble the bell. Otherwise, it will interfere with further work. It is also recommended to clean the box from dirt.
On most transmissions, the bearing is secured with retaining rings. Removed with a screwdriver. You will have to disconnect them a little and open them slightly, after which they can be easily removed. For greater convenience, the ring can be taken with tweezers. Next, you need to use a screwdriver to pry the bearing out of the annular groove, while the input shaft must be moved forward.
Next, a support is placed between the bearing and the box. For this you will need an assistant. The editors will endure. Your job is to push the bearing out with precise but strong blows on the input shaft. During operation, it is necessary to rotate the shaft. Typically this can take up to 20 minutes. There are special pullers, but using them on a disassembled box is problematic. To disassemble a gearbox, you need to have experience in such work.
Before installation, the bearing is lubricated with engine oil. It should be pressed carefully. To do this, the shaft is pulled forward. Drive the bearing into place with light blows of a small hammer. You should tap on the inner cage and do it evenly, in a circle. Once you have inserted the cushion, make sure it is working correctly. He must work absolutely calmly. Afterwards the box is assembled in the reverse order and installed on the car.
Signs of a malfunction of the input shaft bearing of the VAZ 2107 gearbox
There are several signs that indicate bearing failure:
- When the engine is running at neutral speed, an odd noise is heard that changes as the speed increases.
- The gearbox periodically knocks while the car is moving. And there is a knock on any broadcast.
- Gears turn on or off spontaneously.
- The clutch does not engage due to a stuck bearing.
The problem cannot be ignored: misalignment of a faulty bearing will lead to breakage of the clutch basket. And even if the tilt does not occur, a worn part will lead to failure of the transmission and/or clutch.
Bearings can only be replaced with the gearbox disassembled. This is where the work begins.
Diagnostics of box bearings
To check the condition of the gearbox bearings, the device must be disassembled and access to the parts must be opened. This method is the most accurate and effective.
After dismantling and disassembling the unit, you should check the shafts for play, the integrity of the seals and sealing rings. Additionally, the condition of the seats is checked. In normal condition, the formation of backlash and damage to rubber seals is unacceptable. If this is found, the part should be replaced.
Removing the VAZ 2107 gearbox
To remove the checkpoint, you will need a pit or a lift. The procedure is as follows:
- Disconnect (better remove) the battery.
- Engage neutral, disengage the handbrake, raise and suspend the rear axle.
- We unscrew the bolts securing the cardan and the gearbox flange, and disconnect the cardan.
- Remove the front exhaust manifold by unscrewing the bolts.
- Disconnect the oxygen sensor.
- Remove the starter.
- In the cabin, remove the console and gear shift knob.
- Remove the gearbox cover.
- Unscrew the clamp that connects the catalyst to the front exhaust pipe.
- Remove the clutch slave cylinder.
- Unscrew the speedometer cable, remove the headset and the reverse speed sensor cable.
- Remove the driveshaft.
- Unscrew the cross member while holding the gearbox.
- Unscrew and remove the gearbox.
Replacing the bearing of the input shaft of the VAZ 2107 gearbox
Remove the cap and retaining rings from the disassembled box. No further disassembly is required. The procedure is as follows:
- Using a powerful screwdriver, assemble the VAZ 2107 gearbox input shaft bearing from the annular groove. Serious effort will be required, so the screwdriver should be chosen as strong as possible so that it does not break or bend.
- Pull the transmission input shaft forward using the shaft bearing as support.
- Slowly remove the bearing from the input shaft by tapping it with a hammer. Between hammer blows, the shaft must be rotated slightly to avoid distortion of the bearing.
Removing the pad takes from 5 minutes to half an hour. It all depends on the skill of the blacksmith and on how “related” the bearing is to the shaft.
The new bearing is pressed onto the shaft with a light hammer. Impacts must be applied to the inner ring of the bearing. This should be done carefully and evenly by pulling the input shaft forward.
The advantage of this method is that there is no need to fix the inside of the box, which could cause it to become unbalanced. In addition, replacing the bearing without disassembling the entire gearbox significantly saves time.
After replacing the bearing, all that remains is to install the gearbox in place. Given its weight, it is recommended that two people work together. The operations are carried out in the reverse order of removing the box and do not cause any difficulties.
The main purpose of the change is to change the amount of torque. Strictly speaking, gear shifting is only possible through the gearbox drive. The VAZ 2107 is equipped with five-speed manual transmissions, which are characterized by increased efficiency and long service life. The main element of the box is the input shaft, from which the car begins to move forward.
Gearbox device
In general, the concept of “remaking” the box is not entirely correct, since the design of the VAZ-2105 gearbox with 4 speeds was practically no different from the same gearbox 2101. The 2105 gearbox has a three-shaft layout, with constant gear meshing and manual control. Externally, the Kopeika and Pyaterki checkpoints can be distinguished almost only by the markings on the body of the box.
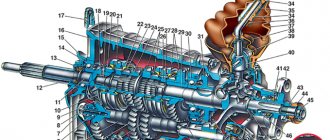
The VAZ-2105 gearbox diagram with 4 stages is presented below, and structurally it does not differ from modifications 2101 and 2106:
| 1 | Bottom cover; | 40 | Needle bearing of the front end of the secondary shaft; |
| 2 | Filler and inspection plug; | 41 | Synchronizer spring thrust washer; |
| 3 | Intermediate shaft second gear gear; | 42 | Fourth gear synchronizer ring gear; |
| 4 | Intermediate shaft third gear gear; | 43 | Sliding clutch for synchronizer of third and fourth gears; |
| 5 | Intermediate shaft; | 44 | Third and fourth gear synchronizer sliding clutch hub; |
| 6 | Front intermediate shaft bearing; | 45 | Synchronizer retaining ring; |
| 7 | Clamp washer bolt; | 46 | Synchronizer locking ring; |
| 8 | Intermediate shaft front bearing clamp washer; | 47 | Synchronizer spring; |
| 9 | Intermediate shaft constant mesh gear; | 48 | Third gear synchronizer gear and ring gear; |
| 10 | Constant mesh gear of the input shaft; | 49 | Second gear synchronizer gear and ring gear; |
| 11 | Spring washer; | 50 | Secondary shaft; |
| 12 | Retaining ring; | 51 | First gear synchronizer gear and ring gear; |
| 13 | Rear input shaft bearing; | 52 | First gear gear bushing; |
| 14 | Input shaft oil seal; | 53 | Secondary shaft intermediate bearing; |
| 15 | Transmission front cover; | 54 | Intermediate bearing lock plate; |
| 16 | Bearing mounting ring; | 55 | Secondary shaft reverse gear; |
| 17 | Clutch housing; | 56 | Elastic cushion for gear shift lever damper; |
| 18 | Gearbox input shaft; | 57 | Damper rubber bushing; |
| 19 | Reversing light switch; | 58 | Damper spacer; |
| 20 | Intermediate shaft reverse gear; | 59 | Damper locking sleeve; |
| 21 | Reverse intermediate gear; | 60 | Inner gear shift lever cover; |
| 22 | Reverse fork; | 61 | Secondary shaft rear bearing oil seal; |
| 23 | Gear shift lever release spring; | 62 | Flange of the elastic coupling of the propeller shaft; |
| 24 | Tension spring bolt; | 63 | Screw; |
| 25 | Gear shift lever guide cup; | 64 | Centering ring seal; |
| 26 | Ball joint of the lever; | 65 | Centering ring retaining ring; |
| 27 | Spherical washer; | 66 | Centering ring; |
| 28 | Spring; | 67 | Rear secondary shaft bearing; |
| 29 | Gear shift lever; | 68 | Drain plug; |
| 30 | First and second gear shift fork; | 69 | Mud deflector; |
| 31 | Third and fourth gear shift fork; | 70 | Speedometer drive gear; |
| 32 | Fork rod for first and second gears; | 71 | Speedometer drive; |
| 33 | 3rd and 4th gear fork rod; | 72 | Rear gearbox cover; |
| 34 | Locking blocks; | 73 | Reverse idler gear axis; |
| 35 | Reverse fork rod; | 74 | Rear intermediate shaft bearing; |
| 36 | Rod lock ball; | 75 | Intermediate shaft first gear; |
| 37 | Retainer spring; | 76 | Gearbox housing; |
| 38 | Retainer cover; | 77 | Sliding clutch for synchronizer of first and second gears. |
| 39 | Breather; |
Since the box from the VAZ-2105 is structurally similar to the 2101, the kinematic diagram of the gearbox is the same. But the gear ratios are different; on 2105 gearboxes they are:
- 1st – 3.67;
- 2nd – 2.10;
- 3rd – 1.36;
- 4th – 1.00;
- Rear – 3.53;
As for the differences in the design between gearboxes 2105 and 2101, they mainly come down to different numbers of teeth on different gears. So, on the intermediate shaft of the gearbox, a 1st speed gear with 14 teeth is used (15 for 2101), and their inclination angle is greater. The constant mesh gear of this shaft has 28 teeth (29 for 2101). The input shaft uses an 18-tooth gear (19 for 2101). Because of these features, the shafts with gear blocks of these two gearboxes are not interchangeable if you try to install them separately. But in the case of a complex replacement - the input shaft along with the intermediate shaft and all gear blocks, then installation is quite possible. As for the secondary shaft, modification 2105 differs from shaft 2101 in the first gear gear (its teeth have a different angle, although their number is the same, and its diameter is also slightly larger).
Primary shaft of the VAZ 2107 gearbox
There are a total of three shafts in the “seven” gearbox design:
- elementary;
- secondary;
- intermediate (through which the first two trees interact).
However, the main role is given to the main one, since it is through it that the interaction of all machine gears on other shafts begins.
The input shaft of the VAZ 2107 gearbox is produced together with a constant mesh gear. This element has inclined grooves that allow it to fit as closely as possible to the shaft teeth. In addition, in addition to four gears, a synchronizer is also installed on the shaft, allowing the shaft to move simultaneously with the helical gear.
There are slots on the front side of the product - it is on them that the clutch disc is located. To allow the input shaft to rotate easily, it is equipped with two roller bearings:
- front - at the end of the crankshaft;
- rear - in the front wall of the gearbox housing.
The input shaft of the VAZ 2107 has strictly verified dimensions:
- total length of the cylinder - 160 mm;
- shaft length to spline disk - 87 mm;
- diameter - 25 mm.
How to remove the input shaft from the box
The gearbox must be installed on a flat surface so that nothing interferes with its disassembly. Before starting work, it is important to clean the housing from dirt and drops of liquid so that debris does not accidentally get into the housing.
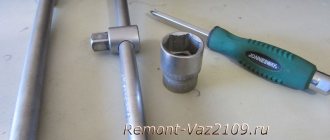
To work you will need standard tools:
- a set of keys;
- flat screwdriver;
- large bolt or screwdriver with a strong blade.
It is necessary to remove the input shaft from the gearbox strictly according to the regulations:
- Pull the oil level indicator out of the housing.
- Remove the bolt with flat washer and two nuts securing the clutch cable bracket. Remove the cable mechanism from the gear selector.
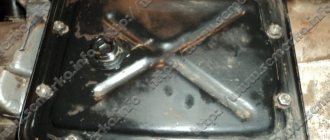
- Unscrew the four box cover bolts and remove the cover.
- Remove the bolt and spring washer securing part of the input shaft.
- Before working on the input shaft, it will be necessary to prevent the shafts from turning on each other. To do this, they need to be secured: for example, insert a thick screwdriver between the teeth.
- Loosen the input shaft lock nut. It is very well established and can take a long time to remove.
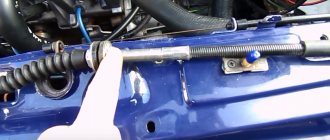
- Next, carefully pull the shaft out of the gearbox housing.
Photo gallery: main stages of work
For further work, you need to clean all mechanisms in order to troubleshoot.
As a result, installation of the input shaft into the gearbox is carried out in the reverse order of removal.
Rejecting the input shaft
During normal operation of the car and gearbox, the driver, as a rule, is not aware of the exhaustion of the resource of wood and its elements. However, if the car starts to “go crazy”, for example, the gear doesn’t work or the speed starts to drop randomly, you need to make sure that the gearbox and, in particular, the input shaft are in good condition.
Felling is carried out with the gearbox removed, since this is the only way to carefully inspect all parts of the tree and determine its suitability for further operations.
The correct cooling procedure is carried out according to the following scheme:
- Visually inspect the input shaft for wear and deformation.
- General condition of retaining rings, retaining ring springs.
- Worn splines.
- Scuffing and scuffing on gears.
That is, a routine inspection of the mechanism allows you to determine the degree of wear of each element and, if necessary, replace them. It is important that the gears and the splined part of the input shaft do not have the slightest damage, otherwise new parts will have to be installed.
Rules for disassembling and assembling the gearbox
If the user has never encountered the repair of such a complex unit, the procedure should be carefully prepared.
- Disassembly of the mechanism is carried out only after it has been completely cleaned of dirt.
- All the tools required for disassembly are pre-prepared - keys, squeezes, pliers, lock ring pullers. It is also advisable to have a separate container for storing small bolts, nuts, and washers.
- It is necessary to dismantle the mechanism parts by first treating the bolts with an anti-boiling agent.
- When disassembling, the units are folded in the dismantling sequence.
- Human memory is extremely unreliable - a photograph of a disassembled mechanism before its reassembly is the best reminder.
- All gaskets without exception must be replaced. Recycling of seals is strictly prohibited.
- No one has canceled the abundance of the cleaner. When washing the structure, you should not skimp on the cleaning material; the better you wash it, the more fun it will be.
- Assembly of the unit is carried out exclusively in the reverse order.
- If after installation there are excess parts left (which is not uncommon), the entire gearbox is completely rebuilt.
It is also necessary to maintain maximum cleanliness during work. Dust, metal shavings, or foreign objects can cause serious damage to the gears.
Main shaft bearing
The “seven” gearbox has incredible “survivability”: for example, the gearbox can “survive” one or even two engine overhauls, after which the car owner will have to repair it. However, there are a lot of small parts in the design of the box, which, unfortunately, cannot boast of their service life. Most often, the driver has to slightly modernize the gearbox design by simply replacing the bearings.
Open type metal bearings with the following characteristics are installed on the input shaft of the VAZ 2107 gearbox:
- manufacturer - VPZ 23 Vologda;
- article - 2107-1701033 / 2101-1701068;
- length - 120 mm;
- width - 95 mm;
- height - 95 mm.
The main function of the input shaft bearing is to act as a rolling bearing, that is, to allow the shaft to move smoothly along its axis.
When the service life of Vologda bearings ends, drivers sometimes buy products from other Russian companies. As practice has shown, imported bearings are distinguished only by their higher cost, and not by their high quality, so there is no point in overpaying for them. And the domestic manufacturer fully meets all the quality and durability requirements that motorists place on them.
When choosing a manufacturer, you should keep in mind that a higher unit price does not mean impeccable quality. However, four Russian factories already have a reputation for supplying reliable and affordable products:
- VPK plant - estimated price for 1 bearing is 270 rubles;
- GPZ plant - production cost 190-200 rubles;
- the SZZ plant (3 gas processing plants) produces the most expensive analogue of Vologda bearings, price from 450 rubles;
- SPZ-4 plant - the pricing policy is quite loyal, the input shaft bearing will cost 220 rubles.
How to determine bearing wear
Because a bearing is a composite unit, it can begin to peel off over time. Thus, its wear can be determined without disassembling the gearbox by ear and by those malfunctions in the gearbox that the driver will immediately notice.
Signs of a malfunction of the bearings of the input shaft of the VAZ 2107 gearbox can be considered:
- Extraneous noise and creaking when the engine is running, even in neutral.
- Impacts in the cavity of the box when moving, even at low speed.
- Arbitrary switching on or off of gears.
- Inability to engage the clutch pedal due to a stuck bearing on the shaft.
It is impossible to ignore one of these signs: bearing failure can lead to serious consequences for the control of the machine. In addition, misaligned bearings will quickly affect the operation of neighboring devices.
The role of oil seals in the operation of the gearbox, how to replace it
A seal is a dense rubber gasket, the main task of which is to seal the joints between different parts in the box. Accordingly, if the oil seal is severely worn, the sealing of the device is broken, and oil leaks may occur.
To prevent loss of lubricant and restore the tightness of the device, it will be necessary to change the oil seal. To do this, you will need simple tools that the driver always has at hand:
- nut heads;
- hammer;
- flat screwdriver;
- knife (they are most convenient for removing the old gasket);
- new oil seal;
- sealant.
Oil seals protect the box body, preventing oil leakage
Input shaft oil seal
This product is made of CSP and NBR composite, which ensures the longest possible service life. In working condition, the oil seal is completely immersed in transmission oil, due to which its elasticity is maintained for a long time.
The input shaft oil seal is designed to operate in a temperature range from -45 to +130 degrees Celsius. Weighs 0.020 kg and measures 28.0x47.0x8.0 mm
The input shaft seal of the VAZ 2107 gearbox is located in the clutch housing. Therefore, to replace it, you will need to dismantle the casing. And to do this, you need to drive the car onto an overpass or inspection hole.
Replacement of the input shaft gasket is carried out as follows:
- Remove the gearbox from the car (you can get the oil seal with the gearbox still in place, but the procedure will take a lot of time).
- Remove the fork and release bearing from the gearbox (this will require a hammer, puller and vice).
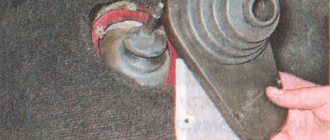
- Remove six nuts from the casing.
- Remove the casing itself (it has the shape of a bell).
- Access to the oil seal is now open: remove the old gasket with a knife, thoroughly clean the joint and install a new oil seal.
- Next, assemble the casing in reverse order.
Find out how to replace gearbox seals on a VAZ 2107: https://bumper.guru/klassicheskie-modeli-vaz/kpp/zamena-salnika-pervichnogo-vala-kpp-vaz-2107.html
Photo gallery: replacement procedure
The bearing is difficult to pull out; you will have to use a special puller. The casing can be easily removed immediately after unscrewing the fastening nuts
New products are installed in place of old ones
Secondary shaft oil seal
The product is also made from high quality composite materials. In terms of technical characteristics, the secondary shaft oil seal is not much different from the primary shaft oil seal.
However, it weighs a little more - 0.028 kg and has larger dimensions - 55x55x10 mm.
The location of the oil seal explains some of the difficulties in removing and replacing it:
- Secure the box flange by inserting a bolt of the required diameter into its hole.
- Turn the flange fastening nut with a wrench.
- Using a screwdriver, pry up the centering metal ring and pull it out from the secondary shaft.
- Remove the bolt from the hole.
- Place the puller against the end of the secondary shaft.
- Remove the flange along with the washer.
- Using screwdrivers or pliers, remove the old oil seal from the box.
- Clean the joint and install a new oil seal.
Photo gallery: work procedure
You need to work with the shaft carefully so as not to damage its surface.
If necessary, you can also use a vice
New oil seals are easily installed in the seat
Replacing the bearing of the input shaft of the VAZ 2107 gearbox
The easiest way to replace a worn item is on a removed box. On the VAZ 2107 it is possible to remove the input shaft bearing directly from the gearbox in the car, but this procedure is labor-intensive and time-consuming.
A bearing is a device that cannot be repaired or reset. Therefore, in case of breakdowns and wear, it is necessary to replace the bearing with a new one.
To work, you need to prepare the usual tools for any driver:
- screwdriver with a powerful flat blade;
- hammer;
- extractor if necessary.
How to remove the old one
With the gearbox already removed from the vehicle, it is necessary to remove the bell (casing) and retaining rings. It is not necessary to completely disassemble the box:
- Insert a screwdriver into the corresponding groove of the input shaft bearing. (looks like a ring).
- Pull the shaft towards you, using the bearing to maintain pressure.
- Carefully remove the bearing by occasionally hitting it with a hammer.
- After each blow with a hammer, it is recommended to turn the shaft a little to avoid dents or distortion of the bearing.
- As a result, after these steps the bearing can be easily removed from the holder.
The work can take from 5 to 30 minutes, depending on the effort and skill of the driver. In some cases, it is necessary to use pullers because the bearing is very rigidly mounted on the shaft.
How to install a new one
Next, you need to install a working one in place of the old bearing. Because of this:
- Press the new bearing onto the shaft using a hammer.
- The hammer should only be used on the inner race of the bearing, otherwise it may become deformed.
- When pressing, you need to pull the input shaft forward a little so that the bearing fits in easier.
Video: replacing the input shaft bearing on a VAZ classic
To summarize all of the above, we can say that the owner of the VAZ 2107 himself is able to carry out all the necessary work with the gearbox and input shaft. However, if you doubt your abilities, it is best to contact auto repair specialists. We also note that the VAZ 2107 gearbox rarely requires any work and usually serves for many years without a hint of malfunction.
Related posts:
- Fan in the interior lighting viburnum
- Liquid locker nippon ace reviews
- Replacing the Niva front axle drive oil seal
- The best piston rings for the VAZ 2110
Repair process
When starting to repair or tune the gearbox, try to wash all accessible surfaces with kerosene as thoroughly as possible.
Next, you should carefully unscrew all the fastening bolts, sequentially releasing the parts.
Each gear is disassembled separately, and it is important to carefully check not only the gaskets, but also the seals. Correcting and diagnosing breakdowns includes replacing gaskets, this is a prerequisite; oil seals are usually changed if they are very worn.
The disassembled VAZ 5 mortar box must be washed again, after which all parts are checked again for faults and, if necessary, replaced with new ones. Most often you have to replace a worn gear or bearing.
To replace parts, you can buy a ready-made gearbox repair kit, designed taking into account the most frequently occurring faults in five-speed gearboxes. Also, before disassembling the transmission, prepare the necessary tools: an impact driver, a three-jaw puller, wrenches of different diameters and a torque wrench. Also for maintenance you will need fixing glue, a set of gaskets and seals, preferably a repair kit.
It should be noted that, like any gearbox, the VAZ 2107 5 mortar requires periodic maintenance to prevent malfunctions while driving.
After all the parts have been checked and replaced, you can begin assembling the gearbox, carrying out all the steps in the reverse order. If the parts have undergone too much wear and replacement of individual components no longer helps, a complete replacement of the gearbox on a VAZ 2107 may be necessary.
Thus, it is quite possible to carry out maintenance and repair of the VAZ 2107 gearbox yourself, the main thing is to follow all the requirements of the dismantling instructions and follow the drawings during assembly.
The VAZ 2107 is equipped with two types of gearboxes, one of which is four-speed and the other five-speed. Sooner or later, these devices begin to malfunction, as a result of which it becomes almost impossible to drive a car. In this material, we will find out what the repair of both types of gearboxes on a VAZ 2107 is, what are the differences between these two mechanisms, and when repair work is required.