Let's start with the fact that during the operation of the car, drivers quite often encounter the fact that the engine does not start, runs intermittently, or suddenly stalls. In this case, diagnostics usually affect the ignition system (on gasoline cars) and the power system.
As practice shows, unstable operation of the power unit on gasoline cars is in many cases due to the fact that gasoline is not supplied to the engine. In this article we will talk about why this happens, as well as what the driver should do if there is no gasoline entering the engine.
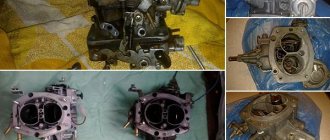
Gasoline carburetors
The carburetor gets its name from the process of “carburetion” that occurs in it - that is, mixing the fuel-air mixture. This unit also regulates the supply of the resulting mixture to the internal combustion engine of the car. In the modern world, there are few carburetor cars left; they are confidently being replaced by more functional cars with injection-type engines.
The starting of the car, its stable operation, engine power and response, and overall fuel consumption depend on the correct operation of the carburetor.
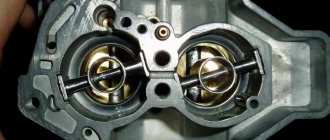
Gasoline level in the carburetor
The gasoline level in the carburetor float chamber must be checked from time to time. At a reduced level, “dips” appear in the operation of the motor and its speed drops sharply. At elevated levels, the engine becomes difficult to regulate at idle speed. All this leads to premature wear of parts and increased fuel consumption.
Here are several ways to set the gasoline level in the carburetor:
- look at the location of the float with the needle valve closed.
- through a special inspection hole in the float chamber.
- using a glass rod.
- through the control plug.
- in a glass jar.
Gasoline consumption in the carburetor
Different car brands may have different fuel consumption. This indicator is measured using a fuel consumption sensor. Also, approximately the level of consumption can be calculated based on the odometer readings. Fuel consumption for driving in different conditions and at different speeds may vary. For carburetor engines, three levels of operation are usually considered:
- 90 km/h,
- 120 km/h,
- driving around the city.
Design and operation of the gas trimmer fuel supply system
In order to correctly determine the reason for the lack of gasoline in the engine cylinder, it is necessary to study the design and operation of the fuel supply system of such engines.
The gas tank is located noticeably below the engine, so
fuel is supplied in two ways :
- forced pumping using a primer;
- suction by the air flow passing through the carburetor (Venturi effect).
To start a brush cutter that has not been used for some time, you must first pump up gasoline so that it fills the pipeline and carburetor, thereby forming a closed system.
The primer is made in the form of a rubber button, which is pressed with a finger, and the unidirectional movement of gasoline is provided by the valve.
When the operator has pumped up the fuel, then completed the rest of the preparatory measures that we talked about here, and the engine is running, the second method of fuel supply is turned on. When the piston moves down during the intake stroke, a vacuum appears in the combustion chamber of the lawn mower, which draws in atmospheric air through the air filter.
The basis of the carburetor is a Venturi tube, which works on the same principle as the popular in the USSR atomizer made from a vacuum cleaner and an ordinary glass jar.
The passing air flow carries with it droplets of fuel, and the ratio of air and gasoline in the finished mixture depends on the diameter of the nozzle, which limits the flow of flammable liquid.
The faster the engine shaft rotates, and the harder the operator presses the gas trigger, the higher the speed of the air flow passing by the nozzle , which means more fuel enters the engine per unit time.
Why is gasoline not flowing into the carburetor?
There may be several reasons why fuel does not enter the carburetor. Here are the most likely ones:
- Fuel pump failure is the most common problem.
- Another reason could be that there is no pressure in the fuel line system.
- Failures can be found in the vacuum pipeline.
- A blockage of dirt may form in the gas tank hose.
- The fuel filter may be clogged.
In addition to those listed, there may be other reasons why gasoline does not reach the carburetor.
How to check if gasoline is flowing into the carburetor?
- Checking in manual mode - remove the fuel hose from the inlet fitting, press the manual pumping lever several times, and check whether fuel flows through the removed hose. If yes, there is a problem with the carburetor; if not, there is a problem with the fuel pump.
- Check with a bottle - the fuel hose is also removed, a plastic bottle is tied to it, after which the engine starts. This method allows you to accurately determine the location of the fault.
Manual testing is considered the least effective and may not always identify the problem.
One of the most common reasons that gasoline does not flow into the carburetor is a clogged fine-mesh filter located near the fitting. To get to it, you need to remove the plug, take out the filter element mesh and clean it with a special detergent or gasoline.
Thus, the question of why gasoline does not flow into the carburetor has only two most likely answers - a malfunction of the carburetor or a failure of the fuel pump. Both of these reasons require accurate diagnosis and subsequent repair of the system.
Air leak
Often the reason for gasoline not flowing is the junction of the pipes with the fuel pump and carburetor, since air will be sucked in through the leaks, and gasoline will not be pumped.
Air leaks can also occur between the components of the carburetor, as well as at the point where it is attached to the intake manifold. Therefore, when looking for the reason for the engine stopping, you should check the tightness of all fastening nuts and bolts. In some cases, the culprit is a rupture of the gaskets located between the parts of the carburetor, as well as at the point where it is attached to the manifold.
After checking the condition of the gaskets and tightening the fasteners, you can check the functionality of the power system.
Next, we will describe the reasons for interruptions in the supply of gasoline, which usually do not happen on the road, but they should not be ruled out.
Reasons leading to engine oil foaming
The reason is the accumulation of condensate.
There are three reasons why air bubbles may appear in the oil of an internal combustion engine:
- depressurization of the cooling system;
- poor compatibility of different types of oils;
- condensation formation.
Let's look at each of them in more detail.
Sealing failure in the vehicle cooling system
Cylinder head gasket
It is the main cause of mixing of coolant (antifreeze) and engine oil. Often, depressurization is a consequence of breaking through the protective gasket, which is installed on the cylinder head and prevents coolant from penetrating into the engine.
The presence of cracks that appear on the surface of body parts after significant overheating, impact, or as a result of metal aging also contributes to the mixing of oil and antifreeze, leading to foaming of the resulting mixture. If a housing part is damaged, the most appropriate action is to replace it with a new part. Repairing such defects using welding in most cases leads to the re-formation of cracks, because body parts are constantly used in rather harsh conditions.
White smoke from the exhaust pipe
An additional symptom indicating an antifreeze leak may be the presence of white smoke, which, along with exhaust gases, comes out of the vehicle's exhaust pipe. It is quite simple to make sure that it is the coolant that evaporates. To do this, the car engine must be warmed up for 5-10 minutes, after which the exhaust system opening must be covered with a paper sheet for a short time. As a result of such actions, the sheet will first get wet, after which it will take some time to dry completely. If, after final drying, there are no visible stains left on the surface of the sheet formed by the fuel mixture or oil, then we can safely consider the depressurization of the car’s cooling system as an established fact.
Poor oil compatibility
Oil compatibility
This is the second reason why the oil in an internal combustion engine can foam. Often, an oil conflict occurs because the vehicle owner adds oil to the engine that is produced differently from the oil that is already present in the engine. To get a more clear picture of what has been said, let’s look at the methods of making oil and the differences in its structure.
- Mineral oils are produced by refining petroleum products. Such oils cannot boast of an ideal structure due to the wide variation in molecular sizes. As a result, the lubricating properties of mineral oils, as well as their viscosity and freezing point, cannot compete with the similar characteristics of synthetic oils, which will be discussed below.
- Synthetic oils appear as a result of a catalytic synthesis reaction, which allows the output to be a substance consisting of molecules of the same type without any impurities. It is thanks to their uniform structure that synthetic oils are distinguished by good lubricating properties, optimal viscosity and low freezing point.
The presence of condensate in an internal combustion engine can also cause oil foaming. This is explained by the fact that the chemical properties of these two liquids do not allow them to dissolve in each other. Instead, the moisture and oil form an emulsion, which is essentially foam. It should be noted that the formation of foam in this case is not a consequence of unstable engine operation or poor oil quality. Often, condensation forms in poorly heated car engines in winter or during the off-season, when the car does not drive long distances, as a result of which the moisture formed on its parts does not have time to completely evaporate. Dealing with this problem is quite simple. To do this, it is necessary to warm up the engine well before each trip, especially in winter, allowing moisture to completely evaporate from its surface.
How to properly adjust the carburetor on a chainsaw?
To adjust the unit, place the tool on a hard, flat surface. It is best to adjust the chainsaw carburetor in a place protected from dust and moisture.
The node setup process should look like this:
- First you need to unscrew the mounting bolts and remove the protective housing of the saw. This will make it possible to inspect the carburetor and, if necessary, clean it;
- Next, you will need to remove the standard air filter of the instrument. If the saw is equipped with an additional foam insert, then it must also be removed;
- After this, you will need a screwdriver, which you need to tighten the bolts marked H and L clockwise until they stop. This must be done very carefully so as not to break the bolts;
- Then both screws should be unscrewed 1.5 turns in the opposite direction;
- Next, you need to start the chainsaw motor and let it run for about 7 minutes;
- As soon as the engine cylinder warms up, you will need to start turning the bolt L until the internal combustion engine begins to operate at maximum speed. Immediately after this, the bolt must be turned 1/4 turn in the opposite direction;
- Then you will need to adjust the engine to operate at high speeds. To do this, you need to connect an electronic tachometer to the engine and start turning the H bolt until the indicators on the instrument display coincide with the instructions for the recommended maximum speed in the instructions for the saw;
- In the end, all that remains is to adjust the operation of the saw’s internal combustion engine at idle speed. To do this, you need to slowly turn the T bolt counterclockwise until the motor runs stably and without failures. If the engine begins to stall, then bolt T should be turned in the direction of the clock hand.
To adjust the carburetor on a chainsaw, you should work with the adjusting bolts as accurately as possible. Over-tightening the screws will place increased stress on the engine and other important components of the garden tool.
Checking the pump's functionality
After this, you should check whether the pump is supplying gasoline. To do this, just unscrew the clamp securing the supply pipe from the fuel pump to the carburetor, lower the end of the pipeline into a container and make sure that the pump pumps. Some fuel pumps have manual pumping, so checking is easy.
But there are also pumps that do not have this function. In this case, you will have to check the operation of the unit with a starter (when the crankshaft rotates, the starter also activates the pump). If uniform streams of gasoline come out of the pipe, in which no air bubbles are visible, then this is an indicator of the serviceability of the gasoline pump, as well as the fuel lines leading to him. And this already narrows the circle of searches, since problems that arise in the area from the tank to the pump are eliminated.
How to flush a chainsaw carburetor?
To clean the unit from heavy contamination, it is best to use a product that is sold in pressurized cylinders. The cleaner comes with a dispenser and a long thin tube, which makes it possible to spray the product in any hard-to-reach places.
It must be remembered that cleaning the carburetor on a chainsaw is done using flammable chemicals. You need to work with them wearing a special protective mask and only in well-ventilated areas.
Read also: Pneumatic cushion for jack
To clean the carburetor on a chainsaw, the unit will need to be partially disassembled. The throttle valve, adjusting screws, body and other parts of the carburetor will need to be washed with the product from the bottle and set aside until completely dry. Once all the elements are dry, the assembly can be assembled and installed back on the chainsaw.
Needle valve leaking
In some cases, the valve gets stuck in its seat. To eliminate such a malfunction, lightly tapping the carburetor cover with a hammer is sometimes enough. Experts also recommend paying attention to the tightness of the valve body. There is an O-ring underneath on most carburetor models - you need to make sure that it is there.
To check the needle valve, it is necessary to create a vacuum by blowing with your mouth or a rubber bulb through a hose placed on the fuel supply fitting. A valve with a defect cannot withstand vacuum. If it is faulty, it should be replaced with a new, working one. It is better to choose spare parts for carburetors wisely - lately there have been a lot of defective products in stores.
Why does the engine stall?
The engine shakes, the speed is unstable, especially at idle - these are the consequences of a cylinder failure.
Why exactly? The most common engines were and remain four-cylinder ones, therefore, when one of the cylinders is turned off, the engine has to work on the remaining three, hence the “troit”.
What happens to engines that have more cylinders? There is another opinion here - it’s not because there are three cylinders left to work, but because there are four strokes in an internal combustion engine - intake, compression, power stroke and exhaust - and when one of them turns off - the power stroke, because on the other strokes it does not affect, then three bars remain, hence the triple. Moreover, not only one cylinder can be switched off, but almost all at once in turn. This is also the correct version, but not everyone understands it.
Consequences of a non-functioning cylinder
Even when the cylinder is not working, fuel continues to flow into it, but as a rule it does not burn. Gasoline is a good solvent and washes away the entire oil film from the cylinder walls, hence increased wear of the rubbing surfaces - the piston, rings and cylinder. The gasoline that does not escape into the pipe safely flows into the engine sump, eventually diluting the oil.
Without oil, the pistons move dry, which causes more friction, as well as all kinds of scuffing. But overheating won’t happen; there’s nothing to burn.
Reasons for turning off the cylinder
In order for the engine to operate normally, it must receive a fuel-air mixture, which at a certain moment is ignited by a spark. Based on this, you need to look for the reason, what is missing for ignition.
This could be a problem with the fuel supply (fuel is not supplied, it is poorly atomized, there is too much gasoline, and therefore cannot burn), there could be problems with the air, for example, the intake manifold is clogged. Problems can also arise in the absence of compression, when valves burn out, rings break, the piston burns out, or the hydraulic compensator simply freezes.
Now let's look at these problems in detail.
No spark
A spark is needed to ignite the fuel-air mixture, and may be absent for several reasons:
- The spark plug is faulty (you can see typical faults of spark plugs)
- high-voltage wire pierces / high resistance / jumped out of place
- inoperative high-voltage ignition coil
- no power to the ignition coil if a system with individual ignition coils is used
- wires are mixed up
- the distributor breaks
- or other electrical problems in the ignition system, there are many ignition systems.
To restore functionality, it is necessary to identify the faulty part and replace it. This is best done by replacement, for example, remove the high-voltage wire from the working cylinder and replace it with the high-voltage wire of the non-working cylinder; if no changes occur, then the problem is not in the wire, we look further.
No fuel
It's a little easier here. On an injection engine, fuel enters through the nozzle, which means that the reasons for the lack of gasoline are connected precisely with it:
- the injector is clogged and does not allow fuel to pass through, or does not spray it, but simply pours
- no power to injector
If you unscrew the spark plugs and turn the engine with the starter, a fuel-air mixture should fly out of the spark plug holes, like small droplets of gasoline. If they do not fly, it means that fuel is not reaching that cylinder and the reason is in the injectors.
Air and compression
To ignite the fuel, air is needed, and even under pressure, otherwise the spark will not break through and ignite it. In order for air to flow, it is necessary to check the air supply system to see if anything is clogged.
There was a case when, when repairing a car, they covered the intake manifold with a rag so that nothing would get into it, when they started to start it, the rag itself didn’t pull out, and it safely completely blocked one of the cylinders, even fuel from the injector was absorbed into it.
Also, air may not flow if the intake valves do not open, for example, if the hydraulic compensator jams. Or if this air comes out due to the same hydraulic valve and a slightly open valve, and the valve may burn out and leak.
The piston may also burn out or the rings may break. In general, you just need to measure the compression, and the reasons associated with compression can be found in the link I gave above.
Another reason could be a broken vacuum brake booster. It is connected to the intake manifold by a tube, and if it is broken, then unaccounted for excess air enters the manifold. This leads to the fact that the air flow meter gives one data, but a completely different amount of air comes in. But this is easy to check; you just need to shut off this air source.
Fuel
If the fuel quality is low, ignition problems may occur and detonation may occur. And most cases of unstable engine operation are related to fuel - you went to a gas station, filled in something incomprehensible, and then think about what happened to the car.
The moment of fuel injection into the manifold (distributed injection system) is absolutely not important; there are systems where fuel is injected by injectors into all cylinders at the same time, so even if you intentionally mix up the wires going to the injectors, it should still work.
Another thing is a diesel engine, here the fuel system supplies fuel and determines the ignition timing, so nothing can be confused in diesel engines, neither the injection timing, nor the injection sequence.
But on diesel engines it happens a little for other reasons - the injector may fail, then one cylinder turns off, or the pump may not be set correctly at the moment of injection, then all cylinders will not work correctly, but this is only for mechanical fuel injection pumps.
The common rail system is more similar to a fuel-injected car, but the most similarities are with direct injection.
But with a diesel engine it is more difficult - there are several systems, each of which works in its own way, and to understand what led to the unstable operation of the engine, you must first of all know which system is installed on the car.
Fill with good fuel, use high-quality spare parts, carry out maintenance on time and you will be happy!
Source: https://kakavto.com/?p=261
How to flush a chainsaw carburetor?
You should think about cleaning the fuel unit of a power tool in the following cases:
- when it is difficult to start the engine;
- in case of unstable operation of the internal combustion engine at short-term idle speed;
- in case of failures when smoothly pressing the standard throttle trigger;
- with a significant increase in fuel consumption.
Most often, liquids that are found in almost every garage are used to flush the built-in carburetor of a chainsaw:
- kerosene;
- diesel fuel;
- pure gasoline;
- solvent.
Modern gardeners using powerful professional saws use more effective and gentle means:
- Mannol Vergaser Reiniger is a cleaner marketed in aerosol form. It quickly and easily breaks down even the oldest formations of resins, soot, oily deposits and other types of contaminants;
- Hi-Gear – This cleaner is distinguished by its high dissolution properties. It can remove old dried stains, oily crusts and the first signs of rust without harming the parts of the fuel system;
- Jet 100 Ultra is a high-tech spray designed to quickly clean the carburetor of a chainsaw. Shows a high rate of dissolution of the oldest oil stains.
Cleaning the carburetor on a chainsaw is performed in the following sequence:
- First you need to clean the outer part of the saw engine, and also remove and thoroughly rinse the factory air filter housing;
- Next, you can proceed to disassembling the power tool. To do this, you need to remove the filter housing and also unscrew the fasteners holding the carburetor together with the engine;
- Then you will need to carefully disconnect the thrust and gas cables from the carburetor. The springs included in the design must be removed so as not to stretch them;
- After this, you need to carefully pull off the fuel supply hoses from the factory fittings of the fuel unit;
- To clean the carburetor on a chainsaw, you need to remove it from the original mounting pins. At the same time, it is important to maintain the integrity of the gasket installed between the internal combustion engine cylinder and the fuel unit;
- The next step is to clean the outer walls of the carburetor. To do this, they can be treated with liquid cleaner or gasoline. In this case, you need to try to prevent dust and debris from getting inside the engine assembly or cylinder;
- Next, you will need to unscrew the screws securing the carburetor diaphragm, remove its cover and wash the internal cavity with an aerosol cleaner;
- After this, you need to dismantle the fuel pre-fine filter, and also disassemble the part of the assembly to which the fuel is supplied. All internal parts of the carburetor must be thoroughly washed with an aerosol cleaner. If the first cleaning does not bring results, then the washing should be repeated.
After all the internal parts of the standard carburetor have completely dried, you need to assemble the fuel unit in the reverse order and install it in place in the structure of the household chainsaw.
Signs
If the principles of preparing the fuel mixture in the carburetor towards enrichment are violated, then problems with starting the engine are observed. A hot engine starts especially hard. If the engine does start, the speed is unstable (often increased in idle mode). It is impossible to adjust or somehow stabilize the speed using conventional methods.
If the fuel mixture is too rich, black smoke will come out of the exhaust pipe - the mixture burns directly in the exhaust pipe. When you press the accelerator pedal, failures are possible - the rich mixture burns very poorly. There will be a thick layer of black carbon on the spark plugs.
Do-it-yourself chainsaw carburetor adjustment
To independently adjust a standard carburetor, the chainsaw owner will need a Phillips or flathead screwdriver, as well as a manual tachometer.
Read also: How to check a VAZ generator with a light bulb
To adjust the carburetor of a chainsaw, spring-loaded adjusting screws are provided in the basic structure of the carburetor.
Depending on the brand of chain saw, the markings of its adjustment screws may vary. However, in order to initially correctly configure the carburetor on a chainsaw, you can always follow the same algorithm:
- First, the operator must look in the saw's instruction manual for the exact incremental angles for turning the spring-loaded adjustment screws. Immediately after this, on the saw in use with the engine turned off, they must be turned according to the instructions in the manual. Failure to do this may result in the operator breaking the tool's motor;
- Next, the chainsaw used on the farm will need to be placed motionless on a flat, stable surface. In this case, the bar and factory chain must initially be directed away from the operator;
- Then you need to start the internal combustion engine of the saw and give it at least 10 minutes to warm up;
- After this, you need to find the correct position of the screw L. To do this, the operator must slowly turn it along and counterclockwise until the motor runs quietly and without failures;
- If as a result of this the chain begins to rotate, then it is necessary to find the position of the screw T at which the chain will stop in place:
- Next, you will need to connect a tachometer to the internal combustion engine cylinder. Then you need to start turning screw H. As soon as the readings on the tachometer match the instructions in the saw instructions, the screw can be released.
To check the operation of the carburetor and chainsaw engine, you need to start the engine again and slowly press the gas lever. If the internal combustion engine smoothly picks up speed, then the adjustment was performed correctly. If this does not happen, you will need to turn screw L 1/8 turn counterclockwise and check the motor again.
Basics of fuel mixture dosage
The situation when a VAZ carburetor overflows happens especially often. Before examining the reasons, you need to learn a little about the principles of preparing the fuel mixture.
A mixture is considered normal when there are 14.7 parts of air to one part of fuel. All other ratios are a consequence of an incorrectly configured carburetor. If the ratio is from 7 to 1 to 12 to 1, then we can talk about overflow. In this case, difficulties arise in starting the engine. It must be remembered that too rich a mixture, as well as too lean, can be dangerous for the engine. It burns more slowly, which means there is a risk of valve burnout. But the combustion temperature is low.