The operation of each automobile engine depends on the quantity and quality of the air-fuel mixture prepared by a special device called a carburetor. All carburetor systems create the mixture and help distribute it evenly throughout the cylinders. You can mix fuel with air flow in different ways. For example, there are membrane-needle carburetors, and there are float carburetors. It is this type that includes carburetors of the VAZ family, produced by the Dimitrovograd Automotive Aggregate Plant (DAAZ).
Adjusting the VAZ 2107 carburetor is an important means of keeping the engine in working condition.
Before adjusting the carburetor, you need to know what type is installed on the car. To do this, you need to remember that:
- If you have a vacuum ignition corrector, this means that you have the latest type of VAZ 2103 or 2106 engine installed, and the modification of the 2107 carburetor is 1107010-20.
- If your “seven” is equipped with a six-wheel engine, but there is no installed vacuum corrector, then you have a carburetor modification 2107-1107010-10.
Main carburetor components to be adjusted:
In order to adjust the carburetor, you need to know the main signs of its malfunction. Since the carburetor is responsible for the acceleration dynamics of the car, these include the following:
- difficulty starting the engine, prolonged “sneezing”;
- all sorts of “jerks”, “jerks”, “failures” when you press the gas pedal;
- sluggish acceleration ability of the car;
- unexplained increase in gasoline consumption.
So, if your car has corresponding “complaints”, let’s start adjusting it.
Attention! The most accurate adjustment can be made with the carburetor removed. Adjusting the VAZ 2107 carburetor does not involve the use of fleecy and woolen fabric, as well as various wires for cleaning the jets.
How to adjust the carburetor yourself on a VAZ 2107? When removing the carburetor cover, the float system is adjusted first, so convenient.
The smell of gasoline in the interior of a fuel-injected car
As mentioned above, the VAZ 2107 was produced in two versions: injection and carburetor. Both models periodically “delighted” their owners with unpleasant odors in the cabin. First, let's look at injection models.
Fuel line leaking
If the gas line in the carburetor “seven” for some reason begins to leak fuel, the appearance of a gasoline smell in the cabin is inevitable. Most often this happens for the following reasons:
- problem with the fuel check valve.
It is located at the rear, behind the passenger seats. This valve was never reliable, and over time it began to leak gasoline. In addition, it may simply get stuck in the closed position. As a result, gasoline vapors will not be able to escape into the adsorber and will fill the interior of the Seven. The solution is obvious - clean or replace the check valve; Due to a clogged check valve, the smell does not escape into the adsorber. - crack in the fuel tank.
Tanks on later injection "sevens" often crack. This usually occurs due to mechanical damage: a strong blow or a deep scratch, which over time has rusted and began to leak gasoline. For whatever reason, a fuel leak starts, the tank will have to be either sealed or replaced. It all depends on the size of the crack and its location; The smell of gasoline in the cabin often occurs due to a cracked gas tank. - problem with the hoses on the fine filter. On injection "sevens" these hoses are attached to the filter using very unreliable thin clamps that weaken over time. Fuel begins to leak, and the smell of gasoline appears in the cabin. The best solution is to replace the standard clamps with thicker ones. The width of the clamp must be at least 1 cm. You can purchase such clamps at any spare parts store.
Electric fuel pump problems
On the latest models of injection “sevens”, electric fuel pumps were installed. The main task of the pump is obvious: to supply fuel from the tank to the injector. At first glance, the appearance of an unpleasant odor in the cabin cannot be associated with a faulty pump, since this device itself is located in the fuel tank. However, there is a connection. The pump, like any other device, wears out over time. The most wear-out element in this device is the sealing gaskets. Also, we should not forget that the pump is cooled by the same gasoline that it supplies to the injector.
The smell of gasoline in the cabin sometimes occurs due to overheating of the fuel pump.
If the driver does not monitor the fuel level in the tank, the pump may begin to overheat, resulting in an unpleasant odor. And if the driver constantly uses low-quality gasoline, the coarse fuel filter may become completely unusable. As a result, the smell of an overheated fuel pump can reach the interior. Solution: remove the pump, replace the gaskets, replace the fuel filters and use only high-quality gasoline with the appropriate octane number.
Poor injector adjustment and other reasons
In some injection-powered "sevens" the smell of gasoline can be felt in the cabin immediately after the engine starts. It should be said right away that this is not always considered a malfunction. For example, on old “Sevens” the smell of gasoline often appears when the driver starts a cold engine in winter, in severe frost. If such a picture is observed, the driver should take into account these points:
- the sensor that takes the temperature from the engine transmits data to the electronic control unit of the “seven” that the engine is cold;
- the block, guided by these data, creates a rich fuel mixture, simultaneously increasing the starting speed of the engine, putting it in warm-up mode;
- Since the mixture is rich and the cylinders are cold, the fuel simply cannot burn completely in them. As a result, some of the gasoline ends up in the exhaust manifold, and the smell of this gasoline enters the cabin.
If the injector is working properly, the smell of gasoline will disappear as soon as the engine warms up. If this does not happen, then there is poor injector adjustment or engine problems. Here's what it could be:
- malfunctions in the ignition system;
- malfunctions in the injector mixture formation system;
- poor compression in the cylinders;
- oxygen sensor failure;
- clogging of one or more nozzles;
- air entering the injection system;
- The ECM sensor has failed.
The result in all of the above cases will be the same: incomplete combustion of fuel, followed by the release of its residues into the exhaust system and the appearance of a gasoline smell in the car interior.
Needle valve leaking
In some cases, the valve gets stuck in its seat. To eliminate such a malfunction, lightly tapping the carburetor cover with a hammer is sometimes enough. Experts also recommend paying attention to the tightness of the valve body. There is an O-ring underneath on most carburetor models - you need to make sure that it is there.
To check the needle valve, it is necessary to create a vacuum by blowing with your mouth or a rubber bulb through a hose placed on the fuel supply fitting. A valve with a defect cannot withstand vacuum. If it is faulty, it should be replaced with a new, working one. It is better to choose spare parts for carburetors wisely - lately there have been a lot of defective products in stores.
Injector adjustment
Adjusting the VAZ 2107 injector in a garage usually comes down to adjusting the idle air controls. This regulator is a miniature electric motor in which a small needle is installed. The purpose of the regulator is to receive signals from the control unit, supply air to the ramp and thereby maintain optimal idle speed of the “seven” engine. If any failure occurs in this system, the regulator should be checked.
Adjustment sequence
Before starting work, the VAZ 2107 engine must be allowed to cool. This is an important preparatory stage. This takes from forty minutes to an hour (it all depends on the time of year).
- Both terminals are removed from the battery.
After this, the speed controller is unscrewed. If this regulator does not operate correctly, stable idling is impossible. - The hole in which this regulator is located is thoroughly purged with compressed air.
- The regulator is disassembled, its main bushing is carefully inspected for scratches, cracks and other mechanical damage. If any are found, the regulator will have to be replaced. This device cannot be repaired.
- The second element that should be checked is the regulator needle.
It should not have any, even the most minor, abrasions and wear. If there are such defects, the needle will have to be changed. All the main elements of the regulator are visible - the needle, copper windings and guide bushing - The next step is to check the regulator windings using a multimeter. It's simple: the resistance of the windings should not be zero, but must correspond to the passport values (these values can be clarified in the car's operating instructions). If the windings are intact, the regulator is assembled and installed in place. The engine starts and idles. If the engine is running normally and there is no smell of gasoline in the cabin, the adjustment can be considered complete.
High fuel level
If the carburetor overflows, the reason may be due to an overestimated fuel level. When engineers created these carburetors, they expected that the level of fuel in the chamber would be strictly defined. But in reality the level is adjusted differently. There are templates for setting the fuel level for Solex and DAAZ, but few people use them. If the level is too high, the mixture will be enriched.
To check the fuel level, you must remove the carburetor cap. But before that you need to pump gasoline into the chamber. On models Ozone-2105, 2107, the correct fuel level is in the middle of the inclined plane on the front wall. On Solexes for front-wheel drive VAZs, the normal level is 29 millimeters to the bottom of the chamber.
If, as a result of the check, the level does not correspond, then it is necessary to adjust it. This can be done by bending the floats.
The smell of burning
Be that as it may, if there is a burning smell in the interior of the VAZ 2107, then this clearly indicates a malfunction. But the scale of the breakdown may vary. You can remove the root cause of this odor yourself by digging around in the car a little. And in some cases you will have to take your horse to the workshop, since you can’t do anything with your own hands. Of course, there is no need to panic if the smell of smoke or burning enters the interior from the street and not from under the hood. Close the air intake damper and forget about the problem. The main thing is to open it in time.
Be sure to check if there is a filter for cleaning the air entering the cabin. If it is, then evaluate its condition. It is quite possible that it is already so clogged that it is simply unable to let air pass through it. Often the cause of a burning smell on a VAZ 2107 car, and on others as well, is dirt on the engine. You can improve the situation a little by thoroughly washing the engine. And after such a procedure, when heated, it will not emit a fetid odor.
But if there are deposits on the exhaust manifold or exhaust pipe, then it will be much more difficult to get rid of them. There is often a burning smell in the cabin if there is an oil leak. As you understand, the engine heats up to high temperatures during operation. And when oil gets on it, it instantly boils and gives off an unpleasant odor. As a rule, the culprit of this phenomenon is always the rubber gasket installed under the valve cover. And the last reason is severe burnout of the gasket under the exhaust pipe. But at the same time an unpleasant sound is also heard.
Seven reasons why candles flood. What to do?
If you get behind the wheel and find that the engine won’t start, don’t be discouraged. Maybe your spark plugs are just flooded. This problem especially often arises in the winter season, which already causes a lot of trouble for motorists. Most often, spark plugs are filled with gasoline, sometimes with oil. You need to understand how and why this happens, then you can act proactively and avoid a situation where the car cannot be started. Well, if everything has already happened, then it would be nice to know how to return the spark plugs to working condition and start the engine.
Cleaning, troubleshooting, checking the VAZ 2107 carburetor
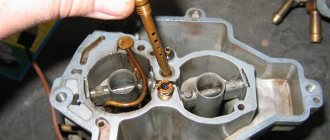
For full service, the unit must be removed from the car. This is done by dismantling the air filter housing, disconnecting the pipes, tubes, cables and solenoid valve wires from the assembly. Afterwards all that remains is to unscrew the 4 nuts securing the carburetor to the intake manifold and remove the assembly. The Ozone carburetor includes three parts. It is better to work with each of them one by one: remove one - disassemble, clean, reassemble and move on to the next component.
Carburetor cover
Let's start with the lid. Maintenance includes the following steps:
- Unscrew the screws securing the cover.
- Disconnect the telescopic air damper control drive.
- Remove the cover from the housing along with the trigger and float.
- Unscrew the screws securing the starting device and disconnect the rod from the damper axis lever.
- We remove the float axis and remove the float along with the locking needle.
- We unscrew the filter plug installed on the fuel supply fitting (if the plug does not unscrew, apply a few gentle blows to it with a wrench). Remove the filter element (mesh).
- We remove the gasket.
- We wash the lid from dirt. We blow out the channels in it using a cleaning agent (if you don’t have the product on hand, you can blow it with compressed air).
- We wash and blow through the filter mesh. We put it in place and tighten the plug.
- We examine the condition of the locking needle (the rubber cuff on it). We install the float with the needle in place.
- Check the position of the float (affects the level in the float chamber). This is done like this: we turn the lid over vertically (so that the locking needle closes the feed channel) and measure the distance from the float in the surface of the lid. The distance is 6.5 mm, with this indicator the level corresponds to the norm. If it doesn’t fit, we adjust and adjust the position of the float by bending the tongue.
- Check the tightness of the locking needle. To do this, turn the cap over with the float up and create a vacuum in the inlet fitting with your mouth (extract air from the fitting). If the locking needle “does not hold,” replace it.
- Using vacuum, we check the integrity of the diaphragm of the starting device (when creating vacuum, the rod of the device must move). If necessary, we repair the starting device using a new membrane from the repair kit.
- We install the starting device on the carburetor cover (replacing the sealing collar of the device), connect the rods and the telescopic drive.
Afterwards we put in a new gasket and put the cover aside.
Something else useful for you:
- How to adjust idle speed on a carburetor
- Adjusting and tuning the carburetor on a VAZ 2109
- Why the car starts to jerk when moving - the main reasons
Frame
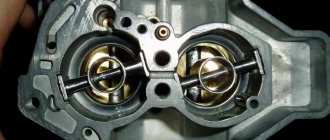
The next stage is cleaning and troubleshooting the case:
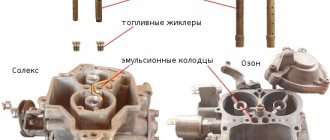
We dismantle the vacuum drive of the second chamber damper. We disconnect the throttle body by unscrewing the mounting screws (from the bottom). Disconnect the accelerator pump along with the diaphragm. We unscrew the air and fuel jets (remember or mark where each one was located), remove the emulsion tubes installed under the air jets. Unscrew the accelerator pump nozzle. Unscrew the accelerator bypass jet. Unscrew the idle speed solenoid valve. We remove the diffusers. We inspect the jets and channels of the removed parts for contamination, and if necessary, wash them. We check the lower plane of the housing (where it is adjacent to the throttle body) for bending
If a bend is detected, replace or straighten the housing. We blow out the channels (you can simply spray the cleaning agent into all visible holes). We check the functionality of the vacuum drive of the throttle valve of the 2nd chamber. We check the tightness of the diffusers. We put the removed parts in place (it is important not to confuse their location) and auxiliary components. Replace the gasket. After these operations, put the body aside
After these operations, put the body aside.
Throttle body
The next stage is setting up the throttle body:
- Unscrew the “quality” and “quantity” screws;
- We thoroughly clean the housing and blow through the channels in it;
- We replace the cuffs with screws and put them in place;
After servicing each component of the carburetor, we also carefully inspect them for correct assembly. Next, we assemble the components together and install the carburetor in place, having first replaced the gasket under it and thoroughly cleaned the seating surface on the intake manifold.
How to install the unit in place
You can assemble and reinstall the carburetor in the same way as you disassembled it, performing all the steps in reverse order.
- The carburetor is installed in its place, the mounting bolts are tightened.
- The pipes through which fuel is supplied are attached. The gas cable is connected to the throttle lever.
- The wiring is attached.
- A vacuum hose is connected to the ignition distributor, and the EPHH limit switches are combined.
- After installing the carburetor, it is adjusted.
Video: installing a carburetor on a VAZ
It is not so difficult to independently remove, disassemble, clean and reinstall the carburetor in the VAZ 2107 and 2106. The main thing is not to be intimidated by the huge number of hoses, valves, parts and dirt and strictly follow the instructions.
Old VAZ models, as a rule, were equipped with carburetors of the following brands: Solex, Weber and Ozone; their popularity over many years of operation has not decreased, but rather, on the contrary, increased. However, like everything in this world, over time, carburetors fail and need repair, cleaning, and adjustment, which in turn puts a considerable burden on car owners, requiring them to have certain knowledge and free time.
Troubleshooting methods
If you find that the leak is in the fuel tank, you must replace it. You can try to prevent troubles of this nature. To do this, it is advisable to periodically carry out preventive inspections of the fuel system of the car, as well as monitor the tension of the tapes securing the gas tank and the good condition of their fastenings to the body.
The most vulnerable part of the fuel tank is its filler neck. Malfunctions of this part can also cause a fuel smell in the car interior. This element can either be welded to the container or screwed using a special rubber gasket. The last method of fastening is considered the most reliable. Welding defects or violation of its integrity will quickly lead to destruction of the entire seam. And the flange mount will remain in place and hold the pipe for a very long time. If you smell fuel, the first thing you should do is inspect the weld.
The presence of a fuel smell in the car interior can be caused by damage to the flexible hoses that connect to the fuel pump. They act as adapters from the line to the tank and from the line to the fuel pump. During movement, the pipes may be damaged or broken. If you find faults in these elements, they must be replaced.
It is necessary to maintain not only cleanliness in the salon, but also a pleasant smell. But not everyone succeeds. There is also a weak spot in the fuel supply system - this is the hatch to which the fuel pump and sensors that monitor the liquid level in the fuel tank are attached. All this is assembled into one module and located in the internal volume of the tank.
This entire unit is mounted using bolted fastenings located along the contour of the cover. There is a special rubber gasket between the tank body and this cover. It is this seal that can be a weak point, because it is continuously exposed to fuel vapors. And after a certain period of time, the gasket material begins to deteriorate. The result is a loss of tightness and the appearance of a fuel smell in the car interior.
The fuel system, and more specifically the tank itself, is equipped with special ventilation. It consists of hoses that are connected to plastic pipes. These hoses ensure the removal of gasoline vapors from the tank. And the weak point here is the plastic pipes, which can simply crumble. You can eliminate the smell in the cabin by replacing this entire unit.
How to check the strainer
This is done as follows. Use manual fuel pumping and fill the float chamber with fuel, after which you will be able to see the shut-off valve close. Then move the top filter cover and remove the valve. It must be thoroughly washed in solvent, then dried using compressed air.
When the engine behaves incorrectly during loads, there are dips or loss of power, or the car “reacts poorly to the pedal,” most likely you have a problem with the fuel supply. In addition, often the cause is a faulty strainer.
Important! It is strictly forbidden to wipe the bottom of the float chamber using a fluffy or any other rag, since after such cleaning, invisible fibers may remain on the bottom of the chamber, which will clog your jets during operation.
The float chamber is cleaned using a rubber bulb and then dried with compressed air.
Checking the tightness of the shut-off needle is carried out using a bulb, since the pressure force that occurs during squeezing is equal to the pressure in the fuel pump. When replacing the carburetor cover, you need to make sure that the floats are in the up position. You should feel strong pressure during installation, after which you need to listen carefully to the carburetor for air leaks. If there is even the slightest leak, the needle and valve body must be replaced.
Have you drained gasoline on your VAZ 2107 again?
If you have once again had gasoline drained from your VAZ 2107 and the secret caps with a key and caps with a code do not help, it’s time to think about a sensor for the gas tank.
The gas tank cap with the key is opened with a “roll” or a powerful screwdriver, inserting them instead of the key and turning them with force. It doesn't take that long to find a gas cap with a code (two rotating plates with numbers), especially if the attacker has the whole night ahead of him. At best, they will pour out the gasoline and break the cap; at worst, they will tear apart half the car.
So how to deal with thieves?
If you have an alarm installed on your car, you can put a sensor on the opening of the gas tank flap so that the alarm warns you that gasoline is being drained.
Attention! You cannot put a regular limit switch (limit switch) in the gas tank flap - it can give a spark and gasoline vapors will ignite. There is a way to install a non-contact sensor (reed switch) in the VAZ 2107 hatch, which is completely sealed and cannot be neutralized from the street and will allow you to protect your car from gasoline drainage
If you install a regular limit switch, then in addition to the fact that it can spark, it is very easy to notice it from the street and press it with some kind of wire, then open the hatch, tear off the wire from the limit switch and calmly drain the gasoline
There is a way to install a non-contact sensor (reed switch) in the VAZ 2107 hatch, which is completely sealed and cannot be neutralized from the street and will allow you to protect your car from gasoline drainage. If you install a regular limit switch, then in addition to the fact that it can spark, it is very easy to notice it from the street and press it with some kind of wire, then open the hatch, tear off the wire from the limit switch and calmly drain the gasoline.
A sealed, non-contact hidden sensor will save you from many problems, namely, it will sound an alarm when the gas tank flap is opened. If you have a feedback alarm, the key fob will work and you can (if you hurry) pay your respects to the thieves. If the alarm system is cheap and ordinary, it will still be somehow inconvenient to drain gasoline from a flashing and howling car, especially at night.
Diagnosing problems on cars - what to pay attention to?
Diagnosis of a malfunction consists of checking the condition of all components that were discussed above and replacing faulty elements.
In this case, everything begins with a visual inspection, after which it is worth moving on to checking individual components - the fuel filter, carburetor, injector and others.
It is also worth considering that cars with a carburetor and an injector have their own nuances of searching for damage:
Carburetor cars VAZ 2101-2105/2106/2107.
As mentioned above, the weak point of the “classic” is the carburetor, the operation of which is based on a mechanical principle.
To avoid problems, it is recommended to periodically adjust the device and check it for serviceability.
In case of unprofessional adjustment, fuel overflows from the top, and its vapor enters the vehicle interior.
In injection cars, the problem of overflow is eliminated.
Diagnosing the problem is easy. When the engine is idling, the carburetor is dry and clearly performs its functions. But as soon as you add gas, fuel flows out from under the membrane.
The reason is broken threads or poorly tightened bolts. There are situations when the carburetor leaks the intake pipe to which the supply hose is attached.
Also, on the “classic” there are often problems with the fuel pump, from under the membranes of which fuel leaks. To eliminate the problem, it is worth tightening all the bolts.
Injection cars.
This category includes the currently popular Lanos, VAZ-2107, 2108, 2109, Niva (21213) and other models (including 2110, 21099).
In such cars, there may be a problem with the injector nozzle, which breaks off if there is a defect or improper use.
Problems often arise in the fuel line - in the area from the tank to the engine. For this reason, the first thing to start with is to inspect the fuel line. Once a leak is discovered, it should be repaired immediately.
Solex carburetor fills engine
Owners of carburetor cars often encounter such a problem as carburetor overflow. The phenomenon occurs not only on models from AvtoVAZ, but also on carburetor foreign cars. Overflow is a significant re-enrichment of the mixture of fuel and air that enters the combustion chambers. The mixture is over-rich for one reason or another related to the carburetor. Sometimes, even with the naked eye, you can see how gasoline flows in a powerful stream from the diffuser nozzle. There is a persistent smell under the hood. Let's look at all the reasons that lead to carburetor overflow and learn how to eliminate them.
Troubleshooting the VAZ 2107 carburetor
To restore the operation of the carburetor, you should inspect the condition of the components and parts, clean them and adjust them.
After disassembly, it is necessary to wash all carburetor parts and visually check for defects.
Particular attention should be paid to the condition of the strainer and jets, which are especially susceptible to clogging, which is the most common cause of malfunction. It is better to clean the VAZ 2107 carburetor jets by blowing them with compressed air
After cleaning, you need to adjust the carburetor:
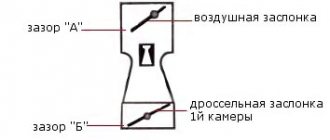
- The needle valve is adjusted by bending the "tongue" of the float bracket. When the valve is open, the distance between the lid and the float should be 15 mm, when closed - 6-7 (in the air) and 1-2 (when immersed in a chamber with gasoline).
- To adjust the starting system, simply remove the air filter. With the “suction” extended, the air damper should be open by a third, and the speed should be in the range of 3200-3600 rpm.
- The idle speed should be adjusted when the engine is warm. First you need to achieve maximum speed by turning the mixture quality screw. Then, turning the quantity screw, achieve engine speed within 950-1050 rpm. Finally, use the quality screw to lower the speed by 100 rpm.
Now, knowing the structure and operating principle of the VAZ 2107 carburetor, you can adjust its operation if necessary.
The float touches the chamber walls
This is another popular reason. Nail Poroshin, in his numerous videos on setting up carburetors, always shows how to do it. Not everyone watches these videos and when adjusting the floats they do not pay attention to their position relative to the walls in the chamber. If adjusted incorrectly, the float will touch the walls of the chamber, and as a result, overflow.
Check the position of the floats as follows. You need to unscrew the screws on the cover and remove the cover. Then they look at how the floats are located. There is a gasket installed on the lid, and impressions of the walls are visible on it. The floats must be installed in such a way that there is a distance between them and the chamber wall. This can be seen from the print. It is also worth checking whether the float moves easily on the axis.
How to solve a problem?
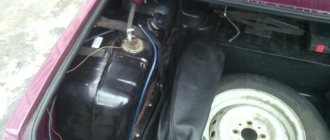
A new electric fuel pump gasket is required. It is very easy to replace it. First you need to relieve the pressure in the injector power system. To do this, you need to start the engine and remove the fuse for the pump while the engine is running. After a couple of seconds the car will stall on its own. Next, you need to open the trunk and use a 7 key to unscrew the submersible pump mounting bolts in order. It is a one-piece structure that combines a coarse filter, a gasoline level indicator, fuel lines, an anti-drip cup and a cover.
Read more: How to connect the DRL through a voltage stabilizer
After unscrewing all eight bolts, you need to remove the pump by removing the wire plug. Be careful - when removing, the fuel level indicator may get stuck (it is slightly bent and has a float at the end).
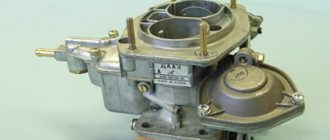
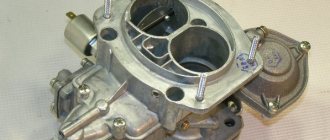
Carburetor: general diagram
It is intended for mixing fuel assemblies corresponding to each of the auto modes of engine operation. The device for mixing fuel with air has a very complex structure and consists of several main parts.
Float section in which the fuel level is regularly maintained. Float with a closing needle type valve. The float tends to lower as the car engine is filled with gasoline. The next portion of liquid is injected through a needle valve, which opens when the gas is pressed. When the fuel level in the chamber reaches normal values, the needle valve closes the supply. The spray tube is needed to transfer gasoline from the float chamber to the mixing chamber. It is noteworthy that the outlet of the atomizer tube is located above the fuel level in the float chamber. This was done on purpose so that when the power unit is not working, gasoline does not leak out, even if the car is standing on a downhill slope. A nozzle with a graduated hole is screwed into the bottom of the atomizer. The diffuser is designed to increase the speed of air flow. Essentially, it is a short tube narrowed from the inside. It is the diffuser that creates a vacuum at the end of the nozzle during the operation of the internal combustion engine
This is important, as it allows for better suction of gasoline from the float chamber and atomization of it more efficiently. The damper monitors the amount of gasoline supplied directly to the cylinders of the power unit. It is controlled by the accelerator pedal.
| 1 | accelerator pump lever |
| 2 | accelerator pump fuel adjustment screw |
| 3 | fuel jet of the second chamber transition system |
| 4 | econostat air jet |
| 5 | air jet of the transition system |
| 6 | econostat fuel jet |
| 7 | air jet of the main dosing system of the second chamber |
| 8 | econostat emulsion jet |
| 9 | econostat sprayer |
| 10 | sprayer of the main dosing system of the second chamber |
| 11 | accelerator pump nozzle valve |
| 12 | accelerator pump nozzle |
| 13 | air damper |
| 14 | small diffuser of the first chamber |
| 15 | air jet of the main dosing system of the first chamber |
| 16 | starter air jet |
| 17 | traction |
| 18 | idle air jet |
| 19 | needle valve |
| 20 | fuel filter |
| 21 | solenoid valve |
| 22 | idle air fuel jet |
| 23 | main fuel jet of the first chamber |
| 24 | economizer housing |
| 25 | emulsion jet idle system |
| 26 | throttle valve of the first chamber |
| 27 | sprayer of the main dosing system of the first chamber |
| 28 | throttle valve of the second chamber |
| 29 | main fuel jet of the second chamber |
Article on the topic: Ford Focus 2 battery
Types of carburetors
New devices are noticeably different from models of previous years. The main difference is the use of additional components. They help, under certain conditions, to enrich or deplete fuel assemblies. Today, the following types of carburetors are distinguished.
- The falling flow model is the most commonly used model today. In such models, the fuel assembly moves from top to bottom and falls. The carburetor can have either one or two chambers. If there are two of them, then they are mounted side by side, in one line.
- Upflow device. The fuel assembly moves from bottom to top.
- Model with horizontal flow. The fuel assembly moves horizontally.
The first type of downdraft carburetor is becoming increasingly widespread, since filling the cylinders with fuel with such a flow pattern is carried out more efficiently, engine power increases to 3-4% compared to engines using other carburetors. It is more comfortable in terms of adjustment and repair, since it is located high.
Models with an upward flow of fuel assemblies also have their advantages, including over devices with a top-down flow. This concerns, first of all, the absence of the process of fuel draining into the intake manifold, in case of abuse of suction or breakdowns. But in devices with fuel assemblies, draining from top to bottom is possible, and when it gets into the cylinders, it washes away the oil lubricant, then flows into the crankcase and dilutes the oil.
Types of carburetors
Horizontal flow motor power supply units have a better design configuration. They have fewer turns.
Troubleshooting
In order to understand the condition of the carburetor in a car, it is enough to carry out a little diagnostics.
Signs of a carburetor malfunction:
- the car began to consume more gasoline than it previously required;
- the engine begins to overheat quickly;
- Black smoke is pouring out of the muffler and popping, “sneezing” and “shooting” noises can be heard. These malfunctions appear when high-voltage wires are incorrectly connected, late ignition, incorrect operation of the distributor and ignition system switch, after unsuccessful repair of the timing belt, or with an inappropriate fuel mixture;
- the car began to noticeably lose power when driving;
- the car accelerates much more slowly;
- failures occur when, when you press the gas pedal, the car does not react instantly, but acceleration occurs gradually and with a delay;
- there are jerks - frequent and short dips;
- swaying occurs - several dips with insignificant intervals.
It is important to remember that before you begin to repair the carburetor, you should diagnose the entire engine power system and its technical condition.
Typical carburetor malfunctions:
- There is no fuel in the float chamber or the fuel mixture is too rich/lean. In this case, the car engine does not start at all or starts but immediately stalls.
- The idle passages or jets are clogged.
- The solenoid valve operates intermittently.
- Failures have appeared in the control unit or among the elements of the forced idle economizer (EFI).
- The rubber o-ring has started to work incorrectly or has melted.
- The fuel “overflows” and the level in the float chamber does not hold. The reason is the depressurization of the fuel valve.
Why should a car's fuel system be sealed?
Currently, the VAZ 2107 car has been discontinued, so it has now become a domestic automobile classic. Despite this, a lot of people drive “Sevens” in our country. The tightness of the fuel system in these cars has always left much to be desired. This applies to both early carburetor “sevens” and later injection ones.
The tightness of the VAZ 2107 fuel system is the key to clean air in the cabin
Meanwhile, the fuel system of any car must be absolutely sealed, and here’s why:
- fuel consumption increases. It's simple: if the car smells like gasoline, it means gasoline is leaking from somewhere. And the larger the leak, the more often the car owner will have to refuel;
- risk of fire. If there is a high concentration of gasoline vapors in the cabin, the risk of fire increases significantly. One stray spark is enough and the interior will be engulfed in flames. And the driver will be very lucky if he survives;
- harm to health. When a person inhales gasoline vapors for a long time, this does not bode well for him. This may cause nausea and dizziness. In some cases, a person may lose consciousness. In addition, systematic inhalation of gasoline vapors can lead to the development of cancer.
Considering all of the above, if the smell of gasoline appears in the cabin, the driver must do everything possible to eliminate this problem, no matter how insignificant it may seem.
Which carburetor model to choose
For any VAZ car, starting from 2101 to 2107, only certain carburetor models are suitable.
DAAZ carburetors
Carburetors DAAZ 2101, 2103, 2106. They were produced at the Dmitrov Automotive Unit Plant, which bought a license from the Italian company Weber, therefore these carburetors can be indicated under both names. The devices were not distinguished by the complexity of their design, but they could please their owners with the rapid acceleration of the car and good speed. One of the biggest problems in installing these models is their virtual absence on the market.
In addition to speed and simplicity, Weber carburetors also provided incredibly fast fuel consumption - these “monsters” consumed 10–14 liters per 100 km. fuel.
The powerful but resource-intensive Weber carburetor was produced by the Russian Dmitrov plant using Italian technology
Carburetors "Ozone"
More technologically advanced models, which were already installed in VAZ 2105 and 2107 cars, were also produced at the Dmitrov Automobile Unit Plant. However, they were not only more advanced and improved, but also more environmentally friendly. This is why they received the name “Ozone”. This carburetor made it possible to reduce fuel consumption to 7–10 liters. 100 km, while maintaining the dynamic characteristics of its predecessors. The downside of the device was the complexity of its assembly and constant contamination in one of the chambers, which led to the fact that the acceleration of the car noticeably deteriorated, the speed decreased and the engine began to act up.
“Ozone” is an environmentally friendly model of DAAZ carburetors
Solex
A little later, DAAZ 21053 carburetors appeared. They were produced under license from the French company Solex, hence the name of the models. These carburetors were not much similar to previous DAAZ models. The updated design with a fuel return system made it possible to save 400–500 ml of fuel per 100 km. These carburetors were distinguished by good power and low gasoline consumption. The disadvantage of the device was the narrow fuel and air channels, which very often became clogged.
The Solex carburetor successfully combines the power and environmental friendliness of its predecessors
Solex carburetors came in many variations with different auxiliary systems. In the CIS, the most popular option has become an electric idle air valve.
Custom carburetor Solex 21073
Often, inquisitive car enthusiasts resorted to replacing the carburetor on their own. One of the suitable models turned out to be Solex 21073, famous for its fairly wide jets and channels. Such a carburetor increased the car’s power, but at the same time increased fuel consumption - 9–12 liters. per 100 km.
Solex 21083
The second non-standard carburetor, which with some modifications fits the VAZ 2106 and 2107 models, is Solex 21083. After expanding the diffusers and installing jets, this device allows you to significantly increase the dynamics of the car without much fuel consumption. However, the process of upgrading a carburetor is very complex and time-consuming.
Adjusting the carburetor on a VAZ 2107
If the driver has an old carburetor “seven”, then to eliminate the smell of gasoline you will have to adjust the idle speed on the carburetor. To do this you will need a flathead screwdriver.
Adjustment sequence
- The engine starts at idle speed. After this, the quality screw on the carburetor is turned clockwise with a screwdriver until the crankshaft reaches maximum speed.
- After setting the maximum speed (they are determined by ear), use the same screwdriver to turn the screw responsible for the amount of mixture.
It is necessary to achieve a situation in which the number of revolutions will be no more than 900 per minute (determined using a tachometer). When adjusting idle speed, always adjust the quantity screw first, and then the quality screw - The final stage is the rotation of the screw, which is responsible for the quality of the mixture. This screw rotates clockwise until the number of revolutions reaches 780–800 per minute. If you managed to achieve this indicator, then the carburetor adjustment can be considered successful.
Signs
If the principles of preparing the fuel mixture in the carburetor towards enrichment are violated, then problems with starting the engine are observed. A hot engine starts especially hard. If the engine does start, the speed is unstable (often increased in idle mode). It is impossible to adjust or somehow stabilize the speed using conventional methods.
If the fuel mixture is too rich, black smoke will come out of the exhaust pipe - the mixture burns directly in the exhaust pipe. When you press the accelerator pedal, failures are possible - the rich mixture burns very poorly. There will be a thick layer of black carbon on the spark plugs.
Adjusting the carburetor on a VAZ 2107
If the driver has an old carburetor “seven”, then to eliminate the smell of gasoline you will have to adjust the idle speed on the carburetor. To do this you will need a flathead screwdriver.
Adjustment sequence
- The engine starts at idle speed. After this, the quality screw on the carburetor is turned clockwise with a screwdriver until the crankshaft reaches maximum speed.
- After setting the maximum speed (they are determined by ear), use the same screwdriver to turn the screw responsible for the amount of mixture.
It is necessary to achieve a situation in which the number of revolutions will be no more than 900 per minute (determined using a tachometer). When adjusting idle speed, always adjust the quantity screw first, and then the quality screw - The final stage is the rotation of the screw, which is responsible for the quality of the mixture. This screw rotates clockwise until the number of revolutions reaches 780–800 per minute. If you managed to achieve this indicator, then the carburetor adjustment can be considered successful.
Screw quality
Most often, the fuel mixture is enriched with a quality screw to compensate for the suction of excess air. This prevents the mixture from becoming too lean. The screw is turned out more than necessary.
You should check the carburetor for possible air leaks and eliminate it. You can check it with a spray bottle. With the engine running, spray on the base of the carburetor, on the connection between the cover and the lower part. If the car starts to stall, then there is an air leak. You can also screw the quality screw back in. But then you can lose stable idle.
Why should a car's fuel system be sealed?
Currently, the VAZ 2107 car has been discontinued, so it has now become a domestic automobile classic. Despite this, a lot of people drive “Sevens” in our country. The tightness of the fuel system in these cars has always left much to be desired. This applies to both early carburetor “sevens” and later injection ones.
The tightness of the VAZ 2107 fuel system is the key to clean air in the cabin
Meanwhile, the fuel system of any car must be absolutely sealed, and here’s why:
- fuel consumption increases. It's simple: if the car smells like gasoline, it means gasoline is leaking from somewhere. And the larger the leak, the more often the car owner will have to refuel;
- risk of fire. If there is a high concentration of gasoline vapors in the cabin, the risk of fire increases significantly. One stray spark is enough and the interior will be engulfed in flames. And the driver will be very lucky if he survives;
- harm to health. When a person inhales gasoline vapors for a long time, this does not bode well for him. This may cause nausea and dizziness. In some cases, a person may lose consciousness. In addition, systematic inhalation of gasoline vapors can lead to the development of cancer.
Considering all of the above, if the smell of gasoline appears in the cabin, the driver must do everything possible to eliminate this problem, no matter how insignificant it may seem.
Gasoline pump
If the fuel pump operates with increased productivity, then more fuel is supplied to the carburetor float chamber than necessary - it is forced through the pressure. This problem is especially relevant for cars whose carburetors are not equipped with a so-called return line for dumping excess fuel. This is true for electrical and mechanical units.
In a mechanical fuel pump, the valves, diaphragm and return spring are checked. Faulty elements are replaced with new ones - repair kits are available for sale.