What is the functionality of the radio?
The fact that there is a standard radio in the domestic car Lada Granta Lux and in Kalina-2, and the devices are constantly being improved. A special feature of the radio is that it fits deep into the standard place, which is accompanied by minor difficulties when removing it. The large monochrome display displays a user-friendly interface.
Reviews from owners indicate that the software has an operating system based on the legendary Windows, the potential capabilities of which are increased by firmware. It is possible to create a desktop in the image of a household computer and connect to the Internet. To do this, you should use a 3g modem.
If you need to enter data, manipulation can be done using the on-screen keyboard. Own memory is not enough, so to meet the ever-growing demands of owners, it is recommended to use an SD card as a storage medium. This drawback is included in the list of reasons, due to the relevance of which, most motorists prefer choosing a foreign vehicle.
A convenient option for connecting with a mobile phone is available for the Lada Granta radio. This allows you to make calls without having to take your phone out of your pocket. You only need to activate a specific button on the device display. This is a kind of extended “hands-free” function.
The radio receiver is also not without pleasant features. If you program a news wave, the device will automatically switch to it from any other channel when a program on the designated topic begins broadcasting.
In the LADA Granta standard, the radio with an integrated LCD display is capable of supporting such file formats as:
- outdated "MP3";
- "WMA";
- "WAV";
- video files that support the “WMV” extension.
Overview of function types
- Easily connected with mobile phone. Convenient communication function.
- All standard Lada Granta radios are equipped with modern radios. They have standard settings that allow you to automatically switch between different ranges. That is, when news starts broadcasting on one channel, and in the meantime you listen to music, you will always be aware of all the latest events.
- The Lada Granta's head unit supports many modern formats. So, the LCD display of the stereo system will play music from MP 3, WMA, WAV. The video can be watched in WMV, MP4 format.
- The LCD display has accessible information content, a convenient, easy-to-read interface.
- One of the best touch keyboards, it works synchronously, with virtually no breakdowns.
- The Lada Granta's standard radio can easily play music from micro SD.
Head unit
Important. If it makes it easier for you to use a USB drive, then be aware that certain problems may arise here.
- Modern equalizer. It's easy to customize and you can listen to tracks in random order. Songs switch without delay.
- Has a photo album function. The stereo system makes it possible to view your favorite photos on the road. This is done from a memory card, and there is support for five formats.
- Phone mode. It requires special knowledge to set up the first time. It is mainly necessary for those people who are overloaded with work and solve many issues on the road.
- New models of car radios for Lada, 2191, are equipped with all navigation capabilities and a rear camera
What to choose for Grants
Granta can be equipped with a 1 or 2 Din head unit with a touch or standard display. When using alternative equipment, it is necessary to purchase or independently manufacture a decorative frame framing the body of the radio. This is especially true for 2 Din systems, since small head units are equipped with a standard frame that fits the Grant instrument panel. The final choice of car radio remains with the car owner.
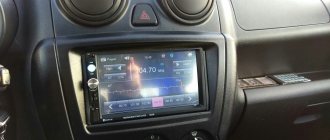
AvtoVAZ produces a special 2 Din radio for the Lada Granta, equipped with a touch screen.
To install a standard radio, you need to purchase an original decorative panel on the center console, since the standard mounting socket is not designed for such equipment.
Cold welding – hot idea
So, let's begin. The work is very delicate and painstaking, one might even say a piece of jewelry, so we must be patient. The most ideal option for making such an invention as a frame for a 2 din Grant radio, in my opinion, is to mold an adapter frame from cold welding, and besides, I was not the only one who came up with this idea. The transition frame needs to be “sculpted” on the center console with the radio. To do this, you should go to a hardware store and buy there:
1. Cold welding 2. Masking tape 3. Nylon thread
You're probably wondering, why use masking tape? And this is in order to paste over the radio according to the form of welding, so as not to glue it to the panel forever. Be sure that everything will work out, and soon you will have a frame for Grant’s 2 din radio.
In order for the mold to be easily removed later, we apply cling film on top of the tape, again following the shape of the weld. Also, to give our frame greater strength, it is recommended to run thin copper wire around its perimeter.
To make it easier to remove the frame, you should put a thread under it. In my case, it turned out according to the well-known saying “The first pancake is lumpy”, I stuck a cold weld right on top of the masking tape and did not put a thread under it (although this would hardly have changed anything), the result is a broken newly made 2 din grant frame. Learn from other people's mistakes.
Don’t be surprised if it takes some effort to remove the cling film from welding; act carefully and you won’t break anything.
After we have removed the “freshly molded” frame, we should immediately take care of the fastenings, because somehow it must hold on.
To do this, we make two thin fasteners, similar to those that are placed on the caps, having previously measured the diameter between the tunnel for the radio and the upper edge of the panel. If you blinded too much, don’t worry, we have sandpaper and desire.
So, the transition frame for the Lada Grant is ready. Now we get to work on grinding off all the excess and giving our frame for the 2 din radio a smooth and attractive look. To do this, we use sandpaper No. 40, and if you have gone through with force and ground off the excess, we use the same cold welding to build up. I would like to immediately warn you that the work of adjusting the frame requires the greatest endurance.
After eliminating all the irregularities, we begin the process of preparing the frame for applying putty and primer. If you have taken on this painstaking work, then you are probably patient and a person striving for ideals, and you probably love your Lada Granta very much. After all, many simply would not take up this matter. In the meantime, let’s continue the so-called journey towards the ideal in the “2 din Grant Frame” case.
How to connect an amplifier and subwoofer?
Since the Lada Granta base is not equipped with musical equipment, and only a push-button radio is installed on board, the question justifiably arises: how is the standard radio installed in the cabin? In reality, this is a simpler procedure than it might seem at first. The occurrence of problems during installation is excluded, since a seat is already provided for the standard device on the Lada Granta panel, regardless of the level of equipment.
You can purchase the device in a retail chain or on an Internet site, where you can actually find an improved version, equipped with a navigation system with a detailed map of the Russian Federation. Don't forget to buy an additional luxury panel. Although multimedia will fit into the standard panel without any problems, the appearance will not be so beautiful. The price for this device reaches 2.5 thousand rubles.
Next comes the installation of the radio. The design feature of the landing niche in the Grants panel does not provide for the need for additional wiring.
- The first step is to remove the plastic pocket in the audio system opening. This is done using a flat-profile screwdriver. There is access to several connectors that involve connecting a radio.
- We remove the frame from the head unit and fix it at the location of the pocket.
- Next we move on to the connection. To do this, connect a couple of connectors and install the device in the landing niche.
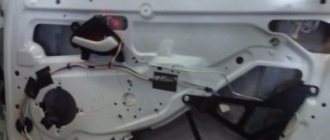
- After this, you can install the speakers in the front door cards. The procedure involves the need to dismantle door trims with unlocking handles and adjust the position of the glass. Using a special template, we begin cutting out the mounting holes.
We attach the speakers to the cards using self-tapping screws. We insert the cables from the speakers into the input connectors intended for this on the rear panel of the car radio. We install the decorative door panels in their original places and evaluate the sound provided by the standard head unit. Thus, the radio is connected.
In addition to the need to connect a radio, many people want to connect a subwoofer and amplifier. Not every Lada Granta owner will be able to enjoy the sound generated by the standard radio. This fact forces car audiophiles to lean toward the additional installation of high-quality audio amplifiers and subwoofers. The goal is known - great sound.
To install the indicated devices yourself, we resort to the following simple manipulations.
- First, we dismantle the lower part of the center console.
- We remove the panel and find mini ISO connectors.
- We insert the plug of the previously purchased adapter into one of these sockets (indicated in yellow). We do not touch the blue and green cables. Owners who have already performed this procedure note the following - we can no longer use standard wires, so we resort to the “mini iso” connector.
- Next, we connect a special fuse to the battery, having previously connected the cable from the amplifier (marked in red) to it.
- The subwoofer in combination with the loudspeakers is connected to the amplifier. We connect the battery ground wire (black) to the LADA Granta body and the corresponding terminal on the amplifier.
- After the measures have been taken, we return the panel and radio to their place.
- Enjoy the updated and high-quality sound.
To install a radio on Grant, you need:
- Remove the decorative plug in the front panel by lifting it with a mounting spatula. Wires with ISO standard connectors are located in special routings on the back.
- Place a 1 Din mounting shaft in the rectangular hole and press firmly.
- Use a screwdriver or other object to bend the metal corners that will keep the part from falling out.
- Open the glove box lid to find the antenna cable, which is located under the floor sound insulation near the front passenger's feet.
- Connect the power adapter (depending on the type of head unit). Route the cables through the installation shaft.
- Install the speakers in their original places. The doors of the basic configuration do not have cables for connection; there is only a connection plug located near the clutch pedal. In this case, the cables should be installed independently, passing them through the corrugated protective channels located between the stand and the door.
- The laid wires are wrapped in foam rubber, which is secured with tape or insulating tape. This manipulation allows you to avoid extraneous sounds caused by the contact of cable insulation on the metal door panels.
- When using speakers with a diameter of more than 13″, it is necessary to make wooden or plywood podiums that will allow the equipment to be installed in a standard hole.
- Connect the plugs to the head unit, which is then inserted all the way into the mounting shaft.
- Check the operation of the radio receiver and player in different modes.
- Install the decorative frame in its original place.
To install a double-din head unit you need:
- Using a mounting spatula, remove the air conditioner control knob.
- Pry up and remove the plastic cover of the central part of the instrument panel. When dismantling, it is necessary to disconnect the wiring plugs to the control buttons for additional equipment.
- Using a hacksaw and a construction knife, cut out the central jumper in the instrument panel. At the same time, the transition channel for the central interior ventilation deflectors is shortened by 4-5 mm.
- Install the radio in the shaft using modified mounting brackets. The device is attached to standard points located in the instrument panel.
- Mount the modified decorative frame onto which the deflectors have previously been rearranged.
If the head unit supports a low-frequency speaker, then a separate wiring is laid to it, which runs under the trim on the thresholds. When using an active subwoofer with a bass reflex, it is necessary to route the power cables, equipped with a separate fuse, into the luggage compartment.
Elements of the acoustic system and subwoofer selection
A car subwoofer is an element of car acoustics designed to reproduce low frequencies of sound, usually 20-120 Hz. This element affects the quality of other acoustic components and prevents them from overloading. The choice of a subwoofer must pursue one goal - to make the speaker system more accurate and stronger in the sound range. Subwoofers can be closed or open. The larger the open subwoofer, the greater the sound pressure. The closed one has the shape of a box into which there is no air access, so the sound is weak.
A subwoofer with a bass reflex has a mouth for air penetration and a pronounced bright sound. This is the most popular and widespread type of acoustic element. Another member of the family of subwoofers, the band pass, looks presentable, but it is absolutely inferior in sound.
Which subwoofer should you choose? First of all, when purchasing, you should know the parameters of the head.
- The most acceptable for subwoofers is a lower frequency.
- Absolute quality (Qts) - correspondence of power to the mobility of the speaker and echo resonator. Low power is estimated at approximately 0.35, high power - up to 0.5.
- Equivalent Size (Vas) is a number that determines the hardness of the surround, speaker calibration, and air pad thickness that affect it. This size is subject to the existing volume, the lightness of the diffuser and the stiffness of the suspension. In this case, options are possible.
- The RF size of a subwoofer is defined as approximately 40-200 Hz and includes a small range of octaves where deep, moderate and ultra-high bass sound occurs. The value of a subwoofer with a large range of ultra-high bass voices is 20-80 Hz.
- The level of condition, the components of the audio system cope well with this. Filters take part in separating the spectrum and filtering unclaimed audio signals. Ultra-high sounds are transmitted to the acoustics and attenuated by the subwoofer.
- The maximum sound pressure is the maximum loudness of the subwoofer.
- Sensitivity, the height of the index of which determines the rapid reduction in amplifier load and significant sound pressure with a minimum of power consumption. The most ideal sensitivity
90 dB.
- Dimensions of the woofer. An important measure for some indicators, because the selection of a subwoofer must correspond to the design of the car body. Manufacturers of radios for the Lada Granta sedan recommend sending the FI port and subwoofer speaker to the rear of the car, and the subwoofer to the interior. For a hatchback, the bass reflex port and subwoofer are installed in the luggage compartment and at the top. For the station wagon, subwoofers with a bass reflex and speaker are sent to the rear.
In order not to make a mistake, it is best to contact specialists when choosing a 2 din car radio for a Lada Granta car. When purchasing a subwoofer, you should consider some of the components of the machine's acoustics, since even the most expensive one does not have the ability to improve the sonority of speakers of low price and quality, but can ruin the entire phonographic picture. To install a 2 din car radio, an adapter is required, the so-called adapter frame 2, which provides an aesthetic appearance.
For different Lada Granta models, this frame is individual and can be selected according to the format and color of the car showroom decoration. Some cars can do without it, but this is a small number of vehicles. The multi-functional 2 din head structure is characterized by many of the internal resources of typical multimedia centers, the inclusion of control keys on the steering wheel, and this requires special knowledge in auto electrics.
The choice of car radios on the modern radio electronics market is quite rich and varied. By familiarizing yourself with the brands and models of radios, their types, installation tips, and selection, you can make your stay in your car much more comfortable and enjoyable. Good luck!
Instead of a total
- If we install a simple radio, the size should be no more than 178 * 50 mm. Installation requires plastic spatulas or a screwdriver. Adapters and slides are included.
- To install 2 din, you need a new overlay on the console, a decorative frame on the GU itself, wire cutters and a metal blade to adjust the installation location.
- Are we replacing the standard speakers with another of the same size? Still need a new decorative frame. Otherwise, gaps in the panel will be visible.
More articles about Granta here.
Hidden text
With a greater installation depth, you will have to come to terms with the protrusion of the control unit above the surface of the console, compensating for it with appropriate design. You also don’t have to waste time searching for a PG intended for standard installation in any specific car model. Without a major rework of the console, nothing will be installed.
Nothing is known yet about any GI produced specifically for Grants. Although anything can happen, because there was one (MyDean) for Kalina2. There are changes to this paragraph. MMC TRINITY appeared for Granta. A little expensive, but maybe there will be other options. Wait and see.
Dismantling a standard music center
The general feelings of owners who have a standard radio in their car are positive. The display is informative and easy to read. The touch keyboard functions flawlessly. The standard radio itself is capable of high-quality reproduction of sound programs from micro-SD cards. However, using USB format media can be challenging.
The device also has some nice options:
- equalizer;
- activated replay mode;
- random sequence of playing tracks (“Random”).
Multimedia LADA Granta is capable of supporting images in 5 formats, which allows you to view photos without any problems. But not everyone can make the correct settings for the “phone” option on the first try. This function will be convenient for a busy owner who is forced to communicate by telephone even while on the road.
The standard speakers of the LADA Granta disappoint many, since even at a 45 percent volume level they emit wheezing, characteristic of bass overload. Some timid music lovers are alarmed by volume jumps when switching to “radio” mode.
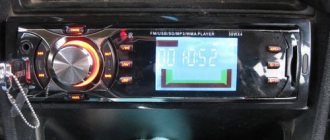
Here is a list of shortcomings that provoked many Grantavods to purchase an alternative version of the radio. Today, the progressive version “2191” claims to replace the outdated standard device “2190”. The new device will please you:
- improved sound;
- interface for connecting with a rearview camera;
- navigation complex;
- integrated input for connecting a subwoofer.
Not every minimum configuration of a car today will please you with the presence of a standard radio. If, nevertheless, such a device is present in the database, it is far from a fact that it can please you with its informative interface and sound quality. If your version of the car has a push-button radio, then, as we found out from the article, installing a more modern radio, as well as the subsequent connection of the radio, is not a difficult matter, the main thing is to approach everything correctly.
The LADA Granta model also did not acquire the role of an exception in this list. After all, the trend of a modern car suggests the owner’s ability to carry out exciting measures to improve and tune his “iron horse,” and you shouldn’t be upset, because a push-button radio is easily replaced with a modern one.
Many motorists face the problem of removing the radio in their car. Some people cannot remove the standard device installed at the factory, others inherited the music along with the car, and others simply lost special keys. There are also plenty of reasons for dismantling - from repairing wiring to buying a new stereo system.
Often, standard head units (aka radios) are removed using the method described above, since they are attached to 2 or 4 clips. For example, the factory player on a Lada Priora car is held on by two latches, and to unlock them, thin steel strips must be inserted between pairs of radio channel switching buttons “2” - “3” and “5” - “6”.
In Priora, stripes must be inserted between the buttons
To remove car radios that are fastened with screws, you need to prepare a simple set of tools:
- thin flat screwdriver or knife;
- Phillips screwdriver;
- set of small sockets (from 6 to 10 mm).
With this mounting option, the factory turntable must be unscrewed using the heads
On different brands of cars, standard players can be mounted in different ways, but the principle is approximately the same: the device is screwed to brackets that are covered from the outside with a plastic lining. As an example, we propose to consider removing the radio on a Korean Hyundai Solaris car, performed in the following order:
- Use a flat-head screwdriver or knife to pry up the lower corner of the plastic decorative panel framing the stereo. Pull the edge and grab it with your hand.
- Gently pull it towards you and release the first latch, and then move around and unlock the rest.
- Holding the panel with both hands, remove it and, if necessary, disconnect the connectors located at the bottom.
- Unscrew the 4 mounting screws with a Phillips screwdriver and pull out the radio.
Removing the device according to the instructions
The algorithm for removing the radio if you have the keys is outrageously simple. It is worth considering in order to understand how to act if they are lost. The order is as follows:
- Remove the front panel of the player and the decorative plastic frame, prying it up with a flathead screwdriver if necessary.
- Insert the first key into the gap between the housing and the mounting frame, located at the end. You should feel slight resistance as the tool bends the latch.
- Repeat the same action with the second key.
- Grasp the radio with your hands by the protruding parts on the sides of the case and carefully remove it from the niche.
To remove the radio, 2 keys are used
Special keys must be inserted into the side openings
When the radio is equipped with four latches, access to them is through 2 pairs of round holes. You need to insert 2 U-shaped keys into them and pull them out by the body, as described above.
The music center can be easily removed using keys
Features of audio system installation
When connecting the stereo system wiring, it is necessary to take into account certain features of the electrical supply. This is provided using red and yellow wires. The first is responsible for remembering the audio system settings, the second is for turning off the radio, which is controlled by the car’s ignition.
It is recommended to use a parallel connection type for both wires so that the audio system can only be turned off manually. In this case, it will not be affected by the car’s ignition key, but there will be a problem of excessive electricity consumption in parking mode, which is solved by installing a special regulator for the red electrical wire. With its help, you can turn off the radio by hardware when leaving the car for a long time. This regulator can be connected to the alarm system, that is, when the vehicle is locked, the audio system will turn off automatically.
The disadvantage of this system is the extra current consumption, but in any case it is much less than the indicators that provide power to the radio during standby mode.
How to connect an amplifier and subwoofer?
If standard keys are lost, you need to make homemade ones, focusing on the shape of the slots. To see them, remove the device’s removable panel and plastic frame. Here is a list of available tools with the help of which owners of various cars manage to unlock the latches:
- thin steel strips 6-15 mm wide;
- stationery knives;
- plastic clamps for electrical wiring;
- nails and straight wire - for round holes;
- thin screwdrivers and other similar items that fit the shape of the cracks.
These steel strips can be used instead of keys
The first step is to remove the front panel of the radio.
To remove the car radio, use the same algorithm:
- Insert first one and then a second strip of thin metal (or a utility knife, thin screwdriver) into the technological opening. Feel each latch unlock.
- If the turntable is supported by 4 clips, insert four instruments.
- Slowly remove the radio from the niche at the same time as the improvised keys.
The strips need to be inserted into the side slots
The music center is removed along with the strips
30% to ideal level or puttying and painting
For puttying, you should purchase a two-component putty for plastic bumpers; after thinking about it, I decided that this is the best and most suitable option for my frame and yours. And for priming - acrylic primer (it is sold in sprays).
It is recommended to clean and degrease the surface of the frame itself, respectively, if you have already completed all the work on smoothing out large irregularities with sandpaper.
We will also need a spatula; it is not advisable to take one that is too large and hard. I would recommend using rubber. After puttying, carefully smooth out the unevenness with sandpaper No. 120.
Installation of Lada Granta car radio
Tools:
- Open-end wrench 10 mm
- Small flat screwdriver
- Knife (if necessary)
- Soldering iron (if necessary)
Initially, in this car model, the calculation is made for a 1-DIN radio. If the owner wants to install another type, a newer one, for example 2-DIN, he will need to start sawing the partitions in the console itself. And if the size is not suitable, then a suitable cantilever frame will have to be cut into the panel.
Here is a description of how to install a 1-DIN radio.
1. Remove the negative terminal from the battery.
2. Remove the plastic pocket installed in place of the future radio using a flat-head screwdriver.
3. Having taken out the pocket, on the back of it you will find slots where ISO connectors will be inserted to connect the radio. Disconnect the connectors to completely remove the pocket.
4. Now remove the metal frame from the radio and install it in the place where the plastic pocket was. Unbend the frame's tendrils to lock it securely in place.
There should be a click to confirm that the frame installation was successful.
5. Connect the connectors to the radio.
If you connect the radio to the connectors incorrectly, all car systems may fail, including, of course, the sound system.
Some radio manufacturers make custom connectors. Most of them come with an ISO plug. But there are times when none of the types are suitable, then the last option remains - cutting the wires. You remove the original plugs of the radio and the plugs of the car wiring and solder them together, but be sure to match the color.
A mistake many car enthusiasts make is twisting the wires and wrapping them with adhesive-backed insulating tape. In winter, the same electrical tape cracks due to frost. As a result, a short circuit may occur in the wiring, which will lead to the failure of all electrical systems of the car.
6. Insert the car radio into the previously installed frame.
Putty? Aligned?
I am sure that now our creation called Granta 2 din frame looks almost perfect and you have a desire to finish the job you started as soon as possible.
So, it's time for the primer. To do this, treat the surface of the frame with sandpaper No. 340 and degrease. Three layers of primer will be enough to obtain the texture we need on our 2 din frame.
Finally, the final stage of our work is painting. For my transition frame for the radio, I used matte black alkyd enamel; it most closely matched my interior interior; of course, black is a neutral color and is suitable in most cases. But.…
Decoding problems
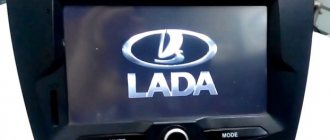
The main pitfall of the described procedure lies in the security code embedded in the memory of most radio tape recorders. The bottom line is this: disconnecting the music center from the external power supply for 10-15 minutes will lead to the fact that the next time you turn on the car radio, it will require you to enter a security code (usually a four-digit one), without which it will not function.
The device requests a code after connecting to the on-board network
If the card with the code is lost or missing, the issue can be resolved in several ways:
- when it comes to a standard device, for a certain fee they will help you find the code at a dealership that sells cars of your brand;
- there are companies and individual specialists dealing with these problems;
- the free way is to search for code using various programs.
Serial number location
Regardless of the method chosen, you will have to remove the radio from the socket to find out the serial number. It is printed along with a barcode on a tag glued to the side or top of the case. After taking out the device, rewrite these numbers, and then try to calculate the PIN code using them using various online calculators on the Internet.
The issue of removing a car radio from its socket is not very difficult and will not require much time. But the consequences can be unexpected for an unprepared motorist. Hence the last piece of advice: find the lost pin code before turning off and removing the player in order to save your time and nerves.
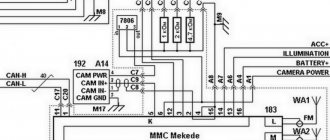
The standard multimedia system 2190 on the Lada Granta has many useful functions, but this does not mean that one day you will not need to connect additional equipment to it (rear view camera, etc.) or remove it altogether. For example, to replace with more powerful multimedia systems or, conversely, to install a double-din radio without a touch screen.
In any case, you may need to dismantle the MMC on Grant, which we will talk about now.
Reviews
| Module type | Price, rub.) |
| Standard 1-DIM (push-button version) | from 3500 – 3700 |
| Standard 2-DIM (sensor) only for Lada Granta liftback | from 7500 – 8000 |
| Third party manufacturers, depending on configuration and specifications |
| № | Positive |
| 1. | Victor, 39 years old: after buying the car, he did not change the radio, despite the push-button control option. The sound quality is good, the radio reception is excellent, that's enough for me. |
| 2. | Konstantin, 41 years old: bought the car second-hand, second owner. I didn’t change anything, I left the original radio. The functionality is good, the build quality is also good, it reads from a flash drive. |
| 3. | Vasily, 44 years old: I listen to the radio more, the reception in the city is good. True, it causes interference near metal structures, but this is natural. |
| 4. | Kirill, 36 years old: I work as a taxi driver, on wheels all day. The standard tape recorder saves the day, it works properly. My friends recommended replacing it with a touchscreen model from the new Granta, but so far the old one hasn’t failed. |
| Negative | |
| 1. | Victor, 38 years old: the standard audio module, although not bad, seemed to me not enough, so I replaced it with a foreign one and supplemented it with an amplifier. Now the volume is good, the quality is high. |
| 2. | Mikhail, 42 years old: I work as a courier, I drive for the entire shift. I expected more from the standard radio, so I had to replace it with a new one. The volume suits me, I plan to connect an amplifier - a crossover. |
| 3. | Ivan, 33 years old: I bought the car second-hand, immediately replaced the audio module, the reviews are not good. New and high-quality equipment from Trinity, no problems. |
| 4. | Vladlen, 40 years old: friends gave me a gift in the form of a radio with touch control for our anniversary. Before this there was a push-button one. Can't compare, quality, sound, control, functionality at a high level. |
Conclusion The opinions of motorists on the functionality and sound quality of the standard radio are divided, which is obvious. Everyone evaluates according to their own criteria. Some people care about sound, others about functionality, and others about control. Regardless of the type of radio: push-button or touch-sensitive, the workmanship is good.
Removing the radio on Grant
The entire dismantling process will take no more than one minute if you have already removed the radio before. If this is the first time for you, then minor difficulties may arise only with finding the necessary elements by touch if the radio is not pulled out in the usual way.
1. Remove the plastic trim of the center console. To dismantle the MMC, it is not even necessary to remove the cover completely; it is enough to unclip only the upper latches using a screwdriver, a small knife or a spatula.
2. Slightly pulling back the upper part of the plastic trim of the center console, press out the MMC latches, which are located on the right and left. To prevent the latches from “settling” into place, you need to slightly pull the MMC towards you.
3. Having released the clamps, we remove the MMC from the niche.
1. Lower the glove compartment lid down and disengage the upper latches.
2. Put your hand into the opening and disconnect the interfering cables. Please note that not all MMCs currently have a USB cable installed that goes into the glove compartment.
The radio has been dismantled, now you can connect additional equipment to it, replace it with another one, or simply find out the model of your MMC by the sticker located on the rear panel.
How to install 2 din in grant norm or standard
Everything is more complicated here. Need to:
- dismantle the center console trim - unclip the fastenings, move it forward and disconnect the buttons and heater handles;
- cut out a vertical plastic partition that will not allow you to install a 2 din device;
- file the plastic casing of the central air duct;
- try on a new acoustic unit, adjust the fastenings if necessary;
- install adapters from the delivery kit on the wiring (if required);
- install the device;
- if we leave the old center console trim: we cut out the partition, try it on, put it in place with the buttons and handles connected, adjust the decorative frame of the control unit, install it;
- if we install a new trim on the console under a 2 din device: we transfer the heater control unit and buttons from the old trim, install them in place, and put a decorative frame on the control unit.