In winter, driving conditions become more difficult - strong temperature changes, snow, ice, slippery road surfaces, freezing of technical fluids, etc. A separate issue is the deterioration of road visibility due to ice or dirt freezing on the windshield. To clean the glass, the car has a glass washing system: an electric pump that supplies windshield cleaning fluid from the washer reservoir through rubber lines and nozzles directly to the windshield.
In summer, ordinary water is sufficient in the windshield washer system, but in winter frosts (especially at temperatures from -25C) it is necessary to fill the washer reservoir with a special low-temperature windshield washer fluid (water + alcohol), which does not thicken and does not freeze in severe frosts, wets the glass surface well and quickly removes ice and dirt from it.
How is such an “anti-freeze” chosen? How to drain and fill the fluid into the reservoir? What should you be aware of when changing windshield washer solutions?
Draining liquid without dismantling
I cannot guarantee that the methods discussed will suit any car.
There is only one universal method, but its use should be approached with extreme care. First, look at the owner's manual for your car and see how the manufacturer itself recommends draining the windshield washer fluid from the windshield washer reservoir. Then decide whether to follow these instructions or use an alternative method.
Is it worth buying a trailer with UAZ wheels?
First way
. It is universal and will fit all cars without exception. The idea is to squeeze the liquid out through the nozzles themselves. Extremely simple, but with its pitfalls. It is better to use it in situations where there is very little composition in the tank, and you do not have the time or opportunity to completely drain it. The simplicity lies in the fact that here you just need to turn on the washer and wait until the reservoir is empty. But there is also a difficulty. Working without stopping, the washer motor may fail. Be sure to give him time to rest.
Second way
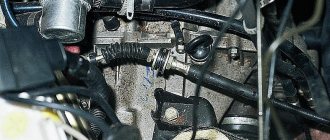
. It involves draining using a hose from the washer itself. On many cars the method works easily and simply, and there are no problems with its implementation. You will need to remove your summer or winter windshield wiper blades by snapping them off. Be sure to wrap fabric around the leash. Next, open the hood and prepare a container for draining. Find the hose in the area where the injectors branch. Disconnect the hose and lower its end into the bottle. Turn on the engine and activate the window washer. The liquid will begin to gradually drain.
There is another option. It involves draining directly from the tank itself.
Third way
. Again, not suitable for all cars. Here you need:
- gain access to the tank;
- To do this, remove the linings or other easily dismantled elements;
- prepare a container for draining;
- find where the motor is located;
- unscrew the electric motor from the tank;
- place a container under it;
- wait for complete drainage;
- turn on the washer motor;
- return all parts to their place;
- add new fluid.
Alternatively, you can use a large syringe with a nipple attached to it to reach the bottom of the tank. The method is not the fastest, but you don’t have to remove or dismantle anything.
But what you shouldn’t do is insert one end of the hose into the tank, try to suck the mixture out with your mouth, and pour it into a container for draining. Swallowing such a liquid, even in small quantities, can cause serious poisoning.
Why do you need to drain the washer fluid?
Why do many motorists decide to change the washer fluid in the washer reservoir? What pushes them to take such a step? In fact, there are several reasons why every motorist should think about the need to carry out such a procedure. Even experts recommend removing the remaining summer fluid from the washer reservoir. The reasons may lie in the following:
- Using ordinary water in winter risks freezing in the car system. The situation will not only be unpleasant, but also dangerous for the car, because when water expands it can damage the tubes, pump, pipes and sprinklers.
- Using tap water is an even more disastrous situation. You should try not to pour tap water into the system, since when used for a long time, sediment will form, which reduces the efficiency of the nozzles and causes clogging of the tubes.
- Anti-freeze products are often counterfeited, and no one is safe from purchasing such a product. When using it, the benefit will be minimal, but it can cause harm to health. If an unpleasant odor is detected, which is the first sign of a low-quality antifreeze, it is necessary to immediately change the working fluid.
- When adding fluid from another manufacturer, a chemical reaction may occur inside the system. The result may be a jelly-like substance.
Whatever problem you encounter, in any case you need to know what to do and how to drain this working fluid.
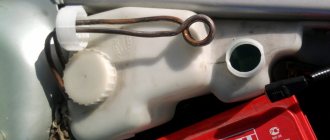
Washer reservoir location
To replace washer fluid, you need to know where the reservoir is located - this is logical. This part is located under the hood. To get to the reservoir, you need to pull the lever that opens the hood.
You can usually find it near your left knee by the image of an open hood on the handle. Then you can get out of the car and open the hood, do not forget to fix the lid using a special device.
Now we have to find where the tank is located. To do this, you need to stand in front of the car and look at the left side of the engine compartment. In the vast majority of cars, the part we need is located behind the optical element, although it can also be behind the radiator. The windshield washer reservoir looks like a small transparent or white plastic container. Its volume can vary from 3.5 to 5 liters.
One of the identifying marks of this part is the lid, which is often painted blue or light blue. Sometimes the cover may be black or yellow. Usually it depicts glass on which washer is sprayed.
How to drain the liquid
We found out where to look for the vessel that needs to be emptied of liquid, all that remains is to figure out how to drain the water from the washer reservoir. The situation is ambiguous, since all cars have different design features, so this process may differ depending on the car model.
Before you begin using the methods discussed below, it is recommended that you look at the owner’s manual for your car. Usually the manufacturer himself clearly prescribes how and in what sequence the liquid is drained from the windshield washer reservoir.
Based on the official instructions, you can decide whether to follow it or use other methods.
Three methods are considered relevant and quite universal.
First way
A truly universal method that is suitable for any vehicle. The point is extremely simple. The driver will be required to remove all the fluid using the windshield washer nozzles themselves.
The sequence of actions is as follows:
- the driver gets behind the wheel;
- turns on the windshield wiper;
- begins to actively work with the water supply lever;
- or automatic spraying starts if such a mode is available.
Basically, you turn on the washer and wait for the reservoir to empty.
But be careful, since this method is only relevant in a situation where there is very little washer fluid left in the tank. Continuous and prolonged operation of the sprayer motor can cause its failure.
Even when there is just a little liquid left, periodically turn off the sprayer and give the electric motor time to rest.
Second method
Here you will need to use the hose from the windshield washer on your car.
A fairly common option for how to get rid of liquid in a tank. The essence of the procedure is as follows:
- the windshield wiper blades are removed;
- instead of them, soft fabric is wound;
- the hood opens;
- a container is being prepared where the drainage will take place;
- Next you should find the hose that goes to the injectors;
- the end of the hose is disconnected from the nozzle;
- the tube is lowered into the drain container;
- The washer motor turns on;
- liquid under pressure comes out of the tank.
Not a bad option, which in principle is suitable for most cars.
Third method
You should approach this option carefully, having first studied the design features of your windshield washer.
The point is to:
- get to the tank;
- prepare empty containers of suitable volume;
- find the location of the electric motor;
- unscrew it;
- place a container under the formed hole;
- wait for drain;
- return everything to its place;
- add new fluid.
The problem with this method is that not all cars have easy access to the tank, and especially to the motor. Plus, only on certain machines the electric motor is located in such a way that when it is removed, the liquid is drained in full. It's up to anyone to get lucky.
An alternative solution would be to use a sufficiently large syringe, to the end of which a tube of the required length and required diameter is connected. Having placed the tube on the syringe, you lower the second end of the hose inside the tank, first unscrewing the lid, and then the gradual pumping process begins.
How to change windshield washer fluid in a car
Repair and servicing of cars, engines and automatic transmissions
So, you have purchased anti-freeze windshield washer fluid, and you need to fill it into the reservoir. This procedure is not complicated, and you do not need to go to a service station - you can do the draining and filling yourself.
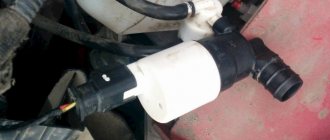
If you have never done this before, remember: the washer reservoir is located under the hood of the car (look for it on the left hand side in the headlight area). It is a small translucent/white container with a capacity of up to 3.5 liters with a blue, cyan, black or yellow lid, which can depict a windshield with a spraying washer.
You have to pour anti-freeze into it, but first you should check whether there is liquid in it, and if there is, then drain it.
How to drain liquid from the tank
Replacing water or fluid in the washer reservoir in the warm season is simple: water or weak anti-freeze can be completely used up by operating the steering column lever. The pump will blow all the liquid out of the system and reservoir. But this method is good if the tank is minimally filled: there is no need to put heavy loads on the washer pump electric motor!
If the tank is full (up to 3.5 liters in the tank + 1.5 liters in the line system), the liquid should be drained forcibly. There are several options for forced draining:
- You can blow it out of the system and empty the tank with an air compressor (the pump tube is connected to the windshield washer system, and the compressed air is turned on).
- You can drain the liquid through the windshield washer hose, which is disconnected from the nozzle and lowered into a drain container. After this, the windshield washer motor is turned on, and liquid under pressure is pumped out of the tank.
- You can unscrew the washer motor and drain the liquid through the resulting hole (but only if access to the motor is convenient).
If access to the hoses and washer motor is difficult (on some brands of cars this is really difficult), you can pump out the liquid from the reservoir using the simplest method - a rubber bulb with an elongated spout or a large syringe with a tube. Then all that remains is to expel the remaining fluid from the lines and injectors, using the steering column lever.
How to fill liquid
After the water or old windshield washer fluid has been drained, you can begin to fill in the new anti-freeze agent. It's simple: you need to remove the cap from the bottle and slowly pour the required amount of liquid into the neck of the tank. For convenience, you can use a large watering can.
When pouring, try not to splash the liquid past - there are electrical wiring and headlights nearby, which can short out if liquids get in
It is also important that the antifreeze does not spill onto the drive belt - this will worsen its technical characteristics.
In the same way, you can add windshield washer fluid when it is used up, or pour hot water into the anti-freeze tank if it freezes in the tank.
What you need to know when replacing a windshield washer
Maintaining the windshield washer system does not require much effort, but it is better to monitor and service it regularly to prevent blockages, traffic jams or ice from appearing in the winter. Important to remember:
- The system should be pumped periodically to remove air and water from it. This should be done before each new anti-freeze fill.
- There should always be a container with 3-4 liters of windshield washer fluid in the trunk to top it up if the reservoir is empty in the middle of the road.
- There is no need to fill the washer reservoir to the top. If the anti-freeze suddenly freezes, you should have room in the tank to add hot water, alcohol or anti-freeze concentrate to melt the ice.
- Antifreeze concentrate can be diluted if there is no serious frost or thaw outside, but the liquid and water should be mixed not in a tank, but in a separate container. This way you will protect the system from accidental incompatibility of components and will be able to control the concentration of the finished solution.
- If you accidentally poured low-quality anti-freeze into the tank, you should drain it completely. If you poured in a liquid with an inappropriate freezing point, you can simply add concentrate.
In conclusion, it should be noted that draining and filling windshield washer fluid in a car is a simple procedure that you can handle without outside help. In winter, replacing a windshield washer is more difficult, as there is a risk of freezing the liquid in the reservoir and pipelines, damaging the washer pump, or breaking the system's electric motor. Therefore, it is important to carry out all stages of work consistently and carefully.
Be sure to pay attention to the quality, characteristics, freezing point and seasonality of the windshield washer fluid, do not leave water in the windshield washer lines and do not let the system freeze in the cold.
How to choose the right antifreeze liquid
Do-it-yourself repair and maintenance of DMRV at Priora
Antifreeze is a liquid based on water and alcohol, and the higher the content of the latter in the solution, the lower temperature it becomes (at 50% content it can withstand temperatures down to -30C). In severe frosts, therefore, liquid concentrate should be poured into the washer reservoir, and at -5-10C you can dilute the anti-freeze with water.
Today there are many windshield washer fluids on the market from various foreign and domestic manufacturers, with different chemical compositions and conditions of use. How not to make a mistake with your choice, buy an anti-freeze product with the required crystallization limit (freezing temperature) and not stumble upon a counterfeit product?
Read the labels on windshield washer fluid containers! It should indicate:
- crystallization (freezing) temperature – from trusted manufacturers on the packaging it is indicated for the concentrate with a margin of several degrees;
- kinematic viscosity - fluid fluidity and thickening conditions (thickened antifreeze clogs the nozzles);
- surface tension coefficient - the ability of a liquid to wet surfaces and impregnate dirt (the higher the better);
- surfactant content (surfactants) – the less, the better.
A separate and very important characteristic is the type of alcohol used in the solution. Ethyl alcohol is considered the highest quality and most expensive, the most popular is inexpensive and effective isopropyl alcohol, the most dangerous to human health and prohibited in legal production is methyl (methanol).
Counterfeit anti-freeze products are easy to identify: if they have no odor, they are dangerous and toxic methanol. If the smell is very strong and unpleasant, it is also a counterfeit product with “flavoring” additives. Ethanol antifreeze smells like vodka, isopropyl liquid has a slight smell of acetone. At the time of buying. Check liquids for smell!
Advice: even if you bought a well-known brand of anti-freeze (for example, Hi-Gear, Liqui Moly, Effect Plus, “Clean Mile”, etc.), and the seller is reliable, do not rush to fill the washer reservoir full! Firstly, today it is easy to stumble upon counterfeit liquids, and secondly, there is no guarantee that you have not made a mistake with the freezing temperature. First fill in 1-1.5 liters - in case of an error, it will not be difficult to drain them later.
Recommendations
Comments 85
Self-disassembly, maintenance and repair of shock absorber parts
Guys, I have never encountered such crap that is happening to me now... Yesterday I realized that the washer was frozen. I warmed it up, drained everything, filled it with anti-freeze at -30, poured it on the glass so that the remnants of the previous washer came out of the hoses and calmed down. This morning I went out and saw that the glass was covered with frost and decided that I would quickly spray it with anti-freeze and use the wipers to clean this whole thing up. Fuck there! It's frozen again! The anti-freeze product, tested by many car enthusiasts, has been purchased in large quantities from the same supplier for many years now. What the hell could this be?
Yes, it's crazy, why be surprised. Warm it up again, drain it. Or dilute it. And on the contrary, I leaked the one, thought Khrenovaya. I put it on the balcony and it doesn’t freeze at - 12 =)
Read also: Can your license be revoked for speeding?
So it doesn’t freeze in a bottle in my trunk. Could it be that the nozzles of the injectors are metal and because of this it freezes in the nozzles?
Try warming it up with your fingers, it helped me so much.
hmmm... I'll try. I'll go to the car right now. The main thing is not to freeze your fingers))
Try warming it up with your fingers, it helped me so much.
strange... So far it hasn’t frozen anymore O_o I’ll hope that it won’t freeze))
Guys, I have never encountered such crap that is happening to me now... Yesterday I realized that the washer was frozen. I warmed it up, drained everything, filled it with anti-freeze at -30, poured it on the glass so that the remnants of the previous washer came out of the hoses and calmed down. This morning I went out and saw that the glass was covered with frost and decided that I would quickly spray it with anti-freeze and use the wipers to clean this whole thing up. Fuck there! It's frozen again! The anti-freeze product, tested by many car enthusiasts, has been purchased in large quantities from the same supplier for many years now. What the hell could this be?
My anti-freeze also froze (perhaps there were remains of a fly swatter there), but we added industrial alcohol and it still froze =/ I’ll have to go to the subway again, defrost it and pump it out with a syringe. First time this has happened in 5 winters
The other day my husband and I were sucking out a fly swab with a syringe in my car =D wow, what a fascinating activity))) The main thing is to do it with a sense of idiocy. Had a blast)))
Ksyusha wrote above: syringe for Zhane. Business for a few minutes, that is, if the tank is full. I drained the same thing, I forgot that in the summer I filled it with distillate with a special tablet
Windshield washer fluids
Even from everyday life it is clear that glass can be cleaned of dirt using water or a special product. Water will help get rid of light dirt, but a special product will cope with any dirt.
As for the car, water can only be used when the temperature outside is positive. In winter, the water will turn into ice. This can lead to dire consequences. The pressure may cause the hoses and reservoir to rupture.
There are 2 types of windshield washer. The table shows the main characteristics of liquids.
| Type of liquid | Use temperature | Difference |
| For the summer season | from +1℃ and above | This liquid copes well with dirt. Removes midges and mosquitoes from glass. |
| For the winter season (non-freezing liquid) | from 0℃ and below | Does not freeze or turn into a mushy mass at subzero temperatures. |
It is important to purchase windshield washer fluid from trusted sellers who sell certified products. Otherwise, you may encounter the fact that the liquid will not cope with dirt on the windshield (in the case of the summer version) or will freeze at subzero temperatures.
Also, due to a poor composition, the washer may have an unpleasant, pungent odor, which can cause a headache and watery eyes for the driver. The first sign of low-quality washer fluid is that the price is too low. A good product cannot be cheap.
It is not recommended to buy anti-freeze in unverified places, it can only cause damage to the car
It is not recommended to mix windshield washer fluid with water unless it is a concentrate. Therefore, if the washer fluid reservoir contains water, it should be drained before adding washer fluid. Before the winter season, you should definitely replace the washer water.
When to use windshield washer instead of water
Water to clean the windshield can (but, again, is not advisable) be used only at positive temperatures and only when driving around the city. In this case, the windshield will only be contaminated with dust, and water will handle the cleaning.
The first option when you should replace water with windshield washer is when traveling outside the city on the highway. The reason is simple. At speed, midges and mosquitoes remain on the windshield. And if during daylight hours the driver does not feel any discomfort while driving, then when the sun sets, the view of the road will deteriorate. Water cannot cope with such pollution on its own. It is only possible to clean the glass if the driver cleans the glass with a washcloth and water, which is unlikely.
The second option for changing windshield washer water is the onset of the winter season . The main thing is to do it before the temperature outside gets below freezing. It is clear that at the first minus, the water in the tank and hoses will freeze and will not perform its function. And it’s worse if these parts can’t withstand the pressure and rupture.
After repairing the washer reservoir, it is recommended to fill the reservoir with water for the first time. During this period, the integrity of the tank is checked. If after repair the tank leaks, only water will flow out. If no leaks are found, then drain the water and use washer fluid.
Why does it need to be changed?
It is impossible to answer this question definitely, since there are quite a lot of reasons for a change. If the system is filled with water, it can simply freeze in winter, which can lead to damage to the washer pump, rupture of the tubes supplying the composition to the nozzles, and failure of the sprinklers themselves. The use of tap water is also undesirable because precipitation, with prolonged use, leads to clogging of the tubes and nozzles.
Sometimes problems arise when using anti-freeze products, especially when purchasing counterfeit products. Unscrupulous manufacturers sometimes use alcohol-containing compounds that pose a health hazard. If unpleasant odors appear during use, it must be replaced immediately. Sometimes it happens that by mixing products from different manufacturers, a chemical reaction occurs and the liquid turns into a jelly-like composition.
Why do you need to empty the washer fluid reservoir?
There are many reasons why experts recommend draining all windshield washer fluid from the reservoir. Let's list the most common ones.
- In summer you can pour distilled water into the container, but in winter it will freeze, which is very dangerous for the car. Therefore, it is imperative to change the summer product to a special, non-freezing winter product.
- Often, antifreeze is counterfeited or diluted with water. If you notice an unpleasant odor (it is a sign of poor quality), you should immediately pour out all the liquid from the windshield washer container and replace it with a new one.
- If you bought a product from another manufacturer, before filling it in, you need to get rid of the old one. By mixing products from different manufacturers, a chemical reaction can begin, and instead of windshield washer, a jelly-like mass is formed.
Instructions for replacing and repairing the tank
Replacing the washer reservoir is usually done as a result of its failure, which cannot be repaired. In particular, if the CP is cracked and it is no longer possible to restore its integrity.
Using the example of a VAZ 2114 car, let’s look at how to remove the washer reservoir:
- First open the hood. Before removing the BO, it is necessary to drain all remaining liquid from the container. If the liquid level in the container is high, then unscrew the cap of the washer reservoir, this will reduce the pressure in the system.
- Then the BO is removed from the grooves; to do this, it can be pulled up, and placed in such a way that you can easily dismantle the electric motors.
- You need to disconnect the contacts from the motors, as well as the water supply pipes.
- Next, the electric motors are removed from the container body - for this you can use a regular screwdriver to pry them off (the author of the video is the menstimecom channel).
As you can see, there is nothing complicated in removing BO. It is much more difficult to repair the washer reservoir. If the container is cracked, it is not a fact that it can be repaired, since everything depends on the size of the crack and its location.
If you don’t know how to seal the washer reservoir, then you have several options:
- For gluing, you can use special glue or cold welding. Before applying material to a crack, the BO must be thoroughly washed, and the area to be patched must also be degreased. Glue or cold welding is applied to the crack, while it is necessary to grab a few more millimeters from each edge of the crack. Depending on the type of glue and cold weld, the waiting time for the material to dry can range from 30 minutes to several hours.
- If the crack or hole is small, you can try to treat it with regular sealant. In this case, the repair procedure looks similar - the surface is first washed and then degreased. A certain amount of sealant is applied to the hole, which should completely fill the crack and the space around it.
- Another option that is best suited for larger cracks is the use of special plaster tape. It is also installed on a degreased surface, but before installation the tape should be coated with epoxy, and the material should be applied in several layers until all the cracks are closed.
- If all these options do not help you, then you can use a soldering iron or wood burning machine. With the help of these devices, the structure of the container is softened, which makes it possible to restore its integrity if the damage is minor. Additionally, after treatment with a soldering iron, the damaged area of the BO can be covered with cold welding.
Electric pump (motor) for windshield washer VAZ 2110 n/o ENC 2.5W
Dear customers, in order to avoid errors when sending an electric windshield washer pump VAZ 2110 n/o ENTS 2.5W to a VAZ car, in the “Comment” line, indicate a new or old model, the model of your car, the year of manufacture.
Today, a car is unthinkable without a windshield washer; at the driver’s first request, washer fluid sprays from the nozzles, and after it, the wipers wash away road dust and the pitiful remains of insects hitting the windshield.
Electric glass washer pump 2110-5208009 (catalog designation "Omega Group" ЭНЦ-4573756032) is designed to supply washer fluid to cleaning systems for windshields, rear windows and headlights of cars.
The electric windshield washer pump 2110-5208009 is powered from the vehicle's on-board network, with a rated voltage of 12 V, the negative pole of which is connected to the body.
The reasons why a windshield washer system fails can be divided into mechanical and electrical.
Operability at ambient temperature: from -40 C to +125 C;
Rated supply voltage: 12V;
Weight: no more than 0.12 kg;
Overall dimensions: 108x45x37 mm;
The pressure developed by the pump is not less than: 0.25±0.01 MPa;
Washer fluid consumption: at least 30 ml/s;
Current consumption: no more than 4.5 A.
1. The mesh of the cup, which is equipped with the washer reservoir of the VAZ 2110, is clogged with dirt or other deposits, which is why the pump cannot pump the liquid. You’ll have to remove the tank and see if the glass with the mesh needs replacement, or simple washing;
2. Instead of a special anti-freeze liquid, in the summer they poured ordinary water, and before the onset of cold weather, when they filled in normal windshield washer, they forgot to remove the water from the hoses. She froze, and accordingly, washing the windshield became impossible. Warm up the car, leave it in a warm garage with the hood closed and wait until the water melts, then the pump can drive it out;
3.In the situation described above or under other heavy loads, the windshield washer motor shaft may turn. At the same time, a hum is heard from the motor, but the pump does not supply anything to the windows. The mechanism needs to be replaced;
4. The hose has jumped off, and the liquid does not flow through the nozzles, but somewhere past them;
5. The hose going to the injectors is pinched;
6. The nozzles (fittings) are clogged with deposits or dirt. To check this, just remove the hose from the nozzle and see if liquid flows. Replacing the injectors will help.
1. The fuse has blown. It is located in the fuse box;
2. The terminals that the VAZ 2110 washer motor is equipped with have oxidized. It happens that the terminals fall off;
3. The windshield washer switch located on the steering wheel does not work. Operation must be checked with a multimeter;
4. Wiring faulty. The wires may need to be replaced;
5. The windshield washer relay does not work. Replacement required.
Checking the electric windshield washer pump ЭНЦ-4573756032
If there is liquid in the windshield washer, but it does not come from the nozzles, you need to check whether the pump motor is working. If it is in good condition, check the fuse, as well as the wiring, for which, after de-energizing the battery and disconnecting the pads from the pump motor, you need to connect the pump motor terminals directly to the battery terminals, observing the polarity. If the pump still does not work, it needs to be replaced.
To make a replacement, you must first remove the windshield washer reservoir, and carefully pry off the pump with a screwdriver, and then remove it.
Before installing a new electric windshield washer pump ЭНЦ-4573756032, replace its rubber seal.
Other article numbers of the product and its analogues in the catalogues: 21100520800900, ЭНЦ-4573756032.
VAZ 2110-2111, VAZ 2112, VAZ 2113-2115, VAZ 1117-1119, VAZ 2170, VAZ 2123.
Any breakdown is not the end of the world, but a completely solvable problem!
How to independently replace the windshield washer motor on a VAZ family car.
With the AvtoAzbuka online store, repair costs will be minimal.
Just COMPARE and BE SURE.
Don't forget to share the information you find with your friends and acquaintances, because they may also need it - just click one of the social networking buttons located above.
Installation process of fan nozzles
Typically, windshield washers on Grants are equipped with jet nozzles. Many car owners are not satisfied with jets of this design, and then the way out of this situation is to replace them with fan nozzles, especially since such manipulation can be carried out independently without any problems.
The procedure for replacing jets is simple and does not differ in any Lada car models. To carry it out, you must perform the following steps sequentially:
- Open the hood and remove the tube from the injector;
- Unscrew the nut using a 12mm wrench and remove the jet;
- Install the new injector by performing the above steps in reverse order.
After installing new jets, it is recommended to carry out one more modification to the washer - installing a check valve.
Homemade siphon
You can start the siphon (create the required vacuum) using either a large medical bulb or a device from any sprayer shown in the photo. You can start the siphon (create the required vacuum) using either a large medical bulb or a device from any sprayer shown in the photo.
Having completed all the above operations, refill the heated antifreeze liquid. We repeat the procedure as many times as necessary to completely defrost the tank. Try not to turn off the engine, but be careful not to be poisoned by exhaust gases. That is, in a confined space - a small garage, for example - the engine should not run.
Next, you should take care of the windshield washer pipes and nozzles. If you used engine compartment heating, the hot air will warm these parts and components. You can also use a household hairdryer, but after defrosting the tank, you can immediately spray them with high-quality anti-freeze. And frozen injectors can be saved with a glass and lock defroster. Better warm, brought from home.
In conclusion, I would like to remind you that it is easier to prevent a disease than to treat it. I wish you a clear road and an excellent view!
What to do if the washer is frozen?
How to drain the washer fluid reservoir
Vintage cars had a lot of free space under the hood, and the driver can easily remove the pump, remove the fluid supply hose, pull out the washer reservoir and drain the fluid.
Modern models have become more complex and now, in order to remove the washer reservoir, you will have to remove several additional parts. But even in this case, there should not be any special problems with draining the liquid.
Let us remind you that the equipment of modern cars includes a standard pump in the washer system, which means it can be used to pump out the remaining water.
Another way is to use a small piece of hose. By placing one end of it in the washer reservoir and creating artificial pressure, you can pump out the remaining liquid.
How to drain?
This also cannot be done with one piece of advice for all car enthusiasts, since each car model has its own system for cleaning the windshield and car headlights. The easiest way to drain cars from the last century. The body shape of such cars did not strive much for aerodynamic perfection; there was a lot of free space under the hood. Therefore, to replace it, it was enough to remove the washer pump, remove the reservoir from the bracket and drain its remains. It is very difficult to call the engine compartment of modern cars free, so the place to install the washer reservoir, and the shape of the body of such products, can be the most unexpected. In some models it is installed in the area of the front bumper, in others near the radiator, and in some, such as in Renault Logan, under the protective grille near the windshield. Among modern cars, this is easiest to do on the domestic VAZ Priora and Kalina models, in which they are installed in accessible places. In other models you will have to suffer a little, since in some cars you will need to remove the front wheel and fender liner, and in others you will also need to remove the bumper. But you can avoid such “showdowns”; let’s talk about this in more detail.
The easiest way
, is to use the standard washer pump, turn it on and wait until it pumps out the remaining liquid. Unfortunately, this is not always possible, since a long period of its operation can lead to damage to the electric motor. Therefore, this method can be used with a small amount of liquid in the tank. If there is a lot of it, in some models its volume can be more than 5 liters, it is forced to be drained.
To do this, you need to find a thin transparent (more convenient, since the pumped-out liquid is visible) hose, and pump out its remains in any available way. It is quite difficult to achieve an absolute result, but it is not scary. The work does not end there, since you still need to get rid of residues in the pipelines, especially in those models where the flush also works on the rear window. This can be done using an air compressor. To do this, disconnect the tube from the pump and supply compressed air to the system, but you must not abuse its pressure so as not to damage the pipelines. As you can see, there are no particular difficulties in this. We tried to tell you how to drain the washer fluid in accessible words. It is impossible to describe all the features for a large number of models. However, if you take this article as a basis, you can drain the “anti-freeze” from any model.
How to make your own summer washer fluid - homemade recipes
One of the simplest recipes known to everyone is adding dishwashing detergent, such as Fairy, to regular or purified water. Do-it-yourself summer washer fluid like this will really give the desired effect, but in order not to be disappointed in it right away, you need to correctly calculate the volume. So, under no circumstances should you pour the product onto the eye. And you definitely can’t add it directly to the tank right away.
Adding a few drops to the tank won't change anything. However, if you splash the glass without looking, the liquid will foam, and it will simply be impossible to use the system for its intended purpose. If you pour the product directly into the tank, it will simply settle at the bottom. So you need to calculate the required amount in advance - this is 1 ml per 1 liter of water. Next, all this is mixed in a plastic bottle until the detergent is completely dispersed. And only then does this resulting cocktail go into the tank, where it begins to serve its intended purpose.
Some will say that this volume is too small and there will be no effect. But that's not true. After all, it is in this proportion that the product will not produce foam or stains on the body, but at the same time, dirt on the glass will come off with ease. This liquid will cope especially well with greasy pollutants; they will not linger even for a couple of wiper strokes.
However, why fat? After all, there are no oil rains on our planet yet? This is no coincidence, because in practice, exhausts, oil emulsions and fumes from asphalt turn out to be precisely greasy dirt that must be removed accordingly.
There is another effective option, which turns out to be especially relevant in the off-season, but when the temperatures do not yet require anti-freezing. So, dirt and slush, as well as insects, are perfectly removed with a washer, to which ammonia is added. After all, this component is indeed often used in window cleaners, for example. If you take into account 5 liters of washer fluid, you need to add 40 or 50 ml of ammonia there. As a rule, bottles sold in pharmacies contain 100 ml. So there is enough money for two refills. In practice, this option is considered to be even more effective than the first.
Nuances
- Select the temperatures at which the liquid should not freeze in accordance with seasonal needs.
- For summer time, there is a special liquid, the composition of which easily copes with adhering insects.
- You should purchase glass liquid only in a specialized department.
- An adequate price must correspond to the quality of the product.
- The product is non-toxic, as it is used for external use, inhalation of vapors is possible.
Rational use and timely replenishment of fluid in the windshield washer reservoir will save you from problems associated with limited visibility.
Tips from this video will help you drain windshield washer fluid without any problems:
Lada Granta windshield wiper and washer repair
The windshield cleaner and washer are removed for replacement and also for repairs.
We prepare the car for the job. Disconnect the negative terminal of the battery.
Using a Torx T20 screwdriver, unscrew the screws and remove the right windshield trim
Use a felt-tip pen to mark the position of the wiper blades on the windshield
Use a screwdriver to pry up the decorative cap and remove the cap from the brush lever
Using a 13mm socket, unscrew the nut securing the brush lever and remove the washer and lever along with the brush from the shaft
Using a Torx T20 wrench, unscrew the two screws securing the left facing
Removing the left facing
Press the block retainer and disconnect the gear motor wiring block from the instrument panel wiring block
Using a 10 mm spanner, unscrew the nut securing the cleaner
Using a 10mm socket, unscrew the two bolts securing the purifier
Remove the windshield wiper from the plenum box
We remove the wire holder from the hole in the plenum box and remove the cleaner from the engine compartment
Use a felt-tip pen or marker to mark the position of the crank relative to the gearmotor shaft
Using a 13mm socket, unscrew the crank fastening nut.
Remove the crank from the gear motor shaft
Using a 10mm socket, unscrew the three bolts securing the gear motor
Remove the gear motor from the bracket
Install the gear motor in reverse order.
To install the gear motor shaft in the correct position, connect the gear motor wire block.
We put on the negative terminal of the battery and turn on the gear motor using the steering column switch.
After this, turn off the gear motor and wait until the gear motor shaft stops.
In this position, install the crank according to the previously applied mark.
If we are installing a new gear motor, install the crank so that point “A” of the crank center line is in line with the trapezoid hinge.
We carry out further installation in reverse order.
How to drain water from a washer barrel - step-by-step instructions with photos and videos
In order to say with 100% certainty how to drain water from the windshield washer reservoir, you need to know the make and model of the car. Since each car model has an individual technical structure. The technical documentation contains information about the process of replacing windshield washer fluid.
However, one method is definitely suitable for all brands - this is spraying water through nozzles. This option is very simplified and, at the same time, complex. It is recommended to use it only if there is not much liquid left in the tank, and there is no time to go to a service center to drain the water.
The easiest way to get rid of water in the reservoir is to drain it through the nozzles, but this method can “kill” the washer motor
This method is simplified in that you do not need to have any repair skills; it is enough to be able to activate the windshield washing mode.
The complexity of the method lies in the fact that it is strictly not recommended to wash the windshield without stopping - it is necessary to periodically give the pump a rest. If the washer reservoir is filled to the top, you will have to spend a lot of time, preferably more than one day. The problem that you may encounter using this method is the washer motor failure due to overheating.
The second way is to drain the water using the washer hose. In cars such as Mazda, you can use this method with ease.
The instructions are as follows:
- Remove the windshield wiper blades - they usually snap off. This is necessary so that during the process of draining the water, the brushes do not rub the windshield “dry”.
- Wrap rags around the windshield wiper arms to avoid scratching the glass.
- Open the hood.
- Prepare a container into which the water will be drained. You can use a 5 liter bottle.
- Get close to the hose where it branches into the washer nozzles. It is attached to the inside of the hood.
- At this point, disconnect the hose and lower it into the bottle.
- You need to start the car engine and activate the windshield washer mode. At this time, the water should drain into the container.
- In the end, you need to put everything in its place.
The next method is to drain the water directly from the washer reservoir. Drivers of Skoda Octavia cars (and many others, but with some differences) can easily use this method.
The stages are as follows:
- In order to get to the tank, you need to open the grille in the bumper in two places. Start opening the first grate at the middle rib. It is enough to pull towards yourself. The second one is obtained in the same way.
- Behind the left grille is the washer reservoir.
- The washer motor is located in the reservoir. To drain the water you need to unscrew it. Water should immediately begin to flow out of the hole into which the motor is screwed. It is worth clarifying that the water only drains up to the hole.
- At the end of the draining, all parts must be installed in their places.
- Now you can add windshield washer fluid.
In the methods described above, it is noticeable that no special tools need to be used. However, in some brands of cars, in order to drain the water, it is necessary to remove the bumper, because The washer reservoir and hoses are located deep.
Video on how to drain the washer fluid reservoir:
In conclusion, I would like to clarify that water, of course, can be used, and it is better if it is distilled water. Thousands of drivers do this every day, but you still shouldn’t replace windshield washer fluid with water.
The water does not contain the lubricating elements that are necessary for the long life of the washer motor. Water does not cope well with contaminants and will not wash away insects.
Often, when the driver does not expect negative temperatures outside, he does not have time to replace it with an antifreeze fluid and the water freezes in the tank. Because of this, not only is it impossible to wash the windshield, but there is a risk that the tank or hose may rupture.
If you run out of windshield washer fluid and only have water on hand, you can top it up to get to your destination. But then you should fill in a specialized liquid. It is worth understanding that savings should always be reasonable, and not to the detriment.
Is it possible to pour water into the washer reservoir?
Water is usually used instead of windshield washer to save money. Water is usually poured into a tank from the tap, with the thought of saving. At least that's what drivers think. At first glance, this is exactly what it looks like. But I would like to reveal the second side of the coin.
If you pay attention to the structure of the windshield washer fluid, you will notice that it is a little “greasy,” so to speak. Thanks to special components, when supplied, the liquid lubricates the pump parts. Water does not have this function. This helps reduce the life of the pump. At one point, the pump may jam and stop working.
Using water instead of washer may adversely affect the operation of the windshield cleaning unit.
Don't forget that tap water contains chlorine. Due to this, deposits form in the tank and on the hoses. In addition, the water may even bloom in the tank, which will lead to clogging of the nozzles. Paying attention to such facts, it is worth thinking about the reasonableness of such savings.
Attention!
In winter, using water instead of washer fluid is strictly prohibited , since it can freeze at any time - both when using it, on the windshield, and in the barrel itself, which will lead to its breakage.
Reasons to drain the washer fluid
Some motorists who have only recently been behind the wheel do not understand why their other colleagues drain the fluid from the tank almost every season and fill in a new one.
There are several reasons to consider doing the same:
Niva with a trailer: what options you can choose, reviews from owners
Category: Light trailers
- the water in the washer is frozen, and frozen water cannot be used in any way;
- if it is ordinary water, when the temperature drops it can cause serious problems;
- tap water clogs the windshield washer nozzles;
- There are often fakes on sale that are best removed from the system immediately;
- if mixed incorrectly, a chemical reaction may occur and the antifreeze will turn into jelly;
- there is a possibility of failure of the washer motor;
- The liquid is old and no longer copes with its tasks.
There are more than enough reasons. Therefore, the driver will have several compelling arguments in favor of draining the old fluid and pouring new fluid into the tank.
Many people don’t want to dismantle numerous components just to get to the washer tank and pour out all the remnants of the composition.
Therefore, it is important to look for alternative ways to solve this issue. Please note that every car is different and may have a slightly different reservoir location.
Check your owner's manual, or just look under the hood. Assess how easy it will be for you to dismantle the unit if you have:
- Lada Granta;
- Hyundai Solaris;
- Volkswagen Polo Sedan;
- Lada Vesta;
- Skoda Octavia;
- Ford Focus;
- Renault Logan;
- VAZ 2114;
- Skoda Rapid;
- Kia Rio;
- Mercedes C class;
- Mitsubishi Galant, etc.
I propose to separately consider several methods when the washer is in a liquid aggregate state, as well as in situations where it is frozen. To drain, you will first have to defrost the composition.
The nuances of operating the device “by season”
What you need to know about operation:
- In the warm season, it is allowed to use a washing solution or water with the addition of a special additive.
- In winter, you need to fill in a special anti-freeze liquid, since the water can freeze and ruin the container itself. You can find the appropriate fluids in domestic auto stores.
- Use heated washer fluid reservoir. As practice shows, most cases of cracks in tanks are due to consumables freezing in them. To prevent this, you can use a heated washer reservoir, which is installed on cars as standard or as additional equipment.
What is being put into the system?
In the last century, drivers could give only one answer to the question of what was poured into the washer reservoir: it was simple water. At that time, we had not even heard of special liquids for these purposes, and the glass washer system itself was not installed on all cars. An increase in the number of cars on the roads, changing climatic conditions, ensuring traffic safety in bad weather conditions and other factors forced developers to pay more attention to the development of this system.
In addition to cleaning windshields, dirt flushing systems for headlights have also appeared. Instead of water, special liquids began to be poured into the system, which contain chemical additives that improve the quality of glass cleaning, do not leave streaks, because they can impair the view of the road surface while driving, and also do not freeze when cold weather sets in, which is important for areas with long and cold winter.
Ways to defrost the washer reservoir
Warming up the glass cleaning system means increasing the water temperature to “above zero”. Depending on the means at hand, the amount of free time, the degree of difficulty, that is, the amount of ice in the container, a convenient option is selected to warm up the washer reservoir.
Most Popular:
- heating in a warm room;
- hot water;
- frost-resistant cleaning mixtures;
- alcohol;
- defrosting the container separately from the machine.
Increase in air temperature
You can drive into a warm parking lot, visit a car mechanic (at the same time the car will warm up), check the weather forecast (if it was the first frost, it may thaw on its own in a couple of days, and there is no need to rush).
It's difficult to guess with the time spent. If there is little water in the glass cleaning system and the room is warm enough, then everything will go quickly. Conversely, it can take several hours if the water is frozen with a large piece of ice. Then you can speed up the defrosting process.
Hot water
Dealing with a large massive piece of ice, even with hot liquids, is difficult, but it is possible with patience. You should pour regular boiling water into the washer tank to the brim.
You need to be careful with boiling water. The windshield washer container is made of plastic. Hot boiling water can warp it.
Periodically you need to check the degree of defrosting. If you can spray liquid, that’s good. In this case, everything is poured onto the glass. If this does not work, and the water has cooled down greatly, you need to drain the cooled water and add hot water again. You can drain using a thin hose.
Then you should definitely replace the water with a non-freezing seasonal version of the purifier.
Anti-freeze
The entire procedure described above can be done with warm non-freezing liquid. It will melt the ice on its own, especially if it is a high-quality and concentrated liquid, and by heating it additionally, for example, on a heating radiator or in a water bath, the effect can be enhanced.
Moreover, if initially there was little frozen water, and the temperature outside is not yet too low, the resulting mixture does not need to be changed. The result is simply a diluted cleanser that does not freeze at a different temperature range. True, it is difficult to find out this range.
Alcohol
From a chemical point of view, industrial alcohol is perfect, and defrosting the ice will be successful. This component is included in most frost-resistant cleanser formulations.
It is difficult to find isopropyl or formic in the required volume, but ethyl is widespread everywhere. This is regular medical alcohol or its diluted version - vodka. Although from an economic point of view the option will be more expensive.
The procedure is no different from those described above. If it is not vodka that is poured, but concentrated alcohol, then as a result of mixing it with water in the tank you will get a homemade non-freezing “washer”.
Blog of Evgeniy Nikolaenko
The hydraulic accumulator is the heart of an autonomous water supply system. Condensation on the hydraulic accumulator , pipes, drain tank and filters is a fairly common problem in private houses with autonomous water supply, especially in the summer, when the air is saturated with moisture and the air temperature is much higher than the temperature of the water in the well. It is the temperature difference and high humidity that are the main reasons for the settling of water droplets on the pipes, tank and accumulator. This article will discuss 3 interesting and effective ways to combat condensation on a hydraulic accumulator, aquachief 1252 filter column and toilet flush cistern.
In my house, the accumulator is located right in the bathroom, and since the humidity there is always high , the amount of condensation even in winter forces us to take measures to remove it. As a rule, when there is excessive accumulation of moisture on the elements of the water supply system, water flows onto the floor, and entire puddles , which constantly have to be wiped off.
Condensate on the hydraulic accumulator
How to remove condensation from a hydraulic accumulator
At first there were attempts: to wrap the accumulator with thermal insulation materials to reduce thermal conductivity; use industrial devices to absorb moisture from the air; dry the air with heaters. But in all cases the result was negative . The process of water transition from vapor to liquid state could not be stopped. After some time, it became clear that fighting the very cause of condensation was useless and even pointless, so it was decided to direct all efforts to combat the consequences of this physical phenomenon.
And then I asked myself the question - what displeases me most in this situation? The answer was quite simple - I didn’t want to crawl around every evening with a rag and wipe the floors, squeeze the water into a bucket and then pour it down the drain.
Then I remembered that somewhere on the veranda an old kitchen stove with a set of baking trays was gathering dust. Why not try placing a baking tray under the accumulator? Brilliant thought
Source