Every car owner has encountered a situation where a fuse in a car has blown and part of the electrical equipment does not work. The complication of the machine design led to the introduction of additional electronic elements interconnected. Fuse links located in the engine compartment and passenger compartment de-energize circuits during short circuits, preventing fire or damage to expensive components.
Main reasons
Each fuse is responsible for the stable operation of certain electrical circuits. If the low-melting element melts, then some kind of malfunction has occurred. Sometimes such situations are isolated, that is, after replacing the fuse, the problem does not recur. But often it turns into a trend.
Experts identify several main reasons why protective fuses burn in a car. If you understand the reason and find the source of the trouble, you will be able to return the machine to normal operation.
- bad connection. It is possible that during installation or during operation on uneven roads, the quality of contact between the fuse and the block was impaired. Sometimes it’s all about the quality of the products themselves, which are not able to guarantee a tight connection. In this situation, the best solution would be to purchase higher quality security elements;
- wear. There is a fairly widespread opinion that the first time the load on the fuse is exceeded, it immediately fails. This is not entirely true. When the situation is critical and the load is really huge, the fuse element is immediately destroyed to break the circuit. But when the load is only slightly higher than normal, the fusible component gradually fails. The cross section decreases, and as a result, after several load sessions it finally burns out. Since fuses are consumables, they tend to fail without causing serious problems in the car itself;
- wrong choice at face value. Each fuse has its own rating. This is the current strength that he is able to pass through himself. If an element with an incorrect value is installed, it cannot withstand the load acting on it and quickly fails;
- sudden surges in voltage. If a sharp surge occurs in the electrical circuit for which the fuse is responsible, the element melts and fails;
- disturbances in the current path. Each fuse is designed for a specific load and is installed on the electrical circuit corresponding to its rating. If you shorten the length of the circuit, the resistance will decrease, and the fuse will pass a higher current through itself. On modern cars, electronics are not designed to withstand overloads. Therefore, special sensitive protective elements are installed in their electrical circuits. Under critical loads, they melt and break the circuit, thereby protecting the equipment from breakdowns.
The article was written for those learning the basics of repair.
Is the input fuse in the power supply blown? Let's figure out the reasons and how to properly diagnose. We will also touch on a couple of related topics when analyzing this malfunction.
I think many have encountered this situation when we turn on the device but there is no reaction, and after a short diagnostic we identify a blown mains fuse. And it doesn’t matter whether it’s the computer’s power supply or the power supply board for a copier or fax machine. Naturally, many people immediately change it or, even worse, put a jumper and immediately turn on the device. And here, with a greater degree of probability, it will burn out again or knock out the machine guns in the shield. Let's take a closer look at what's going on and why you can't change the fuse without diagnostics.
First, let's take a look at the typical input circuit in switching power supplies.
As you can see, fuse FU1 is the first in the circuit, and its main function is protective. But, this is not protecting the internal components of the circuit from overvoltage, but protecting the entire board from short circuiting these same components, and ultimately preventing ignition inside the device.
Therefore, when the mains fuse in the input circuit burns out, this does not mean that there was an excess of the supply voltage, but a short circuit in the circuit after the fuse. And as a rule, in 80% of cases, if you restore the circuit by inserting a new circuit breaker and measuring the resistance at the input of the block between contacts L and N, you will find a resistance equal to zero or slightly more.
A blown fuse is a consequence, so as soon as we discover that it is faulty, we begin diagnostics.
We start diagnostics from the input, the first on the list is varistor VR1, they look like this in general:
So they just perform the function of protecting the power supply from voltage surges. Their essence is that when a certain voltage threshold is exceeded, they begin to pass current through themselves, protecting the rest of the circuit. Several scenarios are possible:
1. The input voltage pulse was insignificant and the varistor, when triggered, absorbed it and dissipated it into heat, which is why the datasheets on them indicate how much power they can receive.
2. The input voltage pulse was stronger, and the varistor, having closed the circuit, led to the formation of an increased current flowing through the fuse, which burned out. In this case, the varistor was not broken and remained functioning. In this case, replacing the mains fuse will restore functionality.
3. Long-term overvoltage. In this situation, a thermal breakdown of the varistor occurs, leading to a short circuit. As a rule, this can be seen with the naked eye in the form of splitting, blackening, and so on.
But the defect can also be hidden, so if there is a short circuit in the circuit, then we unsolder it first and check it. If there is a defect in it, then we have a choice, not to solder it back at all, this will not affect the performance of the circuit, but next time something else will burn out, and replace it with an analogue one. I advise you to always install a new one.
Unfortunately, varistors are not available in all power supplies. It is also worth noting that it can be located in the diagram either before or after the chokes, and can be designated as you like.
Let's look further: Capacitors C1 and C4 are used to suppress low-frequency differential interference, with a capacitance of the order of hundreds of nanofarads and a voltage of 250 volts. In the diagram it can be designated as Cx, and have a rectangular appearance. It is a film type and almost never fails. But it's still worth checking.
Choke T1 - serves to suppress common-mode interference. Despite the fact that the windings may be located on the same magnetic circuit, the phase windings are spaced apart from each other at a distance, and there should be no short circuit. But winding breakage may occur. In this case, this clearly indicates a short circuit in the circuit further.
Capacitors C2 and C3 also act as a common mode filter. Breakdowns happen, but it looks a little different, since at a common point they are connected to the device housing, then in the absence of grounding, an electric shock will be felt when touching the metal parts of the housing. Thermistor T - performs the function of limiting the starting current when the device is connected to the network. The essence of the thermistor is that in a de-energized power supply and at normal temperature it has a high resistance; when voltage is applied, the thermistor heats up and its resistance decreases to zero. This ensures a smooth start of the power supply.
And so, we have looked at the main elements of the so-called input filter, but it is worth considering that this is only an approximate circuit; various manufacturers can modify it, for example, eliminating capacitors, replacing chokes with jumpers, eliminating varistors and thermistors. In some devices, on the contrary, a complication may be observed in the form of additional varistors between ground and phase. When checking elements for breakdown, be sure to unsolder them; checking for a short circuit in the circuit is pointless.
Now let's move on to the next component:
Diode bridge D1-D4. According to statistics, the cause of a short circuit in the input circuit holds the leading position. Moreover, it can be made either in the form of four separate diodes or in the form of an assembly.
It doesn’t make sense to check in the circuit, so we unsolder and look for a breakdown, we also check the voltage drop is normal from 400 to 600, but the exact information is in the datasheets on them. The main thing is that these values do not differ for each diode or junction in the assembly by more than a few units. The reasons for the failure of the diode bridge can be either a breakdown due to excess voltage or current, or degradation of the np junction over time.
In the circuit after the diode rectifier there is a network capacitor C5, with a voltage of usually 400 volts and a capacity of 40 to 200 microfarads. It can also cause a short circuit due to a breakdown between the plates. To check it, you also need to remove it from the circuit, and care should be taken, since a working capacitor can store a charge for a long time. To check, you already need a special LC meter device. Having previously discharged the capacitor, we check its capacity and leakage current. Although it is possible to visually determine the malfunction in the form of swelling, or, if you rub it, in the form of tapping inside, this method cannot show hidden defects.
And the last stage of the test will be to measure transistor Q1 for breakdown. In the above figure, the transistor control circuit is omitted, so depending on the layout, it would be a good idea to check its wiring. And by the way, if it is broken, then before changing it, you should understand in more detail the control circuit of the transistor and the transformer next to it for an interturn short circuit.
And we come to the conclusion:
Only after carrying out all these checks in the circuit and replacing faulty components can we install a fuse of the same rating and turn it on.
I hope the article was useful.
What to do when a fuse blows
Novice motorists are naturally interested in what they need to do in situations when a car fuse blows.
Remember that the cost of these elements is significantly lower than the price of the equipment they protect. These are actually cheap consumables. You can purchase them as a whole set and always keep them on hand in case problems arise, the old device burns out and requires replacement.
Don't worry if the fuses blow. This is an absolutely normal situation for any car, regardless of the make, model, year of manufacture, etc. That is, this happens both on old cars and on brand new expensive foreign cars. No electrical circuit has 100% protection against current and voltage surges.
But you need to react completely differently when burnout becomes regular and constantly repeats even after replacing components. In such a situation, you should diagnose the car and check what is wrong in the electrical system. Moreover, it is strongly recommended to begin diagnosis as soon as possible after the first symptoms are detected.
If you installed a new fuse and it burned out almost immediately, then the car owner's task is to identify the source of the problem. To achieve the desired result, a number of activities should be carried out:
- Using the technical documentation for your vehicle, check which devices and equipment are connected to the problematic fuse. These instructions must indicate which fuse does what;
- now you need to turn on all systems and equipment for which the constantly burning protective element is responsible;
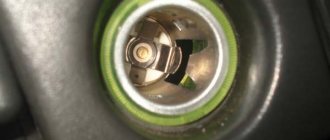
- take a screwdriver, the handle of which must be insulated. Use a metal part to touch the terminals on which the fuse is attached in or outside the block;
- if a spark occurs at the moment of contact, there is some kind of malfunction in the electrical circuit;
- disconnect one of the previously switched on consumers, and then repeat the manipulations with the screwdriver;
- when, after turning off the next device, the spark disappears, this will allow you to determine the culprit. This is what causes your fuse to blow.
Since you have managed to identify the source of the trouble, the appropriate repair or replacement of the unit is carried out. Further work directly depends on what exactly is wrong. If possible, you can fix the problem yourself. In case of serious malfunctions, which you have years of experience in eliminating, it is better to contact specialists.
When the cause of blown fuses has been eliminated, you can finally install a new protective element and continue operating your vehicle.
Checking burnt elements
Motorists should understand how to check the fuses in their car. An overload in the electrical network does not always lead to failure of the fuses themselves. They are the easiest to check, so diagnostics usually start from here.
When an electrical appliance stops functioning, it is far from certain that the protective element is to blame. Here the most correct and rational solution would be to check the status of the device responsible for the faulty device in the car.
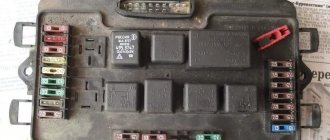
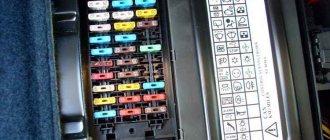
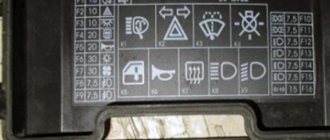
A fuse map will be a very useful tool in the diagnostic process. On all modern cars it is located directly on the cover of the safety block.
There are several main verification methods:
The simplest method is considered to be by replacement. You just need to install a new fuse in place of the potentially faulty device. But it is fair to consider this technique identical to visual inspection. After all, it is easier to determine by external aspects than to change each of the fuses located in the block in a row.
Visual inspection
Let's start with how to understand whether a fuse has blown in a car, based purely on the appearance of the element. This method is considered the most correct, since it is quite easy for many people to visually verify that a breakage of a low-melting component has occurred.
To check, you will need to remove the element, bring it to the light and look at it carefully. It will not be difficult for an experienced motorist to find out and understand whether the fuse in his car has blown or not. Beginners do not understand this right away, which raises several more questions regarding how to get an accurate answer.
A worn fuse is not difficult to identify. This manifests itself in the form of broken wire (low-melting alloy) or burnt marks. Symptoms such as these indicate that the electrical circuit has broken and the fuse needs to be replaced.
A similar testing method is relevant for those fuses that are made from glass or transparent plastic. Most of them are found in passenger cars.
But the method also has a significant drawback. The test is performed by a person, without the use of any instruments. In some cases, especially for beginners, a visual examination does not provide a 100% guarantee of a correct diagnosis. Therefore, it is much more correct and efficient to check fuses using multimeters.
Choose the right fuse
Since the fuse performs a very important function - it insures the car’s expensive electronics against failure, such a “protector” should be chosen extremely carefully. Taking advantage of the fact that when buying one or two “penny” protective devices, the majority of car owners do not pay attention to their quality, unscrupulous sellers or manufacturers try to sell goods that do not meet any quality standards.
Of course, it is very difficult to distinguish a quality product from “garbage” by appearance. You can use the following method to check. You need to connect one of the purchased fuses to the battery. A quality product will be indicated by its rapid burnout. If it starts to heat up and melt, using it in a car is extremely risky - if it is overloaded, the electrical circuit will not open, which can result in either failure of the electronics or a fire.
The other extreme, which car owners often resort to - the use of bugs, can lead to equally sad consequences. The designs of such devices can be very diverse - from wire wound around the ends of a burnt-out device, to a coin inserted as its replacement. Such “homemade products” pass current of any magnitude, since they cannot burn out, which leads to dire consequences, especially for foreign-made cars.
Recommendations for replacement
If you carefully study the instructions, there is nothing particularly complicated in the procedure for replacing the protective element. But it’s worth following certain rules and recommendations.
- Before removing a burnt-out device, make sure you have a new element available. It is the selection and purchase of new fuses that is considered the most difficult stage in the entire replacement work.
- By checking the functionality of all equipment, you will be able to identify the culprit of the incident with your car. Make sure that the problem is in the fuse, and replacing it will restore the car's functionality.
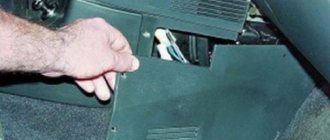
- Now let's move on to how to remove and properly pull out a blown fuse in a car. Anyone who has pulled out elements before is unlikely to encounter any difficulties. You can pull out the device using a special device in the form of pliers. Remove the device carefully, without jerking or tugging on the sides. Otherwise, you risk breaking the case, and the contacts themselves will remain in the socket. Getting them separately will be much more difficult. Previously, large fuses were used that were easily removed with your fingers. But the increase in their number in the car led to a decrease in the structures themselves. Therefore, it is better not to pick around with your hands and fingers, but to take pliers and use them to remove the problematic fuse.
- Check the element for functionality. Since visual inspection does not always give an accurate answer to the question of the condition of the fuse, the best solution is to use a multimeter. Modern fuses are made of transparent plastic or glass. The state of the low-melting thread is usually clearly visible through the body.
- Once the driver has taken the fuse with pliers and pulled it out, it is worth inspecting it. It is possible that there are other problems with the car, and this element has nothing to do with it. We remove it carefully in any case, even if the device is definitely out of order.
- Install the new fuse in its rightful place. Here it is important to adhere to the rule that a fuse with the same rating is inserted into the same socket. You already know about the consequences of choosing the wrong protective elements, so you definitely don’t want to risk the integrity of your vehicle.
- It is considered a big mistake not only to use fuses of a lower rating than required, but also to use a larger one. Some motorists believe that it is possible to replace a 30-amp device with a 40-amp element, which will supposedly be more stable, durable and reliable. But this is a mistaken opinion, which can result in expensive repairs. If the car manufacturer has provided that this socket goes into a device rated 10 Amps, and this socket is rated 40 Amps, install new fuses that way.
- For reinstallation, use the same pliers that were used to remove the burnt-out protective element in the safety block.
Upon completion of the work, you need to check all systems that have stopped functioning due to a blown fuse. If everything works, feel free to close the unit and continue to safely operate your car.
It will sound a little strange, but quite often situations arise when motorists install fuses in the wrong sockets where they should be placed. This can be explained by poor lighting, vision or memory.
There is nothing surprising here, since the nests in the block are very dense and close to each other. Because of this, you don’t always remember exactly where this or that element was extracted from. If in doubt, refer to the instructions or check the map on the safety block cover. This will save you from unwanted mistakes.
How to identify a blown fuse
Before identifying a blown fuse in a car, you should prepare a tester or indicator screwdriver. The first method of checking involves removing it from the socket, visually inspecting it and checking it with a tester. It is almost impossible to visually determine the performance of such a device, so the use of a tester is mandatory. The handle of the device is installed on the diode sign, the probes are applied to the contacts.
With the second method of checking, there is no need to remove fuses from the socket, which is more preferable for most car owners. Before checking, you need to turn on the circuit in which the malfunction is noted - for example, turn on the radio or headlights. After this, using an indicator screwdriver, you must alternately touch the terminals of one terminal of the “protector” being tested, then the other. If there is voltage on the first one, but there is no voltage on the second one, a burnt-out device has been found.
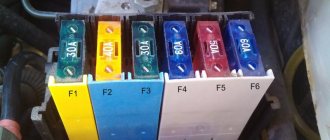
It should be immediately noted that it is highly advisable to have a spare set of fuses of different ratings, and before replacing a fuse, you must select exactly the same rating. If a lower value is selected, the fuse will blow; if a higher value is selected, consumers connected to this circuit will suffer. For ease of quick replacement, all “defenders” have a different color, corresponding to their “power”.
Automotive fuses and their classification
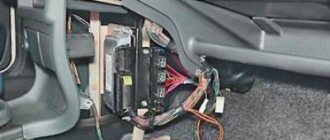
On a car, most fuses are located in blocks. Most often there are two or more fuse boxes on a car. One of them is located under the hood or in the luggage compartment area. It is called the main one and includes the largest number of fuses. The other unit is located under the front panel in the passenger compartment, but in different places for all cars. Also, fuses can be located separately throughout the machine - 1, 2 or 3 pieces.
Automotive fuses are classified according to two parameters - size and rated operating current.
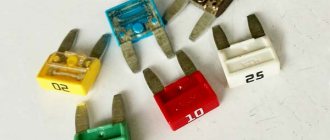
When choosing a car fuse, you should pay attention to the size:
In addition to the size, when purchasing a fuse, you should know its current rating. Most often, elements are installed in cars that have a rated current of 5 to 30 A. The easiest way to determine the fuse current is by its color, and below is a table that shows how the color and rated current of the fuse are related.
Replacing fuses yourself
Replacing a burnt-out device with your own hands is a matter of just a few minutes. Naturally, in order to avoid subsequent replacement of the entire fuse box, this simple manipulation should be taken with full responsibility. After accurately identifying the source of the problem, replacing the fusible protector should begin with selecting a new one that exactly matches the damaged one. For ease of “identification”, all devices have a different color - in accordance with their power.
It is best to purchase fuses in advance, without waiting until one of them fails. At the same time, you should be based not on your own preferences and cost, but on the recommendations of the manufacturer. If they are not available for sale, it makes sense to place an order and wait a little rather than put your car and yourself at risk. As a last resort, temporary use of fuses of suitable size and characteristics is allowed. A detailed algorithm of actions for correctly replacing a faulty fuse can be seen in the video:
How to check a fuse in a car
If a circuit in a vehicle is overloaded, one or more fuses will interrupt the circuit and fail. However, if an electrical device stops working, it is far from certain that the problem is in the fuse. In this case, the right solution would be to diagnose the element in the fuse box that is responsible for a specific electrical device.
It is easy to determine which fuse has failed using the car's instructions. It contains a “map” that shows where the elements responsible for a particular electrical device are installed in the fuse box. This map determines the location of the fuse, due to which the circuit of the electrical device could be de-energized, and then it is necessary to diagnose it. In modern cars, the card is located directly on the fuse box cover.
Visual inspection of the fuse
It is believed that the surest way to check a fuse is to visually inspect it for a break. To do this, the fuse is pulled out of the block and then examined in the light. If the wire inside is broken or there are burnt marks on it, then the circuit is broken due to the fuse.
This method is applicable for glass or transparent plastic fuses, which are the majority. However, the method has a significant disadvantage - it is based solely on human verification and does not have confirmation by a device. Visual inspection sometimes turns out to be erroneous, and it is better to use a tester to determine the integrity of the fuse.
How to check a fuse with a multimeter
To test a circuit element, a common device is used - a multimeter, also known as a tester. The device is indispensable for the car enthusiast, and it allows you to check the car fuse in two ways.
Voltage test
To diagnose a faulty fuse in a car circuit, you must:
Take a multimeter and set it to voltage measurement mode;
- Next, turn on the car circuit with which problems are observed - light, heater, mirror heater or another;
- After this, check the voltage at one terminal of the fuse responsible for this circuit, and then at the other terminal;
- If there is no voltage at one of the terminals, the fuse has blown and will need to be replaced.
This method is good for its simplicity, and in just a few seconds it allows you to determine if there is a problem with a fuse or other element connected to the circuit. However, it also has a disadvantage; using this method it will be difficult to measure the fuse voltage in some circuits, for example, a door lock or an audio signal. It is easier to do this using the second method described below.
Resistance test
A faulty fuse can be diagnosed by its resistance. To do this, you need to remove the element from the machine and switch the multimeter to the mode for measuring electrical resistance (Ohms). After this, the tester leads are connected to the fuse terminals, and if zero electrical resistance is displayed on the screen, it means the element is faulty and needs to be replaced.
It is believed that a failed fuse can be replaced with a wire that can restore the electrical circuit. This is true, but this method of “repair” is extremely undesirable. By installing a wire in place of the fuse, the motorist does not solve the problem, but only complicates it. In emergency cases, this is acceptable, but if you “ride on a wire” for a long time, the car’s electrical wiring will begin to melt, which can result in expensive repairs.