Comments: no Published: 12/14/2015
Rating:
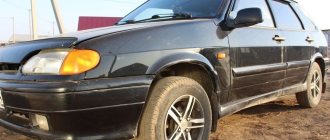
Painting any part of a car is a fairly common procedure for employees of every service station, and the reasons for painting can be a variety of events, from bad parking to scratches from trees or bushes. Sometimes, as a result, the scratch is also accompanied by a noticeable dent, which is very important to get rid of even before painting it yourself. Today we will get acquainted with the theoretical and practical sides of getting rid of damage to the fender of a car, which will allow you to refuse to purchase a new one.
The painting of the wing and the amount of work required is always determined by the current condition of the part, therefore:
- if the damage affected only the top layer of paintwork, then this place can simply be polished with high quality;
- If the scratch is deep enough and has affected the primer layer, or, worse, the metal, then repainting is necessary.
Scratches on the fender of a car
It is logical that you will have to spend the bulk of the time allotted for repairing the fender with your own hands on the preparatory processes. The quality of the final result, when the repaired wing looks like new, directly depends on the preparation performed. These works include:
- preparing the work space - it is best to carry out painting in a spacious room;
- thorough washing and drying of the car;
- Covering all adjacent areas of the vehicle with protective film.
Ideally, the fender can be removed from the car, which will make painting the fender faster and easier, but this is not necessary.
What should you consider when painting a wing yourself?
The biggest problem you can encounter when painting a wing is dust. It may not be noticeable to the naked eye, and the garage may seem clean, but when exposed to a spray gun, it rises out of nowhere, subsequently creating a sandpaper effect on the painted fender. Therefore, when painting a car fender with your own hands, you should pay special attention to cleaning the room - thoroughly vacuum and wash the floor.
We paint the new wing strictly in overalls, which should include rubberized gloves and a mask. This way you can minimize exposure to harmful substances when inhaling paint and working with solvents.
Preparatory procedures, how to paint correctly
If you decide to carry out all the repair work on your own, then you should do everything as soon as possible. Once you discover damage, do not delay the process, as the problem may get worse.
Once the scratch reaches the metal, the oxidation process begins, leading to rust and corrosion. Because of these defects, more serious work will be required.
Before painting, the car is cleaned using conventional detergents. You need to wait until the surface is dry and then degrease it.
For this, special wipes and solvent are used. After saturating one napkin with it, wipe the surface dry with the second. To ensure greater comfort, you need to remove the part that will be worked on.
All other areas of the body that cannot be painted are covered with protective film and masking tape.
To prevent painting defects from appearing, a special chamber is needed; the room must be completely clean of dust and other contaminants. Lights, like devices, should be directed toward the work surface to avoid glare.
Work should not be carried out outdoors, as exposure to sunlight will negatively affect the result. At high temperatures outside, only the first layer is subject to drying out; it will take longer to wait for complete drying.
Therefore, before applying a new layer, wait until the previous one dries.
Before spraying the can, you should shake it well. Try not to go overboard and cover up the rest of the components.
If you are not sure of the result, then you can try your hand at an old part that you have.
Don't forget to follow the existing instructions and stock up on the following tools:
- paint,
- sandpaper of different levels,
- putty and primer,
- antisilicon,
- polyethylene,
- masking tape,
- elements for protection.
When doing all the work yourself, be sure to consider hand protection; use a rubber or silicone spatula so as not to cause unnecessary damage to the surface.
The work of the aerosol begins only after the primer has been applied, dried and polished.
Stages of work execution
Painting work includes several stages, which must be performed strictly in the order in which they are indicated. Before you paint a car fender with your own hands, you need to properly prepare it. The surface must be perfectly clean and smooth, without any visible defects.
Before painting the wing, it is necessary to properly prepare it
It is worth not forgetting about workplace equipment. It is impossible to carry out work in poor conditions; the room must be clean and well ventilated. Dust is the main enemy of fresh paint.
Depending on the damage to the fender (scratches, dents or corrosion), the list of work may vary, but there is still one constant rule - the car must first be washed and dried. If the design of the car allows you to remove the wing, then it is easier to unscrew it and paint it separately.
A universal list of painting steps is given below.
Preparing and polishing the wing
Before restoring and painting the wing, it is necessary to carefully sand the damaged areas or the entire part as a whole.
How to grind correctly? You need to start from the places where the filler was previously applied. The abrasive wheel P80 – P180 is designed for them. Next, they move on to medium-grain sandpaper (up to P320) and treatment of the entire surface to smooth out the marks of primary sanding. At the completion stage, proceed to sanding with fine sandpaper. If necessary, stripping is carried out down to metal.
When sanding by hand, you need to apply proper pressure to the surface. Movements should be linear, not circular. Otherwise, large scratches will remain on the surface of the wing.
Sanding the wing before painting
Prime and putty the surface
After sanding, the wing must be puttied, after which the resulting smooth surface with a minimum number of open pores will be obtained. During the puttying process, the wing must also be sanded. To achieve an ideal result, more difficult areas must be sanded by hand.
You can do this as follows:
After puttying, it is necessary to apply the primer with a spray gun in 2-3 layers at a working pressure within 3-4 atmospheres. Adjust the torch so that it resembles the shape of an elongated oval. Before priming, be sure to do a test on a test surface.
Apply layers with a break of 5-10 minutes (until one layer dries). The first layer should be thin, and the second should be denser.
Leave for 24 hours, then sand the top with P500 – P600 sandpaper if the part will be painted metallic.
Puttying the wing before painting
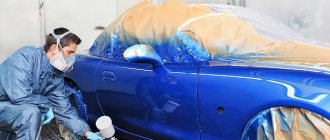
Painting
The painting process itself is much easier than the preparatory stages. Before you start painting, you need to decide how much paint you will need. On average, it takes 150-200 g to paint one wing, if we take test paints into account.
How to paint a car fender:
Typically, drying times vary depending on the paint used. It is usually indicated on the packaging. For example, acrylic paint dries in about 10 minutes.
Varnishing
The last step in painting the wing is varnishing. The varnish is applied after all layers of paint have dried. It will turn the coating into gloss and protect the paint from rapid abrasion and fading.
The varnishing process depends entirely on the type of varnish used. In addition, weather conditions are taken into account. If varnishing is carried out in winter, the holding time increases significantly.
The process of painting a car wing will not take much time.
If the wing defect is small, then it must be painted and varnished in sections. To avoid the difference between the old coating and the fresh varnish, use a transition solvent, which is filled with a spray bottle and lightly sprayed onto the transition boundaries. This is done if the side edges of the wing are damaged. If the damage is in the center, it is recommended to do a local touch-up and completely varnish the wing, rather than fill all the edges with solvent.
After the varnish has dried, a visual inspection of the wing is carried out. If there are minor defects, the varnish is polished by machine using abrasive pastes. To avoid deviations, it is recommended to strictly follow the painting plan.
Price
Painting one entire car wing at a specialized service station costs from RUB 5,000. The work includes:
- straightening dents;
- provision of materials;
- selection of paint;
- final processing.
Do-it-yourself painting is much more profitable and simpler; difficulty arises if you need to straighten dents on a plastic fender or putty on an aluminum part. For such work, minimal experience is required, which is quite possible to obtain by doing your own repairs.
Recommendations from experts
Do-it-yourself painting of a new wing is done using a sprayer at a distance of at least 30 cm strictly perpendicular to the surface, otherwise the result may be a non-uniform shade.
If painting is done in warm weather, allow each coat of paint to dry for at least 20 minutes before applying another. As a rule, the manufacturer writes detailed instructions for the paint, which you must read before starting work.
Each layer of paint should lie extremely evenly, without smudges. Gaps are allowed only when applying the first layer.
According to the recommendations of experts, to obtain an ideal result after finishing the fender painting work, it is recommended to polish the entire car. This way, the car will look like new, and the freshly painted wing will not be conspicuous by its shine.
Which paint is best to choose for restoration work?
Even with careful driving and careful handling of the car, the car fender is often subject to corrosion and mechanical damage - scratches, chips.
Damage needs to be repaired
The choice of damage restoration technology depends on their size - in case of local defects, painting the entire wing is irrational due to high financial costs, here you can only get by with restoring the damaged area, whereas in case of a significant area of damage you will have to remove, straighten, putty, and only then completely repaint the entire surface.
Grinding
When restoring local defects, accurate selection of paint is important, since a stain that stands out against the background of the body will not add visual appeal to the car. To do this, a table of colors is used, by comparing which with the shade of the car the required paint is selected .
Subsequent technological operations are performed according to the algorithm below:
- Cleaning the damaged area from contamination;
- Grinding;
- Degreasing the surface;
- Puttying of irregularities (if necessary in several layers);
- Drying the putty with a hairdryer;
- Priming the treated surface;
- Polishing putty;
- Wing painting.
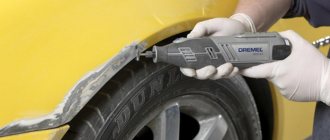
we work with sandpaper
The technological process for restoring dimensional damage to the body is similar to the above sequence, however, painting the car is carried out in a special spray booth using a spray gun, since it is extremely difficult to paint a large surface in a high-quality manner using a homemade method.
In order to paint a car fender after restoration, it makes sense to use nitro paints specifically designed for repair work. They dry quickly (within 25 m) and upon completion of drying they are opened with a layer of varnish.
Cost of painting a wing at a car service center
The most popular choice is two types of paint - acrylic enamel and metallic. In the first case, purchasing consumables costs around 2000 rubles, and in the second – 2400-3000 rubles.
If you resort to the services of a car service, then painting a car wing costs 2000-2500 rubles. more expensive if you add this cost to the main consumables. This is the case if the damage is not serious. In other cases, painting the wing will cost a tidy sum (about 10,000 rubles). If you've ever had to deal with car repairs and have your hands in the right place, then painting your car fender yourself will significantly save your budget.
Source
Instructions for spray painting a car
The dyeing process is divided into a certain number of stages. At the first stage, preparatory work is carried out, which includes cleaning the body, degreasing work, and the use of anti-silicone.
At the next stage, you need to decide on the shade. Having previously checked the body marking instructions, a specialized store will help you choose the required option.
To prevent an error, colorize the body. Specialized equipment and software will evaluate the level of color fading and other factors.
It is worth noting that you will have to spend a lot of money on the procedure. In addition, paint options such as “metallic” or “chameleon” cost much more, because these shades are the most popular.
If there is already rust on the body, then you need to get rid of it, in this case you will need sandpaper, which will turn the surface matte.
After degreasing, we begin the putty process. If the defects are more serious, then you should use putty with windshield washer.
Materials
To paint, you will need to prepare the appropriate tools and find an equipped room. A garage is suitable, but it must be clean, spacious, ventilated, and well lit.
To paint the wing, you need to prepare:
The number of consumables for painting a wing yourself will depend on the condition of the body and the current requirements for the result. High quality consumables guarantee the durability of the decorative layer and its attractive appearance. Home craftsmen pay special attention to preparing the body for painting.
Preliminary work on a damaged wing
Next, the following stages of preparatory work are carried out:
Necessary tools for painting the wing
- Sanding damage:
- if there are only light scratches on the surface, then it is enough to achieve a matte finish;
- if the layer is damaged down to the metal, then there is a risk of rust formation, so the area needs to be thoroughly cleaned with sandpaper P120-180, and then used to combat corrosion.
Degreasing the work area. To do this, you can use white spirit or even acetone, and after the applied product has dried, immediately prime the surface
Here it is important to do everything as quickly as possible, so you will avoid the risk of the smallest particles of rust. Grinding the primed area with a fine abrasive, removing dust and re-degreasing
Please note that the surface must be completely smooth. If there was serious damage to the surface, then they need to be puttied and sanded until the geometry is completely restored. To do this, use an abrasive of 320-400 grit and only the dry processing method. If you still have a feeling of roughness, then use paper with P500. Next, you need to matte all adjacent areas of the wing with your own hands by removing paint and varnish around the damaged area. Here you need to use matting paste or paper with P1000-1200. This must be done so that the transition from new paint to old is least noticeable. Sanding the surface for future painting. You need to work with small areas, gradually increasing their size. Then the entire painting area is primed. It is necessarily preceded by high-quality degreasing. The application of the primer should be carried out in parallel lines, each subsequent one should slightly touch the previous one and slightly extend beyond the putty areas. Here, pay close attention to the instructions on the primer can - these recommendations take priority. After drying, the primer is sanded with a fine abrasive and degreased. After this, you should walk over the surface with a special sticky cloth, which will collect any remaining dust. Touching the surface with your hands is strictly prohibited!
Work methodology
Let's look at how to paint a car fender with your own hands at home, what you need for this, as well as the procedure for performing the work. You can tint a small area yourself or putty a significant part of the wing and apply varnish.
Preparation
It all starts with preparation for coloring. This is a labor-intensive, long-term stage, but without it there is no point in applying the coloring composition to the car body.
To prevent dust from getting onto freshly painted surfaces, the garage is vacuumed and washed, and excess items are removed or covered.
Concrete floors are washed before painting, then working tools are prepared. Set includes:
To paint a new wing or carry out partial repairs of an old one, it is convenient to use a spray gun with a compressor.
Grinding
Before painting the fender, you need to wash and dry the car. It would be optimal to remove the front part - after unscrewing the headlight, bumper, fender liner. Then the entire car (particular attention should be paid to areas near the fender) is covered with film, paper or masking tape. This will create conditions for the work to be carried out correctly and will prevent paint and primer from getting into unnecessary areas.
The wings are degreased and inspection begins. It is necessary to identify scratches and other defects. It is convenient to use a stripping plane with a plastic handle. Rusty parts are removed with emery or a converter (a special composition restores iron oxide).
During sanding, you should constantly use a degreaser, white spirit will do.
Puttying
Minor automotive repairs require the use of a primer - it will prevent rust from spreading. The soil dries within half an hour; as it hardens, the layer is sanded with a fine abrasive material and degreased. A spatula is used to apply the putty. It will help remove small and deep defects that will remain after sanding.
After kneading, check the mixture for the presence of lumps - there should be none. You have 7 minutes to apply the putty, then it will harden.
Using a spatula, apply a little material across the dent, distribute it along the length of the wing, and level it. After the first layer, clean the spatula with a solvent and wait until it dries. On average, the process takes half an hour. Then they clean it, degrease it, and apply new material. Large dents are filled with putty several times.
After drying, the surfaces are cleaned and excess dry areas are removed. Emery is used - it is often changed as the abrasive particles wear off. It is convenient to use a grinding machine; if you don’t have one, then screw the emery onto a block of wood.
Contact of moisture and dry putty is unacceptable.
Application of primer
The stage is similar to the previous ones, but it has its own characteristic features. Procedure:
Small dents are filled with putty - it is not necessary to redo minor damage by removing old paint and primer. When filling significant damage, remember that a large number of layers of material shrinks.
Painting
Correctly applied paint on the surface of the wing will shine; it is best to use a spray can to apply it. When choosing a material, take into account the markings and possible changes in shade over time. If the area to be painted is small, it will be easier to choose the composition.
A popular option is auto enamel with pigments and additives against moisture and corrosion. Enamels are alkyd, nitro, acrylic. Nitro compounds do not have a bright glossy shine, they apply unevenly, alkyd compounds are difficult to polish and take a long time to dry. Acrylic enamels are an ideal option in terms of performance characteristics, but they are more expensive than the first two.
Canned paints can be used, but aerosols are more convenient for beginners.
Paint color selection
Even if the driver knows the original car enamel color number and manufacturer, this does not guarantee that the local painted area will match the rest of the paintwork. Over time, the paint loses its structure under the influence of UV rays. It is only possible to match the color exactly to the body tone approximately.
Another option is to go to a service station to have a computer select the color; here you can also order prepared auto enamel. Colorists note that the most difficult shades to choose for the front fender of a car are white, black and matte colors.
There are three types of auto enamel on the market, each of which has application features, disadvantages and advantages.
- Nitroenamel. It is not recommended to paint the entire part. The paint does not provide gloss; it is necessary to paint in at least 5 layers. Suitable for painting small local areas. Selected if the main body color is matte.
- Alkyd paint. Automotive enamel provides long-lasting shine and gloss, is resistant to gasoline, and is not subject to destruction by aggressive reagents. If the entire body element is painted, then alkyd enamel is applied in three layers. It dries for a long time, up to 36 hours, and cannot be polished.
- Acrylic enamel. The paint contains synthetic and natural resins, thanks to which the paint dries quickly, gives a gloss, and is easy to polish. Apply in 2–4 layers, dry in 3–6 hours.
If partial painting of a used wing and a matte-colored body is necessary, then it is recommended to use nitro enamel, which, after drying, is as similar as possible to the old paintwork. If the body is bright, shiny, and has a chameleon effect, then choose acrylic paints.
How to paint a car fender with your own hands? Practical recommendations.
Stages of work
It is the car fender that most often undergoes minor repairs. It suffers most from minor collisions or poor parking. In this case, painting the car fender is required, which you can easily do yourself.
In fact, this is not such a difficult job and therefore you should not contact a car repair shop every time. After all, at home you can perfectly cope with this task, but you must meet a number of conditions and have all the necessary tools and materials.
Preparatory stage
It is the preparatory work that will take the most time.
But without them, it will not be possible to achieve the desired result. First of all, you will need to prepare the place where painting will take place. This is usually done in the garage. In order not to waste extra time, you should collect all the necessary materials.
You will also need a set of necessary tools for disassembly and equipment such as a compressor and a spray gun. Only after this can you begin to carry out the work directly.
Preparing and polishing the wing
Before painting, you must thoroughly wash the entire car and dry it well. It would be best to remove the front fender. True, you will have to unscrew the fender liner, headlight and bumper to do this.
To make it easier to work on the rear fender, it will be necessary to remove the door seals, feet, hatch and other components.
Then the entire car, and especially the adjacent areas with the wing, must be well covered with film, masking tape or paper. This will prevent any primer or paint from coming into contact.
The wings need to be thoroughly degreased and inspection begins. It is necessary to identify all the scratches and defects that have appeared. To do this you will need a stripping plane.
The resulting rust is removed using P120-180 sandpaper or using a converter that quickly reduces iron oxide.
While working, keep white alcohol or another solvent on hand and degrease immediately. At the same time, we must try to carry out this stage as quickly as possible.
Primer and putty
The primer will prevent further spread of rust. It dries in about half an hour, and then it is also sanded with a fine abrasive material and immediately degreased.
Automotive putty is applied using a special spatula. With its help, it is necessary to eliminate all deep and remaining minor defects.
Surface preparation
Preparation also includes several steps regarding stripping, sanding and priming. In many ways they are similar to previous operations.
One point must be taken into account. If the front fender is to be painted, it is better to put it back in place before priming. It is better not to touch the body with your hands anymore, since the painting process itself remains.
Dent Removal
But before that, you need to once again pay attention to the resulting dent or damage.
If it is small, then simply filling it with putty will be enough. If the surface is not severely damaged after the impact, then it is not necessary to remove all the old paint and primer.
If the damage is large enough, then you need to remember that many layers of putty can cause severe shrinkage over time. This is especially true for alkyd and nitrocellulose putties. The total thickness should not be more than 0.3 mm. But epoxy allows you to apply up to 2 mm. The shrinkage here is minimal.
Paint color selection
Of course, the selection of the required shade is best done in workshops or specialized services. To do this, they have the necessary equipment and experienced personnel.
Therefore, it is not enough to name the factory paint markings. Over time, it may change color slightly. A small painted part will allow you to quickly select the right paint. Even the gas tank flap is good. The main thing is that it is not plastic.
If you can find suitable canned paint in the store, that will be nice. But you can make a computer selection. True, it is not so cheap and costs on average $15 per 100 grams.
The most commonly used coating is automotive enamel. It contains not only a coloring pigment, but anti-corrosion, water-repellent and fire-resistant elements. Three types of such coating are mainly used.
Only after this do they begin the final stage.
Painting the rear fender, like the front fender, will not require much effort or time.
Material application process
If the paint is in a can, you will need a compressor and a spray gun. Although very often it is found in cans, which greatly simplifies the entire procedure.
Wing varnishing
Preparation for this stage begins already during the application of the third layer of paint on the wing.
The varnish must be mixed in advance along with the hardener and solvent. The required proportions are usually indicated on the packaging.
The process of applying varnish is similar to painting. There's just a slight difference. You don't need to use too many layers here, two will be enough.
After applying the first layer, you need to wait for it to dry for 20 minutes. Then you can apply a second layer. The main thing is to prevent leaks. Therefore, the same rules are followed as when painting.
It should be noted that the varnish can dry completely only within two days. Only after this the updated wing will be able to serve for quite a long time.
Source
Primer and putty
Priming the metal surface prevents the occurrence and spread of corrosion; for plastic wings, a primer is used that increases the adhesion rate, due to which the car enamel lays down in an even layer and has optimal adhesion.
The putty is applied to level the surface and prepare the base for painting; it is recommended to do this with a thick rubber trowel. The composition of the putty can be one- or two-component. The two-component material must be prepared by diluting the putty with the hardener in the ratio specified by the specific manufacturer. One-component putty is more convenient because the material is ready for use immediately. Primer and putty process step by step:
- Treat the cleaned metal wing with a rust converter.
- Apply a thin layer of primer or primer and let dry.
- Take a small amount of prepared putty with a trowel. Apply to the dent, level the surface, and let dry for 30 minutes.
- Clean the putty surface and degrease. If necessary, apply a second coat of putty.
After complete drying, sand the surface with fine-grain sandpaper P -500 or higher. You can use matting paste to eliminate the transition, but drivers recommend using standard sandpaper P 600-800.
francevi4 › Blog › Preparing for painting new body parts. Chapter 6
Metal products (more often - fenders, sills, repair inserts for arches, less often - hoods, doors) usually come to the market covered with shipping primer, usually black, less often gray. What is transport? priming? Paintwork applied by cataphoresis (electrodeposition) to give the product a marketable appearance, protect it from corrosion during transportation and actually has virtually no protective or decorative functions. In the ideal case (and until recently this was very important) it is completely removed. There are products made in China and Russia in which the cataphor is removed with a fingernail and a layer of rust is found underneath. I hope you remember what a thermoplasticity test is - it is extremely necessary and, if anything, then completely off. But there are also very good products.
On this wing is the logo of the Danish company. Yes, she didn’t rivet it, most likely it’s Taiwan (they just packaged it in Denmark) but... The sink marks from stamping are minimal, as well as the corrugation on the radii, there is a burr, but it can be easily removed manually with P120 sandpaper and cataphor - just a song, I love it I got tired of cutting it with the machine and never took it all off. The geometry is quite decent, at least the wing fell into place without a sledgehammer.
Thermoplasticity test - very, very good. (By the way, I ordered 4x4 repair inserts for the rear arches from this particular company for the Xer) In short, as advertised, we matte the P180 as much as possible, in hard-to-reach places - matte Medium (Fine is also suitable) and primer.
Denya, of course, would have been given an acid treatment, but since I am not friends with him (with an acid treatment), I applied epoxy Novol
and wet on wet on top (the epoxy is dried until matte) Duxon Dx62.
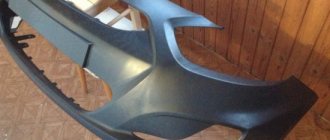
What to do with plastic? Especially for this post, I found old photos of a bumper that had already been painted once before. You can evaluate the quality.
Adhesion is completely zero. The paint began to fall off within 2 weeks after painting. Why? New plastic (unless it’s 100% original), usually Chinese, actually wouldn’t hurt to steam it to remove phenol, horseradish and other bad stuff, but since this procedure is not accessible to everyone, at least wash it thoroughly, very thoroughly solvent and degrease. It’s better to use a special degreaser that has antistatic properties, but at least a simple one. Then matte - P240-320 dry or P400 with water.
Then prime with epoxy
Recently, primed bumpers have appeared on the market, on which there is a sticker with the inscription “But sanding” - do not sand, i.e. Painting is allowed without sanding or re-priming. Lies, guys. Do as I say and you'll be fine. This bumper has been in use for 2 years already, we managed to rub it in a couple of times - nothing fell off. I look forward to your questions, See you at the Drive. And a couple of photos - for the positive, because we all love living creatures! :-))). Maybe a post about lifestone? I have a lot of photos...
Surface painting
— When asked whether it is possible to paint the wing of a car with a spray can, experts give an affirmative answer. Motip acrylic enamel is ideal for painting the wing in this way. It has excellent performance characteristics - it is easy to apply, adheres well to the surface and forms a stable and durable coating.
— To get an excellent result, you need to choose the right paint color. This can be done using a matching catalog or a color fan. Experts can also help in this difficult task - you will need to give the serial number of the body color and, perhaps, bring its small painted part.
— Before working with aerosol paint, shake the can thoroughly for several minutes. The enamel is sprayed onto the wing from a distance of 30 cm. After applying the first developing layer, the surface is inspected and felt again. If any unevenness remains, we sand it again. It is better to apply several thin layers, allowing each to dry for 20-30 minutes.
— The final stage will be to consolidate the result using Motip acrylic varnish. Apply 2 layers, allowing each to dry. Now we know how to paint a car fender - correctly and with excellent results.
If you strictly follow painting technology and use high-quality materials, you will be satisfied with the result. A freshly painted wing will delight the eye with a radiant shine. Read our tips and get to work quickly!