What does the Check Engine Light mean?
Sometimes it can be a very minor problem - for example, a loose gas cap or a faulty catalyst. However, you should not ignore the indicator signals under any circumstances, as this can result in serious problems.
The Check indicator may light up for various reasons.
Sometimes the cause of the indicator light may be poor fuel quality. So don’t be surprised if, after refueling at an unfamiliar gas station, you see the Check Engine light flashing.
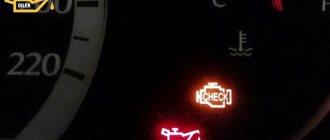
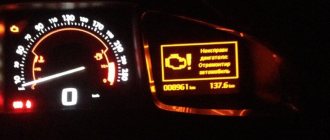
Typically the indicator is located on the car's dashboard under the engine speed indicator. It is indicated by a schematic engine or a rectangle with the inscription Check engine or simply Check. In some cases, instead of an inscription, a lightning symbol is depicted.
Is it possible to continue driving while the light is on?
The brake pads are worn out, it's time for the next maintenance, the speed is switched incorrectly, low-quality fuel is used, the on-board voltage has dropped - all this can cause the Check indicator to light up. First of all, you should check the motor. If the reason for the signal to turn on is due to engine malfunctions, it is dangerous to continue driving.
The problem is aggravated by the fact that it is impossible to independently determine the malfunction of a modern internal combustion engine by smell or color. You should contact professionals who will use a scanner to identify the malfunction, if, of course, there is one.
A burning Check light may indicate various breakdowns - it is better not to ignore it
Therefore, if after restarting the car the light does not go out, you can only drive it to the nearest car service center. There they will conduct a comprehensive diagnostic of the engine and its systems.
Operating a vehicle with the Check Engine icon illuminated leads to increased fuel consumption, unstable engine operation, and decreased traction characteristics of the vehicle. Moreover, in this case, the car owner may lose the guarantee for car repairs.
Why is error 8 associated with problems with the brake system?
Some car enthusiasts incorrectly interpret the message with error 8, believing that it is necessary to check the brake system. This is due to the fact that on VAZ cars this fault number indicates an insufficient level of brake water.
The Chevrolet Niva's on-board computer uses other designations, so you should not interpret them in the same way as in the VAZ. If you doubt the condition of the brake system, you can check it during the repair process. Before all this, pay attention to the brake water level, and then check the pads.
Source: ladaprofi.ru
Why did the light come on and how to fix it
The main situations in which the indicator lights up and the recommended courses of action for the car owner:
Video: Check sensor lights up
Table: reasons for the Check engine light to come on and suggested actions
| When and in what cases does the “check” light come on? | Possible reasons | Suggested Actions |
| When driving, when accelerating | Harsh acceleration, faulty air filter | Replace filter, accelerate smoother |
| When the indicator flashes, the engine starts | The fuel in one of the cylinders does not burn completely; the gasoline either burns out in the exhaust pipe or immediately enters the catalyst | Replace spark plugs, check coil and armored wires, check timing marks |
| After refueling | Low fuel quality | Change gas station |
| When the ignition is turned on | Normal car reaction | Nothing should be done |
| After washing the car, engine, after rain | Water got into the Check engine wiring | Treat with WD40, dry, clean contacts |
| Cold | Knock sensor faulty | Replace |
| On a hot engine | Camshaft sensor faulty | Replace |
| At high speeds | Missing ignition coils or faulty crankshaft sensor | Replace coil or sensor |
| At idle | Throttle sensor malfunction | Replace |
| After replacing spark plugs | “Poor” combustible mixture | Change the octane number of gasoline to a higher one |
| After replacing the air filter | More air began to flow, the composition of the exhaust changed, the lambda probe reacted | Turn off the engine and start again |
| After replacing the timing belt | A terminal has come off from some sensor, most likely the air hose | Check terminals |
| After installing gas equipment | Fuel injector emulation is done incorrectly | Tune |
| After installing the alarm | Only one power line is connected to the turbo timer, the second one contains a temperature sensor, brake pedal and mass air flow sensor | Reset Check engine, connect both lines |
| After replacing the fuel filter | Low pressure filter installed | Replace filter |
| With a simultaneous increase in fuel consumption | Driving too long, oxygen heating up or poor quality fuel | Refuel with high-quality fuel and give the car a rest |
| On long climbs | Worn timing belt, faulty sensors | Check and replace |
| After replacing the ignition module | Module connection problems | Remove and reconnect the positive terminal from the battery |
| At sub-zero temperatures | Malfunction of the throttle position sensor or disconnection of its chip | Replace the device or replace the chip |
| When you press the accelerator pedal | Air filter clogged | Clean or replace the filter |
Chip tuning
Some drivers do chip tuning of the Chevrolet Niva in order to increase engine power. The essence of this procedure is to remove the established restrictions by adjusting the optimal factory settings in the electronic control unit. This procedure helps to extract the additional performance inherent in the motor.
The whole process can be divided into several stages:
The main advantage of this procedure is:
The disadvantages include:
Each specialist has a different attitude towards chip tuning, some consider it useful, while others think that this procedure can negatively affect the performance of the car, while reducing its service life.
To summarize, we can conclude that you can identify error codes on a Chevrolet Niva either independently or using a special device. If malfunctions occur, they must be eliminated as soon as possible, otherwise this may lead to irreversible negative consequences in the operation of the entire system.
Resetting or zeroing the Check indicator
In most cases, as the table shows, Check lights up when a sensor fails or the operating conditions of the vehicle change. However, even after diagnosing and eliminating the malfunction, the light sometimes continues to light.
The fact is that the “trace” of the error remains in the computer’s memory. In this case, you should “reset” or “zero” the indicator readings. You can easily do this yourself by performing a number of simple operations:
Resetting or resetting the Check Engine Light
The sensor is reset and the Check light is no longer on. If this does not happen, contact the service center.
When the Check Engine light comes on on the dashboard, you almost always need to stop the car immediately. Using the recommendations given in this article in practice will help you avoid complex, expensive engine repairs. Good luck on the roads!
International NIVA Club
Self-diagnosis
Without going into details of the operation of all electronics, we note that the functioning of all vehicle systems is “monitored” by an electronic control unit (ECU).
It receives information from numerous sensors. Like any computer, the ECU requires software called firmware. This firmware is capable of analyzing indicators received from sensors, comparing them with normal parameters, identifying errors and storing these errors in memory.
Carrying out self-diagnosis
In the Chevrolet Niva, as in some other cars of the VAZ family, some parameters can be displayed on the VDO dashboard. It is often called an integrated on-board computer.
Testing is started by first pressing the daily mileage reset button and simultaneously turning the ignition key.
All instrument needles begin to move, which indicates the beginning of the testing process. Pressing the same button once will cause the firmware version to appear on the display, and pressing it again will give us a reading called an error code.
Panel codes should not be confused with ECU codes, which are diagnosed by external devices.
Source
ECU errors. Check-Engine - the light came on!
Re: Check-Engine - the light came on!
Post by omega2012 » 04 Nov 2011, 01:51
Re: Check-Engine - the light came on!
Post by nicola999 » 04 Nov 2011, 11:02
The control lamp (checkout) is on.
Post by PegaSN » Dec 29, 2011, 01:23 pm
Re: Problems with the injector.
Post by Anton » Dec 29, 2011, 01:42 pm
Re: The control lamp (checkout) is on.
Post by KROKONIVETS » 29 Dec 2011, 17:55
Remove the terminal from the battery for 2-3 minutes, then put it back on.
Re: Problems with the injector.
Post by PegaSN » 29 Dec 2011, 20:20
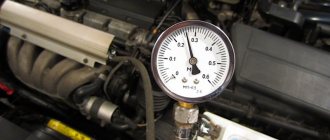
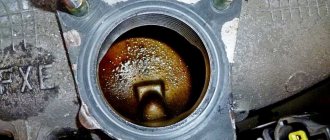
Low compression
The most unpleasant thing that an owner can expect is low compression, which can be measured with a special device. Here you cannot do without disassembling or partially disassembling the engine. The reason lies in a burnt-out valve or severe wear of the piston group.
Under no circumstances should the high-voltage wire be removed from the spark plug while the engine is running. This “old-fashioned” method of diagnosis is fraught with electric shock. As a last resort, you can unscrew the spark plug, insert it into the sealing cap and visually evaluate the spark.
A car is a complex of complex components and mechanisms. No matter how much automakers improve production technology and increase reliability, no one is immune from sudden breakdowns. This applies to all car enthusiasts. Both the owner of an expensive foreign car and a used VAZ can encounter such a malfunction as engine tripping. Well, let’s look at why the “check” blinks on a car and the engine stalls.
The check light came on for a Niva Chevrolet reasons
If the Check engine indicator light comes on on the dashboard of your car (or simply the “check” is on), you should at least be wary. The reasons for this can be very diverse - from a loose gas tank cap to serious problems with the engine.
What does the Check Engine Light mean?
Sometimes it can be a very minor problem - for example, a loose gas cap or a faulty catalyst. However, you should not ignore the indicator signals under any circumstances, as this can result in serious problems.
The Check indicator may light up for various reasons.
Sometimes the cause of the indicator light may be poor fuel quality. So don’t be surprised if, after refueling at an unfamiliar gas station, you see the Check Engine light flashing.
Typically the indicator is located on the car's dashboard under the engine speed indicator. It is indicated by a schematic engine or a rectangle with the inscription Check engine or simply Check. In some cases, instead of an inscription, a lightning symbol is depicted.
Is it possible to continue driving while the light is on?
The brake pads are worn out, it's time for the next maintenance, the speed is switched incorrectly, low-quality fuel is used, the on-board voltage has dropped - all this can cause the Check indicator to light up. First of all, you should check the motor. If the reason for the signal to turn on is due to engine malfunctions, it is dangerous to continue driving.
The problem is aggravated by the fact that it is impossible to independently determine the malfunction of a modern internal combustion engine by smell or color. You should contact professionals who will use a scanner to identify the malfunction, if, of course, there is one.
A burning Check light may indicate various breakdowns - it is better not to ignore it
Therefore, if after restarting the car the light does not go out, you can only drive it to the nearest car service center. There they will conduct a comprehensive diagnostic of the engine and its systems.
Operating a vehicle with the Check Engine icon illuminated leads to increased fuel consumption, unstable engine operation, and decreased traction characteristics of the vehicle. Moreover, in this case, the car owner may lose the guarantee for car repairs.
Why did the light come on and how to fix it
The main situations in which the indicator lights up and the recommended courses of action for the car owner:
Self-diagnosis
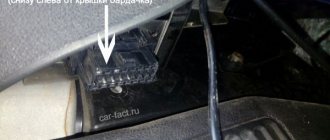
The Chevrolet Niva diagnostic connector helps you obtain information about how most units work, into which special equipment is connected via Bluetooth or a cable. Therefore, if you want to conduct independent diagnostics, it is important to know where it is.
The connector in the Niva is located under the steering wheel on the right side, and the pinout itself is under the dashboard on the driver’s side. To check the on-board computer, you need to use special equipment that transmits all the necessary information to the laptop. Data transfer is carried out using a COM port into which a K-LINE type connector is installed.
Depending on the year of manufacture of the model, the connectors may differ from each other.
If it is not possible to check with a special device, then this can be done using self-diagnosis, which will help to quickly identify all problems associated with the operation of the car. To do this, press the odometer button and turn on the ignition. The speedometer needle will begin to rise to the top; by pressing again, information about the firmware will appear on the screen, and by pressing again, all existing errors will appear.
During self-diagnosis, error 8 and error 14 often appear, the first informs about problems in the brake system, and the second is related to fuel consumption, quite often this is a system glitch, but in any case you need to replace the sensor responsible for these mechanisms, or reset the memory by resetting the battery terminals.
As practice shows, knowing how to perform an independent check is very useful, since this knowledge helps to quickly identify a malfunction and eliminate it in a timely manner.
The check light came on - Chevrolet Niva logbook #shnivamobile of the year on DRIVE2
Most spark plugs in cars up to the year of manufacture need to be changed every 25 kilometers. Changing spark plugs yourself is quite easy.
The Check Engine light is constantly on. I checked it for error No. 8. - if 8 appears, then in the on-board network...
A faulty mass air flow sensor increases fuel consumption, increases CO2 levels in the exhaust gas, and reduces engine power and smoothness.
If you have a home car error scanner, then by connecting it to the car, you can easily find out which sensor needs to be replaced. The Chevrolet Niva check light has been constantly on for thousands of miles, I get the same error all the time. But you will notice that the longer you drive, the more your fuel consumption increases.
The cost of new catalysts is very high due to the precious alloys they contain. On some cars, there are several catalysts, the cost of which can reach up to 90 rubles. So don't delay replacing the sensor. Although replacing the sensor and its cost is not very small, it is not commensurate with the cost of the exhaust gas catalyst system.
You can also save on replacement costs by doing it yourself. Many car manuals have detailed instructions on how to replace the oxygen sensor yourself.
Remember that you cannot delay replacing this important element! Check the fuel filler cap Many drivers, in most cases, when the check engine light appears, will think about serious problems in the car engine, but will not even think to check the tightness of the fuel system, which may be compromised due to a defect or insufficiently tightened fuel filler cap.
This is a very common reason for the appearance of the “Check” engine icon.
If when the “Check” indication appears, your car has not lost power, and there are no audible signs of engine damage - engine knocking, humming, creaking, etc. Your gas tank cap may be cracked or not tightened enough. If the cap was not tightened enough, then after tightening it all the way, continue driving the car for a while to see if the engine error disappears.
Replacing brushes or the generator itself
Current collection brushes wear out most often, so here is a description of how to do this job:
- Remove the negative terminal from the battery and disconnect the wires leading from the generator casing.
- Remove the protective cap from the terminals of the positive terminal of the wires. Unscrew the nut that secures the block to the generator block.
- Disconnect the spring clips and remove the dark plastic case.
- Unscrew the voltage regulator mountings with a Phillips screwdriver. Take it out together with the brushes.
- Disconnect the wires from it. Remove the assembly together with the fastening bar, take off the belt.
- Release the generator from the bracket by unscrewing all the mounting bolts.
The upcoming action plan depends on what you will change. If the brushes are very worn, they need to be replaced. If the current collectors are visually intact, then the reason may be in the remaining parts of the generator. Almost always, car enthusiasts simply change it completely.
If the check engine light comes on: 5 most common reasons for the “Check engine” light to turn on
The main costs are related to the cost of the sensor, which for some car models can be 11 rubles if it is an original sensor or up to rubles if it is an analogue substitute. Replacing the sensor yourself is very simple. But due to the low cost of replacing the sensor, you can entrust this work to a mechanic at a car service center. Remember that you need to regularly change the air filter, observing the vehicle maintenance regulations!
You can also ring each of them using a tester. Damage to the ignition relay can be determined visually; if there is no reaction when turning the key, the relay should be replaced. You can check it by installing a working relay. You can determine the lack of contact on the main components of the car parts by visual inspection. It is necessary to tighten the contacts on the starter, the injector power supply and the fuel pump.
The positive wire that powers the electronic injection system comes directly from the battery terminal with a separate wire. Often the problem with the immobilizer can be a low battery. You just need to install a new battery. This is to find out the reasons for the malfunction of the electrical part of the car, but do not forget about mechanical damage: The indicator on the instrument panel will help you find out if there is no fuel in the tank.
It indicates any damage to the injector or engine error. If the oil level in the car has dropped, this can be determined visually using a warning lamp in the form of a can on the instrument panel. If you are sure that there is enough oil in the engine, pull out the level meter and check. Troubleshooting Having identified the problem that causes the Chevrolet Niva engine to start poorly, you can begin to fix the problem.
Knowing the source of the problem, you can draw the appropriate conclusions: Most of the above reasons have a simple nature of damage, and correcting them will not take much time. A list of the main malfunctions when the engine does not start or starts poorly, and how to eliminate them.
You can light a cigarette from another car, then the generator will recharge the battery. Clean the contacts if they are oxidized and lubricate them with Lithol. The lubricant prevents the appearance of oxide on the terminals.
The first start always goes without problems; Then, after leaving the car in the parking lot, after an hour the owner will no longer be able to start the engine without repairs. In the Chevrolet Niva it is located under the bottom and is encased in aluminum. However, this is done on many cars. Pumping in excess air One smart book says that the engine may not start due to the fact that the intake manifold draws in too much air.
This means you need to check the fastening of all pipes. The starter turns, the engine on the Chevrolet Niva does not start, and the reason, it turns out, must be sought in the brake system! We won't look for anything. The vacuum supply hose is removed, and from the amplifier side, see. That's the whole trick.
Despite its apparent simplicity, defects in the air supply system are difficult to detect. Replacing the carb solved all the problems. I also had the jet in my carb replaced with a larger one.
The dynamics, of course, have worsened, but the efficiency has increased. On the highway, consumption at average speed reached 8.5 liters per hundred. I poured the exact amount of gasoline into the empty tank, set the odometer to 0, and then counted. Kostya understands, it means we need to blow all the dirt out of the carb more often!
And this is the first time with gasoline, I’ve been filling up at the RN at P. Usov for years and everything was fine.
I had to go to the store and decided to clean the xx jet at the same time. I unscrewed it, started the car, accelerated it 3 times, screwed the valve back on, and lo and behold, the revs don’t fluctuate, it runs smoothly and the acceleration is good: I took out the wires from the ECU, clearly visible in the palm of my hand, and pulled them out near the gas pedal.
And the coolest thing is that the car is 1.
But it’s easy to check the input signal of the coils using a regular emitter repeater with an LED, I’ve already made one... Yes, I know this method, but when it was necessary, of course, I forgot about it.: I urgently need to buy a new ECU and drive with it. Advice on cleaning from VAZ cars “ grandfathers.” You start the car, let it run for XX minutes 5. Disconnect the gas-resistant hose in front of the gas pump and put it in a jar of acetone, so that the gas pump pumps not gasoline but acetone from the tank.
Battery disconnect method
Disconnecting the battery is an old way to reset the check engine light. Here are three steps to clear the check using this method: Step 1: Disconnect the cables from the battery. At this point, you should use a wrench to unscrew the positive and negative cables.
Step 2: Discharge the remaining electricity. The next thing you should do is press and hold the car horn for about 30 seconds. This action will help drain the car battery.
Step 3: Wait and reconnect the battery. After disconnecting the battery cables and draining the remaining electricity, all you have to do is wait about 15 minutes and then plug the battery back in. Error codes will be cleared. (Note: This method may not work on some vehicles.) If after this procedure the “check” lights up again, this may mean that the problem is still much more serious.
A few words about how the battery-generator tandem works
Everyone, even a novice driver, knows that the battery interacts with the generator. After starting the engine, the battery goes into constant charging mode. After the engine speed increases, the voltage at the generator output also increases, which is not a “hum”.
In order to prevent the above described, a small relay-regulator is installed in the rotor excitation circuit, the task of which is to reduce the current to the optimal level, regardless of the engine speed. As a result, the voltage is maintained at the required level. The battery light comes on when there is no charging from the generator.
So, let's simulate the situation. You started the engine, but the battery light did not go out. What's the matter?
- Faulty relay-regulator, diode bridge;
- Poor tension of the generator belt, critical wear or belt slippage. Wear (play) of the generator bearing;
- Blown fuse or poor contact;
- Poor contact at the battery terminals, at the generator terminal or at the ground wire;
- Open circuit of the generator excitation circuit, serious wear of the generator brushes or brush holders;
- Wearing out the ignition switch is an option, but in this case several lights will light up at once.
Car exhaust catalyst
An automobile catalyst helps a car make engine exhaust gases more environmentally friendly. It converts carbon monoxide and other harmful substances into harmless compounds. If your exhaust catalyst has become unusable, you will notice it not only when the engine icon (check) appears, but also long before that, when the car’s power drops by half. For example, when you press the gas pedal, the car will not have good acceleration dynamics as before.