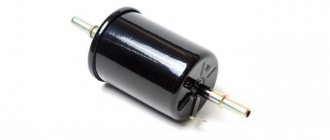
The fuel supply system in the Kia Rio-3 has two filters : coarse filter (mesh filter - a mesh bag) and fine filter (plastic block with a filter element inside). Both filters are components of the fuel module located in the fuel tank.
According to the Kia Rio-3 maintenance regulations, the fuel filter is replaced every 60 thousand km.
Signs indicating the need to replace the fuel filter:
- Insufficient pressure in the engine fuel system (the norm is a pressure of at least 345 kPa or 3.45 kgf/cm2).
- Unstable engine idling
- Loss of engine power
- Reduced engine response during acceleration.
- Jerks and failures in engine operation.
All of the above may be a consequence of a decrease in the throughput of the fuel filter (both fuel filters). At the same time, replacing fuel filter elements may be necessary ahead of schedule . It all depends on the quality of the fuel poured into the gas tank.
How often to change the fuel filter on a KIA Rio
KIA brand cars are sensitive to fuel quality. Recommendations regarding the frequency of filter replacement are provided by the manufacturer himself. The instructions for KIA Rio 2014, 2013, 2012, 2011, 2010 and other years indicate that a new filter unit must be installed after a mileage of 60 thousand km. However, this rule of regulation does not work for us.
Many gas stations in Russia sell low-quality fuel. Therefore, it is necessary to change the element after 35–40 thousand kilometers. It is these figures that KIA Rio owners with gasoline engines should rely on. The situation with diesel cars of this brand is different: the unit should be replaced after 15 thousand kilometers.
In winter, it is recommended to install a new filter on diesel engines after every 10 thousand km. The viscosity of the fuel at low temperatures increases, and the throughput of the filtration system after such a mileage becomes lower.
However, these figures are not the ultimate truth. A hint about when to change the fuel filter on a KIA Rio 3 will be given by the car itself. The driver will feel changes in the operation of the car.
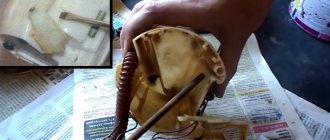
Replacing the KIA Rio fuel pump mesh
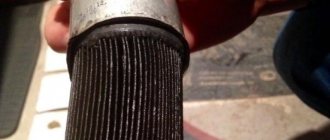
After removing the KIA Rio fuel pump, it is necessary to visually inspect its grid, after which the grid should be cleaned or replaced.
The process of replacing the KIA Rio fuel pump mesh:
- By disconnecting the connector and bending a couple of latches, you need to remove the fuel level sensor
- Next, you need to separate the outer and inner parts of the KIA Rio fuel pump by releasing the fastening latches (there are three of them)
- It is not at all necessary to disconnect the corrugated tube.
- The mesh is very difficult to remove, so to remove it you will need to apply force or even pry it off with a flat screwdriver, removing the “swing”
- Clean the bottom of the glass and replace the mesh
After the KIA Rio fuel pump is installed and all the wires are connected to it, you will need to check all connections for leaks with an assistant. This is done as follows: the driver must turn the ignition key, but not start the car, and his assistant must check for leaks at the connection points. If no problems are found during the inspection, then you can tighten the KIA Rio fuel pump cap and replace the sofa. It is also important to note that starting the engine with an empty fuel pump is not recommended.
Thus, replacing the KIA Rio fuel pump mesh or the entire structure is a fairly simple procedure, but at the same time very useful and effective. The quality and serviceability of the KIA Rio fuel pump directly depend on the quality of the fuel poured into it.
Signs indicating the need to replace the fuel filter
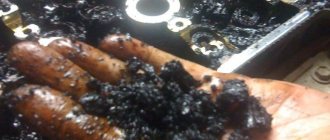
The filter becomes clogged with foreign matter. This reduces the throughput of the node, which manifests itself in a change in the quality of operation of the power plant. The fuel filter on a KIA Rio 3 must be replaced when the following symptoms appear:
- “jerks” of the car when accelerating;
- loss of stability of the internal combustion engine at idle;
- pressure drop in the motor;
- the occurrence of uncharacteristic noise;
- problems with gaining speed while driving, loss of power;
- increased fuel consumption.
Also read: Kia Sportage 3 wheel size, tire and wheel parameters
At first these signs remain invisible. Over time they get stronger. If the driver ignores these signals, problems will arise with starting the internal combustion engine. It is better to replace the fuel filter on KIA Rio 2, 3 and 4 before the part exhausts its service life.
If you don't change, what will happen?
If you do not change the component in time, you will heavily load the pump, which will find it difficult to push fuel through the system, because the fuel pump screen is already clogged. The car will begin to pick up speed worse, its power will decrease, and the original dynamics will disappear. Sometimes you will observe power dips when the internal combustion engine is running. This is especially noticeable when driving uphill.
The engine will start worse day by day - until the moment when it fails altogether. And this happens sometimes.
Problems with the filter will increase fuel consumption. For example, if previously a car consumed 9–10 liters per 100 km, then with a clogged filter this figure can increase to 11–12 liters. Dips will appear when you press the accelerator pedal. This can lead to an accident when overtaking on a country highway when you need to accelerate sharply.
At that moment, when you are standing at a traffic light, the engine speed in idle mode can fluctuate - right up to the point where the internal combustion engine stalls. You will remain standing at the crossroads - there is little pleasure in this.
The process of replacing a part on the Rio model is presented in this video:
Which filter to choose
When choosing a part, it is necessary to take into account the type of internal combustion engine. Officially, KIA Rio 3 with diesel power units was not supplied to the Russian market. There are only a few such machines in Russia. Finding an original fuel filter for such cars is very difficult. It is best to purchase an analogue from Bosch.
There is no point in buying cheap Chinese filtration systems. Their prices are lower, but the quality of the filters themselves leaves much to be desired. They purify diesel fuel worse. The risk of power plant failure increases.
It is easier to purchase a filtration system for KIA RIO 3 with a gasoline engine. The volume of the power plant does not affect the selection of parts. Engines with a volume of 1.4 and 1.6 liters use the same filtration system. Moreover, a similar unit is used on KIA Sportage, Sorento and some Hyundai cars (Accent and Elantra).
It is best to search for an original filter in stores by its article number - 31112-1R000. Analogues from AMD, Finwhale and Nipparts are also suitable. Factory part numbers for these parts are AMD.FF45, PF731 and N1330330, respectively.
Replacing the fuel filter on KIA Rio 2015, 2016 and earlier years of production is best combined with installing a new filter mesh. It is used as a preliminary filtration system and prevents massive foreign particles contained in gasoline from entering the filter. Mesh article number – 31184-1R000. As an alternative, it is better to use a mesh from the Cross company with article number KM79-01114.
Part selection
The fuel filter is one of those car parts that has many analogues, and finding the right one is easy. So, Kia Rio has a number of analogues of the original part.
Original
Estimated prices for filters for a Kia Rio car will please you with their affordable prices.
- Coarse fuel filter 31090-1G000 . Average cost 600 rub.
- Fine fuel filter 31112-1G000 . Average cost 1200 rub.
Analogs
Now let’s look at the list of analogues with catalog numbers and prices:
| Manufacturer's name | Catalog number | Price in rubles per piece |
| Nipparts | N1330325 | 750 |
| Toko | T1304028P | 800 |
| SCT | ST 6516 | 1000 |
| Profit | 1535-0014 | 1000 |
| Blue Print | ADG02376 | 1000 |
| Koreastar | KFFH-053 | 1000 |
| Master-sport | 300-KF-PCS-MS | 1200 |
| Japan Parts | FC-K22S | 1500 |
| Patron | PF3258 | 1500 |
| Alco | FF-076 | 1700 |
Procedure for replacing the fuel filter
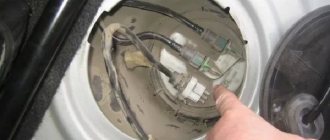
The hatch that provides access to the fuel module in the KIA Rio 3 is located in the car's interior. It is mounted under the rear seat. The mounting brackets for the rear sofa are located between the cushion itself and the backrest. To unscrew the fasteners, it is better to use a 12mm socket wrench. After unscrewing all the brackets, lift the seat and remove the 2 latches.
Also read: Kia Sportage 3, list of works during maintenance 6, Kia Sportage maintenance regulations
The fuel system is protected from external influences by a small plastic hatch. The part is installed with adhesive-sealant. To dismantle the element, you simply need to cut off the fixing compound with a utility knife.
In winter, it is more difficult to remove sealant. It starts to chip instead of being cut off. Therefore, it is better to preheat it a little with a hair dryer.
After removing the sealant, you need to remove the hatch and clean the space of dirt. This can be done with a regular vacuum cleaner. Then the fuel filter is replaced on the KIA Rio 3:
- Remove the ignition key and remove the connector that supplies power to the fuel module.
- Remove the fuel vapor supply hose to the absorber.
- Remove the fuel transfer pipe.
- Unscrew the stop plate of the module cover.
- Remove the fuel module.
- Remove the sensor indicating the fuel level in the car.
- Remove the wires from the holders.
- Move the sensor down along the special guides.
- Remove the power sensor.
- Remove the power plug from the fuel pump.
- Pull out the elements securing the fuel supply tube.
- Separate the module cover from the glass.
- Remove the fine filtration system.
- Separate the element securing the fuel pump.
- Disconnect the mesh.
- Disconnect the “-” at the fuel pressure regulator.
- Remove the seal ring.
- Remove the fuel drain pipe from the housing.
Now you need to install a new filter system and assemble the unit. All steps are performed in reverse order.
For a more detailed understanding of the process, you can watch the disassembly of the module in the video. After completing the work, it is advisable to ventilate the interior.
Technical regulations for replacement
In order to maintain the functionality of the technical product, the manufacturer recommends replacing the Kia Rio fuel filter every 30,000 km. mileage In this case, maintenance is carried out every 15,000 km. In practice, this interval is not maintained. Car enthusiasts who care about their vehicles update cleaning elements every 10,000 km.
The replacement process is not at all complicated; every car owner can do it. Specialists are rarely called to the workshop in case of detection of a large-scale breakdown or other malfunction that requires prompt intervention by a professional.
What is the point of regular replacement?
It is necessary to observe the frequency of changing the fuel filter. This will reduce the load on the engine and reduce the likelihood of carbon deposits forming inside the power plant. The car will behave more confidently when accelerating. Regularly changing the unit will also save on fuel.
You can increase the resource of the cleaning system using 3 tips:
- You need to refuel only at proven gas stations operating under the brands of large companies.
- Do not store fuel in old rusty cans.
- You should not go to a gas station immediately after filling it with fuel from a tanker.
Also read: Replacing the standard Kia Rio 3 radio - how to remove and connect a new device yourself
Don't forget about the need to change the filter. This is fraught with damage. Moreover, the car can “stop” right on the highway, far from civilization.
KIA Rio: replacing the fuel pump
If, while accelerating, if you sharply press the gas pedal, you feel slight twitching or “failure,” then it is likely that there are problems with the KIA Rio fuel pump.
Problems with the KIA Rio fuel pump:
- Car jerking when accelerating
- Feeling of the gas pedal “failure” after pressing
- Having problems starting the car
The most obvious and common problem with the KIA Rio fuel pump is its contamination. In this case, it is necessary to replace the fuel pump grid, which will require removing it. The removal procedure is quite simple, although it will require some skill, as well as the use of special tools. In order to remove the KIA Rio fuel pump, you should prepare a 12mm wrench, a regular and Phillips screwdriver, a large amount of rags, an empty container of small volume and, of course, a new mesh for the KIA Rio fuel pump (judging by the reviews of the owners of the popular Korean, as an alternative For the original mesh, a mesh with a cut corner from a VAZ-2110 1.6 will do.
After removing the KIA Rio fuel pump, you should also inspect the tank for the presence of sand or other contaminants. A large amount of debris in the housing of the gas pump or gas tank indicates poor quality of the fuel being poured.
Remove the KIA Rio fuel pump:
- Remove the rear sofa by unscrewing with a 12mm wrench the two bolts that hold it in place
- Using a Phillips screwdriver, unscrew the hatch that covers the location of the fuel pump and remove the cover, having first disconnected the plug
- Next, to reduce the amount of excess fuel that will be detected during the removal process, you need to start the KIA Rio engine and wait until it stalls
- Disconnect the fuel lines that are secured with latches
- During the work, gasoline will leak out of the fuel pump (thanks to the previously performed actions, in smaller quantities), so the person removing the KIA Rio fuel pump will definitely need a rag - it needs to be prepared in advance
- It is necessary to unscrew the lid holding the “glass”, for which you should press a flat screwdriver into the side surface (it is ribbed) of the slot and unscrew it with gentle blows until it becomes possible to unscrew it by hand
- Carefully remove the pump housing, not forgetting the O-ring and the float held on the side of the lever
- A small amount of gasoline will remain inside the “glass”, so when removing it you will need to act carefully so as not to spill it
- The remaining gasoline from the pump and fuel wires is poured into a container prepared in advance, while the removed KIA Rio fuel pump housing is turned upside down
Kia Rio fuel system
- Repair manuals
- Repair manual for Kia Rio 2000.
- Fuel system
5.0 Fuel system Name A3 SOHC A5 DOHC Engine idling speed, min –1 750±50 Ignition timing, ° to TDC 8±5 8±5 (6± 5 for Europe*) Throttle assembly diffuser diameter, mm 50 Air resistance...
5.2 Fuel system elements Engine control and management elements The fuel system is controlled by the ECM (Engine Control Module). The ECM adjusts the ignition timing, determines the amount of fuel supplied to the engine, controls the toxicity reduction system...
5.3 Ignition timing PERFORMANCE ORDER 1. Apply the parking brake. 2. Start the engine and warm it up to operating temperature. 3. Turn off all electrical consumers. 4. Connect the strobe sensor to the high-voltage wire of the first cylinder. 5. By combining the marks on the school...
5.4 Idle speed PERFORMANCE ORDER 1. Apply the parking brake. 2. Start the engine and warm it up to operating temperature. 3. Turn off all electrical consumers. 4. Connect the inductive tachometer to the high-voltage wire of the first cylinder or to the “O” contact of the diagnostic...
5.5 Air flow meter sensor Removal PERFORMANCE ORDER 1. Disconnect the connector from the air flow sensor. Warning Do not throw or hit the sensor as this will damage it. 2. Loosen the air intake pipe clamps on both sides of the air flow sensor. 3. Otso...
5.6 Knock sensor Check PERFORMANCE ORDER 1. Disconnect the electrical connector of the knock sensor and remove the knock sensor. Secure the knock sensor in a vice and connect a voltmeter between terminals 1 and 2. 2. Use a hammer to hit the vice sharply and observe the voltmeter reading. 3. About...
5.7 Throttle position sensor Checking resistance PERFORMANCE ORDER 1. Disconnect the connector from the throttle position sensor. 2. Connect an ohmmeter between pins 1 and 2 of the connector. 3. Check that the sensor resistance increases in proportion to the throttle angle. Sop...
5.8 Checking the main relay PERFORMANCE ORDER 1. Remove the cover from the main fuse and relay box. 2. Press your finger against the main relay. 3. Check that the relay clicks when you turn on the ignition. 4. Check that when the ignition is turned off, the relay also clicks. 5. Remove the relay and additional wires...
5.9 Checking the fuel pump relay Warning The fuel system remains under pressure even after the engine is turned off, so the pressure in the fuel system must be relieved before disconnecting the lines. PERFORMANCE ORDER 1. Listen to whether the fuel pump relay clicks when the ignition is turned on. 2. ...
5.10 Checking the voltage of the front and rear heated oxygen sensors PERFORMANCE ORDER 1. Start the engine and warm it up to operating temperature. 2. Leave the engine running at idle speed. 3. Connect a voltmeter between pins 1 (LG/R wire) and ground. 4. Increase and decrease engine speed several times...
5.11 Checking the front and rear heated oxygen sensors PERFORMANCE ORDER 1. Turn off the ignition. 2. Disconnect the oxygen sensor connector. 3. Connect an ohmmeter between pins 1 and 3 and measure the resistance. Resistance: 3–7 Ohms at 20°C 4. Otherwise, replace the oxygen sensor. Tightening torque: 30–49 N•m 5….
5.12 Relieving pressure in the fuel system Warning The fuel system remains under pressure even after the engine is turned off, so the pressure in the fuel system must be relieved before disconnecting the lines. PERFORMANCE ORDER 1. Start the engine. 2. Disconnect the fuel pump power connector, located...
5.13 Fuel lines Warning Gasoline is explosive, so when working with fuel system components, ensure normal ventilation of the workplace, do not use fire, sparking devices, open fire-hazardous lighting fixtures, and do not smoke. When disconnecting the quick release couplings...
5.14 Activating the fuel system After relieving pressure in the fuel system, the fuel system must be activated in order to avoid prolonged cranking of the starter when starting the engine. EXECUTION ORDER 1. Using an additional wire, connect the FUEL PUMP (fuel pump) and B+ terminals of the diagnostic...
5.15 Checking the residual pressure in the fuel system PERFORMANCE ORDER 1. Disconnect the wire from the negative terminal of the battery. Warning The fuel system remains under pressure, even after the engine is turned off, so the pressure in the fuel system must be relieved before disconnecting the lines. 2. Sn…
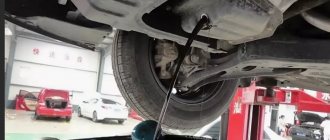
5.16 Checking fuel pipelines PERFORMANCE ORDER 1. Disconnect the wire from the negative terminal of the battery. 2. Relieve pressure in the fuel system. 3. Raise the car. 4. Connect the OK2A1 131 001 A measuring device near the fuel filter. 5. Connect the wire to the negative...
5.17 Checking fuel injectors PERFORMANCE ORDER 1. Start the engine and warm it up to normal operating temperature. Leave the engine running at idle speed. 2. Using a stethoscope or a screwdriver, listen to the sounds created by the injectors when they operate. Warning Gasoline is explosive...
5.18 Quick-release couplings Warning The fuel system remains under pressure even after the engine is turned off, so the pressure in the fuel system must be relieved before disconnecting the lines. Connection PERFORMANCE ORDER 1. Push the flange of the quick-release connection onto the pipe until it is clearly…
5.19 Fuel pump Check PERFORMANCE ORDER 1. Connect the FUEL PUMP (fuel pump) and B+ terminals of the diagnostic connector with an additional wire. 2. Remove the cap from the fuel filler neck of the fuel tank. 3. Turn on the ignition. 4. Determine if the fuel pump is working by listening...
5.20 Fuel tank Sequence of removing the fuel tank 1 – fuel filler pipe; 2 – fuel tank; 3 – fuel filter; 4 – tape; 5 – fuel pump; 6 – fuel pipe. Removal PERFORMANCE ORDER Warning Gasoline is explosive, so when working with...
5.21 Checking the crankcase ventilation (PCV) system PERFORMANCE ORDER 1. Start the engine and warm it up to operating temperature. 2. Leave the engine running at idle speed. 3. Disconnect the crankcase ventilation hose from the cylinder head cover. 4. Close the crankcase ventilation hose with your finger. 5. …
5.22 Checking the fuel vapor recovery system PERFORMANCE ORDER 1. Start the engine and warm it up to operating temperature. 2. Disconnect the vacuum hose from the EVAR valve and blow through the hose side. 3. Make sure that there is no vacuum in the canister of the fuel vapor recovery system,...
5.23 Checking the fuel vapor recovery system valve PERFORMANCE ORDER 1. Disconnect the vacuum hoses from the fuel vapor recovery valve (EVAR) and blow it out. 2. Make sure no air is passing through the valve. 3. Disconnect the connector from the valve and use additional wires to connect the valve to the battery as shown...
5.24 Checking the canister closing valve PERFORMANCE ORDER 1. Measure the closing resistance of the activated carbon canister. Resistance: 23-26 ohms at 20°C 2. If the resistance is not within the required values, replace the valve.
↓ Comments ↓
1. Brief introduction to the car
1.0 Brief introduction to the car 1.2 Keys 1.3 Door locks 1.4 Immobilizer 1.5 Power windows 1.6 Seats 1.7 Seat belts 1.8 Rear seat belts 1.9 Airbags 1.10 Airbag system components 1.11 Airbag warning lamp 1.12 Tailgate (5-door model) 1. 13 Trunk lid 1.14 Luggage compartment lamp 1.15 Hood 1.16 Fuel filler flap 1.17 Steering wheel 1.18 Rear view mirrors 1.19 Interior lighting 1.20 Interior equipment 1.21 Digital clock 1.22 Trunk curtain 1.23 Power socket 1.24 Antenna 1.25 Sunroof 1.26 Solar holder points 1.27 Cargo net 1.28 Roof rack 1.29 Ignition switch 1.30 Engine start 1.31 Manual transmission 1.32 Automatic transmission 1.33 Brake system 1.34 Parking brake 1.35 Hydraulic power steering 1.36 Adjustable steering column 1.37 Instrument cluster 1.38 Headlights 1.39 Turn signals 1.40 Headlight range control 1.4 1 Daytime running lighting 1.42 Rear fog lights 1.43 Windshield wipers and washers 1.44 Heated rear window 1.45 Heated outside rear view mirror 1.46 Heating and ventilation system 1.47 System operation 1.48 Information on plates 1.49 Hazard warning lights 1.50 Starting the engine from the battery of another vehicle 1.51 Fuses 1.52 Memory fuse 1.53 Towing the vehicle 1.54 Wiper blades 1.55 Replacement lamps 1.56 Caring for the appearance of the car 1.57 Maintenance
2. Engines A3E, A5D
2.0 Engines A3E, A5D 2.1 Technical data 2.2 Compression check 2.3 Camshafts 2.4 Pistons and connecting rods 2.5 Crankshaft 2.6 Checking connecting rod and main bearings 2.7 Air filter (ACL) 2.8 Accelerator cable 2.9 Cylinder head 2.10 Checking valves 2.11 Checking seats valve la 2.12 Checking the spring valve 2.13 Toothed belt 2.14 Exhaust system
3. Lubrication system
3.0 Lubrication system 3.1 Technical data 3.2 Checking the engine oil pressure 3.3 Changing the engine oil 3.4 Changing the oil filter 3.5 Oil pump
4. Cooling system
4.0 Cooling system 4.1 Technical data 4.2 Coolant 4.3 Changing the coolant 4.4 Water pump 4.5 Radiator 4.6 Checking the cooling system for leaks 4.7 Radiator fan motor 4.8 Checking the radiator cap 4.9 Back pressure valve 4.10 Thermostat
5. Fuel system
5.0 Fuel system 5.2 Fuel system components 5.3 Ignition timing 5.4 Idle speed 5.5 Air flow meter sensor 5.6 Knock sensor 5.7 Throttle position sensor 5.8 Checking the main relay 5.9 Checking the fuel pump relay 5.10 Checking the voltage of the front and rear heated oxygen sensors 5. 11 Checking the front and rear heated oxygen sensors 5.12 Relieving pressure in the fuel system 5.13 Fuel lines 5.14 Activating the fuel system 5.15 Checking the residual pressure in the fuel system 5.16 Checking the fuel lines 5.17 Checking the fuel injectors 5.18 Quick-release connections 5.19 Fuel pump 5.20 Fuel tank 5.21 Checking the crankcase ventilation (PCV) system 5.22 Checking the fuel vapor recovery system 5.23 Checking the fuel vapor recovery system valve 5.24 Checking the canister closing valve
6. Ignition system
6.0 Ignition system 6.1 Technical data 6.2 Ignition system operation 6.3 Ignition system components 6.4 Ignition timing 6.5 Ignition coil 6.6 Spark plugs 6.7 High voltage wires
7. Clutch
7.0 Clutch 7.1 Technical data 7.2 Clutch pedal adjustment 7.3 Clutch pedal height 7.4 Clutch disc 7.5 Checking the clutch cover with pressure plate 7.6 Checking the clutch disc 7.7 Clutch cover and pressure plate 7.8 Replacing the central bearing 7.9 Clutch pedal 7.10 Clutch cable 7. 11 Clutch release bearing 7.12 Fork clutch release/release lever
8. Gearbox
8.0 Gearbox 8.1. Technical data 8.2. Automatic transmission F4E–K
9. Axles and drive shafts
9.0 Axles and drive shafts 9.1 Technical data 9.2 Checking the condition of the protective cover 9.3 Checking the reliability of the spline connection 9.4 Replacing the drive shaft 9.5 Repairing the drive shaft 9.6. Front axle 9.7 Rear axle 9.8 Adjusting the tension of the rear wheel bearings
10. Suspension
10.0 Suspension 10.1 Technical data 10.2 Checking the front suspension elements 10.3 Checking and adjusting the wheel alignment angles 10.4 Front wheel toe-in 10.5 Front suspension strut 10.6 Front suspension lower arm 10.7 Front anti-roll bar 10.8 Rear suspension beam
11. Wheels and tires
11.0 Wheels and tires 11.1 Technical data 11.2 Recommendations for replacing tires 11.3 Checking air pressure and tire condition 11.4 Wheel runout 11.5 Rearranging wheels 11.6 Wheel balancing
12. Steering
12.0 Steering 12.2 Steering without hydraulic power steering 12.3 Checking steering without hydraulic power 12.4 Steering column without hydraulic power 12.5 Steering with hydraulic power 12.6 Checking the fluid pressure in the hydraulic system 12.7 Checking the steering force 12.8 Checking the fluid level 12.9 Bleeding the hydraulic power system steering 12.10 Power steering pump drive belt 12.11 Power steering gear 12.12 Power steering pump
13. Brake system
13.0 Brake system 13.1 Technical data 13.2 Checking the vacuum brake booster using instruments 13.3 One-way vacuum valve 13.4 Vacuum brake booster 13.5 Bleeding the hydraulic system of the brake drive 13.6 Checking the brake pipes 13.7 Checking and replacing brake hoses 13.8. Brake pedal 13.9 Replacing the front brake pads 13.10 Replacing the brake pads on the rear drum brakes 13.11 Repairing the front brake caliper 13.12 Repairing the service brake cylinder 13.13 Master cylinder 13.14 Pressure limiter 13.15 Parking brake 13.16 ABS control unit 13.17 Hydraulic control unit (HCU) 1 3.18 Front frequency sensor wheel rotation 13.19 Rear wheel speed sensor 13.20. Wheel speed sensor gear rotor 13.21 Basic inspection 13.22 Functionality check
14. Body
14.0 Body 14.2 Hood 14.3 Trunk Lid 14.4 Trunk Lid Hinge 14.5 Tailgate 14.6 Gas-filled Tailgate Support Pillar 14.7 Tailgate Lock 14.8 Tailgate Outside Handle 14.9 Front Door 14.10 Door Weather Seal 14.11 Rear Door 14.12 Instrument panel 14.13 Ceiling 14.14 Side trunk trim for five-door cars 14.15 Rear trunk trim 14.16 A-pillar upper trim 14.17 B-pillar lower trim 14.18 B-pillar upper trim 14.19 C-pillar trim for four-door cars 14.20 C-pillar trim for five-door cars 14.21 Front door trim 14.22 Front door sill trim 14.23 Trim rear door 14.24 Trim tailgate 14.25 Rear door sill trim 14.26 Rear parcel shelf 14.27 Rear wheel arch trim for four-door cars 14.28 Rear wheel arch trim for five-door cars 14.29 Front bumper 14.30 Rear bumper 14.31 Front seats 14.32 Front seat back trim 14.33 Front seat cushion trim 14.34 Under head 14.35 Front hinged hinge seats 14.36 Rear seat 14.37 Seat belts 14.38 Rear seat belts 14.39 Rear seat belt anchor 14.40 Projected plane distances for checking the distances between individual points of the vehicle body 14.41 Actual distances for checking the distances between individual points of the vehicle body
15. Air conditioning system
15.0 Air conditioning system 15.1 Technical data 15.2 Air conditioning system circuit 15.3 Notes when replacing air conditioning system components 15.4 Connecting air conditioning system components 15.5 Precautions 15.6 Performance check 15.7 Diagnosis of the air conditioning system using pressure gauges 15.8 Checking the air conditioning compressor clutch clearance 1 5.9 Checking the clutch air conditioning compressor 15.10 Oil for lubricating the air conditioning compressor 15.11 Checking the level and adding oil to the air conditioning compressor 15.12 Evaporator air filter 15.13 Dual pressure sensor 15.14 Air conditioning compressor 15.15 Checking the condenser 15.16 Checking the condenser fan 15.17 Checking the receiver/dryer 15.18 Checking the thermostatic sensor (ter mistor) 15.19 Engine check fan 15.20 Checking the resistor block of the fan motor 15.21 Air supply switch to the vehicle interior 15.22 Air conditioning control panel
16. Electrical equipment
16.0 Electrical equipment 16.1 Technical data 16.2 Electrical circuits 16.3. Generator 16.4. Battery 16.5 Starter 16.6 Checking when cranking the crankshaft of a cold engine 16.7 Checking the electrical circuit of the traction relay 16.8 Checking the traction relay 16.9 Checking the brushes and brush holder 16.10 Checking the stator coils 16.11 Checking the rotor 16.12 Removing and installing the starter 16.13 Repairing the starter 16.14 Many function switch 16.15 Horn 16.16 Fuse and relay box installed in the vehicle interior 16.17 Checking the door lock activator relay 16.18 Checking the outside rear view mirror position adjustment switch 16.19 Checking the outside rear view mirror position activator 16.20 Checking the window lift motor 16.21 Checking the rear window defogger 16.22 Repairing the conductive heater strip 16.23 Windshield wiper motor wow glass 16.24 Window washers 16.25 Headlight adjustment 16.26 Fog lamp adjustment 16.27 Airbags (SRS) 16.28 Warning labels 16.29 Driver airbag and spiral wire 16.30 Checking the airbag 16.31 Checking the spiral wire (spring) 16.32 Front passenger airbag 16. 33. Electrical circuits