Today I was doing some minor engine repairs; it was necessary to align the TDC marks on the RV and KV. I decided to leave a note here so as not to forget)), and maybe it will be useful to someone else. There is a mark on the RV, there is only one of its kind.
There is also a mount for the phase sensor marker, we don’t need this.
On the HF damper it is a little more difficult, due to its inaccessibility (if the radiator is not removed). But looking at the removed pulley, everything becomes clear. You can find the missing tooth spot by touch, count 20 teeth counterclockwise, and look for the mark there.
And so in a real situation. Opposite the mark you can put a mark with a marker, it will be clearly visible.
To find it, you don’t need to remove anything additional, your hand can go through freely, turn the pulley to a position where you can comfortably draw a line. Well, in conclusion, it’s easier to first set a mark on the RV sprocket and then look for the mark on the damper, it will be somewhere near the crankshaft sensor (DPKV). Since the crankshaft makes two revolutions during one revolution of the RV, you need to look in the area of +- 5 teeth.
You will need: a screwdriver, keys “8”, “10”, “13”, a special key for turning the crankshaft.
Setting the piston of the fourth cylinder to the TDC position of the compression stroke
The piston of the 4th cylinder is set to the TDC (top dead center) position of the compression stroke so that when carrying out work related to removing the camshaft drive chain, the valve timing is not disrupted.
If the valve timing is incorrect, the engine will not operate normally.
Set TDC according to the mark on the camshaft sprocket (when installing according to the marks on the crankshaft pulley and on the front cover of the camshaft drive chain, the piston of either the 1st or 4th cylinder may be in this position).
After this, make sure that the marks on the crankshaft pulley and the cover match.
Photos of timing marks Niva Chevrolet
Part 2. Valve + piston = repair Niva Chevrolet NIVA Chevrolet 4+4
Then you should remove the element tension mechanism.
Location of TDC marks The marks are located on the camshaft sprocket, hole a, and on the camshaft bearing housing, protrusion b.
If the valve timing is incorrect, the engine will not operate normally. How to remove it correctly can be found in articles about the hydraulic chain tensioner of a Niva Chevrolet car. If you pull it towards yourself the distance will be removed along with the chain.
If after several revolutions there are no discrepancies, the fastening bolts on both sprockets are tightened, and the lock washers are installed in their original places. The adjustment of the timing marks ends here and all engine components are reassembled. Consequences of incorrect installation and adjustment: Characteristic extraneous clicks appear in the engine, which become louder as the speed of the machine increases.
The engine is unstable even at idle speed. The car's acceleration time increases significantly because the engine does not respond well to pressing the gas pedal. Acceleration occurs in jerks, during which clouds of black smoke may fly out of the exhaust pipe.
Valve wear accelerates many times over, and if the shafts are out of synchronization too much, the valves become deformed and their seats break.
Incorrect adjustment can also lead to a broken timing chain. It is recommended that when loosening the tightening, unscrew it by hand or with a deep-head wrench.
What are tags and their purpose in the Shnivy mechanism
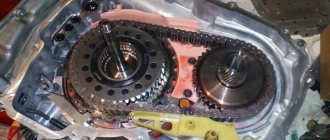
Marks in the timing system on a Chevrolet Niva car are special types of notches and holes that are located on the gas distributor pulleys. The photo shows pulleys with marks along which the timing chain is aligned.
See:
Aligning the chain with marks is done so that it is better fixed and holds the gas distribution mechanism itself. If you install the chain without following the marks, then the operation of the pulleys will be uncoordinated and will then lead to their rapid wear. Therefore, it is important, whenever replacing a chain or parts of a gas distribution mechanism, to install them in accordance with the marks. There may be a malfunction of the timing system when the chain tension is loosened or it is stretched. In order to correctly set the timing mechanism according to special marks, we will look at the procedure for installing the gas distributor phases on the VAZ-2123.
Setting the timing of the gas distribution mechanism using special marks
So, setting the phases in the timing system according to special marks on a Chevrolet Niva car includes the following sequence of actions:
First, we make sure that we have the necessary tools: a screwdriver and wrenches 8, 13 and 10. You will also need a special tool that will need to be used to turn the crankshaft. The VAZ-2123 car is installed on the inspection hole and the wheels are secured using the handbrake. You can put shoes under the wheels. We open the hood on the Chevrolet Niva and remove the following elements: the fan is removed; unscrew the radiator mounts and move it to the side
There is no need to remove the pipes and drain the liquid; the air duct pipe is removed. Having reached the valve cover, you need to unscrew its fasteners and carefully remove it to prevent dirt and other objects from getting inside.
Timing marks VAZ(LADA) 21214 NIVA
Installing timing marks
for VAZ(LADA) 21214
NIVA
.
Sorry about the quality. The camera died.
Part 2. Valve piston = repair Niva Chevrolet NIVA Chevrolet 44
Overhaul of the Chevrolet NIVA engine.
After repair work, it is recommended to replace the cover gasket.
After the cover was removed, the following view is observed, shown in the photo below.
Under the valve cover
See:
Important! When unscrewing the bolt, it is necessary to control its position, because it is not fixed by anything and can freely fall into the engine sump. It is recommended that when loosening the tightening, unscrew it by hand or with a deep-head wrench
When assembling, do not forget to replace the gasket on the cover!
The work carried out does not require much time, but is the key to the successful operation of the parts of the gas distribution mechanism of the Niva Chevrolet car
Drawing a conclusion, I would like to note the importance of setting the timing chain according to special marks. If for some reason you forgot to align the pulleys with the marks, then it is better not to start this process and make the adjustment again
This will extend the life of the timing system and all its components.
Do you still think that diagnosing a car is difficult?
If you are reading these lines, it means you are interested in doing something in the car yourself and really saving money, because you already know that:
- Service stations charge a lot of money for simple computer diagnostics
- To find out the error you need to go to specialists
- The services use simple impact wrenches, but you can’t find a good specialist
And of course you are tired of throwing money down the drain, and driving around the service station all the time is out of the question, then you need a simple CAR SCANNER ELM327, which connects to any car and through a regular smartphone you will always find the problem, turn off CHECK and save a lot of money.
Parts and consumables:
The chain tensioner is being dismantled. How to remove it correctly can be found in articles about the hydraulic chain tensioner of a Niva Chevrolet car.
It is possible to do without removing the chain tensioner, but for this you need to have the appropriate skills. If you decide not to remove the tensioner, then you need to press out the tensioner plunger using a screwdriver.
We proceed to removing the crankshaft sprocket along with the chain. To do this, you need to manually pull it towards you about cm.
The location of the chain on the teeth changes. The best option is to move in increments of one tooth.
The sprocket is installed on the camshaft flange along with the chain. When the location of the chain on the sprocket changes, the holes in it will accordingly not coincide with the locating pin.
To do this, rotate the crankshaft in the required direction until the hole and the notch of the pin coincide. Now take the timing chain and lubricate it as well. First install it on the crank pulley gears, then on the oil pump and on the camshaft.
The chain should be tensioned from sprocket to sprocket, while observing the position of the pulleys according to the marks.
Install the timing belt tensioning component and tighten all nuts with a wrench. Having done this, check again that the marks match.
split for Chevrolet Niva
Also tighten the screws on the gears. The scrolling step is one tooth. The sprocket with chain is placed on the camshaft flange.
Niva Chevrolet
When the chain moves on the sprocket, its holes will not line up with the pin. You should turn the crankshaft in the specified direction until the mark and pin match
It is important to secure the part with a bolt and washer without tightening it completely. After turning the crankshaft twice with a special wrench, check the placement of marks on the camshaft gear and bearings
If the marks correspond, their adjustment has been successfully completed.
The cylinder head cover has been removed. Remove the cylinder head cover, see. Rotating the crankshaft, align the marks on the camshaft sprocket and its bearing housing. If the chain is installed correctly, the mark on the crankshaft pulley should align with the long mark on the camshaft chain cover. If the marks do not match, straighten the lock washer tabs of the camshaft sprocket bolt. Engage first gear to prevent the crankshaft from turning, remove the bolt and
When does a belt need to be replaced?
- during scheduled maintenance (if the mileage is 100 thousand km);
- if the marks on the camshaft sprocket do not match the mark on the bearing housing identified during phase diagnostics;
- when the pump that drives the “water pump” fails;
- if the chain is damaged (wear, stretching or cracking), requiring urgent replacement and adjustment according to the marks.
Advice : if the engine does not pull and does not gain speed, you need to check the DPKV and timing marks and set the TDC (engine top dead center) on the flywheel. Both pulleys (inlet and outlet) are placed along the marks with the chain tensioned.
When to use low gear
For what purposes is a transfer case even needed, when does it make sense to engage the locking and downshift? Such seemingly simple, but at the same time serious questions will become clear when considering the following example. When driving on a country road on a hard surface, fourth gear is engaged. Suddenly, a large puddle with a soft, unreliable surface appears in front of the car. In such an obstacle the car can easily “sink”. To prevent this, you should engage a lower gear and slowly overcome such an obstacle without haste. This gear is designed specifically for driving on soft road surfaces, when even in first gear the car feels “hard”.
Low gear
It is worth noting that in order to engage a lower gear on a Niva Chevrolet, you need to stop - this is how the car’s differential is designed. But you don’t need to stop at all to turn the lock on and off. But is it worth using such additional and, without a doubt, useful functions of the machine often? Experienced drivers recommend using them in places where the dirt is not located on level ground, but with various potholes and the like.
Thus, the low gear of the Chevrolet transfer case is designed for comfortable off-road driving and overcoming various obstacles. In such a gear you need to drive slowly, you cannot accelerate sharply, because at this moment the wheels will receive a large load, as a result of which a real hole can form, from which it will be very difficult for the car to get out.
With this driving style, the motorist will better feel the movement of the wheels, as a result of which, when they “bury”, as evidenced by the chaotic movement of the car, it will be possible to immediately do something after overcoming the obstacle. Most often, this is done by changing the trajectory of the car.
It is also worth noting that when driving through sticky mud or deep puddles, you should never suddenly engage second downshift. At the same time, the torque increases, as a result of which the car can simply “choke”, stalling at the most inopportune moment.
Product description
Branded developments:
Innovative USPK technology was used in the production of oil and petrol resistant rubber:
BNKS-28AMN (synthetic butadiene-nitrile rubber) is used in the recipe.
Benefits for the car enthusiast:
Warranty 2 years unlimited mileage
- Availability: In stock
- Length: 16 cm x Width: 6 cm x Height: 3 cm
- Weight: 0.45 kg
- Product code: 4877
- Cash upon receipt (cash on delivery)
- Online payment by bank cards without commission
- Electronic wallets
- According to the organization's account (excluding VAT)
- Post office
- SDEK | DPD | PEC
- Business Line
- Energy | GTD (KIT)
- Baikal Service
- ZhelDorExpedition
- Dispatch from 1 day
- Delivery from 2 days
- Product didn't fit? Easily return it within 14 days
- Read about other store guarantees
Source
What's next?
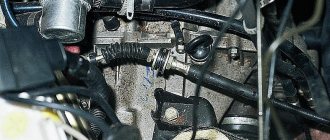
The car is placed in fifth gear. Use a special 38 mm wrench to remove the nut on the crankshaft pulley.
Unscrew the spark plugs and make marks on the crankshaft, as well as on the camshaft gear. Then dismantle the pulley and unscrew the fastenings of the lower frontal cover. They are located on the engine sump. Unscrew the two damper mounting bolts. The last one is removed too. The oil pump gear clamps are bent. Then the bolt is unscrewed with a 17mm head.
The oil lines are removed from the tensioner using a brake pipe wrench. Afterwards you will need to unscrew the nut of the low oil pressure sensor from the tee. To do this, you will need a 22mm wrench. This procedure is required when using the “Pilot” tensioner.
Using a spark plug wrench, the tee is removed and a pressure sensor is installed instead. Using a 10mm wrench, unscrew the two tensioner nuts. The last one is removed from the place. The top nut is removed. It can be obtained with pliers or a tubular wrench.
The next step is to remove all three gears, as well as the chain. Use a screwdriver to remove the old crankshaft oil seal. It is necessary to thoroughly wipe the oil seal seat from dirt.
You will need a clean rag. It is also advisable to wipe the lid. After these procedures, a new oil seal is pressed in. To make it go in easily, you will need to pre-lubricate the elements with oil. An old oil seal is used as a mandrel (so that the part fits evenly into the hole).
Phase adjustment in case of mismatch
If the notches do not match, work continues:
- The “whiskers” of the lock washer are bent. The fixing bolt is unscrewed using a key set to “13”, and the position of the camshaft sprocket is loosened.
- The first gear on the gearbox is engaged, allowing you to avoid spinning when unscrewing the crankshaft gear bolt.
- The fastener is removed with a lock washer. To prevent the bolts from falling into the engine sump, use a deep-head wrench or unscrew the bolt by hand.
- Remove the chain tensioner using a screwdriver. It should be replaced if it is stretched or strained, during scheduled maintenance, after 60-80 thousand kilometers.
How to set engine marks on a VAZ 2121
There is a standard 21213 NIVA, the engine of which has tractor traction at the bottom and lacks traction at speeds above 3000. Replacing the chain, all the sprockets, the camshaft with the bed did not solve the problem. Rearranging the chain on a tooth back and forth, too. It was noticed that the mark on the camshaft sprocket is not installed strictly opposite the protrusion; it can be placed half a tooth forward or backward. It was decided to check the valve timing. A device for adjusting valves with an indicator is welcome, but not at all required. However, I have it. The valve clearances must be properly adjusted!
When replacing the lower sprocket, check that the marks on the small sprocket and the pulley match. They correspond to TDC.
Having placed a mark on the pulley opposite the long mark 3 (TDC on the distributor drive cover), we mark marks 1 and 2 (5 and 10 degrees) on the pulley with a light marker (I used a white oil marker). We turn the crankshaft so that the standard mark on the pulley is opposite mark 1 (10 degrees) and mark 2 more marks - 5 and 10 degrees. on the other side of the zero mark. Also, by placing the extreme marks opposite the existing protrusions, we mark 15 and 20 degrees. We mark the zero mark on the second side of the pulley (now it is on both halves of the pulley). We have a scale marked on the crankshaft pulley - 20 - 15 -10 - 5 - 0 - 5 -10 - 15 -20 degrees. This is the easy way. You can make a scale out of paper, mark it more precisely, for example, with an accuracy of 1 degree, and stick it on the pulley. This method is a little more complicated, but also more accurate. I was quite happy with the 5 degree scale.
We install the crankshaft and camshaft according to the marks, as when adjusting the valves, the slider looks at the 4th cylinder. If there is an indicator, install it on the 2nd valve (intake of the 1st cylinder). We will use them to look for the moment of opening and closing of the valve. If there is no indicator, press the rocker up, using an open-end wrench 13-17. In this position, both valves of the 1st cylinder are clamped and slightly open (overlapping). Turn the crankshaft counterclockwise 10 -15 degrees. Using the applied marks, we find the moment when the intake valve begins to open by the appearance and disappearance of the gap between the rocker and the camshaft cam. We look at the pulley and the long mark on the cover, and count the degrees. For example, the mark is exactly between 10 and 15, we get 12.5 degrees. — the beginning of the opening of the intake valve. Let's remember. We move the indicator to the first valve (exhaust of the 1st cylinder) or control it by pulling the rocker up, turn the crankshaft clockwise, and find the moment when the exhaust valve closes.
For example, we got 15 degrees.
By simple calculations (in our head) we find the valve overlap point (15 + 12.5)/2 = 13.75 degrees. This point, located at TDC, is considered optimal. In our example, the overlap point moved 1.5 degrees after TDC. You can check the pie chart of the valve timing and compare the result:
On my car, the mark, with new sprockets and chain, turned out to be shifted forward by 5 (!) degrees. This is where the tractor came from. Perhaps VAZ specifically places this mark with an offset in order to increase the torque at the bottom, or maybe during assembly they use sprockets from Lada cars. In NIV, the block is slightly higher, which is why the mark shifts. Don't know. To correct the situation, a split (adjustable) sprocket was purchased and installed:
With its help, you can smoothly adjust the position of the camshaft relative to the crankshaft + - 1 tooth.
If we set it so that the overlap point does not reach TDC, we get earlier opening of the intake, an increase in power at high speeds and a drop in traction at low speeds, and vice versa, the overlap point after TDC - we have tractor traction at low speeds, and stupidity at high speeds. Exact recommendations like “how many degrees should I turn?” no one will give it to you. It all depends on the condition of the engine and personal feelings. However, you should not go more than half a tooth away from the point of zero overlap. It must be remembered that at large angles the pistons may collide with the valves. I made it so that the overlap point was shifted by 2.5 degrees before TDC, I got a good pick-up after 3000 rpm, and at low speeds the thrust remained almost unchanged. After all the manipulations, it is necessary to re-set the ignition timing, and it may be necessary to adjust the idle speed.
Source
Replacing the chain drive
- Place the car on a level surface. Open the hood. Disconnect the battery. Remove the air filter.
- The choke cable should be disconnected and moved away. It is also necessary to disconnect all electrical drives and pipes.
- Remove the fan, generator belt and pump roller. The belt should be thoroughly examined. If deep cracks or other damage is found on it, it must be replaced with a new one. Remove the tray protection and thoroughly clean its cover.
- Remove the valve plug. Unscrew the camshaft sprocket screw.
- Take a wrench and unscrew the ratchet nut.
- Now we begin to rotate the crankshaft until the marks on it and on the engine casing completely coincide. Make sure that the marks also match on the bearing housing and camshaft sprockets.
How to replace the chain tensioner on a VAZ 21213-VAZ 2131
Cars of the Niva family are very old models, in my opinion the very first cars went back to 1977 if memory serves, but these are new times and the car is still being produced and refined, so here are the chain tensioners that AvtoVAZ installed on its cars in Depending on the year of production, they may differ from each other, so for example, somewhere before 2000 or even higher, these cars of the Niva family came with the most common spring chain tensioners, these tensioners are very easy to remove, but one of their drawbacks (Or maybe an advantage) is the fact that they do not tension themselves, that is, from time to time you have to tighten them yourself, which is very inconvenient, but this is for someone, because it only takes 1-2 minutes to tighten the chain tensioner!
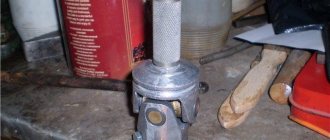
Now let’s look at a new type of tensioner that came on cars that were produced much later, so to speak, during Russia and not during the USSR, and so in new times, the so-called hydraulic chain tensioner was installed on this family of cars, its whole advantage is that you won’t need to constantly tighten it, that is, it was installed at the factory, and you, as they say, forgot about it, but it’s not so simple, if this tensioner suddenly jams or something else happens to it, then you will have to change it to a new one , and today you will learn how to replace this type of chain tensioner in this article. (By the way, you can see what a hydraulic chain tensioner looks like in the photo below)
By the way, if you have a regular tensioner of an old model, but it looks like it is shown in the photo, then read more about how to replace this unit in the article entitled
Removing the chain tensioner
1) At the very beginning of the operation, use a wrench to unscrew the tube that is connected to the hydraulic chain tensioner itself, and after this tube is unscrewed, disconnect it and move it aside.
2) Then, using a wrench or a socket with a universal joint (If it is difficult to get to), unscrew the two nuts that secure the hydraulic tensioner to the car engine (One of the nuts is not visible in the photo, but when you look at this tensioner on the car, then you will immediately understand where the second nut is, since it is located nearby) and then carefully remove it from the hole in which it is located.
Installing a new
Installing a new tensioner occurs in the reverse order of removal, and by the way, after installation, close the hood and sit behind the wheel of your car, then try to start the car and if that chain rattle disappears, then you did everything correctly and that’s why the chain rattled the tensioner itself.
Checking the tensioner for wear
- If you have removed your old tensioner and think that it is in working order and there is no point in changing it, then first rinse this tensioner in a container filled with gasoline (Rinse the tensioner at your discretion, just if all the dirt comes away from it, then it may even improve its performance like this how small particles of dirt will not interfere with the movement of the plunger itself, but more on that a little later), and after washing, thoroughly dry this tensioner or simply blow it out with compressed air.
- After washing and drying it, let's look at what it consists of, namely the plunger itself, which is also indicated under the number 1, and the tensioner housing, which is indicated under the number 2.
- Now, after studying this material, let's move on to checking, firstly, inspect the tensioner plunger itself; in no case should there be any kind of defects on its surface, such as, for example, scuffs, deep scratches, etc.
- Then inspect the body itself; there should also be no nicks, dents, etc. on its surface.
- And finally, perform another fairly simple check, namely, grab the tensioner plunger itself with your hand and then try to move it; if the plunger sticks in any place, then replace the tensioner with a new one.
Build process
- The front cylinder head cover is installed and a layer of sealant is applied.
- The bolts are tightened.
- The air filter is installed, sealant is applied and the pan is screwed on.
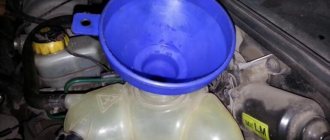
The fitting is unscrewed to bleed air from the block before filling with coolant. Pour liquid into the radiator. After it leaks out of the fitting, the lamb is screwed into place. Filling the engine oil. The hose and crankcase ventilation tube are connected to the fittings, and the copper wires are connected to the ignition coils.
The tips of the high-voltage wires are connected to the spark plugs. It is possible that after unscrewing the spark plugs, the remaining water in the wells penetrates the cylinders. Using a long knitting needle and a clean rag, it is easy to remove moisture from them.
Chevrolet Niva repair prices
Cost of maintenance work
| Job | Price |
| Changing the oil and filter in the engine (internal combustion engine) | 500 |
| Replacing the air filter | 300 |
| Replacing the cabin filter | 500 |
| Replacing the fuel filter | 500 |
| Changing the transmission oil | 2300 |
| Changing the oil in the gearbox (manual transmission, MTA, robot, isitronic) | 500 |
| Changing the oil in the front axle gearbox | 500 |
| Changing the oil in the transfer case (pk) | 500 |
| Changing the oil in the rear axle gearbox | 500 |
| Replacing steering fluid | 500 |
| Replacing hydraulic fluid in the control unit of the robotic box | 1200 |
| Replacing brake fluid | 300 |
| Cleaning fuel injectors on the engine, without removing the injectors | 1400 |
| Replacing the drive belt | 600 |
| Replacing the timing belt (timing belt) | 4300 |
| Replacing power steering fluid | 400 |
| Flushing the throttle valve | 1400 |
| Coolant replacement | 700 |
| Replacing brake hydraulic fluid | 300 |
| Replacing transmission fluid | 600 |
| Changing engine oil and filter with flushing | 700 |
| Topping up technical fluid | 50 |
| Replacing the timing belt of a diesel engine without removing the internal combustion engine | 6800 |
| Replacing the diesel engine fuel filter | 1000 |
| Handbrake adjustment | 700 |
| Replacing the timing chain of a diesel engine on a removed internal combustion engine | 4800 |
| Replacing the timing chain on a removed internal combustion engine | 4800 |
Also interesting: The low beam light does not light up: the main causes and troubleshooting
Suspension repair prices
| Job | Price |
| Replacement of trailing arm c/blocks | 800 |
| Replacing upper s/blocks (one side) | 700 |
| Replacement of lower s/blocks (one side) | 800 |
| Replacing rear stabilizer bushings | 500 |
| Replacing front stabilizer bushings | 1000 |
| Car chassis diagnostics | 800 |
| Control inspection | 450 |
| Wheel s/o | 100 |
| Replacing rear shock absorber | 1000 |
| Replacing the front shock absorber | 1500 |
| Replacing the steering knuckle | 1500 |
| Replacement of rear wheel hub bearing | 1500 |
| Replacing the front wheel hub bearing | 1500 |
| Wheel Bearing Adjustment | 200 |
| Replacing the front suspension spring | 1500 |
| Replacement of rear suspension spring | 1500 |
| Replacing the rear c/o lever | 1000 |
| Replacing the front wishbone | 1000 |
| Replacing lever c/blocks (lever removed) | 800 |
| Replacing upper s/blocks (lever removed) | 800 |
| Replacing the rear suspension shock absorber | 500 |
| Replacing the rear suspension spring | 1000 |
| Replacing the silent block of the rear axle beam suspension | 2000 |
| Replacing the rear wheel hub | 1000 |
| Replacing the rear wheel hub bearing | 1200 |
| Adjusting the rear wheel hub bearing | 200 |
| Replacement of rear suspension stabilizer bushings | 700 |
| Replacing the rear suspension stabilizer bar | 500 |
| Replacing the rear suspension arm | 600 |
| Replacement of rear suspension axle tie rods | 2200 |
| Replacing the rear suspension beam | 4500 |
| Replacing the rear axle suspension spring | 2700 |
| Strengthening the rear axle suspension spring | 2700 |
| Replacing the silent block of the rear suspension arm | 500 |
| Replacing the rear suspension trailing arm | 600 |
| Replacing the rear suspension wishbone | 1000 |
Brake system repair prices
| Job | Price |
| Replacing the brake hose | 300 |
| Replacing the brake pipe | 300 |
| Replacing the master brake cylinder | 1000 |
| Replacing brake fluid | 400 |
| Bleeding the brake system, removing air | 400 |
| Replacing front brake pads, disc brakes | 600 |
| Replacing front brake pads, drum brakes | 1000 |
| Replacing the front brake wheel cylinder | 1000 |
| Replacing the rear brake wheel cylinder | 1000 |
| Replacing the front brake caliper | 1200 |
| Replacing the rear brake caliper | 1200 |
| Front brake service | 200 |
| Rear brake service | 200 |
| Replacing hand brake pads | 1200 |
| Maintenance of the hand brake mechanism | 300 |
| Replacing the handbrake cable | 500 |
| Adjusting the handbrake (handbrake) drive | 500 |
| Replacing front brake discs | 700 |
| Replacing rear brake discs | 1000 |
| Replacing brake drums | 1000 |
| Replacing the anti-lock braking system (ABS) brake unit | 1500 |
| Replacing the brake force regulator | 300 |
Steering repair prices
| Job | Price |
| Replacing the tie rod end | 500 |
| Replacing the steering rod | 700 |
| Replacing the steering rack | 2300 |
| Replacing the hydraulic booster (power steering) | 1000 |
| Adjusting the toe of the front axle wheels | 1500 |
| Rear axle wheel toe adjustment | 300 |
| Replacing the power steering high pressure hose | 1700 |
| Repair of power steering high pressure hose | 1500 |
| Replacing the power steering pump (Hydraulic Power Steering) 500 to | 1300 |
| Injection of steering linkage joints at a point | 70 |
| Changing power steering oil with flushing | 1400 |
| Replacing the power steering filter | 800 |
| Replacing the steering gear | 1700 |
| Replacing the swing arm | 1000 |
| Replacing the steering linkage damper | 700 |
| Replacing the steering column | 2300 |
| Replacing the steering column propeller shaft | 1600 |
| Replacing the longitudinal linkage of the steering linkage | 700 |
| Replacing the steering linkage tie rod | 700 |
Electrical repair cost
| Job | Price |
| Generator replacement | 1200 |
| Starter replacement | 2300 |
| Generator repair | 700 |
| Starter repair | 700 |
| Replacing the generator diode bridge | 500 |
| Replacing the starter relay | 500 |
| Replacing the starter bendix | 500 |
| Replacement of high-voltage wires | 300 |
| Replacing spark plugs | 300 |
| Replacing the ignition coil | 300 |
| Replacing the ignition coil module | 600 |
| Replacing the stove rheostat | 2300 |
| Replacing the electric heater fan motor | 1000 |
| Replacing the windshield wiper motor | 1000 |
| Replacing the electronic control unit (ECU) | 600 |
| Replacing the power window button module | 600 |
| Replacing the air conditioner heater control unit | 1000 |
| Replacement of the engine control unit (engine computer) | 600 |
| Replacing the engine compartment fuse module | 1000 |
| Replacing the interior fuse module | 1000 |
| Replacing the trunk fuse module | 1000 |
| Replacing the comfort control unit | 600 |
| Replacing the central locking control module | 600 |
| Replacing the electric motor of the engine radiator cooling fan | 1400 |
| Replacing the electric motor of the air conditioner radiator cooling fan | 1400 |
| Replacing the electric window motor | 1000 |
| Replacing the power cable to the generator | 400 |
| Replacing the power cable to the starter | 600 |
| Replacing the ground wire | 500 |
| Wiring harness repair | 2000 |
| Replacing the fuse | 50 |
| Replacing a light bulb | 100 |
| Replacing the sound signal | 300 |
| Replacing the steering column slip ring | 1600 |
| Replacement under steering switch | 900 |
| Replacing the ignition switch contact group | 2300 |
| Replacing the door lock actuator | 1000 |
Engine repair
| Job | Price |
| Removal/installation of passenger cars | 10000 |
| Removal/installation Jeep | 21000 |
| Troubleshooting | 5500 |
Piston rings replacement
| Job | Price |
| Replacing piston rings of cylinder 4 | 15000 |
| Replacement of piston rings of 5 cylinders | 20000 |
| Replacement of piston rings of 6 cylinders | 30000 |
| Replacing V6 piston rings | 35000 |
| Replacing V8 piston rings | 40000 |
| Replacing V12 piston rings | 60000 |
Engine head repair
| Job | Price |
| Repair of engine block head in-line cylinder head | 6000 |
| Engine block head repair V-shaped engine | 12 000 |
| Repair of engine block heads for jeeps in-line cylinder head | 6000 |
| Troubleshooting | 3000 |
| Repair of 8-valve cylinder head | 4000 |
| Repair of 16-valve cylinder head | 5000 |
| Repair of 20-valve cylinder head | 6000 |
| Repair of 24-valve cylinder head | 7000 |
Also interesting: Intermediate driveshafts Niva Chevrolet in Balashikha