To quickly remove fogging from the windshield and rear windows, conductive metal threads are applied to them. An electric current is passed through the mesh they form, the threads heat up, and the condensate evaporates. Driving with defects in this system is dangerous, visibility is reduced, and restoring the heater is quite simple in most cases.
Operating principle of heated rear window
When current passes through metals, electron energy is converted into heat. The temperature of the conductors increases in proportion to the square of the current and electrical resistance.
The cross-section of the threads is calculated in such a way as to allocate sufficient thermal power to them with a limited applied voltage. A typical value of about 12 Volts of the on-board network is used.
This is interesting: What to do if the fuel level gauge does not work
The voltage is supplied through a circuit that includes a protective fuse, a power relay and a switch that controls its winding.
A significant current flows through the relay contacts, ranging from ten amperes or more, depending on the glass area and the expected efficiency, that is, the speed of cleaning the fogged surface and the temperature of the glass and air.
The current is distributed evenly across the threads, for which they are made as accurately as possible, with a calibrated cross-section.
Signs of breakdown
The main manifestations of why the rear window heating does not work include:
- complete shutdown of heating;
- Not all strips work;
- periodic performance of elements.
Experienced drivers will immediately notice when the heating is not performing its function sufficiently. In winter, the first sign of incorrect operation is fogged up windows when the heater is running for a long period of time. If the rear window heating refuses to turn on or functions intermittently, it means there is a break in the electrical circuit. All components of the heating device should be checked.
Why do heating elements break?
A break can occur for mechanical or electrical reasons:
- the metal of the thread gradually oxidizes, the cross-section decreases, and the released power increases; severe overheating causes the thread to evaporate and the contact to disappear;
- when cleaning glass, a thin strip of sprayed metal can easily be damaged with the same consequences;
- even minor thermal deformations lead to a weakening of the structure of the conductive strip, which ends in the appearance of microcracks and loss of electrical contact.
Most often, one or more threads break; the entire mesh rarely fails completely. This can usually occur due to a power system failure, a blown fuse, or a failed relay or switch.
Sometimes switching is complicated by the introduction of an automatic electronic relay with timer shutdown, which does not add reliability.
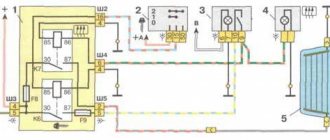
What are the fuses in the Lada Priora mounting block responsible for?
So let's now go over the fuses:
- Fuse F1 is responsible for the electric radiator fan of the engine cooling system
- Fuse F2 is responsible for the heated rear window
- Fuse F3 is responsible for the high beam (starboard side)
- Fuse F4 is responsible for the high beam (left side)
- Fuse F5 is responsible for the sound signal
- Fuse F6 is responsible for the low beam (left side)
- Fuse F7 is responsible for the low beam (starboard side)
- Fuse F8 is responsible for the alarm signal
- Fuse F9 is responsible for the heater fan
- Fuse F10 is responsible for the instrument cluster, interior lighting, brake light
- Fuse F11 is responsible for the windshield wiper, heated rear window (control)
- Fuse F12 is responsible for output “15” devices
- Fuse F13 is responsible for the cigarette lighter
- Fuse F14 is responsible for the side light (left side)
- Fuse F15 is responsible for the side light (right side)
- Fuse F16 is responsible for terminal “15” of the ABS
- Fuse F17 is responsible for the left fog lamp
- Fuse F18 is responsible for the right fog lamp
- Fuse F19 is responsible for seat heating
- Fuse F20 is responsible for the immobilizer control unit
- Fuse F21 is responsible for the rear fog light
- Fuse F22 – F30 – reserve location for fuse
- Fuse F31 is responsible for the electrical package control unit
- Fuse F32 – reserve location for fuse
Electrical equipment that consumes a large current during operation is connected through relays that protect the switch contacts from burning. To replace relays and pin fuses, special plastic tweezers 1 and 2 are provided in the mounting block. A blown fuse is identified by a burnt-out jumper; if in doubt, you can check it with a tester.
How to find broken glass heating filaments
Access to the conductive strips on the rear window is easy, so to troubleshoot, you can use a conventional multimeter, including an ohmmeter and a voltmeter. Both methods are suitable.
Visual inspection
In case of gross violations of the integrity, instrument monitoring may not be necessary; the break or disappearance of an entire section of the strip is noticeable to the eye. It is better to check what is found using a magnifying glass; under it, the defect is visible in all details.
Reasons for failure
You need to start looking for the reasons for the lack of heating by checking the fuse, which for various reasons can fail.
To find it, it is useful to use the operating instructions for a specific car. If this element fails, it must be replaced immediately, and then, if necessary, continue diagnostics.
Another reason for the loss of functionality of the entire system may be the failure of the relay.
In this case, this part simply needs to be replaced, since it cannot be repaired.
Next, you should check the voltage at the contacts of the main vertical buses with the heating button on. It should correspond to a value of 12 Volts.
Otherwise, it is recommended to clean the terminal contacts and other connection points that may oxidize and therefore not allow electricity to pass through. If after such procedures the voltmeter does not show anything, then this indicates an open circuit.
The specific location of damage can be detected visually or using a multi-function tester. From one to three strips can be damaged at the same time.
DIY rear window heating repair
Replacing heated glass will be too expensive. Meanwhile, torn strips can be repaired, for which appropriate compositions and kits are sold.
Gluing the track
For repairs using the gluing method, a special electrically conductive adhesive is used. It contains a binder and fine metal powder or fine shavings. When applied to the track, contact is restored.
It is important to preserve the linear resistance characteristics of the thread (strip). To do this, the glass is covered with masking tape, leaving a distance between the strips equal to the width of the thread being restored. The resistance of a conductor depends on its width and thickness. Therefore, all that remains is to give the repair layer the required height relative to the glass.
The necessary information on the number of application layers is determined by the density of the specific commercial adhesive and is indicated on the label. The entire repair technology is also outlined there.
After drying the last layer, the glue near the adhesive tape must be trimmed with a stationery knife so that when removing the protection, the entire sticker does not tear off the glass. The repaired area is checked visually, by the rate of condensate removal, or with an instrument using the methods indicated above.
Galvanic copper deposition
There is a method of applying a thin layer of metal to the break site using an electrochemical method. This is quite complicated, but quite accessible for electroplating enthusiasts. Reagents required are copper sulfate and a weak solution of sulfuric acid, no more than 1%.
- A galvanic brush is made. This is a bundle of multi-core wires of the smallest cross-section of individual threads. They are crimped inside a thin metal tube.
- The repair area is covered with electrical tape, leaving a gap the width of the strip. The grid is grounded to the car body, and the brush is connected to the positive terminal of the battery through a light bulb from the car's exterior lighting.
- To prepare a galvanic solution, add several grams of vitriol and battery sulfuric acid solution to 100 ml of water. Wetting the brush, move it from the beginning of the working strip to the break point, gradually depositing copper on the glass.
- After a few minutes, a copper-plated area appears, covering the break point. It is necessary to achieve approximately the same metal density as the original mesh.
If repair kits are available for sale, the method is not very relevant, but it is quite workable. The resulting conductor, after some training, will be no worse than a new one.
Sources of the problem
When the rear window heating malfunctions, you should pay attention to the main points:
You don't need any special skills to replace them. If you study the instructions and know where the heated relay for the car rear window or front structure is located, the wiring diagram, the fuse mechanism, then you can completely do without the help of a specialist.
System fuse
The element may burn out under certain circumstances, increasing the risk of shorting. As a result, the heating will not turn on because there is no power being supplied to it, because the fuse is a protective mechanism for the heating. To understand the location of the elements, you should refer to the vehicle's owner's manual. Algorithm of actions when the location of the fuse is found:
- Remove the device.
- Inspect for integrity.
- Carry out a performance check separately from the entire device.
- Determine the cause of the malfunction.
- Replace individual spare parts or the entire mechanism.
If necessary, the fragment is replaced with a new part, since it is unlikely that anyone will undertake to restore it - it is inexpensive.
Wiring
After diagnosing the fuse or replacing it, further searches for the malfunction of the rear window defroster (if it still does not function) must be looked for in the wiring. Cause:
As a result, no current flows to the heating poles and the system does not work. You can perform simple diagnostic steps using a multimeter. To do this, you need to turn on the heating, and then measure the voltage at the heater terminals. They are usually located at the bottom of the glass or on the sides.
It is worth examining the entire length of the wiring for integrity and then, if there is a break anywhere, it will be found. Instructions:
- disconnect the terminals;
- clean connection contacts;
- replace wires.
Assembly is carried out after re-checking the operation with a multimeter.
If one or more thread strips are broken, then no current flows through them. Therefore, ice will appear in some areas, which impairs visibility and reduces driving safety. Complete disassembly of the heating equipment will help verify the break. The solution to the problem is to replace faulty elements with new ones.
Heating relay
The relay is responsible for heating the windshield. If the start key does not turn on the device, you should check the relay. It turns off the heating when the car engine is turned off. The element is located in the mounting block. The exact location is specified in the vehicle manual.
Controls
If the device does not start, the reason may lie not in the relay, but in the dysfunction of the power button itself. It is equipped with an indicator light, and if the sensor does not light up, it means that the device is faulty. The problem must be looked for in the contacts of the toggle switch, to which the threads do not conduct current. Solution: replacing the element.
In what cases is it useless to repair heating elements?
If there is a significant area of damage, when almost all the threads are broken and over a large area, it is unlikely that it will be possible to restore the mesh to nominal efficiency. There is no hope for the reliability of the result. This glass must be replaced together with the heating element.
As a last resort, you can use an external heater installed under the glass, but this is a temporary measure, it works slowly, unevenly, consumes a lot of energy, and if the glass is very frozen, it can cause cracks and even spillage of tempered glass.
Old model VAZ 2107 fuse diagram
The “old” fuse box has 17 fuses. Each of them protects one or more electrical circuits. Purpose of fuses:
| Fuse number (rated current)* | Purpose of VAZ 2107 fuses |
| F1 (8A/10A) | Rear lights (reversing light). Reverse safety device. Heater electric motor. Heater fuse. Warning lamp and heated rear window relay (winding). Electric motor for rear window cleaner and washer (VAZ-21047) |
| F2 (8/10A) | Electric motors for wipers, windshield washers and headlights. Relay for wipers, windshield washers and headlights (contacts). Wiper fuse VAZ 2107 |
| F3/4 (8A/10A) | Reserve |
| F5 (16A/20A) | Rear window defroster heating element and its relay (contacts) |
| F6 (8A/10A) | Cigarette lighter fuse for VAZ 2107. Socket for portable lamp |
| F7 (16A/20A) | Sound signal. Radiator cooling fan electric motor. Fan fuse for VAZ 2107. |
| F8 (8A/10A) | Direction indicators in hazard warning mode. Switch and relay interrupter for direction indicators and hazard warning lights (in hazard warning mode) |
| F9 (8A/10A) | Fog lights. Generator voltage regulator G-222 (for car parts) |
| F10 (8A/10A) | Instrument cluster. Instrument panel fuse. Indicator lamp and battery charge relay. Direction indicators and corresponding warning lamps. Indicator lamps for fuel reserve, oil pressure, parking brake and brake fluid level. Voltmeter. Instruments of the carburetor electro-pneumatic valve control system. Parking brake warning light relay |
| F11 (8A/10A) | Brake light bulbs. Lamps for interior body lighting. Brake light fuse. |
| F12 (8A/10A) | High beam (right headlight). Headlight wiper relay activation coil |
| F13 (8A/10A) | High beam (left headlight) and high beam indicator lamp |
| F14 (8A/10A) | Side light (left headlight and right rear light). Indicator lamp for turning on the side light. License plate lights. Engine compartment lamp |
| F15 (8A/10A) | Side light (right headlight and left rear light). Instrument lighting lamp. Cigarette lighter lamp. Glove compartment lamp |
| F16 (8A/10A) | Low beam (right headlight). Headlight cleaner relay switching coil |
| F17 (8A/10A) | Low beam (left headlight) |
| * In the denominator for pin type fuses |