03/04/2022 5,888 Light and sound devices
Author: Ivan Baranov
A horn or horn is a safety element that should be functional in any car. Thanks to this device, accidents can be prevented, which is why its performance is very important. What to do if the horn does not work, and how to connect the signal after repair? You will find answers to these questions below.
[Hide]
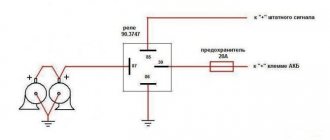
Signal Connection Diagram Through Relay
Due to the fact that Volgov signals consume a larger current of 14 A than the standard 5 A, this fuse will burn out when the fan and Volgov signal operate simultaneously, and the corresponding tracks on the printed circuit board in the fuse block may also be damaged. I picked out the connectors from the old wiring from the Zhiguli and clamped them onto a new speaker cable. You can buy Relay Finder at .
Connect one contact of the multimeter to the minus of the circuit, and connect the second to ground. Fortunately, the choice is huge, from simple inexpensive two-tone signals with good sound to compressor signals. Four-pin relay, connection.
This is where many car owners think about replacing the standard sound signal with an alternative one. It will also make the signals trigger clearly. That's right, to relieve the load on the car wiring that comes from the steering wheel. After all, the volume and sound of standard signals, both on most domestic cars and on many foreign cars, leave much to be desired. If we want to add credibility to our signal, we simply need to replace it with something more serious. In case of such a problem, the operation of the horn can be restored, since it is not damaged. I bought these signals produced by LETZ without brackets: I decided to install them behind the radiator grille, since under the hood the sound would still be a little muffled. To do this you need to use th contact. Let's consider connecting fog lights. Installing a signal (horn) via a relay on a Toyota CROWN S171
Possible malfunctions: signs and causes
By what signs can you determine that a car horn needs repair:
- The steering horn does not work. When the driver presses the steering wheel button, the sound device does not work.
- The device sometimes works, sometimes it doesn’t. When you press the button on the steering wheel, the horn first sounds and then disappears.
As for the reasons why a device may fail, there are many:
- A fuse located in the fuse block under the hood or inside the vehicle has blown. In case of such a problem, the operation of the horn can be restored, since it is not damaged. The car may also, in addition to the fuse, have a relay.
- The horn itself is broken. If you replaced the safety element, but this did not help solve the problem, then you need to check the horn itself. To do this, the device will need to be removed, and its contacts will need to be connected directly to the battery. When connected directly, a functional horn will sound.
- In some cases, the reason lies in the appearance of a short circuit in the vehicle's electrical network. A short may affect the connection circuit, so you must first check the functionality of the fuse socket. Sometimes the horn may not work correctly due to circuit damage and current leakage.
- Also, the cause of the malfunction sometimes lies in worn-out clamping contacts located on the steering column. A malfunction of this type is more typical for domestic cars. As a result of long-term use, the springs begin to wear out over time, which leads to the fact that the impulse through them cannot be transmitted from the button to the buzzer itself.
- It also happens that the slip ring wears out right on the steering wheel.
- If the contacts are not worn out, then they could simply oxidize. Long-term use, as well as lack of maintenance, lead to deposits forming on the contacts over time. As mentioned above, this problem can cause difficulty transmitting the signal to activate the buzzer.
- The contact blades are located under the steering wheel hub. This petal may burst over time; sometimes the cause should be sought in the jamming of the pressure rack.
- The horn winding is burnt out.
- Sometimes the horn malfunction is due to a damaged electrical connection or an accidental disconnection of the terminal directly on the signal itself.
- Sometimes the reason for a non-working signal may be a break in the cable on the steering wheel on cars equipped with an airbag (video published by the channel Learning to drive a car. All secrets for beginners).
How does a car horn work?
Let's consider a universal diagram of a car sound signal:
- The so-called anchor.
- Device rod.
- Nut for adjustment.
- Lock-nut.
- The first tungsten contact of the horn.
- Another tungsten contact.
- Capacitor element.
- Core.
- The housing that contains all the components.
- Activation button located on the steering wheel.
- Resonator disk.
- Membrane.
- Winding.
- This is a relay contact.
- Another anchor.
- Relay coil.
- Signals.
In accordance with the connection diagram, when the driver presses the control button, a current begins to pass through the winding, which ultimately magnetizes the core, which in turn attracts the armature. With this anchor, the rod that bends the membrane begins to move, and thanks to the nut, the contacts open, which helps interrupt the electrical circuit. All elements, in particular the disk, rod, anchor and others, return to their original position using a spring and membrane. In this case, the contacts close, which again leads to the passage of current through the winding. The process of opening the contacts is carried out by pressing the horn button on the steering wheel (the author of the video is the channel pribambas sender).
Sound signal NIVA
Sound signal GAZ in NIVU
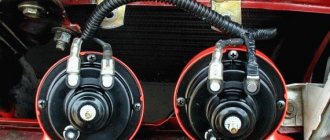
Lately there have been a lot of inappropriate behavior on the roads. Few people pay attention to the native quiet signal. Therefore, I decided to install a signal from GAZ. I bought the following signals produced by LETZ without brackets:
I decided to put it behind the radiator grille, because... Under the hood the sound would still be a little muffled. Standard signal:
To place the signals, I made the following mounts from stainless steel:
Connection diagram via relay:
True, I took the power from fuse No. 15 which is 16A
The power wires go into the factory hole:
The relay is located on the brake fluid reservoir mounting stud:
The original “+” and “-” wires were not enough to reach the relay; we had to extend them by about 25 cm. In order for the signals to fit in, we need to file down the “pipes” a little with sandpaper. Next, everything is painted, moviled and assembled:
Signals don't come out
Installing a sound signal from GAZ (PAZ) in NIVU
Another day of vacation was marked by an improvement in the sound signal of my car. I was very depressed by the sound of the stock signal; it seemed like a solid car, but it beeped like a castrated hedgehog. Well, somehow it’s not solid. Ideally, these are pneumatic pipes, but while there is no pneumatic system, I bought two sound signals from GAZ (PAZ), one high, the other low. Their sound pressure level is 105-118 dB.
To begin with, I was looking for a place to stick them, they were too big. I planned to do it from the front, instead of the standard one, but I couldn’t unscrew the grille mounting bolts.
I opened the hood and began to think about where I could stick the new horns. And then I saw the spare tire fastener, which had not been used for its intended purpose for a long time... In which I drilled two holes with an 8mm metal drill:
Knowing the ability of a minus to disappear somewhere, due to dirt or loosening of fasteners, I protected myself a little and brought out an additional minus:
Then I secured it all and began to think about how to connect the power relay. I'm a complete novice when it comes to electricians, so a call to an electrician friend provided me with this “sacred” knowledge. And after a little prayer to all the Electrical Gods, I began to connect the wires to the relay. Everything turned out perfect. The signal worked in such a way that my ears remembered this sound for a long time...
That's all. Everything works, everything beeps. Now the sound produced is similar to the roar of a rhinoceros during the “rut”.
Diagram for connecting new signals to standard wiring
sound signal via power relay:
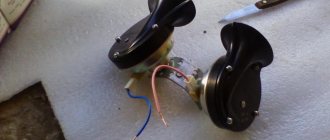
Repair of NIVA sound signal
The sliding contact of the horn broke off.
Well, off we go. - take the socket from the rear light 05 (only the terminal from it) - screw - drill + 2mm drill
We knock the rivet off the standard terminal
Let's drill a hole. We take a new contact, a screw and a nut, because the screw is too long
Along the way, I decided to put a button on the signal, parallel to the steering wheel, for convenience. Press with your left hand.
Replacing the standard Niva sound signal with a C308/309
I decided to install the purchased C308/309 kit (VAZ-2103/06 until 1993) in a similar way.
The sockets are tilted down so as not to collect moisture; to do this, we had to disassemble the signals and turn the top covers 90′, otherwise you won’t be able to get to the terminals later
I really hoped that the signal housings were smaller and that I wouldn’t have to cut anything. I had to. The lining did not want to be put on, and since I didn’t have a hacksaw blade with me, I bent the excess metal on the bell of the lower signal.
I took the following connection diagram:
Wire - 1.5 sq. mm. I connected the power to the standard signal circuit, there is a 16A fuse there, in addition to the signal from this fuse, the rear brake lights and interior lamps are powered (I have all of these on LEDs).
I attached the relay under the spare tire bracket. Not the best place, but most of the time it's dry
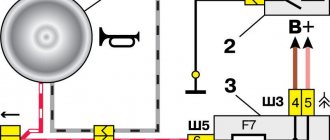
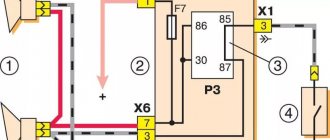
Connection diagram for a signal from the Volga via a 4-pin relay, for cars with a control minus on the steering wheel button
In my opinion, everything is clear, and they have already written about this many times, but it may be useful to someone. For example, I recently gave a car I had made to a man, and over time his signal stopped working. You can’t travel all over Moscow for trifles, so he asked me to draw a diagram for him, I did it, but don’t disappear. I decided to post it publicly.
Description, I will try to use simple understandable language:
Two opposite contacts on the relay, numbered No. 86 and 85, are the so-called control contacts. If voltage is applied to them, the relay will close, and then direct voltage will flow through contacts No. 30-No. 87. Well, let's say a contact that you need to break and short-circuit, let's say a signal. Why through a relay? Well, let’s take the interior button for example, the contacts on the buttons are weak and are not designed for direct load, and if you apply the plus from the battery through the button, say, to the starter, then after the first use the button will melt. Therefore, through the interior button we connect the control wires to the relay, and the direct plus to the consumer, in our case the signal. Thus, through a relay from the battery to the input (contact No. 87) and output (contact No. 30) to the consumer (Signal).
What is a control minus? Usually, on the relay, the minus goes directly to contact No. 86, and the control plus is opened with a key (button). In our case, the key (button) already exists, this is the signal button on the steering wheel. The way it is designed, the steering shaft is connected to the steering column and body through rolling bearings, and there is always a constant minus on it. Next, the minus from the steering shaft is fed to the core of the steering wheel, a contactor is installed in the steering wheel itself, to which the minus from the steering wheel fits on one side, and on the other side the contact goes to a contact round plate (most often copper or brass) along which on the steering side the stationary contact slides on the shaft, it then removes the minus from the steering wheel button and sends it further to the signal, in our case to the relay, to contact No. 86. So, not everything is so complicated and shrouded in mystery; if you have never dealt with electrics, then don’t go into details, just connect according to the diagram, which in my opinion is quite simple.
Air signal connection
If you need to connect not an electric, but an airborne sound signal, the connection procedure will be almost the same as described above. The difference is that the wire from the relay does not go to the sound signal itself, but to the compressor (the engine that supplies air to the signal). And the pneumatic signal pipes are connected to the compressor through tubes.
When you press the horn, air from the compressor is supplied to the horns. With the help of a membrane installed in them, a sound signal is obtained.
You can read about how to connect the headlights yourself in our article How to connect the headlights.
It is often difficult for novice auto electricians and people modifying their car to understand the phrase “connect via a relay.” What does connecting via a relay mean and how to do it? Let's figure it out.
Before studying the wiring diagram for any automotive device via a relay, you need to know what a relay is in general and how it works. This is written about in detail here
. Once you understand the operating principle of this simple device, it will be much easier to figure out how to connect it.
The general meaning of connecting via a relay is the load on the switch that controls the installed equipment. All powerful consumers of electricity in the car (for example, headlights, starter, fuel pump, heated rear window, electric power steering) are connected through a relay. Thanks to this, these devices can be controlled by small, beautiful buttons instead of rough and large switches. In addition, in some cases, the relay allows you to save on wires.
The relay is connected to an open circuit in the electrical circuit. Let's look at installing a relay using the example of a gas pump. Power is supplied to it by the engine control unit (hereinafter referred to as the computer) and in order for the computer board tracks to withstand the current consumed by the pump, they would have to be made too powerful. Passing strong current near sensitive electronic components of a computer can affect their operation. To avoid such problems, a relay is installed between the computer and the fuel pump and the computer is connected not to the pump, but to this little “helper”.
The relay, as it were, divides the wire going from the fuse block to the pump into two parts, which can close inside the relay when voltage is applied to the control contacts of the magnet. As already mentioned in the article about the relay device, the control current is very small and cannot damage the computer in any way. The computer supplies voltage to the control contacts of the relay, and it then “connects” the power circuit within itself and connects the fuel pump.
Using the same principle, the relay is installed on any other electrical consumers in the car. Let's consider connecting fog lights.
The wires to the fog lights come from the fuse box, but they go through a relay along the way. The process of turning the headlights on/off is controlled by a button on the dashboard. When it is pressed, voltage is supplied to one of the control contacts of the relay, and it closes the power circuit - the lamps in the headlights light up. The second control contact of the relay is “mass”, that is, voltage goes through it to the car body, creating an electrical circuit.
Using this circuit, you can connect almost any powerful device and control it with a small, beautiful key. In some cases, a relay can be a salvation from factory defects. For example, in a VAZ-2106, the current flowing to the starter solenoid relay through the ignition switch quickly leads to a malfunction of the lock contact group
. They get rid of this trouble by installing an intermediate relay and changing the power supply of the solenoid relay. After modification, a weak control current begins to pass through the contact group of the lock, and the relay connects powerful power to the starter.
Hello, here is a diagram for connecting the signals, I apologize for the plagiarism, I connected everything and it works.
How to install Volga signals on a LADA car
All cars have a device for producing sound signals (horn), but its sound does not always suit the owner. This is the main reason for replacing the standard horn with alternative options (for example, with a sound signal from the Volga). Let's look at this improvement in detail.
Nowadays, horns are usually used in pairs. One with a high tone, the other with a low tone. This provides strength and beauty of sound.
Will need to buy:
- A couple of sound signals from GAZ 3110 (article number for high tone - 22.3721, for low tone - 221.3721), approximate price 500 rubles;
- 4-pin relay 75.3777-10;
- Relay socket;
- Mounted fuse 10-15A;
- Single-core wire;
- Corrugation for wires;
- Terminals;
- Brackets/brackets for mounting sound signals (optional).
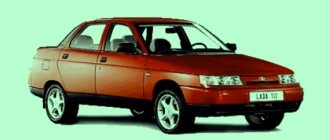
Installation and connection of a sound signal from the Volga is shown using the example of the Lada Vesta sedan. On other cars (for example, Lada Largus, Granta, Kalina, Priora, Niva 2121 or XRAY) all actions are performed in a similar way.
Bottom line
The sound of the horn is the main communication tool between driver and pedestrian. Take his choice and condition seriously, because experiments in this matter can end very sadly. The installation instructions for each machine horn describe the characteristics: volume level, frequency and range of the device. Practical characteristics take priority over tuning. When choosing an emitter, first of all pay attention to the level of safety and reliability, avoid experimental models.
Do-it-yourself signal diagnostics and repair
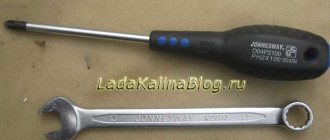
How to check and repair the horn yourself? For diagnostics, you will need a tester (preferably a digital multimeter, but if you don’t have one, you can use a regular one), crimping pliers, pliers, and a utility knife. Prepare spare wiring and a service manual for the machine.
Checking with repairs is performed as follows:
- The functionality of the fuse and relay is checked; you need to find the mounting block. A more precise diagram is indicated in the technical documentation, but usually the safety device is located in the power supply unit; it can be installed in the dashboard. Once you have located the block, examine the diagram on the back of the block cover to find the fuse. Dismantle the device that is responsible for the operation of the horn and carefully inspect it - if there is an open circuit, this indicates that the fuse is not working.
- But if the device is intact, this does not mean that it is functional. You need to diagnose it using a tester. Set the multimeter to the resistance measurement mode with sound (if we are talking about a digital tester and it has such a function). If you have an analog multimeter, before diagnosing you will need to calibrate the tester; to do this, short-circuit its probes with each other and move the regulator to zero. Then press the tester probes against the contacts of the safety device. If the part is working, then the multimeter will show 0 Ohm, but if not, then if there is no change on the display, we can conclude that the resistance is too high. This indicates a broken fuse and the device needs to be replaced.
- After this, if the fuse is working, you need to find the relay block, which is located either in the engine compartment or in the interior of the car - use the service book to search. Typically the relays are located in the same fuse box. The easiest way to check the operation of the relay is to swap the devices with other similar parts. In most cases, relays are interchangeable, so if after replacing the device the horn starts working, then you can understand that the reason was in the relay.
- You should also check the steering horn switch; a tester is also used for this. If there is no power supplied to it, then of course the button will not be able to respond to pressing.
- Next, diagnose the functionality of the relay switch. To do this, you will need to dismantle the relay and set the resistance measurement mode on the multimeter. One contact from the tester should be brought to the relay switch connector, and the second is connected to the negative terminal of the battery. With this connection, the assistant must press the beep button. As a result, numerical values should appear on the display. If the message Out of Limits appears on the screen, this indicates that the switch is not in working condition, and accordingly, it needs to be changed.
- It would be a good idea to check the horn itself. As a rule, the horn device is located behind the engine radiator grille, directly in front of the main radiator device. Having found the mechanism, you need to determine which of the conclusions is positive and which is negative. Please refer to the technical manual to determine this accurately. Once you know this, connect the horn directly to the car's battery to check its operation. The positive contact is connected to the plus, the negative, respectively, to the minus. When the negative contact is connected, the horn should start working, but if the connection does not produce results, then the device is faulty.
- The next step will be to diagnose the circuit. If you have any suspicions about the health of the electrical circuit, you need to check the grounding of the circuit, as well as the voltage and current values. Determine the mass to accurately identify grounding; for diagnostics, set the tester to measure resistance in Ohms. Connect one contact of the multimeter to the minus of the circuit, and connect the second to ground. As a result, numbers should be shown on the tester screen - if they are present, the wiring is intact. At this stage, you need to check the condition of the contacts. As practice shows, often the cause of failure lies in their oxidation, so it makes sense to clean the contacts.
Repair and operation of the VAZ 2108 2109 21099 car
The sound signal of the VAZ 2108 2109 21099 is directly related to the safety of driving a car, since with its help the driver comes into contact with other road users. Therefore, the sound signal must always be in good working order.
Steering wheel horn switch
But it often happens that it doesn't work. Let's look at the possible reasons: 1) Fuse F8 has burned out (it may differ depending on the type of mounting block) in the mounting block. 2) Relay K8 is faulty (it may differ depending on the type of mounting block) in the mounting block. 3) The sound signal itself is faulty.
4) Poor contact in the audio signal circuit.
Let's go in order:
1) Fuse F8 protects the K8 relay circuit and the sound signal itself from a short circuit. If fuse F8 has burned out, then you first need to make sure that the electrical circuit of the VAZ 2108 2109 21099 sound signal is not shorted.
VAZ 2109 sound signal circuit
If the short circuit remains, the new fuse will also burn out. It is necessary to find and eliminate the cause of the blown fuse. 2) If relay K8 is faulty, then when you press the signal on the steering wheel it will not close +12V to the sound signal. A faulty relay must be replaced.
3) The sound signal is located in front of the radiator of the cooling system.
Sound signal VAZ 2109
To get to it you need to bend or remove the decorative radiator grille. Checking the sound signal is simple. One of its contacts is constantly connected to ground; the second contact must be supplied with +12V from the battery. To do this, take a piece of wire about a meter long.
We securely connect one end of the wire to the +12V battery, and connect the other end to the sound signal. If the signal does not work, then it is faulty. The sound signal of the VAZ 2108 2109 21099 has a volume control, you can try turning it. Or disassemble the signal itself; perhaps a visual inspection will help determine the cause of the malfunction.
4) Poor contact means that +12V does not reach the audio signal.
A common reason is poor contact here
If your fuse is intact, the relay is working, the horn itself and the switch on the steering wheel are working, then most likely the problem is in the wiring.
Either in the mounting block, or on the sound signal itself of the terminal oxidation. You can check whether the voltage is coming to the sound signal or not using a multimeter.
One person presses the signal on the steering wheel, and the second measures the voltage on the sound signal in front of the radiator.
Shall we make some noise? Sound selection
How many times in one trip do you press the horn? Of course, this depends on temperament, but in dense traffic you can’t go anywhere without a sound signal - you have to indicate your presence on the road. True, the sound of standard “pipes” sometimes evokes melancholy, especially in small cars. Let's figure out how to choose and install more serious signals.
But first, a few words about their correct use.
Traffic rules: rules for using sound signals
Car horns have become an indispensable soundtrack to any city. Which is not at all great, because traffic rules directly prohibit the use of sound signals in populated areas unless absolutely necessary (to prevent accidents).
Traffic rules clause 19.10. Sound signals can only be used:
- to warn other drivers of the intention to overtake outside populated areas;
- in cases where it is necessary to prevent a traffic accident.
There is also a special road sign 3.26 “Sound signal prohibited.” It is intended for installation outside populated areas, where unnecessary noise cannot be made (in forests, in nature reserves), but it is also found in cities, where it simply duplicates the current rules - you cannot honk your horn in the city without a good reason even without this sign.
Unfortunately, drivers regularly violate this point of the rules: they use the horn to greet each other or express indignation, to attract attention or to hurry up someone who is unwary at a traffic light. In general, they buzz for any reason. Which not only increases general nervousness on the road, but also disturbs other people - the sound of the horn in the city spreads far and loudly, shielding it from buildings.
At the same time, the sound signal itself is necessary for the car and is even included in the “List of malfunctions and conditions under which the operation of vehicles is prohibited” - you simply cannot drive with a non-working horn (due to the impossibility of signaling to a pedestrian or another driver to prevent an accident). But you need to use it wisely and only for a compelling reason.
Do you agree to not make any more noise in the city? Then we move on to choosing “pipes” to replace the standard ones.
Design of signals. Electrics and pneumatics
Typically, a car has a pair of single-tone signals (high and low pitch), the sound of which is harmoniously superimposed on each other. The difference between their frequencies is 70–100 Hz, forming the desired sound depth. Structurally, car sound signals are divided into electromagnetic and pneumatic. In both types, sound is generated by vibrations of the membrane, but different forces set it in motion.
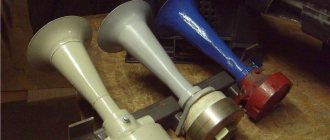
From the factory, most cars are equipped with electromagnetic signals , most often of a hornless (disk) design - “pancakes”. These signals are inexpensive to produce and take up little space, making them easy to place under the hood. You can’t get much power from “pancakes,” so motorists are replacing them with horn electromagnetic signals—“snails.” Thanks to their funnel-shaped geometry, they generate a very loud sound. The price to pay is massiveness: finding space for two “snails” in the engine compartment can be difficult.
In electromagnetic signals, a solenoid creates membrane oscillations. In pneumatic signals, the membrane is driven by compressed air, so their operation requires a separate device - a compressor capable of pumping air under pressure into the horn. The sound of such signals is noticeably more powerful than electromagnetic ones, but they take up more space than even the most massive “snails” - not every car can be installed.
In electromagnetic signals, a solenoid creates membrane oscillations. In pneumatic signals, the membrane is driven by compressed air, so their operation requires a separate device - a compressor capable of pumping air under pressure into the horn. The sound of such signals is noticeably more powerful than electromagnetic ones, but they take up more space than even the most massive “snails” - not every car can be installed.
A pneumatic signal may have several bells (“horns”) of different sizes; The more there are, the more powerful the compressor will be needed. The tonality of the whistle depends on the size of the bells - several “horns” will sound like a whole brass band. But don’t get carried away: according to GOST R 41.28-99 (UNECE rule No. 28), the sound signal should sound monotonously and continuously; installation of musical signals with overflows and melodies is prohibited.
"Volgov" signals
Why buy custom horns at all? Firstly, the standard ones often fail, and the original “pipes” are expensive. Secondly, their volume sometimes simply does not correspond to the realities of the road. Additional sound insulation is increasingly popular; in the summer everyone prefers to drive with the windows closed and the air conditioning running, and if the music in the cabin is also playing loudly... Your modest horn, installed by the automaker taking into account the requirements for reducing noise in cities, simply will not be heard. That's why motorists try to set the signal louder - it's often a matter of visibility and safety on the road.
But there are also standard horns with decent sound. In Russia, for example, the so-called Volgov signals are highly valued - Yuri Detochkin would approve of such a choice. The characteristic mixture of high and low frequencies (510 and 410 Hz) at 115 decibels sounds solid and “juicy”, as befits the most prestigious mass-produced Soviet car. Of course, these are not original signals from Volga, but their modern copy, but the sound is very similar.
Installation of a new horn according to GOST
The standards do not describe criteria for the characteristics of the signal - only its absence as such is a violation. Only high-frequency emitters are tested against the norm, and the main frequency must be constant and not change under different influences of electricity. A poorly chosen car horn can cause trouble on the road, irritating both the driver and pedestrians. It should be noted that sounds imitating sirens of official vehicles can lead to bad consequences.
The standard vehicle signal frequency ranges from 320 to 440 Hz. This is due to medical requirements. When purchasing pneumatic radiators with several tones, choose one that will not disturb you, or take care of increasing the sound insulation in the car. Make sure the car's battery is compatible with the device you want. Several signals cause a standard battery to rapidly drain, drawing up to 25 amps.
Attention should be paid to the space under the hood. Some signals that have a protective grille can be installed outside, but this cannot be said about “snails”.
The signals have detailed installation instructions, but the basic principles are always the same: you will need to connect the car horn to a power source via a relay or breaker.
Mounting is a separate issue: the basic kit may not have the part you need to mount it specifically to your vehicle, so be prepared to purchase a well-protected cable of the required length if a flat mounting surface is too far from the battery.
Why do you need a relay?
The seller persistently sold me a relay for 40 rubles, saying that I couldn’t do without this device. But in the end it worked out without him.
What is the point of a relay?
First version (myth). The bottom line is that the VAZ and Volgov circuits for connecting sound signals are not the same. The horns on the Volga take the ground from the body, and on the VAZ - from the connected wire. According to the sellers, when we press the beep, we close the ground (-), not (+). Therefore, if you connect without a relay, the horn will work constantly. But in reality, everything turned out quite the opposite, which made the work easier. Therefore, we proceed as follows.
Second version (more real). Signals for the Volga consume a current of 14 A, and a standard beep 5.5 A. Due to excessive load, the fuse may melt, and if you set its rating higher, the tracks on the board will melt.
If you want to install a relay, install it, but I don’t care, because the loads going to the horn are not constant, but short-term.
Watch the video
Connecting a signal through a relay immediately solves many problems, the main one of which is electrolysis of wires due to unfavorable operating conditions of the vehicle (dirt, moisture).
Alternative options
In this case, the possibilities are limited solely by the imagination of the Vesta owner. Most often, sound signals from the Volga are installed on the Lada, since their sound is much louder. But there are other ways. The most common options for such “modernization” are:
- installation of signals from the Volga - in this case, different installation methods are possible (with connecting a relay in the cabin or under the hood)
— installation of other signals;
— installation of a signal with an integrated compressor;
— a combination of signal and high beam.
Setting other signals is just one of many options.
Installation of signals from Volga
It involves not only installing “shells” directly on Vesta, but also various options for connecting them. It is worth remembering that the sound signal from the Volga can be either old or new. However, they have no differences, except for a slight difference in tonality:
What types of horns are there?
Today, every car owner can choose a signal for his vehicle to suit his taste. But before you go to the store, it is important to understand what is their difference from each other, what advantages and disadvantages are inherent in a particular type.
Car horns are divided into three main types:
- Electromagnetic
- Pneumatic
- Electronic.
The types of sound signals differ in both structure and sound. The main characteristic of a car horn is its noise level.